

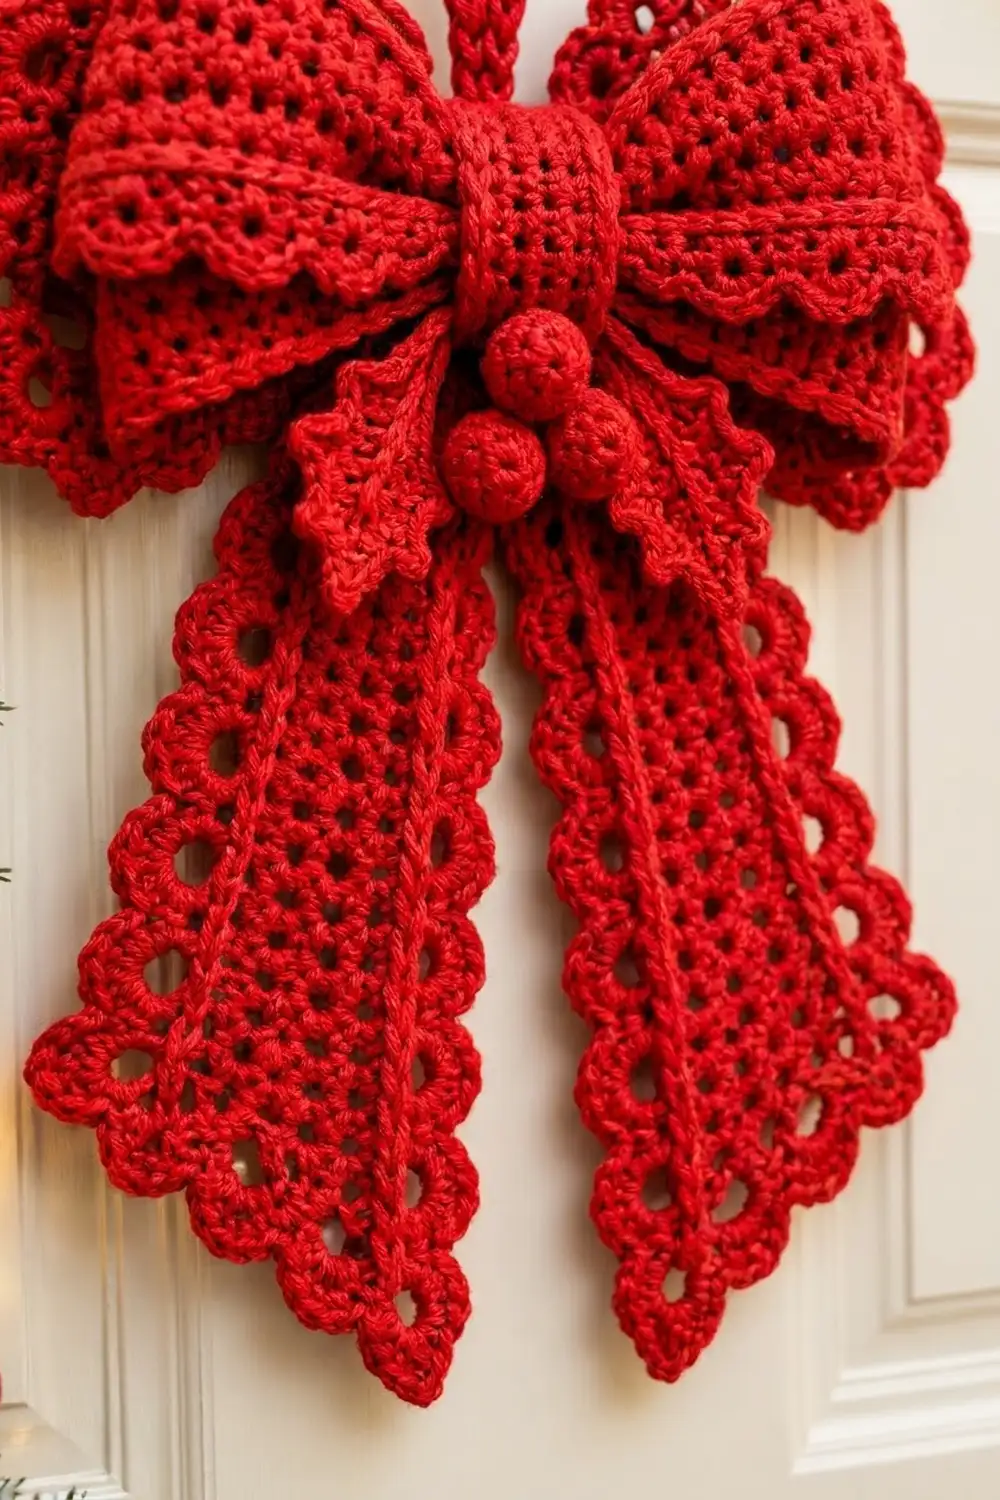
This oversized bow is made for a front door. It has two layered wings, two long pointed tails, a ribbed center knot, a pair of holly leaves, and three round berries, all in one rich Christmas red. Every edge has a scalloped border with a round eyelet under each scallop, so the bow looks like vintage lace ribbon.
The fabric alternates solid double crochet rows with open mesh rows, which gives the wings and tails a light, airy texture. Raised slip stitch lines run across the wings and down the tails, like the folds and stitching on real ribbon. A cord loop at the top hangs the bow from a door knocker, hook, or knob.
The pattern uses US crochet terms. The finished bow measures 13.5 in (34.3 cm) wide and 14.5 in (36.8 cm) tall, plus a 4 in (10.2 cm) hanging loop.
You crochet ten small parts flat, plus a hanging cord. The parts are a back wing panel, a front wing panel, two tails, a center band, two holly leaves, and three berries. Both panels and both tails get the same eyelet scallop border. You then pinch the panels together at the center, tuck the tails behind, and wrap the band around everything to form the knot.
Finished Size and Construction
- Finished size: 13.5 in (34.3 cm) wide x 14.5 in (36.8 cm) tall, plus a 4 in (10.2 cm) hanging loop
- Skill level: Intermediate
- Terminology: US
- Yarn weight: Worsted (#4)
- Hook: 5.0 mm (H-8)
- Number of pieces: 10 parts plus 1 hanging cord
- Layout: front wing panel stacked on the back wing panel, two tails behind, band around the center
- Back panel: 12 in x 5.5 in (30.5 x 14.0 cm) before the border, 13.5 in x 7 in (34.3 x 17.8 cm) after
- Front panel: about 9.9 in x 4.5 in (25.1 x 11.4 cm) before the border, 11.4 in x 6 in (29.0 x 15.2 cm) after
- Tail: about 3.5 in x 9.5 in (8.9 x 24.1 cm) before the border, 5 in x 11 in (12.7 x 27.9 cm) after
- Border depth: 0.75 in (1.9 cm) on every edge
Materials
Choose a smooth worsted yarn with good stitch definition. Acrylic holds its shape outdoors under a porch roof. Cotton or a cotton blend gives the crispest scallops. Avoid fuzzy or highly textured yarn, because the eyelets and raised lines will disappear.
- Red: 120 g, about 216 m (236 yd) of worsted yarn
This quantity includes a margin of about 15 percent for your gauge swatch and normal differences in tension.
Tools:
- 5.0 mm (H-8) crochet hook
- Tapestry needle
- A small handful of polyester fiberfill for the berries
- Scissors
- Rust-proof pins and a blocking mat
- Spray bottle
- Measuring tape
Abbreviations (US Terms)
- ch: chain
- sl st: slip stitch
- sc: single crochet
- hdc: half double crochet
- dc: double crochet
- sk: skip
- sp: space
- st(s): stitch(es)
- BLO: back loop only
- MR: magic ring
- inc: 2 sc in the same st
- dec: sc2tog
- dc3tog: (yarn over, insert hook in next st, pull up a loop, yarn over, pull through 2 loops) 3 times, yarn over, pull through all 4 loops on hook
- Picot: ch 3, sl st in 3rd ch from hook
- Surface slip stitch: Hold the yarn behind the fabric. Insert the hook from front to back, pull up a loop, and draw it through the loop on your hook. Repeat along a straight line to make a raised chain ridge on the front.
Gauge and Checkpoints
Gauge: 15 sts and 8 rows = 4 in (10.2 cm) in pattern (alternating dc rows and mesh rows). For the band, 16 sc and 18 rows = 4 in (10.2 cm) in BLO sc.
Make one tail first. It’s the smallest bordered piece, so it works as your swatch.
- After Row 1, the tail should be about 3.5 in (8.9 cm) wide.
- After Row 16, it should be 8 in (20.3 cm) long.
- After the border, it should be 5 in (12.7 cm) wide.
If your piece is too big, go down one hook size. If it’s too small, go up one hook size. Measure both width and row height, because both matter. The panels and tails are joined only at the center, so any piece that misses its checkpoint will make the bow look lopsided.
Back Wing Panel (make 1)
Ch 47.
Row 1 (RS): Dc in 4th ch from hook (the skipped ch count as a dc) and in each ch across, turn. (45 sts)
Row 2 (mesh): Ch 4 (counts as dc and ch 1), sk next st, dc in next st, *ch 1, sk next st, dc in next st; rep from * across, working the last dc in the top of the turning ch, turn. (23 dc and 22 ch-1 sps = 45 sts)
Row 3: Ch 3 (counts as dc), dc in each ch-1 sp and each dc across, working the last dc in the 3rd ch of the turning ch-4, turn. (45 sts)
Rows 4–11: Repeat Rows 2–3 four more times. Row 11 is a solid dc row. (45 sts)
Checkpoint: 12 in x 5.5 in (30.5 x 14.0 cm).
Front Wing Panel (make 1)
Ch 39.
Row 1 (RS): Dc in 4th ch from hook and in each ch across, turn. (37 sts)
Row 2 (mesh): Work as Back Panel Row 2. (19 dc and 18 ch-1 sps = 37 sts)
Row 3: Work as Back Panel Row 3. (37 sts)
Rows 4–9: Repeat Rows 2–3 three more times. Row 9 is a solid dc row. (37 sts)
Checkpoint: about 9.9 in x 4.5 in (25.1 x 11.4 cm).
Tails (make 2)
Ch 15.
Row 1 (RS): Dc in 4th ch from hook and in each ch across, turn. (13 sts)
Row 2 (mesh): Work as Back Panel Row 2. (7 dc and 6 ch-1 sps = 13 sts)
Row 3: Work as Back Panel Row 3. (13 sts)
Rows 4–16: Repeat Rows 2–3, ending with a mesh row (Row 16). (13 sts)
Row 17: Ch 2, dc2tog over next 2 sts (counts as dc3tog), dc in next 7 sts and sps, dc3tog over last 3 sts, turn. (9 sts)
Row 18: Ch 2, dc2tog over next 2 sts, dc in next 3 sts, dc3tog over last 3 sts, turn. (5 sts)
Row 19: Ch 2, dc4tog over the remaining 4 sts. (1 st, which is the tip)
Checkpoint: about 3.5 in (8.9 cm) wide and 9.5 in (24.1 cm) long to the tip.
Eyelet Scallop Border (Panels and Tails)
Each panel and tail gets the same three-round border. It adds 0.75 in (1.9 cm) to each edge. Round 1 adds about 0.25 in (0.6 cm), and Rounds 2–3 together add about 0.5 in (1.3 cm).
Border gauge: Work 1 sc per stitch along the top and bottom edges. Along the sides, work 2 sc per dc row end, with one fewer where noted. This keeps the edge flat and gives every side a count of 1 plus a multiple of 4.
Why the math works: Round 2 starts each side with 1 sc, then repeats “ch 3, sk 3, sc in next” across. Each repeat uses 4 sts, so sides of 45, 37, 21, 17, and 13 sts all divide evenly with nothing left over. The corner ch-2 sps sit outside the side counts, and in Round 2 each one becomes its own ch-3 corner loop.
Back Panel Border
Rnd 1: Ch 1 and rotate to work down the side. Work 21 sc along the row ends (2 sc per row, 1 sc in the last row), ch 2 at the corner, 45 sc across the foundation ch, ch 2, 21 sc along the other row ends, ch 2, 45 sc across Row 11, ch 2, join with sl st to first sc. (132 sc: 21, 45, 21, 45 per side, plus 4 corner ch-2 sps)
Rnd 2: Ch 1. On each side, sc in first st, *ch 3, sk 3, sc in next st; rep from * to end of side. At each corner, ch 3 and skip the corner sp. Join. (36 sc and 36 ch-3 loops: 11 loops per long side, 5 per short side, and 4 corner loops)
Rnd 3: Sl st into the first loop. Work (sc, hdc, 3 dc, hdc, sc) in each side loop and (sc, hdc, 5 dc, hdc, sc) in each corner loop. Join and fasten off. (32 scallops x 7 sts + 4 corner scallops x 9 sts = 260 sts)
Checkpoint: 13.5 in x 7 in (34.3 x 17.8 cm).
Front Panel Border
Rnd 1: Work as for the back panel, with 17 sc on each short side (2 per row, 1 in the last row) and 37 sc on each long side. (108 sc: 17, 37, 17, 37 per side, plus 4 corner ch-2 sps)
Rnd 2: Work as for the back panel. (30 sc and 30 loops: 9 per long side, 4 per short side, and 4 corner loops)
Rnd 3: Work as for the back panel. (26 x 7 + 4 x 9 = 218 sts)
Checkpoint: 11.4 in x 6 in (29.0 x 15.2 cm).
Tail Border
The tail has three corners: two at the top and one at the tip.
Rnd 1: Ch 1. Work 37 sc down the first side (32 sc along Rows 1–16 at 2 per row, plus 5 sc spaced evenly along the shaped Rows 17–19). Ch 2 at the tip, work 37 sc up the other side, ch 2, work 13 sc across the foundation ch, ch 2, and join. (87 sc: 37, 37, 13 per side, plus 3 corner ch-2 sps)
Rnd 2: Work as for the back panel. (24 sc and 24 loops: 9 per long side, 3 across the top, and 3 corner loops)
Rnd 3: Work as for the back panel. (21 x 7 + 3 x 9 = 174 sts)
Checkpoint: 5 in x 11 in (12.7 x 27.9 cm).
Raised Ribbon Lines
With the RS facing, work these surface slip stitch lines:
- Each tail: two lines from the top edge down to Row 16, one between sts 4 and 5 and one between sts 9 and 10.
- Front panel: two lines across the full width, one between Rows 3 and 4 and one between Rows 6 and 7.
- Back panel: two lines across the full width, one between Rows 3 and 4 and one between Rows 8 and 9.
Keep the lines loose so the fabric doesn’t pucker. Weave in all ends on the WS.
Center Band (make 1)
Ch 9.
Row 1: Sc in 2nd ch from hook and in each ch across, turn. (8 sc)
Rows 2–24: Ch 1, sc in BLO of each st across, turn. (8 sc)
Fasten off, leaving a 12 in (30.5 cm) tail for sewing. Checkpoint: 2 in x 5.3 in (5.1 x 13.5 cm). Once the band is wrapped, the ridges run vertically.
Holly Leaves (make 2)
Ch 13.
Side 1: Sc in 2nd ch from hook, hdc in next ch, dc in next ch, picot, dc in next 3 ch, picot, dc in next 3 ch, picot, dc in next ch, hdc in next ch, then work (sc, ch 3, sc) in the last ch to make the tip.
Side 2: Working along the other side of the foundation ch, hdc in next ch, dc in next ch, picot, dc in next 3 ch, picot, dc in next 3 ch, picot, dc in next ch, hdc in next ch, sc in the last ch. Join with sl st to the first sc. Fasten off, leaving a tail for sewing.
Work a surface slip stitch vein along the foundation ch. Each leaf is about 3.5 in (8.9 cm) long, with 3 picot points on each side plus the tip.
Berries (make 3)
Rnd 1: 6 sc in MR. (6 sts)
Rnd 2: Inc in each st around. (12 sts)
Rnds 3–4: Sc in each st around. (12 sts)
Stuff firmly.
Rnd 5: Dec 6 times. (6 sts)
Close the opening and leave a tail for sewing. Each berry is about 1 in (2.5 cm) across.
Hanging Cord (make 1)
Ch 36. Sl st in the back bump of each ch across. (35 sl sts) Fasten off. The cord is about 8 in (20.3 cm) long and folds in half into a 4 in (10.2 cm) loop.
Make All Pieces
Every piece uses the same red yarn:
- Back wing panel: 1
- Front wing panel: 1
- Tails: 2
- Center band: 1
- Holly leaves: 2
- Berries: 3
- Hanging cord: 1
Layout (front view):
              [ hanging loop ]
[ back wing ][ front wing ][BAND][ front wing ][ back wing ]
                [ leaf ][ berry x3 ][ leaf ]
                 [ tail ]          [ tail ]
                   \/                 \/
Joining
- Stack the wings. Lay the front panel on the back panel, both RS up, with their centers lined up. Set the front panel 0.5 in (1.3 cm) below the back panel’s top edge so both scalloped edges show.
- Pinch the center. Gather both panels together at the center into three accordion folds, about 1.75 in (4.4 cm) tall. Wrap yarn tightly around the pinch 3–4 times and knot it at the back.
- Add the tails. Place both tails behind the pinch with their top edges overlapping. Angle them outward so the tips sit about 7 in (17.8 cm) apart. Stitch the tops to the back of the pinch.
- Wrap the band. Wrap the band around the pinch and the tail tops with the RS out. At the back, whipstitch the 8 sts of one short end to the 8 sts of the other, one stitch to one stitch. Pull just firmly enough to hold the band in place without crushing the folds.
- Add the leaves and berries. Sew one leaf at each lower corner of the band, angled down and outward. Sew the three berries in a cluster over the leaf bases, just below the band.
- Attach the loop. Fold the cord in half and sew both ends to the back of the band.
Size checkpoint: 13.5 in (34.3 cm) wide and 14.5 in (36.8 cm) from the top of the back panel to the tail tips.
Final Blocking
- Lightly mist the bow with water. You can also block each piece before assembly if you prefer.
- Lay the bow face up on the blocking mat.
- Pin out each scallop on the wings and tails so the eyelets open.
- Pin each tail tip into a sharp point.
- Shape the wing folds by hand so they stand up from the band.
- Let the bow dry completely before you remove the pins.
- For acrylic yarn, you can also steam gently from above, keeping the iron off the yarn.
Final Quality-Control Checklist
- The back panel measures 13.5 in x 7 in (34.3 x 17.8 cm).
- The front panel measures 11.4 in x 6 in (29.0 x 15.2 cm).
- Both tails measure 5 in x 11 in (12.7 x 27.9 cm) and match in length.
- Every scallop has an open eyelet under it.
- The raised lines are straight and the fabric lies flat.
- The band is centered and its seam is hidden at the back.
- The berries are firmly stuffed and securely sewn on.
- The hanging loop holds the bow’s weight without stretching.
Troubleshooting
- Wavy border: You worked too many sc in Round 1. Recount each side against the stated counts.
- Cupped border: You worked too few sc, or Round 3 is too tight. Go up one hook size for the border only.
- Scallops don’t fit a side: The side count isn’t 1 plus a multiple of 4. Add or remove one sc at the end of that side in Round 1.
- Tails are different lengths: Count the rows on each tail. Both should have exactly 19.
- Band won’t close: Add 2 rows to the band, or pinch the wings tighter.
- Bow tilts on the door: Move the cord ends so they sit exactly at the center of the band.
Care
Spot clean with mild soap and cool water, then reshape the bow and dry it flat. Store it flat, or loosely padded with tissue, so the folds keep their shape.

Final Notes
Each stage builds on the measurements before it. At 15 sts and 8 rows to 4 in (10.2 cm), the back panel reaches 12 in x 5.5 in (30.5 x 14.0 cm). The front panel reaches about 9.9 in x 4.5 in (25.1 x 11.4 cm), and each tail about 3.5 in x 9.5 in (8.9 x 24.1 cm). The 0.75 in (1.9 cm) border brings their widths to 13.5 in (34.3 cm), 11.4 in (29.0 cm), and 5 in (12.7 cm). Once assembled, the bow measures 13.5 in x 14.5 in (34.3 x 36.8 cm), ready for your door.
Happy crocheting!