

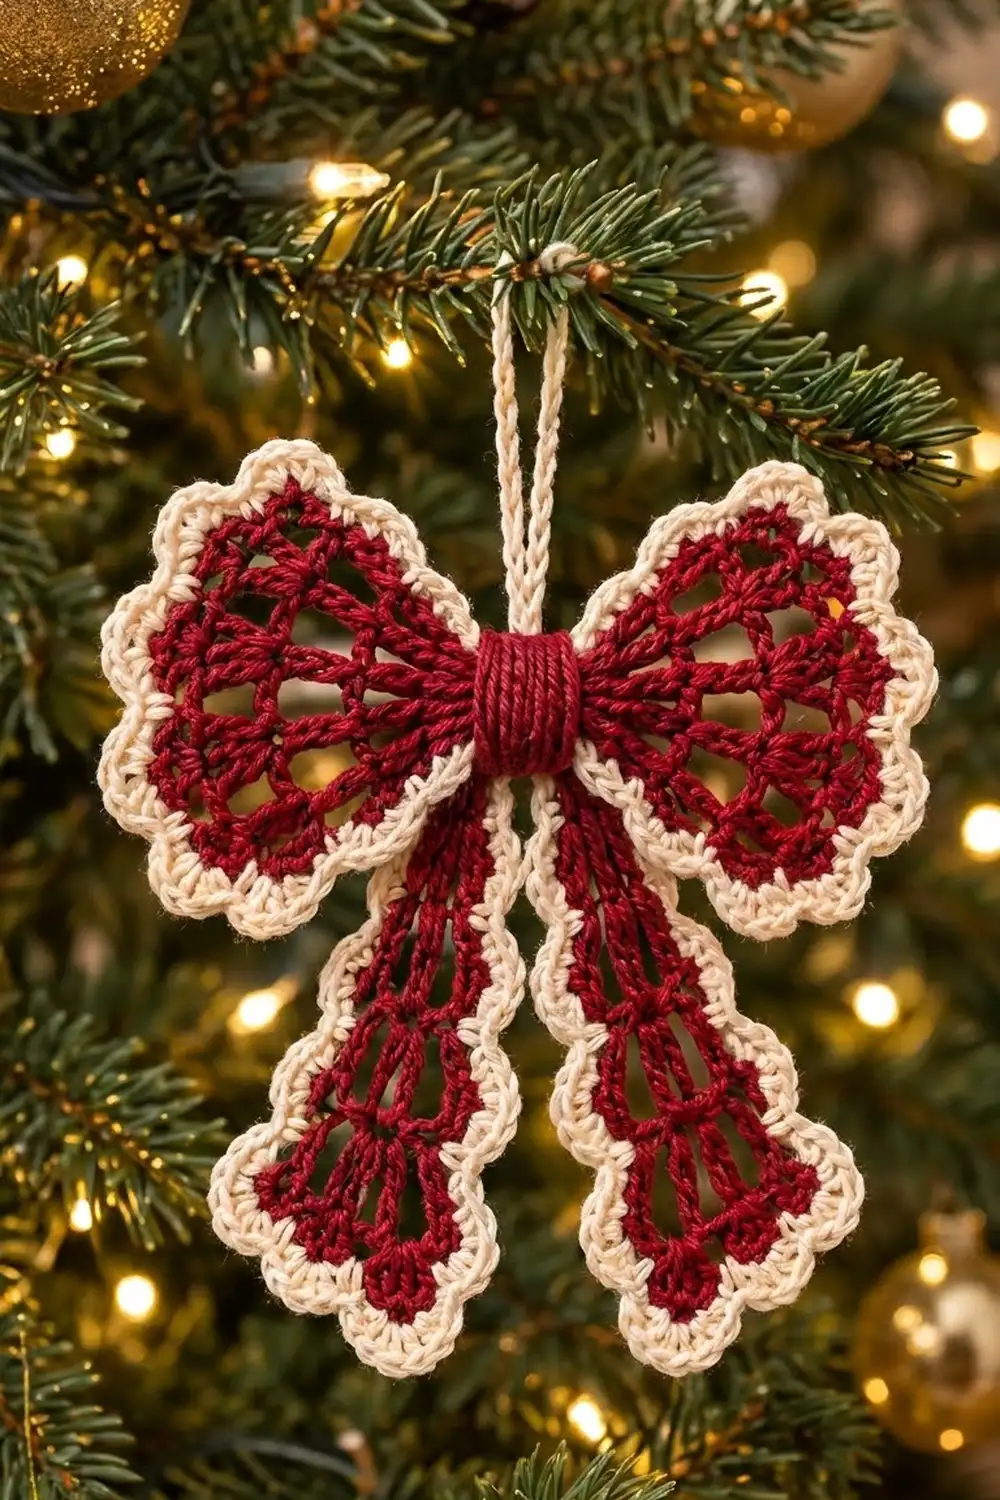
This little bow is classic Christmas. Cranberry lace fans out into two scalloped wings, two slim tails flare out below, and a snug band holds the center. A cream rope-style border outlines each part, so the bow stands out clearly against green branches.
The bow uses just two colors, cranberry red and soft cream. It looks lacy and a little vintage, like a hand-tied ribbon bow, but it holds its shape on the tree.
The pattern uses US crochet terms. The finished bow measures about 4.5 in (11.4 cm) wide and 5 in (12.7 cm) tall, plus a 2.5 in (6.4 cm) hanging loop.
You’ll make two fan wings worked in rows from a ring, two tails worked in rows from a short chain, a small sc band, and a cord. Each wing and tail gets a two-round cream border before assembly. Then you’ll stack the parts, sew them together, and wrap the band around the center.
Finished Size and Construction
- Finished size: 4.5 in (11.4 cm) wide x 5 in (12.7 cm) tall, plus a 2.5 in (6.4 cm) loop
- Skill level: Easy-intermediate
- Terminology: US
- Yarn weight: Sport (#2) cotton
- Hook: 2.75 mm (US C/2)
- Number of pieces: 6 (2 wings, 2 tails, 1 band, 1 cord), assembled into one ornament
- Layout: Wings side by side with points meeting at the center; tails behind them in a V
- Wing size: 2.5 in (6.4 cm) point to lobe tip x 3.5 in (8.9 cm) across, bordered
- Tail size: 3.5 in (8.9 cm) long x 1.75 in (4.4 cm) across the lobes, bordered
- Wing size before border: 2 in (5.1 cm) from ring to lobe tip
- Border depth: 0.25 in (0.6 cm), 2 rounds
Materials
Choose a smooth mercerized sport-weight cotton. Cotton gives clear stitch definition and blocks flat, which matters for lace. Acrylic works, but the lobes will be softer and need starch.
- Color A – Cranberry Red: 20 g, about 62 m
- Color B – Cream: 10 g, about 31 m
These amounts include about 25% extra, so one small ball of each color is plenty.
Tools:
- 2.75 mm (US C/2) crochet hook
- Tapestry needle
- Scissors
- Rust-proof pins
- Blocking mat or folded towel
- Spray starch (optional)
- Ruler or tape measure
Abbreviations (US Terms)
- ch – chain
- sl st – slip stitch
- sc – single crochet
- hdc – half double crochet
- dc – double crochet
- tr – treble crochet
- sp(s) – space(s)
- st(s) – stitch(es)
- tch – turning chain
- RS / WS – right side / wrong side
Special stitch – Crab stitch (reverse sc): Work from left to right (if you’re right-handed). Insert the hook into the next stitch to the right, yarn over and pull up a loop, then yarn over and pull through both loops. This makes a twisted, rope-like edge.
Gauge and Checkpoints
Gauge: 24 sc and 26 rows = 4 in (10.2 cm); 11 rows of dc = 4 in (10.2 cm).
Make one wing first, including its border, and measure it before you make the rest. Lace is forgiving, but the parts must match each other.
Wing checkpoints:
- After Row 3: 1.2 in (3.0 cm) from ring to top edge
- After Row 4: 1.55 in (3.9 cm)
- After Row 5: 2 in (5.1 cm) to the lobe tips
- After border: 2.5 in (6.4 cm) point to tip, 3.5 in (8.9 cm) across
Tail checkpoints:
- After Row 7: 2.5 in (6.4 cm) long
- After Row 8: 3 in (7.6 cm) long
- After border: 3.5 in (8.9 cm) long, 1.75 in (4.4 cm) across the lobes
If your wing is more than 0.25 in (0.6 cm) too big, go down one hook size. If it is too small, go up one size. Use the same hook for every part.
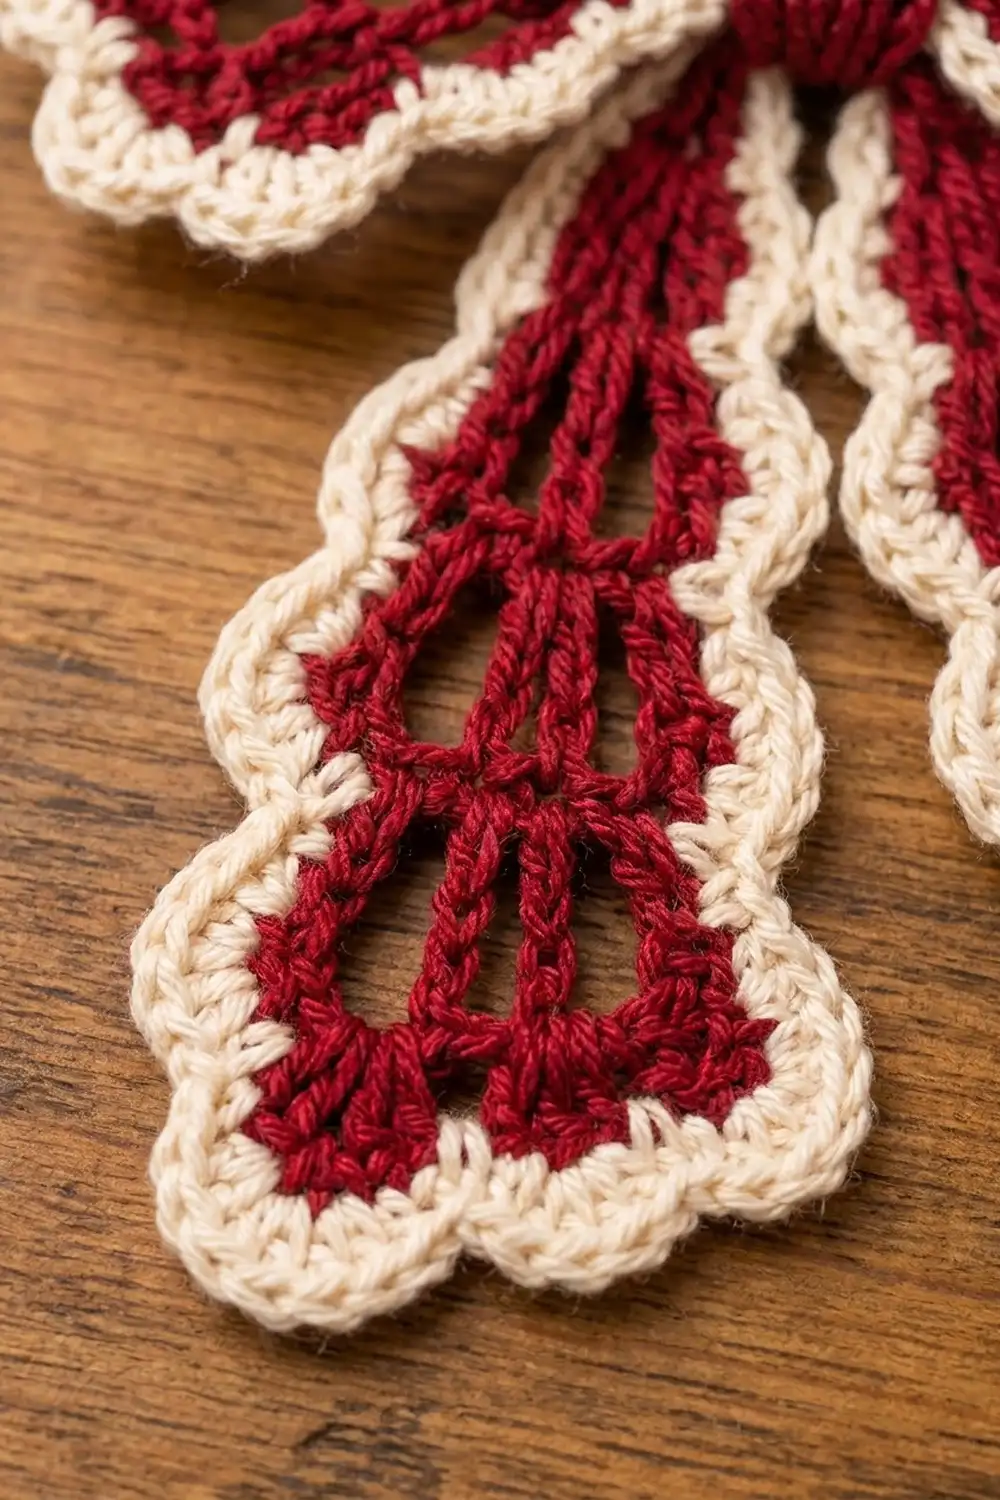
Wing (make 2)
With Color A, ch 4 and sl st to the first ch to form a ring.
Row 1 (RS): Ch 3 (counts as dc), 4 dc in ring. Turn. (5 dc)
Row 2: Ch 5 (counts as dc + ch 2), [dc in next dc, ch 2] 3 times, dc in top of tch. Turn. (5 dc, 4 ch-2 sps)
Row 3: Ch 6 (counts as dc + ch 3), [dc in next dc, ch 3] 3 times, dc in 3rd ch of tch. Turn. (5 dc, 4 ch-3 sps)
These are the long radiating spokes.
Row 4: Ch 3 (counts as dc), [ch 2, dc in next ch-3 sp, ch 2, dc in next dc] 4 times, working the last dc in 3rd ch of tch. Turn. (9 dc, 8 ch-2 sps)
This row adds a short spoke in the middle of each open section.
Row 5 (lobes): Ch 1, sc in first dc, [(hdc, 2 dc) in next ch-2 sp, 3 tr in next dc, (2 dc, hdc) in next ch-2 sp, sc in next dc] 4 times, working the last sc in top of tch. (41 sts: 1 sc + 4 lobes of 10 sts)
Each lobe is centered on one of the short Row 4 spokes. The sc between lobes sits on the long spokes and forms the dips. Fasten off.
Tail (make 2)
With Color A, ch 7.
Row 1 (RS): Dc in 4th ch from hook and in each of next 3 ch. Turn. (5 dc; skipped ch 3 counts as first dc)
Row 2: Ch 3 (counts as dc), dc in next dc, ch 1, dc in next dc, ch 1, dc in next dc, dc in top of tch. Turn. (5 dc, 2 ch-1 sps)
Row 3: Ch 3, dc in next dc, ch 2, dc in next dc, ch 2, dc in next dc, dc in top of tch. Turn. (5 dc, 2 ch-2 sps)
Row 4: Ch 3, dc in next dc, [ch 1, dc in next ch-2 sp, ch 1, dc in next dc] 2 times, dc in top of tch. Turn. (7 dc, 4 ch-1 sps)
This row turns the three columns into five.
Rows 5–7: Ch 3, dc in next dc, [ch 1, dc in next dc] 4 times, dc in top of tch. Turn. (7 dc, 4 ch-1 sps per row)
Row 8 (lobes): Ch 1, sc in each of first 2 dc, (hdc, dc) in next ch-1 sp, 3 tr in next dc, (dc, hdc) in next ch-1 sp, sc in center dc, (hdc, dc) in next ch-1 sp, 3 tr in next dc, (dc, hdc) in next ch-1 sp, sc in next dc, sc in top of tch. (19 sts)
Count check: 2 + 7 + 1 + 7 + 2 = 19. The center sc makes the notch between the two lobes. Fasten off.
Center Band (make 1)
With Color A, ch 13.
Row 1: Sc in 2nd ch from hook and in each ch across. Turn. (12 sc)
Rows 2–4: Ch 1, sc in each st across. Turn. (12 sc)
The band measures 2 in (5.1 cm) x 0.6 in (1.5 cm). Fasten off, leaving an 8 in (20.3 cm) tail for sewing.
Hanging Cord (make 1)
With Color B, ch 36. Sl st in the back bump of the 2nd ch from hook and each ch across. (35 sl sts)
The cord is about 5.5 in (14.0 cm) long. Fasten off, leaving a 6 in (15.2 cm) tail.
Make All Pieces
Color A (Cranberry Red): 2 wings, 2 tails, 1 band
Color B (Cream): borders on the 2 wings and 2 tails, 1 cord
Layout (front view):
            [ Cord loop ]
 [ Wing L ] [   Band   ] [ Wing R ]
       [ Tail L ]   [ Tail R ]
The wing points meet under the band. The tails sit behind the wings with their tops overlapping under the band, and they splay out about 30 degrees apart.
Border
Work the border on each wing and each tail before joining. Use Color B with the RS facing.
Border gauge: 24 sc = 4 in (10.2 cm). Crab stitch is worked 1 per sc, so it adds no width along the edge. It only adds the corded finish.
How the counts are defined: each 3-sc corner group belongs to the edge it starts or ends. Side counts below are the stitches between corner groups, so nothing is counted twice.
Wing Border
Round 1: Join Color B in the first st of Row 5. Work 3 sc in that st, sc in each of next 39 sts, 3 sc in last st. (Curved edge: 3 + 39 + 3 = 45 sc)
Work down the straight side with 2 sc in the end of each of Rows 4, 3, 2 and 1. (8 sc) Work 1 sc in the ring at the point. (1 sc) Work up the other side with 2 sc in each row end. (8 sc) Sl st to first sc. (45 + 8 + 1 + 8 = 62 sc)
Round 2: Ch 1, crab st in each sc around. Sl st to first st. (62 crab sts) Fasten off.
Why it works: Row 5 has 41 sts. The 2 end stitches get 3 sc each (6) and the 39 between them get 1 each, which makes 45. Two sc per dc row end matches the dc height, so the sides stay flat. The 3-sc groups turn the sharp corners where the curve meets each side.
Tail Border
Round 1: Join Color B in the first st of Row 8. Work 3 sc in that st, sc in each of next 17 sts, 3 sc in last st. (Bottom edge: 3 + 17 + 3 = 23 sc)
Work up the side with 2 sc in the end of each of Rows 7 through 1. (14 sc) Along the foundation chain, work 3 sc in the first ch, sc in each of next 3 ch, 3 sc in last ch. (Top edge: 3 + 3 + 3 = 9 sc) Work down the other side with 2 sc per row end. (14 sc) Sl st to first sc. (23 + 14 + 9 + 14 = 60 sc)
Round 2: Ch 1, crab st in each sc around. Sl st to first st. (60 crab sts) Fasten off.
Why it works: Row 8 has 19 sts, so 17 plus two 3-sc corners gives 23. Seven dc rows at 2 sc each give 14 per side. The foundation has 5 ch, so 3 + 3 + 3 = 9 across the top.
Weave in all ends on the WS before joining.
Joining
Use the Color A tail from the band, plus a separate 12 in (30.5 cm) length of Color A for everything else. Whip stitch through the inner loops of the cream border, working stitch to stitch.
Step 1 – Wings: Lay both wings RS up with the points facing each other, and overlap the points by 0.25 in (0.6 cm). Match the point sc of Wing L to the point sc of Wing R. Then match the first side sc above the point and the first side sc below it on each wing. Sew these 3 matched pairs together. (3 stitch pairs)
Step 2 – Pinch: Gently gather the narrow end of the joined wings into soft vertical pleats about 0.75 in (1.9 cm) tall. Wrap the yarn around the pleats 3 times and knot it at the back.
Step 3 – Tails: Turn the bow over. Lay the tails WS up so their top edges overlap the pinch, and cross Tail L over Tail R to form a V. Sew the 9 top-edge stitches of each tail to the back of the pleated center.
Step 4 – Band: Wrap the band around the center from front to back so it covers the pinch. Mattress stitch the two short ends together at the back, matching the 4 row ends on one end to the 4 row ends on the other. Tack the band to the pleats with 2 hidden stitches.
Step 5 – Cord: Fold the cord in half. Sew both ends to the back of the band, centered, so the loop stands 2.5 in (6.4 cm) above the bow.
Tension advice: Pull each joining stitch snug but not tight, because tight sewing will pucker the lace. The band should hold firmly without crushing the pleats flat.
Size checkpoint: The assembled bow should measure 4.5 in (11.4 cm) wide and 5 in (12.7 cm) tall, not counting the loop.
Final Blocking
- Lightly mist the bow with water, or dampen it and press out the excess water in a towel.
- Lay it RS up on the blocking mat.
- Pin each wing lobe at its tr peak, using 4 pins per wing.
- Pin each tail lobe at its peak, and pin the notch between the lobes.
- Open every chain space with your fingertip so the spokes look straight.
- Check that the width is 4.5 in (11.4 cm), and adjust the wings evenly if needed.
- Spray with starch if you want a stiffer ornament.
- Let it dry completely, then unpin.
Final Quality-Control Checklist
- Each wing’s Row 5 has 41 sts and 4 even lobes
- Each tail’s Row 8 has 19 sts and a clear center notch
- Wing borders have 62 sts and tail borders have 60 sts
- The crab stitch edge is even, with no gaps at corners
- Both wings measure 2.5 in (6.4 cm) point to tip
- Both tails measure 3.5 in (8.9 cm) long
- The band covers the pinch completely and its seam is hidden at the back
- The bow measures 4.5 in (11.4 cm) x 5 in (12.7 cm)
- The loop is centered and secure
- All ends are woven in and can’t be seen from the front
Troubleshooting
Wing curls into a cup: Rows 4–5 are too tight. Loosen your chains or go up a hook size.
Wing ruffles: The chains are too loose. Go down a hook size, or work the Row 4 chains more snugly.
Lobes look flat: Make sure all 3 tr go into the single short spoke from Row 4, then pin the peaks firmly when blocking.
Border flares at the sides: Use 2 sc per row end, not 3, and recount to 8 (wing) or 14 (tail).
Corners look pinched: Check that you worked 3 sc in each corner stitch in Round 1.
Tails are different lengths: Count the rows. Each tail needs exactly 8. Block both to 3.5 in (8.9 cm).
Band is too loose: Remove 1 row, or wrap more yarn around the pinch before adding the band.
Care
Hand wash in cool water with mild soap, press out the water in a towel, and reshape the bow flat to dry. Store it flat in a box so the lobes don’t get crushed.
Final Notes
The whole bow follows a simple chain of measurements. Each wing reaches 2 in (5.1 cm) after Row 5 and 2.5 in (6.4 cm) after its 62-stitch border. Each tail reaches 3 in (7.6 cm) after Row 8 and 3.5 in (8.9 cm) after its 60-stitch border. Two wings with overlapped points give 4.5 in (11.4 cm) of width, and the tails bring the height to 5 in (12.7 cm). If your first wing hits its checkpoints, the rest of the bow will come out the right size.
Make one for the tree, a few for gift toppers, or a whole matching set.
Happy crocheting!