

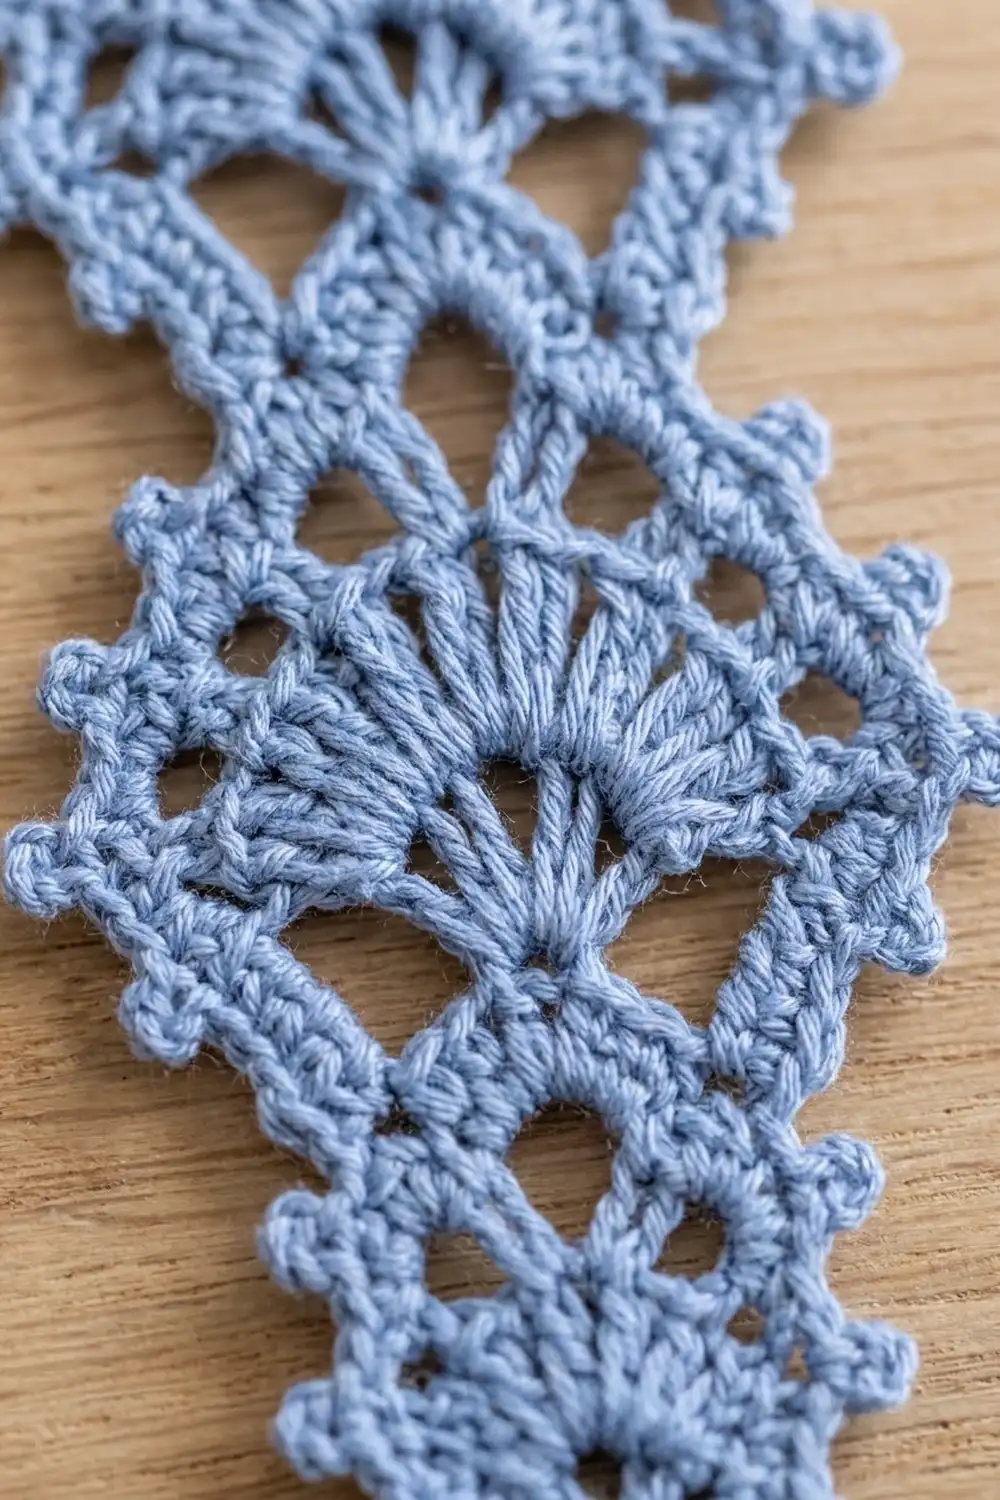
The Frosted Fan Icicle is a slim, lacy ornament that catches the light on a tree branch. Four fans stack one above the other. Each fan is a little wider than the one below it, so the piece narrows to a point at the bottom like a real icicle. An open lattice of chain loops forms the pointed top, and tiny picots run along the edges.
It is worked in one color of soft periwinkle blue cotton thread, which gives it a cool, frosty look. It looks good in a group on a tree, but each ornament is one finished piece.
The pattern uses US crochet terms throughout. The finished ornament measures 2.0 in (5.1 cm) wide by 4.5 in (11.4 cm) long, plus a 1 in (2.5 cm) hanging loop.
You work it in one piece from the bottom up. You start with a small fan in a chain ring. Then you build three more fans, each starting from the center stitch of the row below. The top lattice narrows by one loop per row to a point. Finally, you work a two-round picot border around the whole outline with a hanging loop at the top, then block and stiffen the ornament.
Finished Size and Construction
- Finished size: 2.0 in (5.1 cm) wide x 4.5 in (11.4 cm) long, plus a 1 in (2.5 cm) loop
- Overall hanging length: 5.5 in (14.0 cm)
- Skill level: Intermediate (thread work, shells, reading stitch placement)
- Terminology: US crochet terms
- Yarn weight: Size 10 cotton crochet thread (Lace, weight 0)
- Hook: 1.5 mm (US steel 8)
- Number of pieces: 1
- Layout: Single vertical piece: 4 fan tiers plus a lattice top
- Piece size before border: 1.75 in (4.4 cm) wide x 4.25 in (10.8 cm) tall
- Border depth: 1/8 in (0.3 cm) on every edge
Materials
Thread: Use mercerized cotton crochet thread in size 10. Mercerized cotton holds a crisp shape after starching and keeps the fan ribs well defined. Avoid fuzzy or very soft acrylic threads, because the lattice will lose its sharpness.
- Periwinkle blue: 5 g, about 18 m (20 yd)
This quantity includes a generous margin for your gauge swatch, the hanging loop, and weaving in ends. The ornament itself uses roughly 3 g.
Tools:
- 1.5 mm (US steel 8) crochet hook
- Fine tapestry needle (size 24 or similar)
- Small sharp scissors
- Rust-proof pins
- Foam blocking board or folded towel
- Spray starch or fabric stiffener
- Ruler or flexible tape measure
- Optional: 1 stitch marker
Abbreviations (US Terms)
- ch – chain
- sl st – slip stitch
- sc – single crochet
- tr – treble crochet (yarn over twice)
- sk – skip
- sp – space
- st(s) – stitch(es)
- tch – turning chain
- RS – right side
- rep – repeat
Special stitch: Picot. Ch 3, sl st in the 3rd ch from the hook.
Turning chains: A ch-4 at the start of a row counts as 1 tr. A ch-5 counts as 1 tr + ch 1. A ch-1 never counts as a stitch.
Gauge and Checkpoints
Gauge: 14 sc = 1 in (2.5 cm), and 1 tr row ≈ 0.3 in (0.8 cm) tall.
The ornament is small, so make it once as your swatch. Work Rows 1–3 and measure. If your numbers match, keep going. If they don’t, rip back and adjust before investing time in the upper tiers.
Checkpoints (measured flat, lightly pressed with your fingers):
- After Row 3 (9 sc): 0.65 in (1.7 cm) wide, 0.75 in (1.9 cm) tall
- After Row 6 (17 sc): 1.2 in (3.0 cm) wide, 1.5 in (3.8 cm) tall
- After Row 9 (21 sc): 1.5 in (3.8 cm) wide, 2.25 in (5.7 cm) tall
- After Row 12 (25 sc): 1.75 in (4.4 cm) wide, 3.0 in (7.6 cm) tall
- After Row 19: 4.25 in (10.8 cm) tall from bottom tip to top point
If your piece is too big: Change to a 1.25 mm hook, or tighten your tension on the tr stitches. Tall stitches grow quickly when the yarn-overs are loose.
If your piece is too small: Change to a 1.75 mm hook. Make sure you pull each tr up to full height before completing it.
Height matters more than width here. Blocking can stretch a fan wider, but it cannot add much length.
Pattern
Turn at the end of every row. Every tier has three rows: a shell row, a rib row, and an sc row across the top of the fan.
Tier 1 – Bottom Tip Fan
Row 1: Ch 4, sl st in the first ch to form a ring. Ch 4 (counts as tr), 4 tr in the ring. Turn. (5 tr)
The tr sit in the upper half of the ring. The lower half stays exposed and becomes the bottom tip.
Row 2 (ribs): Ch 5 (counts as tr + ch 1), tr in next tr, [ch 1, tr in next tr] 2 times, ch 1, tr in the 4th ch of the tch. Turn. (5 tr, 4 ch-1 sps = 9 sts)
Row 3 (fan top): Ch 1, sc in the first tr, [sc in next ch-1 sp, sc in next tr] 4 times, working the last sc in the 4th ch of the tch. Turn. (9 sc)
This row has 5 tr (one sc each) plus 4 ch-1 sps (one sc each), for 9 sc. Sc #5 is the center.
Tier 2 – 7-Rib Fan
Row 4 (shell): Ch 4 (counts as tr), sk next 3 sc, 7 tr in next sc (sc #5), sk next 3 sc, tr in last sc. Turn. (9 tr total: 2 edge tr + 7-tr shell)
Check: 1 + 3 skipped + 1 + 3 skipped + 1 = 9 base sts. The skipped stitches leave an open triangular gap on each side of the fan.
Row 5 (ribs): Ch 5 (counts as tr + ch 1), tr in first shell tr, [ch 1, tr in next tr] 6 times, ch 1, tr in the 4th ch of the tch. Turn. (9 tr, 8 ch-1 sps = 17 sts)
Row 6 (fan top): Ch 1, sc in first tr, [sc in next ch-1 sp, sc in next tr] 8 times. Turn. (17 sc)
Center = sc #9.
Tier 3 – 9-Rib Fan
Row 7 (shell): Ch 4 (counts as tr), sk next 7 sc, 9 tr in next sc (sc #9), sk next 7 sc, tr in last sc. Turn. (11 tr total: 2 edge tr + 9-tr shell)
Check: 1 + 7 + 1 + 7 + 1 = 17.
Row 8 (ribs): Ch 5 (counts as tr + ch 1), tr in first shell tr, [ch 1, tr in next tr] 8 times, ch 1, tr in the 4th ch of the tch. Turn. (11 tr, 10 ch-1 sps = 21 sts)
Row 9 (fan top): Ch 1, sc in first tr, [sc in next ch-1 sp, sc in next tr] 10 times. Turn. (21 sc)
Center = sc #11.
Tier 4 – 11-Rib Top Fan (Widest)
Row 10 (shell): Ch 4 (counts as tr), sk next 9 sc, 11 tr in next sc (sc #11), sk next 9 sc, tr in last sc. Turn. (13 tr total: 2 edge tr + 11-tr shell)
Check: 1 + 9 + 1 + 9 + 1 = 21.
Row 11 (ribs): Ch 5 (counts as tr + ch 1), tr in first shell tr, [ch 1, tr in next tr] 10 times, ch 1, tr in the 4th ch of the tch. Turn. (13 tr, 12 ch-1 sps = 25 sts)
Row 12 (fan top): Ch 1, sc in first tr, [sc in next ch-1 sp, sc in next tr] 12 times. Turn. (25 sc)
This is the widest row: 1.75 in (4.4 cm).
Lattice Top
Row 13: Ch 1, sc in first sc, [ch 3, sk next 3 sc, sc in next sc] 6 times. Turn. (7 sc, 6 ch-3 loops)
The sc land on sts 1, 5, 9, 13, 17, 21, and 25, so the loops sit evenly across the full width.
Row 14: Sl st in the first 2 ch of the first loop, ch 1, sc in the same loop, [ch 3, sc in next loop] 5 times. Turn. (6 sc, 5 loops)
Row 15: Work as Row 14, repeating the bracket 4 times. (5 sc, 4 loops)
Row 16: Work as Row 14, repeating the bracket 3 times. (4 sc, 3 loops)
Row 17: Work as Row 14, repeating the bracket 2 times. (3 sc, 2 loops)
Row 18: Work as Row 14, repeating the bracket 1 time. (2 sc, 1 loop)
Row 19 (top point): Sl st in the first 2 ch of the loop, ch 1, sc in the same loop. (1 sc) Fasten off.
Each lattice row works 1 sc into every loop, so each row has one fewer loop than the row below. Starting each row with a sl st pulls both edges in by half a loop. This gives you an even triangle on both sides.
Border
Border gauge: Round 1 is about 7 sc per 1 in (2.5 cm) of edge. Each long side is a fixed 32 sc, set by the row ends, so you never have to guess at “evenly.”
How the row ends are covered (per long side):
- 8 tr rows (Rows 1, 2, 4, 5, 7, 8, 10, 11), 2 sc each = 16 sc
- 4 sc rows (Rows 3, 6, 9, 12), 1 sc each = 4 sc
- 6 lattice rows (Rows 13–18), 2 sc each = 12 sc
- Total = 32 sc per long side
These 32 sc do not include the corner groups. The top point and bottom tip are counted separately below.
Round 1: With RS facing, join thread with a sl st in the Row 19 sc. Ch 1, 3 sc in the same st (top point group).
Work 32 sc down the first long side as listed above. At the bottom tip, work 3 sc over the exposed lower edge of the foundation ring (bottom tip group).
Work 32 sc up the second long side. Join with a sl st to the first sc. (70 sc: 32 + 32 + 3 at top + 3 at bottom)
Round 2: Ch 1. Sc in the first sc of the top group. Work (sc, ch 30, sc) in the center top sc to make the hanging loop. Sc in the 3rd top sc.
- Side 1: [sc in next 4 sc, picot] 8 times.
- Bottom: sc in next sc, (sc, picot, sc) in the center bottom sc, sc in next sc.
- Side 2: [picot, sc in next 4 sc] 8 times.
Join with a sl st to the first sc. Fasten off. (72 sc, 17 picots, 1 ch-30 hanging loop)
Why the math works: Each long side has 32 sc, and 32 ÷ 4 = 8 exactly. That gives 8 picots per side with no leftover stitches. Side 1 places each picot after its group of 4, and Side 2 places it before. That mirrors the spacing, so the picots line up as matching pairs across the ornament. Corner groups turn the points cleanly without crowding the sides. Round 2 adds 2 extra sc at the top and 2 at the bottom: 70 + 4 = 72 sc.
Final Blocking
- Weave in all ends along the sc rows or the border, never through the lattice loops.
- Soak the ornament in cool water for a few minutes, then roll it in a towel to remove excess water.
- Pin the top point and bottom tip first, 4.5 in (11.4 cm) apart.
- Pin the widest point (Row 12) to 2.0 in (5.1 cm) across, including the border.
- Pin each fan open so the ribs spread evenly. Pin the open triangles beside each fan into clear, crisp shapes.
- Pin out each picot along both sides.
- Spray with starch or brush on fabric stiffener. Let it dry completely, at least 6 hours.
- Unpin and shape the hanging loop by hand so it stands up neatly.
Final Quality-Control Checklist
- Four fans with 5, 7, 9, and 11 ribs from bottom to top
- Open triangular gaps on both sides of Tiers 2, 3, and 4
- Lattice top has 6 rows of loops and ends in a single point
- 8 picots on each long side plus 1 at the bottom tip
- Finished size 2.0 in (5.1 cm) x 4.5 in (11.4 cm)
- Hanging loop about 1 in (2.5 cm) tall
- Both sides mirror each other, and the ornament hangs straight
Troubleshooting
Fans cup or ruffle: Your tr are too loose for the base. Go down a hook size, or block the fan firmly flat.
Fans pull the piece narrow: You may have worked the shell into the wrong sc. Count to the exact center (#5, #9, or #11) before working the shell.
Lattice leans to one side: You probably skipped the starting sl sts on one row. Each lattice row must begin with sl sts into the first loop.
Picots don’t pair up across the ornament: Check that Side 2 starts with a picot rather than ending with one.
Ornament twists when hung: Re-block it with more stiffener, and center the hanging loop in the middle top sc.
Bottom tip is ragged: Work the 3 tip sc over the ring chain itself, not into the first tr.
Care
Hand wash in cool water with mild soap, then re-block and re-starch to restore the crisp shape. Store flat or hanging, away from heavy ornaments that could crush it.

Final Notes
The size of this ornament depends on a short chain of checks. Rows 1–3 should measure 0.65 in (1.7 cm) wide. The fan-top rows grow from 9 to 17 to 21 to 25 sc, so the piece widens from 1.2 in (3.0 cm) to 1.5 in (3.8 cm) to 1.75 in (4.4 cm). The lattice brings the body to 4.25 in (10.8 cm) tall. Then the 1/8 in (0.3 cm) border gives the finished 2.0 in (5.1 cm) by 4.5 in (11.4 cm). If each checkpoint matches, the border’s 32 sc per side and 8 picots per side will fit exactly. Make one, then make a few more for a frosty set on your tree.
Happy crocheting!