

The Frost Ribbon Lace Ornament is a slim, vertical thread-crochet ornament with three pointed oval openings stacked one above the other. A ring of tall stitches outlines each opening. The rings pinch together at two crossing points, and a picot edge with a small point at each widest spot turns every oval into a soft diamond. A plain chain loop at the top hangs it from a branch, and a single picot finishes the bottom tip.
This sample uses one color, a soft periwinkle blue crochet cotton. It looks calm and wintry on its own and stands out well against green branches and warm lights. The style is light, airy lace, more like a snowflake than a bauble.
The pattern uses US crochet terms throughout. The finished ornament is about 6 in (15.2 cm) long including the hanging loop and 1.5 in (3.8 cm) wide at its widest point. The lace body alone, without the loop, is about 5 in (12.7 cm) long.
Construction is simple and quick. First you chain a hanging loop and one continuous frame that forms three linked rings. Round 1 works tall stitches around the whole outline in one pass, and Round 2 adds the picot border and the diamond points. Blocking with starch sets the final crisp shape.
Finished Size and Construction
- Finished size: 1.5 in (3.8 cm) wide x 6 in (15.2 cm) long, including the loop
- Lace body length: 5 in (12.7 cm)
- Skill level: Intermediate (thread crochet, simple stitches, careful counting)
- Terminology: US crochet terms
- Yarn weight: Size 10 crochet cotton thread (lace weight, category 0)
- Hook: 1.5 mm (US steel 8)
- Number of pieces: 1 single piece
- Layout: 3 oval openings stacked vertically, joined at 2 crossing points
- Piece size: each oval section is about 1.6 in (4.1 cm) tall
- Size before border (after Round 1): 1.2 in (3.0 cm) wide x 4.8 in (12.2 cm) long, plus the loop
- Border depth: about 0.15 in (0.4 cm) per side, plus about 0.2 in (0.5 cm) at the bottom tip
Materials
Yarn advice: Choose a size 10 mercerized cotton thread. It has a slight sheen, shows each stitch clearly, and takes starch well. Avoid fuzzy or very soft threads, because the openings need crisp edges to read as diamonds.
- Periwinkle blue (Color A): 3 g, about 25 m (27 yd)
One ornament uses less than this. The amount includes a margin for a test piece, practice chains, and weaving in ends. A standard 50 g ball will make a large matching set.
Tools:
- 1.5 mm (US steel 8) crochet hook
- Fine tapestry needle
- Small sharp scissors
- 2 locking stitch markers
- Ruler or tape measure with inch and cm markings
- Blocking board or foam mat, plus rust-proof pins
- Fabric stiffener or liquid starch
- Plastic wrap to protect the blocking surface
Abbreviations (US Terms)
- ch – chain
- sl st – slip stitch
- sc – single crochet
- hdc – half double crochet
- dc – double crochet
- st(s) – stitch(es)
- sp – space
- p – picot
- J1, J2 – junction 1, junction 2 (the crossing points)
- T – top point, at the base of the hanging loop
- B – bottom point chain
Special stitch:
Picot (p): Ch 3, sl st in the 3rd ch from the hook. A picot sits on top of the round and does not use up a stitch from the round below.
Gauge and Checkpoints
Thread tension varies a lot from person to person, so make one test ornament before you start a set. It takes less than an hour.
Gauge: 11 ch = 1 in (2.5 cm), unstretched. One Round 1 dc stands about 0.25 in (0.6 cm) tall.
Checkpoint 1 – foundation frame: Pinched flat, each ring should measure about 1.6 in (4.1 cm) from point to point. Without the loop, the three-ring frame should be about 4.8 in (12.2 cm) long.
Checkpoint 2 – after Round 1: The piece should be about 1.2 in (3.0 cm) wide at the widest part of each oval. Each opening should be about 0.7 in (1.8 cm) across.
Checkpoint 3 – after Round 2: Without the loop, the piece should be about 1.5 in (3.8 cm) wide and 5 in (12.7 cm) long.
If your piece is too big: Go down to a 1.25 mm (US steel 10) hook. If your piece is too small: Go up to a 1.65 mm (US steel 7) hook. Do not change the stitch counts, because the shaping depends on them. Differences of 0.1 in (0.3 cm) are fine for an ornament.
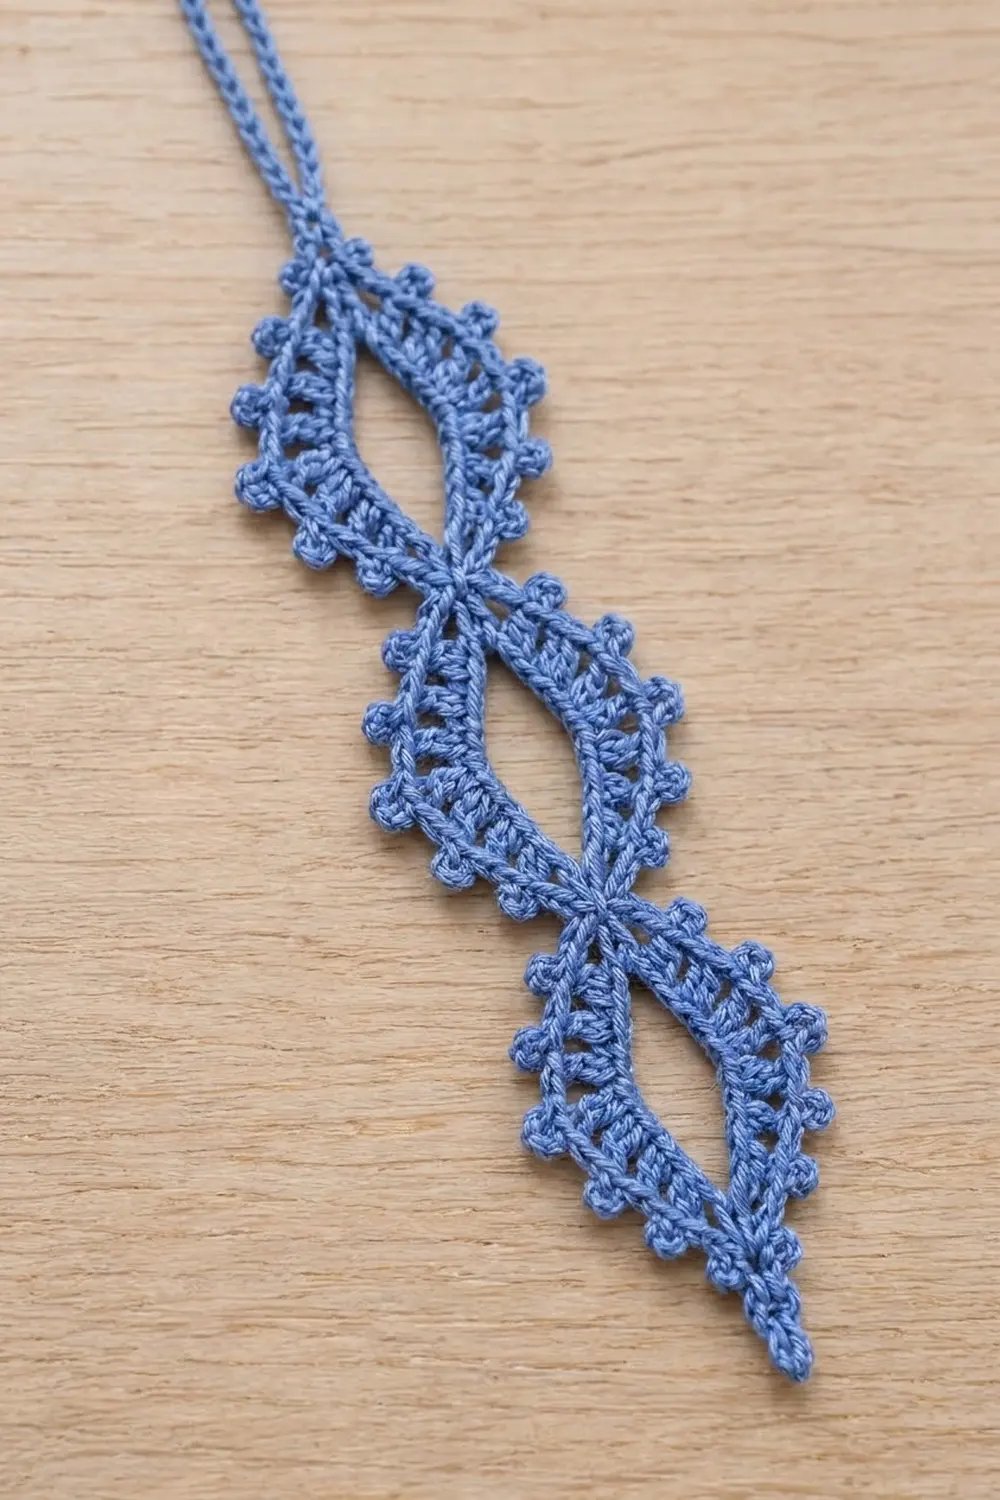
Foundation: Hanging Loop and Three-Ring Frame
The frame is one continuous chain. It runs down the right side of the ornament, turns at the bottom point, and comes back up the left side. On the way up it joins to the right side at two junctions. This creates three linked rings, each with 17 ch on each side.
Hanging loop: Leave a 6 in (15.2 cm) tail, ch 20, and sl st in the 1st ch to form a ring. This sl st is point T.
Right side, going down:
- Ch 17, then ch 1 more and place a marker in this ch. This marked ch is J1.
- Ch 17, then ch 1 more and place a marker in this ch. This marked ch is J2.
- Ch 17, then ch 1 more. This last ch is B, the bottom point. Do not join.
Left side, going up:
- Ch 17, sl st in the J2 marked ch. Keep the chain untwisted.
- Ch 17, sl st in the J1 marked ch.
- Ch 17, sl st in point T at the base of the hanging loop.
Leave the markers in place. You now have three closed rings stacked vertically:
- Ring 1 runs from T down to J1.
- Ring 2 runs from J1 down to J2.
- Ring 3 runs from J2 down to B and back up to J2.
Foundation count: 20 loop ch + 105 frame ch (6 sides x 17 ch = 102, plus the 3 marked chains J1, J2, and B).
Lay the frame flat and check Checkpoint 1.
Round 1: Tall Stitch Frame
Round 1 goes around the outside of the whole frame in one continuous pass: down the left side, around the bottom point, and up the right side. Work each stitch over the single chain so the stitches stand outward and the inside of each ring stays open. On each side the stitches start short, grow tall, and shrink again, which shapes each ring into a pointed oval.
Side sequence (worked over 17 ch): Sc in next ch, hdc in next ch, dc in next 13 ch, hdc in next ch, sc in next ch. (17 sts)
Round 1:
- Ch 1 (does not count as a st), sc in T.
- Work the side sequence over the 17 left ch of Ring 1.
- Sc in the J1 sl st.
- Work the side sequence over the 17 left ch of Ring 2.
- Sc in the J2 sl st.
- Work the side sequence over the 17 left ch of Ring 3.
- In B, work (sc, ch 3, sc). This is the bottom point.
- Work the side sequence over the 17 right ch of Ring 3.
- Sc in the J2 marked ch, working under its remaining loop.
- Work the side sequence over the 17 right ch of Ring 2.
- Sc in the J1 marked ch.
- Work the side sequence over the 17 right ch of Ring 1.
- Sl st in the first sc to join.
Round 1 count: 1 sc at T + (6 sides x 17 sts) + 4 junction sc + 2 sc at B = 1 + 102 + 4 + 2 = 109 sts and 1 ch-3 sp.
The junction sc on both sides draw the two strands together, which forms the crossing between the ovals. Remove the markers now.
Check Checkpoint 2. The dc spokes should fan out evenly around each opening.
Border: Picot Edge and Diamond Points
Round 2 is the border. It adds sc and picots around the outside of every oval, plus one extra point at the widest spot of each side. That center point is what turns each soft oval into a diamond shape.
Border gauge: Round 2 adds about 0.15 in (0.4 cm) to each side, so the width grows from 1.2 in (3.0 cm) to 1.5 in (3.8 cm). The bottom picot adds about 0.2 in (0.5 cm) of length, so the body grows from 4.8 in (12.2 cm) to 5 in (12.7 cm).
Border side sequence (worked over 17 sts of Round 1):
Sc in next 2 sts, (p, sc in next 2 sts) 3 times, (sc, p, sc) in next st, (sc in next 2 sts, p) 3 times, sc in next 2 sts.
Count per side: 8 sts used before the center + 1 center st + 8 sts used after = 17 Round 1 sts used. This gives 18 sc and 7 picots per side.
The center st is the 9th stitch of each side, which is the middle dc of the 13 dc. Putting the extra sc and picot there places the diamond point exactly at the widest part of the oval.
Round 2:
- Ch 1 (does not count as a st), sc in first sc (at T).
- Work the border side sequence over the next 17 sts (Ring 1, left).
- Sc in the J1 junction sc.
- Work the border side sequence (Ring 2, left).
- Sc in the J2 junction sc.
- Work the border side sequence (Ring 3, left).
- Sc in the next sc, work (sc, p, sc) in the ch-3 sp, then sc in the next sc. This is the bottom tip.
- Work the border side sequence (Ring 3, right).
- Sc in the J2 junction sc.
- Work the border side sequence (Ring 2, right).
- Sc in the J1 junction sc.
- Work the border side sequence (Ring 1, right).
- Sl st in the first sc to join. Fasten off, leaving a 6 in (15.2 cm) tail.
Round 2 count: 1 sc at T + (6 sides x 18 sc) + 4 junction sc + 4 sc at the bottom tip = 1 + 108 + 4 + 4 = 117 sc and 43 picots (6 sides x 7 picots + 1 bottom picot).
Why the math works: Each side of Round 1 has 17 sts, and the border sequence uses exactly 17. The single increase at the center adds only 1 sc per side. That is enough to flare the point without making the edge ripple. Picots sit on top and use no stitches. The junction sc stay at 1 st each, so the crossings stay narrow. At the bottom, the 2 Round 1 sc and the ch-3 sp become 4 sc with a single centered picot, which makes a sharp tip.
Weave both tails through the back of the Round 1 stitches. Don’t trim them close until after blocking.
Final Blocking
Starch blocking makes the ornament hang flat and hold its diamond shape.
- Hand wash the ornament in cool water and press it between towels until it is just damp.
- Prepare the stiffener following the bottle’s directions.
- Dip the ornament, work the solution into all the stitches, and gently squeeze out the excess.
- Cover the blocking board with plastic wrap. Lay the ornament flat, right side up.
- Pin point T and the bottom tip first, stretching the body to 5 in (12.7 cm) long.
- Pin each diamond point so every oval measures 1.5 in (3.8 cm) across.
- Pin each junction so it stays narrow and centered.
- Open each picot with the tip of a pin so it sits round.
- Clear any stiffener film from the openings.
- Let it dry completely, usually 12–24 hours. Remove the pins and trim the tails.
Final Quality-Control Checklist
- The ornament is 1.5 in (3.8 cm) wide and 5 in (12.7 cm) long, plus the hanging loop, for 6 in (15.2 cm) in total.
- All three openings are the same size, about 1.6 in (4.1 cm) tall.
- Both junctions sit on the center line and look like a neat crossing.
- Each side of each oval has 7 picots, with the 4th one at the widest point.
- The bottom tip has one centered picot.
- The ornament hangs straight without twisting.
- No stiffener film is left in the openings or picots.
- All tails are woven in and trimmed.
Troubleshooting
The frame twists into a spiral. The chain was twisted before a junction sl st. Undo back to that junction, lay the chain flat, and rejoin.
The ovals are different sizes. One side has more or fewer than 17 ch. Count every side before you start Round 1.
The openings close up or ruffle. Your Round 1 tension is off. Make sure each side has exactly 17 sts, then adjust your tension, not the counts.
The junctions look thick. You worked more than 1 sc into a junction. Each junction gets exactly 1 sc in each round.
The diamond points don’t show. The center (sc, p, sc) is off center. It belongs in the 9th st of each side.
The piece curls after drying. It needs more stiffener. Dip it again and re-pin it flat.
Care
Dust gently with a soft, dry brush. If it needs cleaning, hand wash it in cool water, then re-starch and re-block it flat. Never machine wash or dry it.

Final Notes
The measurements build in a short, clear chain. A 20-ch loop and a frame of 17 ch per side make three rings of about 1.6 in (4.1 cm) each. Round 1 works 17 sts per side for 109 sts in total and brings the width to 1.2 in (3.0 cm). Round 2 turns those same 17 sts per side into 18 sc and 7 picots, for 117 sc and 43 picots in total. The border brings the width to 1.5 in (3.8 cm) and the body length to 5 in (12.7 cm). With the loop, the finished ornament is 6 in (15.2 cm) long.
Once your first ornament matches these checkpoints, the rest of a set will go quickly and match on the tree.
Happy crocheting!