

The Frosted Fern Lace Leaf is a long, slim leaf motif with an old-fashioned lace look. A raised spine runs straight down the middle. Five shell fans open outward on each side of it, and a ring of chain arches surrounds the fans. A firm, rope-like edge holds the shape crisp.
This sample is worked in a single shade of cream cotton, which gives the leaf a frosty, wintry feel. It works well as a hanging ornament, a gift-tag topper, or a lacy accent on a wreath or window. All instructions use US crochet terms.
The finished leaf measures 3.5 in (8.9 cm) wide by 9.5 in (24.1 cm) long, including the top hanging loop and the bottom tip ring. The leaf body alone is 3.5 x 8.5 in (8.9 x 21.6 cm).
Construction is simple. You chain a spine and work single crochet up and down both sides of it, closing a hanging loop at the top. Next comes a round of shell fans, then a round of chain arches. Two border rounds of sc and reverse sc finish the edge. The whole leaf is one piece worked in the round, with no sewing.
Finished Size and Construction
- Finished size: 3.5 x 9.5 in (8.9 x 24.1 cm) overall; body 3.5 x 8.5 in (8.9 x 21.6 cm)
- Skill level: Easy-intermediate
- Terminology: US crochet terms
- Yarn weight: Worsted (#4), cotton or cotton blend
- Hook: 4.0 mm (G-6)
- Number of pieces: 1
- Layout: Single leaf, worked in the round around a foundation chain
- Piece size: 3.5 x 8.5 in (8.9 x 21.6 cm) body
- Size before border (after Rnd 3): 2.75 x 7.75 in (7.0 x 19.7 cm)
- Border depth: 0.375 in (1.0 cm) per edge, 2 rounds
Materials
Yarn: Use a smooth worsted-weight cotton or cotton blend. Cotton shows off the shell texture and blocks to a crisp point. Wool blends make a softer leaf that tends to lose its sharp tips, and fuzzy yarns hide the arches.
- Cream / ivory: 15 g, about 30 m (33 yd) per leaf
This quantity includes a margin of roughly 20% for your gauge swatch and weaving in ends.
Tools:
– 4.0 mm (G-6) crochet hook
– Tapestry needle
– Scissors
– Rust-proof pins and a blocking mat or folded towel
– Spray bottle with water
– Ruler or tape measure
Abbreviations (US Terms)
- ch – chain
- sl st – slip stitch
- sc – single crochet
- dc – double crochet
- sk – skip
- sp – space
- st(s) – stitch(es)
- rev sc – reverse single crochet (crab stitch)
- Rnd – round
Special stitches:
- Small fan: 5 dc in the same st.
- Large fan: 7 dc in the same st.
- Reverse sc: Without turning, work from left to right (right to left if you are left-handed). Insert the hook into the next st to the right, yarn over, pull up a loop, yarn over, and pull through both loops. This makes the twisted, cord-like edge.
Gauge and Checkpoints
Gauge: 18 sc and 20 rows = 4 in (10.2 cm) in sc.
Gauge matters less here than in a garment, but it sets the length of the spine, and everything else builds from the spine. Make one test leaf first and check it at each stage:
- After Rnd 1: The spine measures 7 in (17.8 cm), not counting the loop. The width is about 0.5 in (1.3 cm).
- After Rnd 2: Width across the widest fans is 2 in (5.1 cm). Length is 7.25 in (18.4 cm).
- After Rnd 3: Width is 2.75 in (7.0 cm) and length is 7.75 in (19.7 cm).
- After Rnd 5 (blocked): The body is 3.5 x 8.5 in (8.9 x 21.6 cm), and the overall length is 9.5 in (24.1 cm).
If your leaf is too big: Go down to a 3.75 mm (F-5) hook. If only the fans flare, tighten your dc rather than changing hooks.
If your leaf is too small: Go up to a 4.5 mm (7) hook. If the spine is 0.25 in (0.6 cm) or more short, check that you are not pulling the foundation chain tight. Many people chain more tightly than they crochet, so you can also make the foundation chain with a hook one size larger.
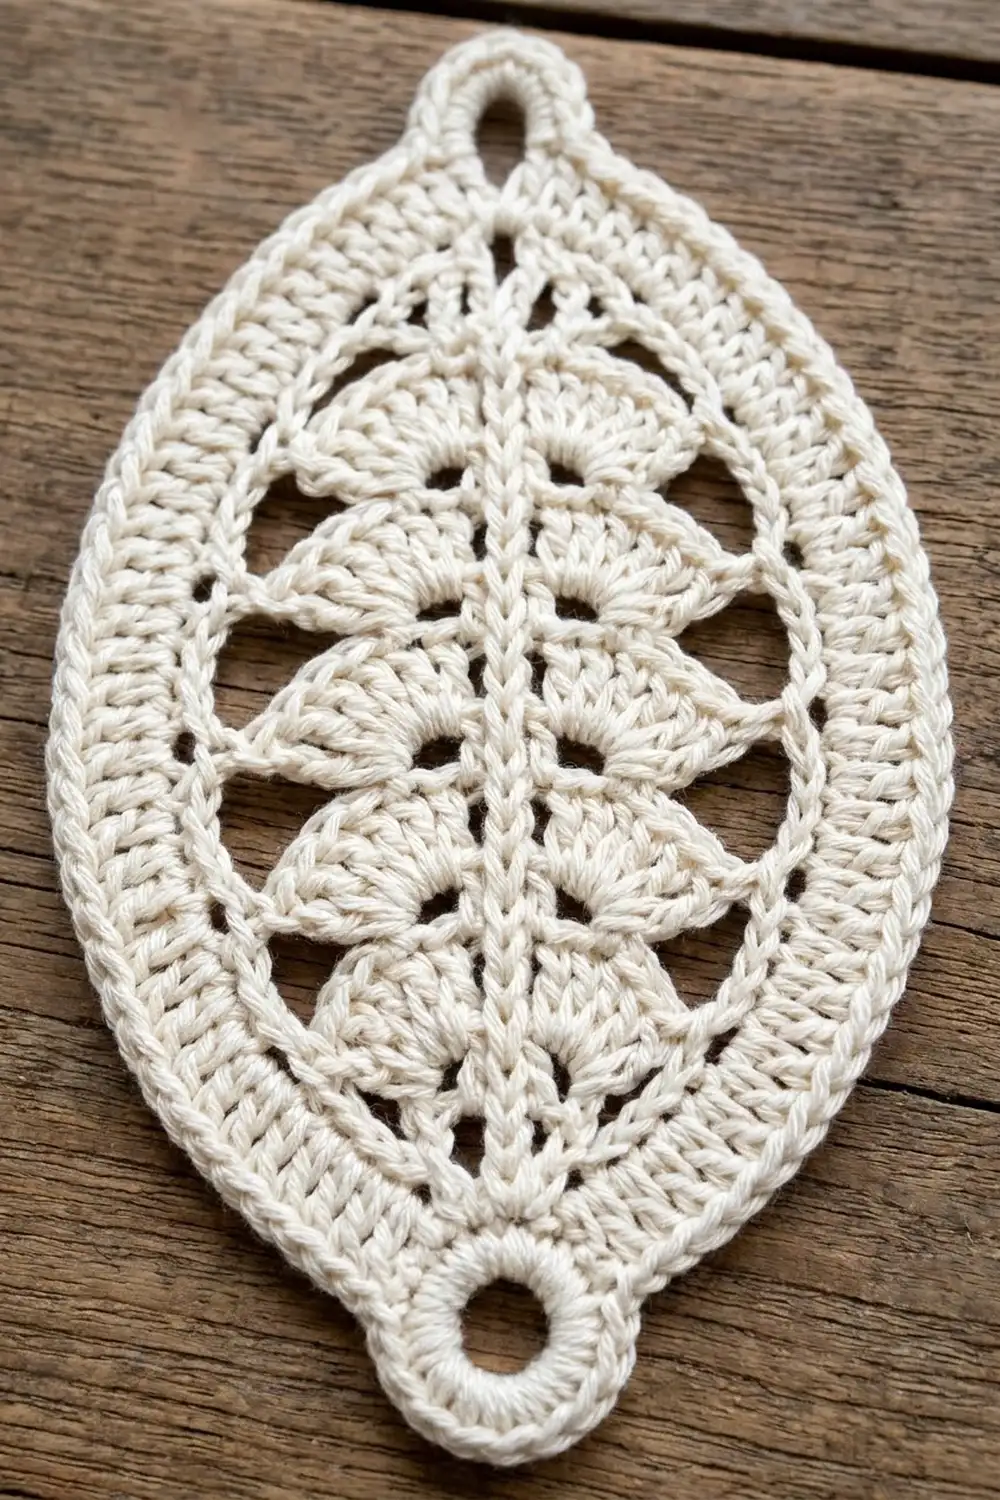
The Leaf
Foundation and Rnd 1 (Spine and Hanging Loop)
Ch 33.
Rnd 1:
1. Sc in the 2nd ch from the hook and in each of the next 30 ch, for 31 sc. This is Side A. It runs from the top of the leaf down toward the tip.
2. Work 3 sc in the last ch. This is the bottom tip.
3. Rotate the work and continue along the opposite side of the foundation chain. Work sc in each of the next 31 ch. This is Side B, running up from the tip to the top.
4. Ch 8, then sl st in the first sc of the round to close the hanging loop.
Count: 65 sc (31 on Side A + 3 at the tip + 31 on Side B), plus 1 ch-8 loop.
Number the stitches on each side 1 to 31. On Side A, st 1 is at the top. On Side B, st 1 is at the tip. The fans in Rnd 2 are placed by these numbers.
Rnd 2 (Shell Fans)
Side A:
1. Ch 1. Sc in the same st as the join (st 1 of Side A).
2. Sk 2 sts, small fan in st 4, sk 2 sts, sc in st 7.
3. Sk 2, large fan in st 10, sk 2, sc in st 13.
4. Sk 2, large fan in st 16, sk 2, sc in st 19.
5. Sk 2, large fan in st 22, sk 2, sc in st 25.
6. Sk 2, small fan in st 28, sk 2, sc in st 31.
Tip:
7. Sk the first tip sc. Work (sc, ch 3, sc) in the center tip sc. Sk the third tip sc.
Side B:
8. Sc in st 1 of Side B.
9. Work the fans in the reverse order: sk 2, small fan in st 4, sk 2, sc in st 7. Then [sk 2, large fan in next st, sk 2, sc in next st] 3 times. Then sk 2, small fan in st 28, sk 2, sc in st 31.
Top:
10. Work 12 sc into the ch-8 loop to cover it, then sl st in the first sc of the round.
Count: 26 sc (6 on Side A + 2 at the tip + 6 on Side B + 12 in the loop), 62 dc (31 per side, as 5 + 7 + 7 + 7 + 5), and 1 ch-3 tip sp.
Small fans at each end and large fans in the middle give the leaf its taper. On each side, the fans are spaced on a 6-st repeat (sc, sk 2, fan, sk 2), and 5 repeats plus the starting sc use exactly 31 sts.
Rnd 3 (Chain Arches)
Side A:
1. Ch 1. Sc in the same st as the join.
2. Ch 4, then sc in the center dc of fan 1 (the 3rd of 5).
3. [Ch 5, sc in the center dc of the next fan] 4 times. On a large fan the center dc is the 4th of 7; on the last small fan it is the 3rd of 5.
4. Ch 4.
Tip:
5. Work (sc, ch 4, sc) in the tip ch-3 sp.
Side B:
6. Ch 4, then sc in the center dc of the first fan.
7. [Ch 5, sc in the center dc of the next fan] 4 times.
8. Ch 4, then sc in the last sc of Side B, just before the covered loop.
9. Sl st in the first sc of the round. The covered loop stays free.
Count: 14 sc, 4 ch-4 sps on the sides, 1 ch-4 sp at the tip, and 8 ch-5 sps. Each side has 6 arches: ch-4, ch-5, ch-5, ch-5, ch-5, ch-4.
The arches sit over the fan tips and form the open lacy band between the fans and the edge.
Checkpoint: The leaf should now be 2.75 x 7.75 in (7.0 x 19.7 cm), lying flat with gentle points at the top and the tip.
Border
Border gauge: About 4.5 sc per inch (2.5 cm) along the curved edge. That is the same as the body gauge, with the sc packed slightly closer around the curves.
Rnd 4 (Solid Edge)
Side A:
1. Sl st into the first ch-4 sp. Ch 1, then work 6 sc in the same sp.
2. Work 7 sc in each of the next 4 ch-5 sps.
3. Work 6 sc in the next ch-4 sp.
Tip:
4. Work (3 sc, ch 5, 3 sc) in the tip ch-4 sp.
Side B:
5. Work 6 sc in the next ch-4 sp, 7 sc in each of the next 4 ch-5 sps, and 6 sc in the last ch-4 sp.
6. Sl st in the first sc of the round.
Count: 40 sc per side (6 + 28 + 6). The total is 86 sc (40 + 6 at the tip + 40) plus 1 ch-5 tip loop.
Rnd 5 (Reverse sc Cord)
- Ch 1. Work rev sc in each sc around until you reach the tip loop.
- Work 8 rev sc into the ch-5 tip loop.
- Continue with rev sc in each remaining sc.
- Sl st in the first st and fasten off.
Count: 86 rev sc, plus 8 rev sc in the tip loop, for 94 sts.
Why the Math Works
Each side’s edge has to travel around the curve from the hanging loop to the tip, a distance of about 8.9 in (22.6 cm). At 4.5 sc per inch, that needs about 40 sc.
The arches give exactly that: 6 + (4 x 7) + 6 = 40 sc. Each arch gets 1 to 2 more sc than it has chains, which is the usual allowance for an outer curve. With fewer stitches the edge would pull in and the leaf would cup. With more, it would ruffle.
The tip is counted separately so that its 6 sc and ring are not double-counted with the sides. Rev sc adds no stitches, only firmness, so Rnd 5 keeps the count of 86 plus the 8 sts in the ring.
Final Blocking
- Weave in all ends along the spine or inside the border sc, where they won’t show.
- Mist the leaf until it is damp but not dripping.
- Lay it flat on the mat, right side up.
- Pin the top at the base of the hanging loop and pin the bottom tip. Gently stretch the leaf until the body is 8.5 in (21.6 cm) long.
- Pin each side at its widest point so the width is 3.5 in (8.9 cm).
- Pin the tip of each ch-5 arch outward so the arches open evenly.
- Use your fingers to straighten the spine and fan out each shell.
- Let it dry completely, about 6 to 12 hours, before you unpin it.
Final Quality-Control Checklist
- [ ] Spine is straight and 7 in (17.8 cm) long
- [ ] 5 fans per side, in the order 5, 7, 7, 7, 5 dc
- [ ] Both sides mirror each other
- [ ] 6 arches per side, plus 1 at the tip
- [ ] 40 sc per side in Rnd 4
- [ ] Hanging loop is fully covered with 12 sc
- [ ] Tip ring is open and covered with 8 rev sc
- [ ] Body is 3.5 x 8.5 in (8.9 x 21.6 cm); overall length is 9.5 in (24.1 cm)
- [ ] All ends are woven in securely
Troubleshooting
The spine curves or twists. The foundation chain is too tight. Remake it with a hook one size larger.
The fans don’t line up across the spine. You probably miscounted a skip. Count the stitches as 1 to 31 on each side and check that the fans sit on sts 4, 10, 16, 22, and 28.
The edge cups. Your border is too tight. Check that you have 7 sc in each ch-5, or go up a hook size for Rnds 4 and 5 only.
The edge ruffles. Work 6 sc in each ch-5 instead of 7, which gives 36 sc per side, and re-block firmly.
The rev sc looks messy. Keep the loops loose, and always insert the hook into the next stitch toward your dominant hand.
The tip is blunt. Pin the tip ring firmly while blocking, and make sure the tip (sc, ch 4, sc) in Rnd 3 is worked into the ch-3 sp itself.
Care
Hand wash in cool water with a mild soap, press out the water in a towel, and re-block flat to dry. Don’t wring or tumble dry, because both distort the arches.

Final Notes
The whole leaf builds from one measurement:
– The 31-st spine sets the length at 7 in (17.8 cm).
– The 6-st fan repeat fits five fans per side.
– The 6-arch frame brings the leaf to 2.75 x 7.75 in (7.0 x 19.7 cm).
– The 40-st-per-side border finishes it at 3.5 x 8.5 in (8.9 x 21.6 cm), with an overall length of 9.5 in (24.1 cm) including the loops.
If your checkpoints match at each stage, the finished leaf will too. Hang it by its covered loop, or slip the tip ring of one leaf through the hanging loop of another for a simple hanging strand.
Happy crocheting!