

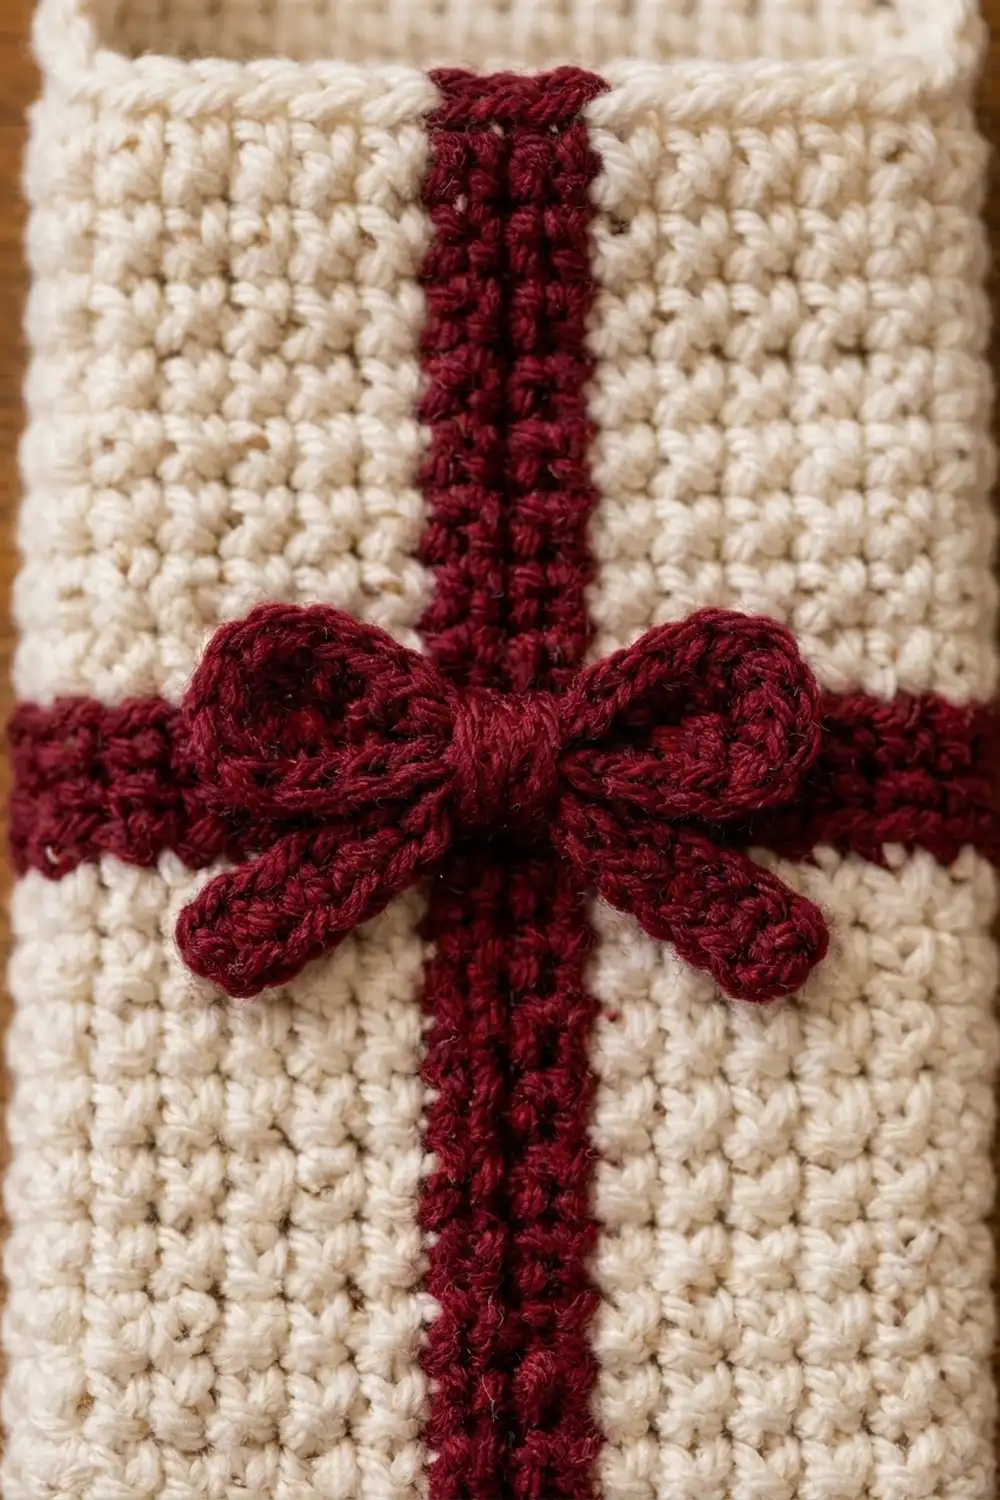
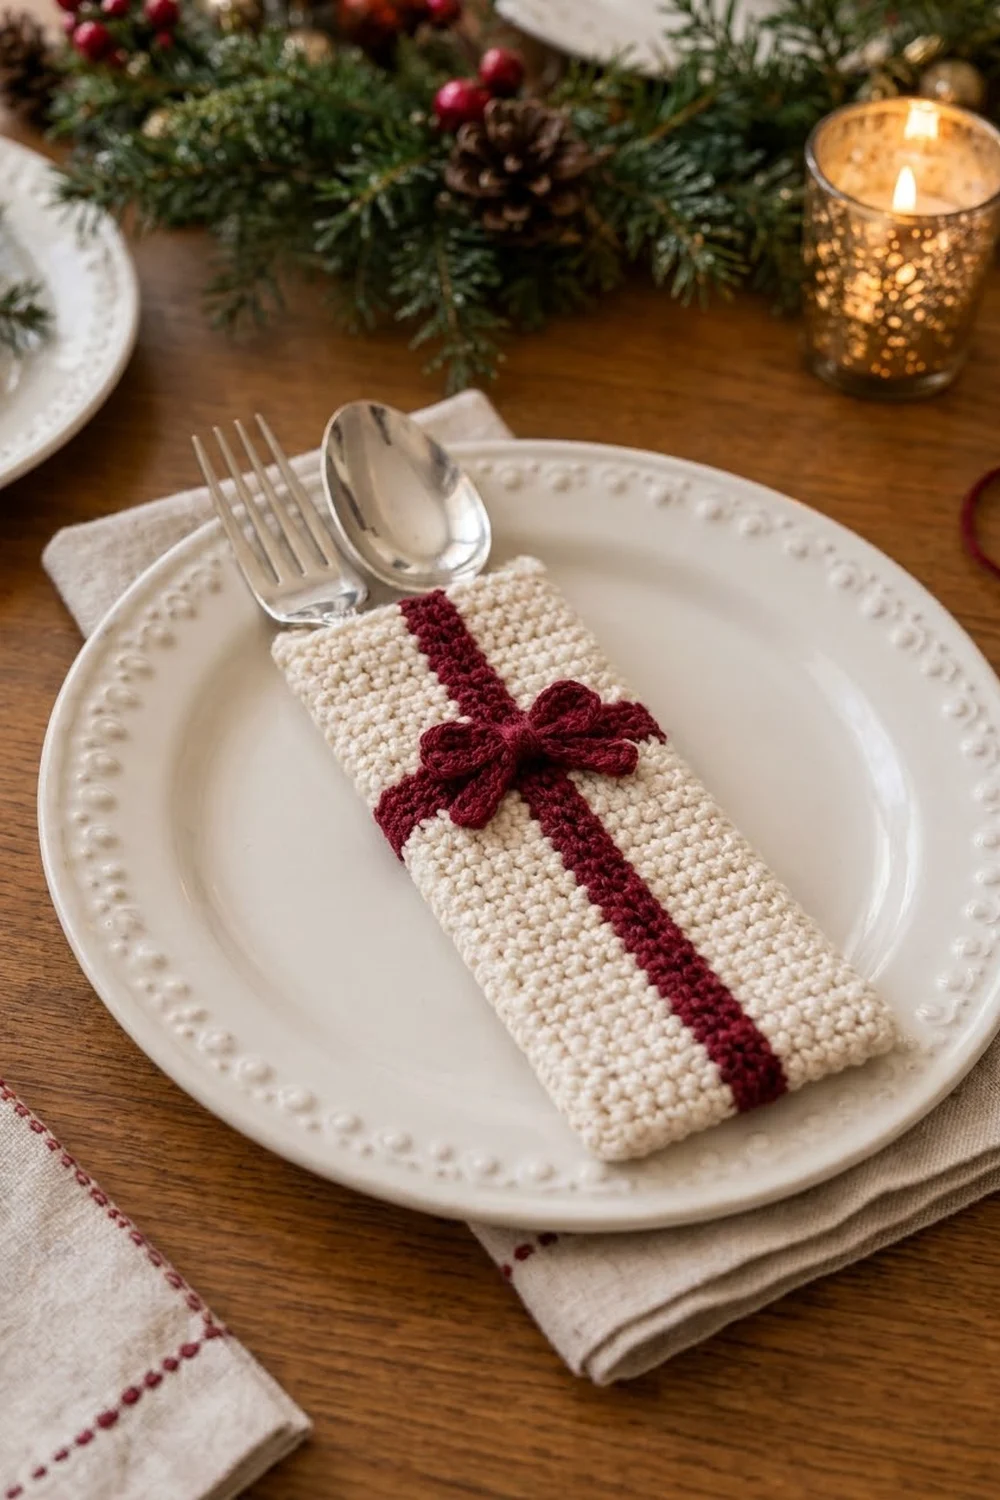
This little cutlery holder looks like a wrapped present waiting at every place setting. It is a soft cream pocket with a burgundy ribbon running up the center, a burgundy band across the front, and a small crocheted bow where the two meet. A fork and spoon slide in neatly, and the handles stand up out of the top.
The colors are classic and calm: warm cream for the “wrapping paper” and deep burgundy for the ribbon. The fabric is plain single crochet, which keeps the pocket firm, so it stands up neatly on a plate or napkin.
This pattern uses US crochet terms. The finished pocket measures 3.5 in (8.9 cm) wide by 7.5 in (19.1 cm) tall.
Construction is simple. You crochet two flat panels in rows: a front panel with the stripe and band worked in as you go, and a plain back panel. A single crochet round joins the panels around three sides and also forms the border. Then you finish the top opening and sew on a three-part bow.
Finished Size and Construction
- Finished size: 3.5 in x 7.5 in (8.9 cm x 19.1 cm)
- Skill level: Easy / Advanced Beginner (simple color changes)
- Terminology: US crochet terms
- Yarn weight: Worsted (#4)
- Hook: 4.0 mm (G-6)
- Number of pieces: 2 panels (front and back) + 3 bow parts
- Layout: Front panel stacked on back panel, joined on 3 sides, top open
- Panel size: 12 sts x 29 rows
- Size before border: 3.0 in x 7.25 in (7.6 cm x 18.4 cm)
- Border depth: 0.25 in (0.6 cm) on the sides and bottom
Materials
Yarn: Use a worsted weight cotton or cotton blend with about 200 m per 100 g. Cotton gives crisp stitch definition and holds its shape well around cutlery. Acrylic also works, but it will be a little softer.
Amounts for one pocket:
- Color A, Cream: 20 g / 40 m
- Color B, Burgundy: 6 g / 12 m
To make a set, multiply these amounts by the number of place settings. All quantities include about a 20% margin for swatching and weaving in ends.
Tools:
- 4.0 mm (G-6) crochet hook
- Tapestry needle
- Scissors
- 1 small yarn bobbin, or a 1 m length of B wound into a butterfly
- 4 stitch markers or clips
- Rust-proof pins and a blocking mat
- Spray bottle
- Piece of cardboard, 3 in x 7 in (7.6 cm x 17.8 cm), for blocking
Abbreviations (US Terms)
- ch – chain
- sc – single crochet
- sl st – slip stitch
- st(s) – stitch(es)
- yo – yarn over
- RS / WS – right side / wrong side
- rep – repeat
- A / B – Color A (cream) / Color B (burgundy)
Special technique – Color change: Work the last sc before the new color until 2 loops are on the hook. Drop the old color, yo with the new color, and pull it through both loops. The new color is now on your hook and ready for the next stitch.
Carrying yarn: Always leave the color you are not using on the WS of the panel. On RS rows, drop it to the back. On WS rows, drop it toward you. Carry cream loosely across the back of the 2 burgundy sts. The short float stays hidden inside the pocket.
Gauge and Checkpoints
Gauge: 16 sc and 16 rows = 4 in (10.2 cm) in single crochet. So 1 st = 0.25 in (0.6 cm) wide, and 1 row = 0.25 in (0.6 cm) tall.
Make the plain back panel first and use it as your gauge swatch.
Checkpoints:
- Back panel, after Row 8: 3.0 in wide x 2.0 in tall (7.6 cm x 5.1 cm)
- Front panel, after Row 19: 3.0 in x 4.75 in (7.6 cm x 12.1 cm)
- Front panel, after Row 21 (band done): 3.0 in x 5.25 in (7.6 cm x 13.3 cm)
- Each finished panel, after Row 29: 3.0 in x 7.25 in (7.6 cm x 18.4 cm)
- Joined and bordered pocket: 3.5 in x 7.5 in (8.9 cm x 19.1 cm)
If your piece is too big, change to a 3.75 mm (F-5) hook. If it is too small, change to a 4.5 mm (7) hook.
Width matters most. A pocket narrower than 3.0 in (7.6 cm) before the border will grip a dinner fork too tightly.
Back Panel
With A, ch 13.
Row 1 (RS): Sc in 2nd ch from hook and in each ch across. Ch 1, turn. (12 sc)
Rows 2–29: Sc in each st across. Ch 1, turn. (12 sc)
At the end of Row 29, do not ch 1. Fasten off and weave in the ends.
Checkpoint: 12 sts x 29 rows, 3.0 in x 7.25 in (7.6 cm x 18.4 cm).
Front Panel
Wind about 1 m of B onto a bobbin for the stripe. Keep the main B ball for the band.
With A, ch 13.
Row 1 (RS): With A, sc in 2nd ch from hook and in next 4 ch, changing to B (bobbin) on the 5th sc. With B, sc in next 2 ch, changing to A on the 2nd sc. With A, sc in last 5 ch. Ch 1, turn. (12 sc: 5 A, 2 B, 5 A)
Row 2 (WS): With A, sc in first 5 sts, changing to B on the 5th sc. With B, sc in next 2 sts, changing to A on the 2nd sc. With A, sc in last 5 sts. Ch 1, turn. (12 sc: 5 A, 2 B, 5 A)
Rows 3–19: Rep Row 2. (12 sc per row)
At the end of each stripe section, the bobbin hangs in exactly the place where the next row needs it. Always stack the burgundy sts on top of the burgundy sts below.
Row 19 finish: After the 2 B sts in Row 19, cut the bobbin and leave a 4 in (10.2 cm) tail on the WS. Work the last 5 A sts. On the final sc, change to B from the main ball. Ch 1, turn.
Row 20 (WS) – Band: With B, sc in each st across. Ch 1, turn. (12 sc, all B)
Row 21 (RS) – Band: With B, sc in each st across, changing to A on the last sc. Cut B and leave a 4 in (10.2 cm) tail. Ch 1, turn. (12 sc, all B)
During Rows 20–21, cream waits at the edge and is carried up 2 rows. The joining round will cover it.
Row 22 (WS): With A, sc in first 5 sts, changing to a newly wound B bobbin on the 5th sc. With B, sc in next 2 sts, changing to A. With A, sc in last 5 sts. Ch 1, turn. (12 sc: 5 A, 2 B, 5 A)
Rows 23–29: Rep Row 2. (12 sc per row)
Fasten off after Row 29. Weave each tail into stitches of its own color on the WS.
Checkpoint: 12 sts x 29 rows, 3.0 in x 7.25 in (7.6 cm x 18.4 cm). The band sits 8 rows, or 2.0 in (5.1 cm), below the top edge.
Bow (3 Parts, All in B)
Loops strip: Ch 20.
– Row 1: Sc in 2nd ch from hook and in each ch across. Ch 1, turn. (19 sc)
– Row 2: Sc in each st across. (19 sc)
Fasten off and leave a 12 in (30.5 cm) tail. The strip measures 4.75 in x 0.5 in (12.1 cm x 1.3 cm).
Tails strip: Ch 13.
– Row 1: Sc in 2nd ch from hook and in each ch across. (12 sc)
Fasten off. The strip measures 3.0 in (7.6 cm) long.
Center knot: Ch 5.
– Row 1: Sc in 2nd ch from hook and in each ch across. Ch 1, turn. (4 sc)
– Row 2: Sc in each st across. (4 sc)
Fasten off and leave an 8 in (20.3 cm) tail. The knot measures 1.0 in x 0.5 in (2.5 cm x 1.3 cm).
Assemble the bow:
- Fold both ends of the loops strip to the center so they overlap by 1 st. Stitch the overlap with the long tail. You now have two loops.
- Wrap the long tail tightly around the middle 3 times to pinch it. The bow should be about 2.25 in (5.7 cm) wide.
- Fold the tails strip at its center into an upside-down V, so each tail is 1.5 in (3.8 cm) long. Place it behind the pinched loops.
- Wrap the center knot around both layers and sew its short ends together at the back.
- Keep the remaining tail for sewing the bow on.
Make All Pieces
Pieces for one pocket:
- Color A: 1 back panel. The front panel also uses A for its background.
- Color B: stripe and band on the front panel, plus 1 loops strip, 1 tails strip, and 1 center knot
Front panel color layout (RS facing, top row first):
Rows 22–29:  A A A A A B B A A A A A
Rows 20–21:  B B B B B B B B B B B B
Rows  1–19:  A A A A A B B A A A A A
             (bow sewn where stripe meets band)
Stacking (side view):
[ FRONT panel 12 x 29, RS out ]
[ BACK  panel 12 x 29, RS out ]
  joined: right side, bottom, left side
  open: top
Joining
Place the back panel RS down. Lay the front panel RS up on top of it, so the WS of the two panels face each other. Line up the foundation edges and top edges. Row 1 of the front should sit on Row 1 of the back, Row 2 on Row 2, and so on to Row 29.
Clip the two top corners and the two bottom corners.
You join the panels by working Border Round 1 through both layers at once. Each sc goes through one row end of the front and the matching row end of the back. Along the bottom, each sc goes through one foundation st of the front and the matching foundation st of the back.
Insert the hook fully through both layers before you yo. This keeps the seam closed and stops the back panel from slipping.
Tension: Keep the joining sc the same size as your fabric stitches. Seams worked too tight pull the pocket into a curve. Seams worked too loose flare at the corners.
Size checkpoint after joining: The pocket should measure 3.5 in x 7.5 in (8.9 cm x 19.1 cm) laid flat.
Border
Border gauge: The same as the fabric, 16 sc = 4 in (10.2 cm). Worked into row ends, each sc adds 1 st height, or 0.25 in (0.6 cm), to that edge.
Round 1 (joining, through both layers): With the front facing, join A at the top right corner, in the row end of Row 29. Ch 1.
- Right side: Sc in each row end down the side. (29 sc)
- Bottom: 3 sc in the first foundation st, sc in each of the next 10 sts, 3 sc in the last foundation st. (16 sc = 12 worked 1-per-stitch + 4 added at the corners)
- Left side: Sc in each row end up the side, ending at Row 29. (29 sc)
Total: 74 sc (29 + 16 + 29). Do not join. Fasten off.
Round 2 (top opening, sl st edge): With RS facing, join A in the top of the first sc of Round 1 at the right corner.
- Sl st in each of the 12 top sts of the front panel.
- Sl st in the last sc of Round 1 at the left corner.
- Sl st in each of the 12 top sts of the back panel.
- Join with a sl st into the first sl st, which is the right corner sc.
(26 sl st: 12 front + 1 + 12 back + 1)
Fasten off and weave in the ends.
Why the math works:
- Each side starts from one panel’s 29 row ends, worked 1 to 1 (1 piece x 29 = 29). No stitches are added along the side.
- The bottom starts from one panel’s 12 sts (1 piece x 12 = 12). The 4 extra stitches are only the 2 added in each corner to turn it flat.
- Width: 12 sts at 0.25 in, plus 1 border sc on each side, gives 3.0 + 0.25 + 0.25 = 3.5 in (8.9 cm).
- Height: 29 rows at 0.25 in, plus 1 bottom border sc, gives 7.25 + 0.25 = 7.5 in (19.1 cm).
- The sl st round adds almost no height.
Attach the bow: Center the bow over the spot where the stripe crosses the band. Sew through the center knot and the loop backs, into the front panel only, so the pocket stays open. Add 2 small tacks under each loop tip and 1 under each tail so nothing flips up.
Final Blocking
- Slide the 3 in x 7 in (7.6 cm x 17.8 cm) cardboard inside the pocket. It keeps the layers apart and squares the shape.
- Lightly mist both sides with water until damp, not soaked.
- Pin the pocket to the mat at 3.5 in x 7.5 in (8.9 cm x 19.1 cm). Place a pin at each corner first, then the middle of each side.
- Use your fingers to straighten the stripe so it runs perfectly vertical, and the band so it runs perfectly horizontal.
- Fluff the bow loops with your fingertips. Do not pin them flat.
- Let everything dry completely, then remove the pins and cardboard.
Final Quality-Control Checklist
- [ ] Each panel has 12 sts x 29 rows.
- [ ] The burgundy stripe is exactly 2 sts wide and centered, with 5 cream sts on each side.
- [ ] The band is 2 full rows (Rows 20–21) and sits 2.0 in (5.1 cm) below the top.
- [ ] Border Round 1 has 29 + 16 + 29 = 74 sc.
- [ ] The top opening has 26 sl st and is not sewn shut.
- [ ] The finished pocket measures 3.5 in x 7.5 in (8.9 cm x 19.1 cm).
- [ ] The bow is about 2.25 in (5.7 cm) wide and sewn to the front panel only.
- [ ] No cream shows through the burgundy, and all tails are hidden on the WS.
Troubleshooting
The stripe zigzags. You have shifted 1 st. Count 5 A sts before every color change on every row.
Cream specks show in the stripe. Make sure you change colors on the last yo of the previous stitch. Keep the floats on the WS, not trapped in the stitches.
The band edges look jagged. Change to B on the last sc of Row 19 and back to A on the last sc of Row 21, exactly as written.
The pocket is too tight for cutlery. Your gauge is tight. Remake it with a larger hook. The width before the border must be 3.0 in (7.6 cm).
The sides wave or ripple. You worked more than 1 sc per row end. The count must be exactly 29 per side.
The bottom corners cup. Check that you worked 3 sc in each corner, not 2 or 4.
The bow is floppy. Wrap the center pinch more tightly and add tacks under the loop tips.
Care
Hand wash in cool water with mild soap. Press out the water in a towel and lay flat to dry, reshaping it over the cardboard if needed.
Final Notes
The measurement chain is short and reliable. Gauge of 16 sc x 16 rows = 4 in (10.2 cm) gives two panels of 12 x 29 that each measure 3.0 in x 7.25 in (7.6 cm x 18.4 cm). A 74 sc joining border adds 0.25 in (0.6 cm) to the sides and bottom, for a finished pocket of 3.5 in x 7.5 in (8.9 cm x 19.1 cm). The 2-st stripe, 2-row band, and a bow about 2.25 in (5.7 cm) wide complete the gift-wrapped look.
Make one for every place setting and your holiday table is ready.
Happy crocheting!