

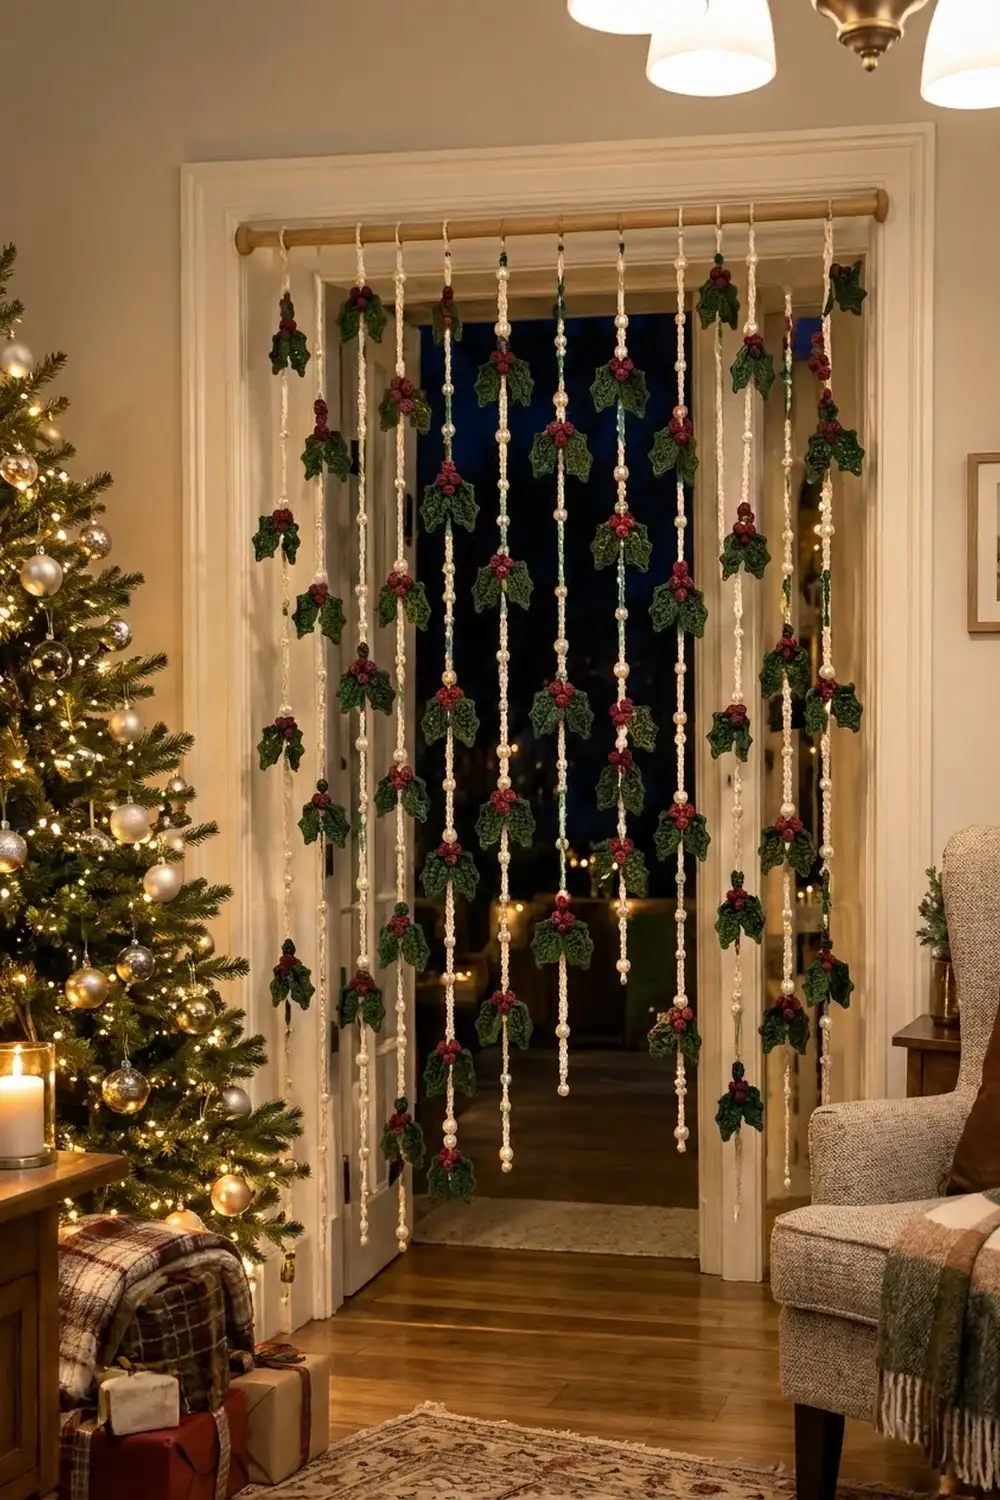
This doorway curtain turns an ordinary entry into a holiday focal point. Twelve cream cords hang from a wooden dowel. Each cord has ivory pearl beads along it and is decorated with deep green holly leaves and clusters of burgundy berries. The clusters are staggered from strand to strand, so the curtain looks full and balanced from across the room.
The palette is classic and cozy: forest green, cranberry burgundy, soft cream, and pearl white, with a fine yellow-green vein down the center of each leaf. The style is part cottage Christmas and part boho macramé, and it works with both rustic and elegant decor.
This pattern uses US crochet terms. Each strand measures 72 in (182.9 cm) below its rod loop. Each holly cluster measures about 5 in (12.7 cm) wide, and the 12 strands span 33 in (83.8 cm), which suits a standard 36 in (91.4 cm) doorway.
The construction is modular. You crochet flat holly leaves around a foundation chain, make tiny stuffed berries, and work each beaded strand as a one-pass cord with pre-strung pearls. Then you assemble the clusters, sew them to marked cord stitches, and slide the rod loops onto the dowel.
Finished Size and Construction
- Finished size: 12 strands, each 72 in (182.9 cm) long below the rod loop. The span across the dowel is 33 in (83.8 cm).
- Skill level: Intermediate. The project is repetitive, but you need neat finishing.
- Terminology: US crochet terms
- Yarn weight: Worsted (#4) cotton or cotton blend
- Hook: 4.0 mm (G-6)
- Number of pieces: 12 cords, 78 holly clusters, 156 leaves, 234 berries
- Layout: 12 strands spaced 3 in (7.6 cm) apart. Odd strands carry 7 clusters and even strands carry 6, offset by 4.5 in (11.4 cm).
- Piece sizes: Each leaf is 2.75 in x 1.25 in (7.0 cm x 3.2 cm), each berry is 0.5 in (1.3 cm), and each assembled cluster is about 5 in x 2 in (12.7 cm x 5.1 cm).
- Size before border: Each cord is 288 stitches, or 72 in (182.9 cm).
- Border depth: There is no fabric border. The “border” is the finishing at the top and bottom of each strand: a rod loop with a 3.5 in (8.9 cm) circumference and a beaded tail at the bottom.
Materials
Choose a smooth mercerized or matte worsted cotton. Cotton holds the leaf points crisply and does not stretch much under the weight of the beads. The quantities below assume about 180 m per 100 g. If your yarn has a different meterage, recalculate by length, not by grams.
- Forest green (leaves): 250 g / 450 m
- Burgundy red (berries): 120 g / 216 m
- Cream (cords): 150 g / 270 m
- Yellow-green or olive (leaf veins): 25 g / 45 m
All quantities include a margin of about 20% for gauge differences and sewing tails.
Tools and notions:
– 4.0 mm (G-6) crochet hook
– 200 ivory pearl beads, 10 mm, with holes of at least 3 mm (you need 186, plus spares)
– Wooden dowel, 40 in (101.6 cm) long and 1 in (2.5 cm) in diameter, with two cup hooks or curtain brackets
– Tapestry needle and a big-eye beading needle or dental-floss threader
– Locking stitch markers (at least 7 per strand)
– Scissors, measuring tape, blocking mat, and rust-proof pins
– Spray bottle with clean water
Abbreviations (US Terms)
- ch: chain
- sl st: slip stitch
- sc: single crochet
- hdc: half double crochet
- dc: double crochet
- sc2tog: single crochet 2 together
- MR: magic ring
- st(s): stitch(es)
- picot: ch 3, sl st in 3rd ch from hook
Special stitches
Cord stitch (CS). Start the cord with ch 2, then sc in the 2nd ch from hook. That sc is the first CS. For each new CS:
1. Turn the work clockwise, like turning a page.
2. Insert the hook under the 2 loops on the left edge.
3. Yarn over and pull up a loop (2 loops on hook).
4. Yarn over and pull through both loops.
Each CS adds one stitch to the length of the cord and makes a round, twisted cord.
Bead stitch (BS). Slide one pre-strung pearl up until it touches the work. Then complete one CS, trapping the pearl against the cord. A BS counts as 1 cord stitch.
Gauge and Checkpoints
Make one of each element and measure it before you start production. You will be making these pieces dozens of times, so a small error multiplies quickly.
- Cord gauge: 4 CS = 1 in (2.5 cm). As a test, work 48 CS. The cord should measure 12 in (30.5 cm) when it hangs freely.
- Leaf checkpoint: The foundation of 13 ch should measure about 2.5 in (6.4 cm). The finished leaf, including the tip picot, should measure 2.75 in x 1.25 in (7.0 cm x 3.2 cm).
- Berry checkpoint: A finished berry should be 0.5 in (1.3 cm) across and feel firm.
If your pieces are too big, go down to a 3.75 mm (F-5) hook. On a long cord, even 1 extra inch per 12 in adds 6 in (15.2 cm) over a 72 in (182.9 cm) strand.
If your pieces are too small, go up to a 4.5 mm (7) hook. Re-check the cord most carefully, because strand length is what has to match your doorway.
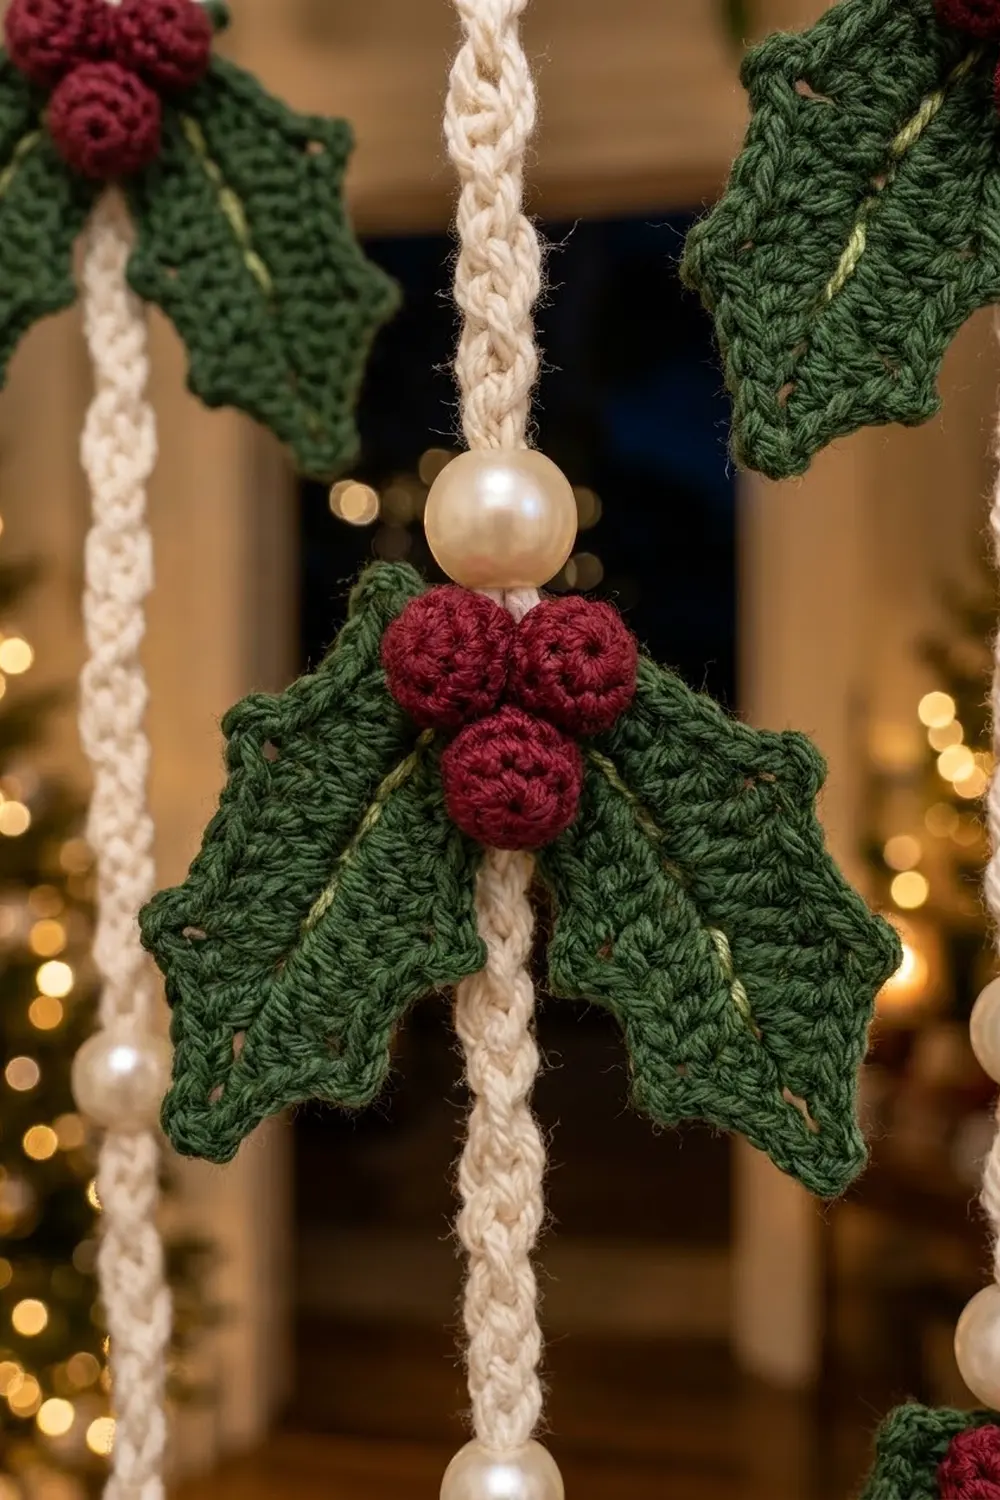
Holly Leaf (Make 156)
Use forest green. You work up one side of the foundation chain and back down the other, so the chain itself forms the center ridge.
Foundation: Ch 13.
Side 1 (tip to base). Work into the chains, starting at the tip:
1. Sl st in the 2nd ch from hook, then sc in the next ch and hdc in the next ch.
2. Picot.
3. Dc in each of the next 2 ch.
4. Picot.
5. Dc in each of the next 2 ch.
6. Picot.
7. Hdc in each of the next 2 ch and sc in each of the next 2 ch.
8. Sl st in the last ch.
That gives 12 sts and 3 picots.
Base turn: Ch 1 (does not count as a stitch). Rotate the leaf so you can work into the free loops on the other side of the foundation chain.
Side 2 (base to tip):
1. Sl st in the first free loop.
2. Sc in each of the next 2 loops, then hdc in each of the next 2 loops.
3. Picot.
4. Dc in each of the next 2 loops.
5. Picot.
6. Dc in each of the next 2 loops.
7. Picot.
8. Hdc in the next loop, sc in the next loop, and sl st in the last loop.
That gives 12 sts and 3 picots.
Tip: Picot, then sl st in the first sl st of Side 1. Fasten off and leave a 6 in (15.2 cm) tail at the base for sewing.
Leaf total: 24 sts and 7 picots. Side 2 mirrors Side 1, so the lobes line up across the leaf. Counted from the tip, the picots on both sides fall between stitches 3 and 4, 5 and 6, and 7 and 8.
Vein: Hold the olive yarn behind the leaf. Starting at the base, work 12 surface sl sts up the foundation chain line and stop at the tip. Fasten off and weave in both ends on the back.
Berry (Make 234)
Use burgundy.
- Rnd 1: Work 6 sc in a MR and pull it tight. (6 sts)
- Rnd 2: Sc in each st around. (6 sts)
- Rnd 3: Push the starting tail inside the berry as stuffing, then sc2tog 3 times. (3 sts)
Fasten off with an 8 in (20.3 cm) tail. Weave the tail through the 3 remaining stitches, pull it closed, and keep the tail for sewing.
Beaded Cord Strand (Make 12)
Use cream. Before you start, thread the pearls onto the yarn ball: 16 pearls for an odd strand, 15 for an even strand.
Rod loop (both strand types): Ch 14 and sl st in the first ch to form a ring. Ch 2, then sc in the 2nd ch from hook. That sc is the first CS of the strand. The loop is not counted in the 288 strand stitches.
Unit (36 sts). Each unit is worked in this order:
1. 12 CS. Place a marker in the 12th CS; this is where a holly cluster will go.
2. 11 CS, then 1 BS.
3. 11 CS, then 1 BS.
That is 12 + 11 + 1 + 11 + 1 = 36 sts, which is 9 in (22.9 cm).
Odd strands (1, 3, 5, 7, 9, 11):
1. Top lead: 16 sts in total, counting the first CS. That is 4 in (10.2 cm).
2. Work the unit 7 times (252 sts).
3. Bottom tail: 9 CS, 1 BS, 9 CS, 1 BS (20 sts).
Total: 16 + 252 + 20 = 288 sts = 72 in (182.9 cm), with 16 pearls and 7 markers.
Even strands (2, 4, 6, 8, 10, 12):
1. Top lead: 34 sts, or 8.5 in (21.6 cm).
2. Work the unit 6 times (216 sts).
3. Bottom tail: 11 CS, 1 BS, 15 CS, 1 BS, 9 CS, 1 BS (38 sts).
Total: 34 + 216 + 38 = 288 sts = 72 in (182.9 cm), with 15 pearls and 6 markers.
Fasten off. Tie a firm overhand knot right under the last pearl and trim the yarn 0.5 in (1.3 cm) below the knot.
Make All Pieces
Quantities by color:
– Green: 156 leaves (6 strands x 7 clusters x 2, plus 6 strands x 6 clusters x 2)
– Olive: 156 veins
– Burgundy: 234 berries (78 clusters x 3)
– Cream: 6 odd strands and 6 even strands
Make the pieces in batches of 10 and bag them by type.
Layout grid. C marks a cluster. Distances are measured from the bottom of the rod loop.
Distance          S1  S2  S3  S4  S5  S6  S7  S8  S9  S10 S11 S12
7 in   (17.8 cm)  C   .   C   .   C   .   C   .   C   .   C   .
11.5 in (29.2 cm) .   C   .   C   .   C   .   C   .   C   .   C
16 in  (40.6 cm)  C   .   C   .   C   .   C   .   C   .   C   .
20.5 in (52.1 cm) .   C   .   C   .   C   .   C   .   C   .   C
25 in  (63.5 cm)  C   .   C   .   C   .   C   .   C   .   C   .
29.5 in (74.9 cm) .   C   .   C   .   C   .   C   .   C   .   C
34 in  (86.4 cm)  C   .   C   .   C   .   C   .   C   .   C   .
38.5 in (97.8 cm) .   C   .   C   .   C   .   C   .   C   .   C
43 in (109.2 cm)  C   .   C   .   C   .   C   .   C   .   C   .
47.5 in (120.7 cm).   C   .   C   .   C   .   C   .   C   .   C
52 in (132.1 cm)  C   .   C   .   C   .   C   .   C   .   C   .
56.5 in (143.5 cm).   C   .   C   .   C   .   C   .   C   .   C
61 in (154.9 cm)  C   .   C   .   C   .   C   .   C   .   C   .
Joining
Joining happens in two steps: building each cluster, then attaching clusters to the cords.
Step 1: Build a cluster
1. Lay two leaves base to base in a wide V, with the tips pointing outward and slightly down.
2. Overlap the bases by 0.25 in (0.6 cm). The base sl st and first sc of one leaf should sit over the same stitches of the other leaf.
3. Using one leaf’s base tail, whipstitch through both layers 3 times.
4. Arrange 3 berries in a tight triangle over the overlap, 2 on top and 1 below.
5. Sew each berry with its own tail. Pass the tail through the overlap and back up through the berry twice. Don’t knot yet.
Step 2: Attach the cluster to the cord. Center the cluster on a marked cord stitch, with the cord running vertically behind the overlap. Using the remaining berry and leaf tails, sew through 3 cord stitches: the marked one, the one above it, and the one below it. Knot the tails on the back, bury them inside the cord, and remove the marker.
Tension: Snug each stitch down, but don’t pull hard. Over-tight sewing makes the cord pucker and shortens the strand. Each cluster should lie flat and should not twist when the cord hangs.
Size checkpoint: Each cluster should measure about 5 in (12.7 cm) wide and 2 in (5.1 cm) tall. Hang the strand from a hook after all its clusters are attached. It should still measure 72 in (182.9 cm) below the loop, give or take 0.5 in (1.3 cm).
Border: Rod Loops and Strand Ends
A curtain has no fabric edge, so its border is the finishing at the top and bottom of each strand. Use the cord gauge for these checks: 4 CS = 1 in (2.5 cm), and 4 ch ≈ 1 in (2.5 cm).
Top edge (per strand).
– The rod loop is 14 ch. That gives a circumference of 3.5 in (8.9 cm).
– A 1 in (2.5 cm) dowel has a circumference of about 3.14 in (8.0 cm).
– The 0.36 in (0.9 cm) of extra space lets each loop slide but not tilt.
Across the dowel, 12 loops spaced 3 in (7.6 cm) apart give 11 gaps x 3 in = 33 in (83.8 cm). On a 36 in (91.4 cm) doorway, that leaves 1.5 in (3.8 cm) of clearance on each side, and a 40 in (101.6 cm) dowel extends past the brackets on both ends.
Bottom edge (per strand).
– Odd strands finish with a 20-stitch tail carrying 2 pearls.
– Even strands finish with a 38-stitch tail carrying 3 pearls.
Why the math works.
– Each odd strand is 16 + (7 x 36) + 20 = 288 sts.
– Each even strand is 34 + (6 x 36) + 38 = 288 sts.
– All strands are 288 / 4 = 72 in (182.9 cm), so the bottom edge hangs perfectly level.
– The even strands start 18 sts later (34 − 16), which is exactly half of a 36-stitch unit, or 4.5 in (11.4 cm). That is what creates the staggered checkerboard of clusters.
Final Blocking
- Before you assemble anything, lightly mist the leaves and pin them flat on the mat. Pin each of the 7 picots out to a point, and pin the leaf to 2.75 in x 1.25 in (7.0 cm x 3.2 cm).
- Let the leaves dry completely, for at least 4 hours.
- Roll each berry between your palms to round it.
- After joining, hang each strand from a hook. Mist the cord lightly and let it hang straight until dry, so it relaxes into its final length.
- Re-measure each strand at 72 in (182.9 cm).
- Slide all 12 loops onto the dowel, space them 3 in (7.6 cm) apart, and hang the dowel.
Final Quality-Control Checklist
- 12 strands, each 288 sts and 72 in (182.9 cm)
- Odd strands have 7 clusters and 16 pearls; even strands have 6 clusters and 15 pearls
- Every leaf has 24 sts, 7 picots, and an olive vein
- Every cluster has 2 leaves and 3 berries and measures about 5 in (12.7 cm) wide
- The clusters are staggered 4.5 in (11.4 cm) between neighboring strands
- All ends are buried inside the cords or behind the leaves
- The loops slide freely on the dowel
Troubleshooting
- Leaf curls: Your foundation chain is too tight. Chain with a hook one size larger and work the leaf with the regular hook.
- Picots are flat: Re-block them. Pin each point out and mist again.
- Strands are uneven lengths: Count the stitches between pearls. If a strand is short by a few stitches, you can add CS to the bottom tail, but only before the final pearl.
- Pearls won’t thread: Use a floss threader, or choose pearls with 3 mm holes.
- Clusters spin on the cord: Sew through 3 cord stitches, not 1.
- Berries are lumpy: Tuck the tail in evenly before Rnd 3.
Care
Spot clean with cool water and mild soap, and dry the curtain hanging. Store it rolled loosely around the dowel in a cloth bag so the leaves don’t get crushed.
Final Notes
The measurement chain is simple:
– 4 CS = 1 in (2.5 cm)
– One unit = 36 sts = 9 in (22.9 cm)
– Each strand = 288 sts = 72 in (182.9 cm)
– 12 strands at 3 in (7.6 cm) spacing = 33 in (83.8 cm) across
Check your gauge early and count your units, and the curtain will hang straight and level. Happy crocheting!