

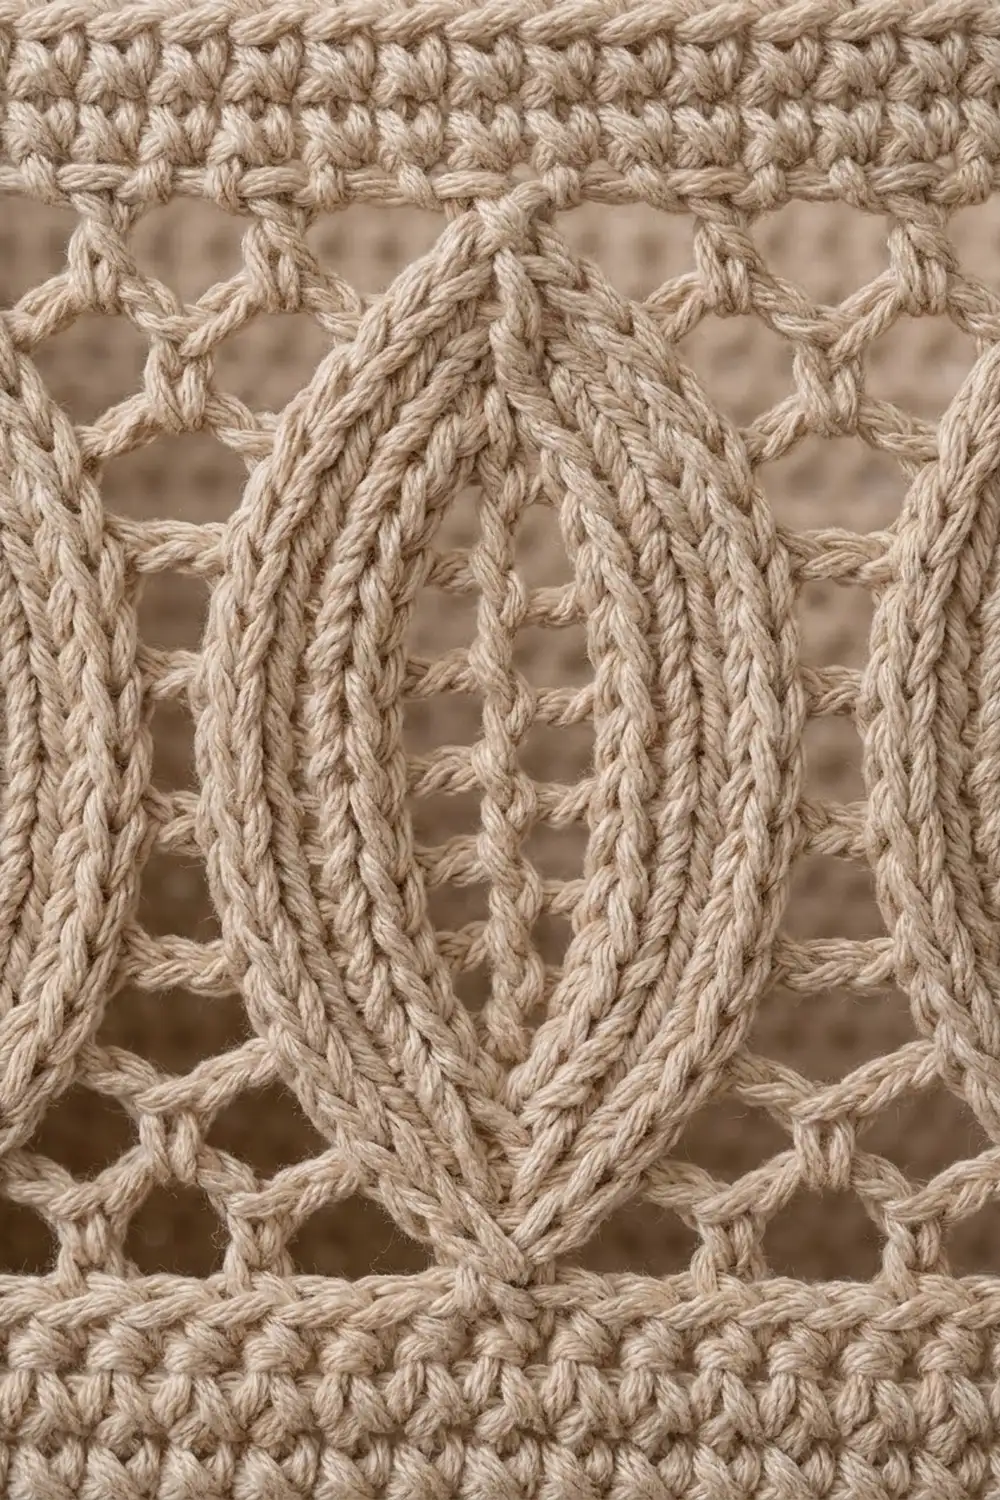
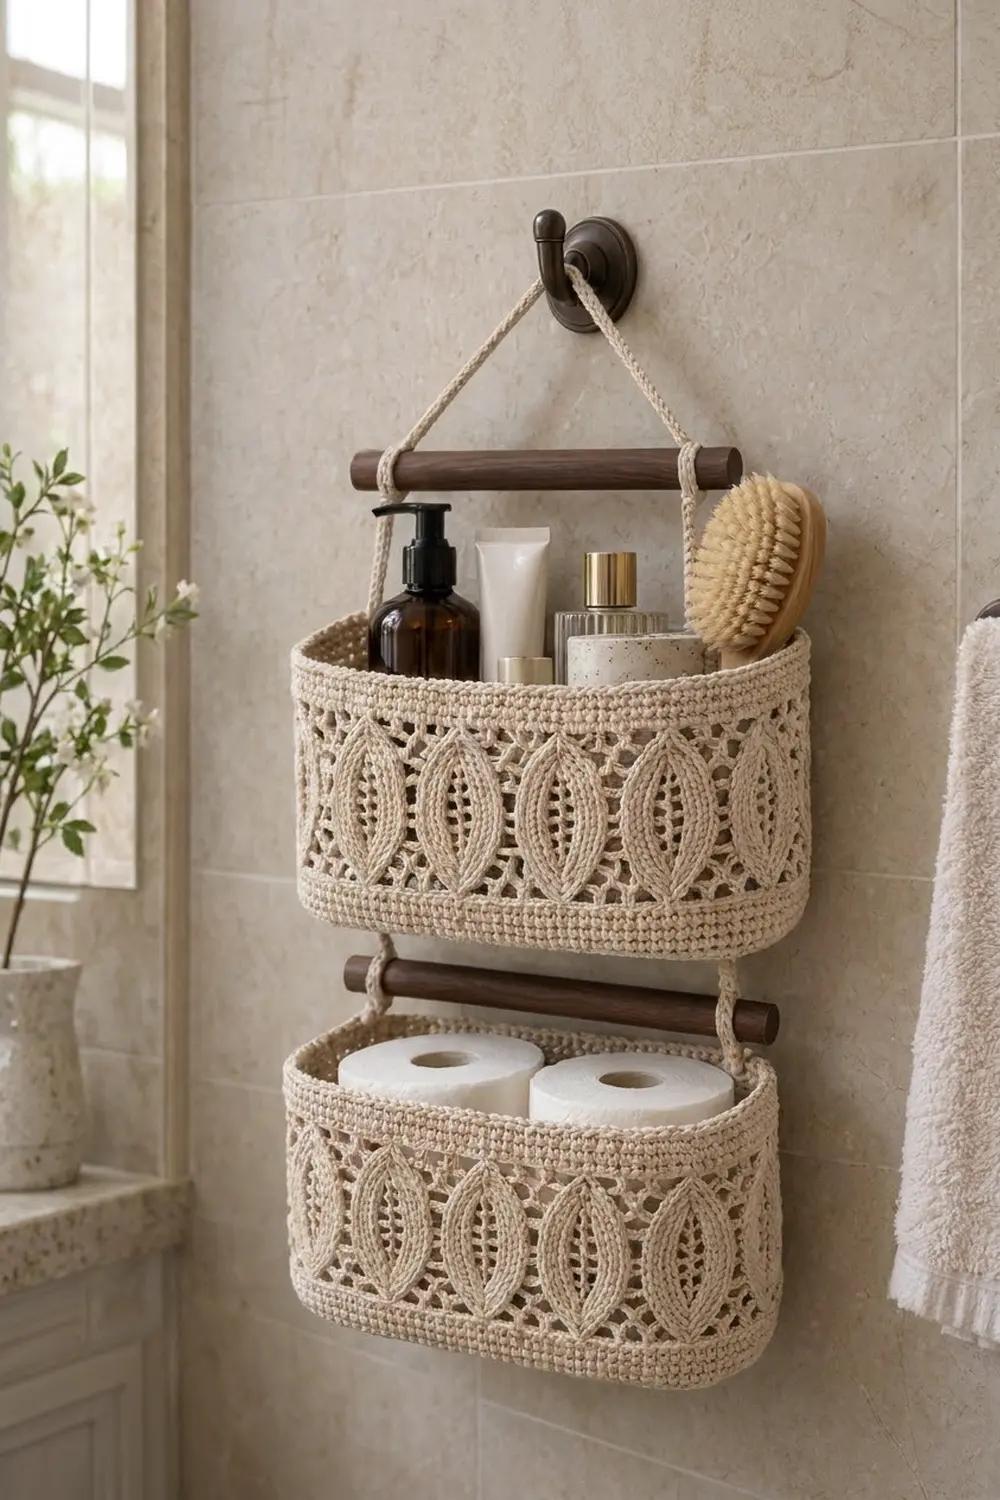
The Willow Leaf Hanging Basket is a two-tier wall organizer. Two oval baskets hang one above the other, each from its own wooden dowel. Around the middle of each basket runs a band of raised leaf motifs: each almond-shaped leaf is outlined in front-post stitches and has an open slot down the center, with airy diamond mesh between the leaves.
The sample uses one color, a natural oatmeal cotton. The firm single crochet base and bands keep the baskets sturdy enough for bottles, brushes and toilet rolls, and the lace keeps them looking light. The style is calm, natural and suits a spa-like bathroom.
This pattern uses US crochet terms. Each basket measures 11.25 in (28.6 cm) long, 4 in (10.2 cm) deep and 5.7 in (14.5 cm) tall. Hung from the hook, the whole organizer is about 24 in (61.0 cm) tall.
You will crochet an oval base in rounds, then turn up the wall with a back-loop round. Next come a solid band, six lace rounds and a top band with a corded rim. Finally you add hanging tabs, slide in the dowels and tie everything together with slip-stitch cords.
Finished Size and Construction
- Finished basket size: 11.25 in × 4 in × 5.7 in tall (28.6 cm × 10.2 cm × 14.5 cm)
- Total hanging height: about 24 in (61.0 cm)
- Skill level: Intermediate
- Terminology: US
- Yarn weight: Worsted (#4) cotton
- Hook: 4.0 mm (G-6)
- Number of pieces: 2 baskets, 4 tabs, 3 cords, plus 2 dowels
- Layout: baskets stacked vertically, about 1.5 in (3.8 cm) of gap between them
- Wall perimeter: 112 sts = 28 in (71.1 cm)
- Basket height before border: 4.1 in (10.4 cm)
- Border depth (top band plus rim): 1.6 in (4.1 cm)
Materials
Choose a smooth, firm, mercerized or combed worsted cotton of roughly 190–210 yd (174–192 m) per 100 g. Cotton holds its shape, shows the post stitches clearly and stands up to a humid bathroom. Avoid acrylic, because it sags under weight.
Yarn (one color):
– Oatmeal/natural beige: 170 g, about 330 yd (302 m)
– Each basket with its 2 tabs: about 140 yd (128 m), 72 g
– All 3 cords: about 10 yd (9.1 m), 5 g
These quantities include a margin of about 15% for your swatch and any tension differences.
Tools and notions:
– 4.0 mm (G-6) crochet hook
– 2 wooden dowels, 0.75 in (1.9 cm) diameter × 14 in (35.6 cm) long, stained dark walnut
– 1 sturdy wall hook
– 6 stitch markers
– Tapestry needle, scissors, measuring tape
– Optional: spray starch or fabric stiffener
Abbreviations (US Terms)
- ch – chain
- sc – single crochet
- dc – double crochet
- sl st – slip stitch
- sk – skip
- sp – space
- st(s) – stitch(es)
- rnd – round
- BLO – back loop only
- FPdc – front post double crochet
- FPtr – front post treble crochet
- rev sc – reverse single crochet (crab stitch)
Special stitches
- FPdc: Yo, insert hook from front to back to front around the post of the indicated stitch, pull up a loop, (yo, pull through 2 loops) twice.
- FPtr: Yo twice, insert hook around the post as for FPdc, pull up a loop, (yo, pull through 2 loops) 3 times. The extra height lets the outline travel diagonally without pulling.
- Rev sc: Working left to right (if you are right-handed), insert hook in the next stitch to the right, pull up a loop, yo, pull through both loops.
- Slip-stitch cord: Ch the stated number, then sl st in the back bump of the 2nd ch from the hook and of each ch across.
Lace convention: In every lace round, the beginning ch 3 counts as the first dc of the first repeat. Each ch-1 counts as 1 stitch and each ch-2 counts as 2 stitches. Post stitches always wrap a post stitch of the round just completed.
Gauge and Checkpoints
- Sc gauge: 16 sts × 18 rnds = 4 in (10.2 cm)
- Dc lace gauge: 16 sts × 8 rnds = 4 in (10.2 cm)
Make one complete basket before you start the second, and check it at each stage:
- After Rnd 1: about 7.7 in (19.6 cm) long
- After Rnd 5: about 9.5 in × 2.2 in (24.1 cm × 5.6 cm)
- After Rnd 9: 11.25 in × 4 in (28.6 cm × 10.2 cm), lying flat
- After Rnd 14: wall height 1.1 in (2.8 cm)
- After Rnd 20: wall height 4.1 in (10.4 cm)
- After Rnd 27: wall height 5.7 in (14.5 cm)
If the piece is too big, go down a hook size; if it is too small, go up one. If the base ruffles, your sc is looser than your chain, so tighten up. If the base cups, loosen up, or go up a hook size for the base only.
Basket Base (make 2)
Ch 32.
Rnd 1: 2 sc in 2nd ch from hook, sc in next 29 ch, 3 sc in last ch. Rotate and work along the other side of the foundation chain: sc in next 29 ch, 1 sc in the same ch as the first 2 sc. Join with a sl st to the first sc. (64 sts)
Each round starts with ch 1 (this does not count as a stitch), then sc in the same st. Join each round to the first sc.
Rnds 2–9: For round number n, work [sc in next (n − 2) sts, 2 sc in next st] 2 times, sc in next 29 sts, [sc in next (n − 2) sts, 2 sc in next st] 3 times, sc in next 29 sts, [sc in next (n − 2) sts, 2 sc in next st] once. In Rnd 2, (n − 2) is 0, so the brackets are just “2 sc in next st.”
Stitch counts: Rnd 2: 70 · Rnd 3: 76 · Rnd 4: 82 · Rnd 5: 88 · Rnd 6: 94 · Rnd 7: 100 · Rnd 8: 106 · Rnd 9: 112
After Rnd 9 you have two straight sides of 29 sts and two curved ends of 27 sts (29 + 27 + 29 + 27 = 112). Place 4 markers at the boundaries between the sides and the ends, and move them up as you work.
Wall
Rnd 10 (turning round): Ch 1, sc BLO in each st around, join. (112 + 0 = 112 sts) This round makes a crisp fold line at the bottom edge.
Rnds 11–14: Ch 1, sc in each st around, join. (112 sts)
Leaf Lace Band
The lace is worked over 14 repeats of 8 sts. Each repeat makes one leaf.
Rnd 15 (leaf base): Ch 3. Dc in next st, ch 1, sk next st, dc in next st, FPdc around each of next 2 sts, dc in next st, ch 1, sk next st, dc in next st; rep from * around, join to the top of the ch-3. (112 sts)*
Rnd 16 (leaf widens): Sl st in next ch-1 sp, ch 3. Dc in ch-1 sp, sk next dc, FPtr around next FPdc, dc in top of same FPdc, dc in top of next FPdc, FPtr around same FPdc, sk next dc, dc in next ch-1 sp, ch 2, sk next 2 dc; rep from * around, join. (112 sts)*
Rnd 17 (slot opens): Sl st in top of next FPtr, ch 3. Dc in top of FPtr, ch 2, sk next 2 dc, dc in top of next FPtr, FPtr around same FPtr, sk next dc, 2 dc in next ch-2 sp, sk next dc, FPtr around next FPtr (the next repeat’s first dc goes into the top of this same FPtr); rep from * around, join. (112 sts)*
Rnd 18 (widest point): Ch 3. Dc in dc, ch 2, sk ch-2 sp, dc in next dc, FPdc around next FPtr, dc in each of next 2 dc, FPdc around next FPtr; rep from * around, join. (112 sts)*
Rnd 19 (leaf narrows): Sl st in next ch-2 sp, ch 3, dc in same sp. 2 dc in ch-2 sp, sk next dc, FPtr around next FPdc, dc in top of same FPdc, ch 2, sk next 2 dc, dc in top of next FPdc, FPtr around same FPdc, sk next dc; rep from * around. In the first repeat, the “2 dc in ch-2 sp” are the ch-3 and dc you already made. Join. (112 sts)*
Rnd 20 (leaf tip): Sl st in next dc and in top of next FPtr, ch 3. Dc in top of FPtr, ch 1, sk next dc, 2 dc in next ch-2 sp, ch 1, sk next dc, dc in top of next FPtr, FPtr around same FPtr, sk next 2 dc, FPtr around next FPtr; rep from * around, join. (112 sts)*
The two outline stitches meet side by side, which closes the point of each leaf.
Checkpoint: The lace band measures 3 in (7.6 cm), and the wall is now 4.1 in (10.4 cm) tall.
Make All Pieces
- Baskets: 2, worked as above
- Tabs: 4 (2 per basket). Ch 6, sc in 2nd ch from hook and in each ch across (5 sts). Rows 2–28: Ch 1, turn, sc in each st across (5 sts). Each tab is 1.25 in × 6.2 in (3.2 cm × 15.7 cm).
- Top cord: 1. Work a slip-stitch cord on ch 113 (112 sl sts), about 28 in (71.1 cm) long.
- Connector cords: 2. Work a slip-stitch cord on ch 65 (64 sl sts), about 16 in (40.6 cm) each.
Cord gauge is 4 ch = 1 in (2.5 cm). All pieces use the oatmeal yarn.
            [ wall hook ]
               /     \
           top cord (28 in)
             /         \
   o======= DOWEL 1 =======o
   |      [ BASKET 1 ]     |
   |   connector cords     |
   o======= DOWEL 2 =======o
          [ BASKET 2 ]
Joining and Assembly
Tabs: Fold a basket flat and mark the center stitch of each 27-st end, which is the 14th st. Center a tab over sts 12–16 of the end. Whipstitch the tab’s bottom 4 rows, about 0.9 in (2.3 cm), to the inside of the wall, matching the tab’s 5 sts to those 5 wall sts one for one. Bring the tab up over the rim and sew its last 4 rows to the outside of the wall the same way. The loop left between is 20 rows, about 4.4 in (11.2 cm). Repeat at the other end and on the second basket.
Sew with yarn at your normal tension: snug, but not so tight that the wall puckers.
Dowels: Slide a dowel through both loops of each basket. The ends should stick out about 1.4 in (3.6 cm) past each end of the basket, and the dowel should sit about 1.5 in (3.8 cm) above the rim.
Cords: Tie the top cord around the upper dowel, 0.5 in (1.3 cm) from each tip, so the knots are 13 in (33.0 cm) apart. The peak should rise about 8 in (20.3 cm) above the dowel. Knot one connector cord just inside each top-cord knot. Run the connector cords down the outside of the upper basket’s ends and tie them around the lower dowel, again 0.5 in (1.3 cm) from the tips.
Size checkpoint: The two dowels should be 8.7 in (22.1 cm) apart, center to center, and both should hang level.
Border (Top Band and Rim)
Border gauge: 16 sc × 18 rnds = 4 in (10.2 cm). The border keeps the 4 markers in place, so the sides stay at 29 / 27 / 29 / 27 sts.
Rnd 21 (conversion round): Ch 1, sc in each dc, each post st and each ch-1 sp around, join. (112 + 0 = 112 sts; 29 / 27 / 29 / 27)
Rnds 22–26: Ch 1, sc in each st around, join. (112 sts; 29 / 27 / 29 / 27)
Rnd 27 (rim): Ch 1, rev sc in each st around, join. (112 sts; 29 / 27 / 29 / 27) Fasten off and weave in the ends.
The top band is 1.3 in (3.3 cm) and the rim adds 0.25 in (0.6 cm), for a border of 1.6 in (4.1 cm). The total height is 4.1 + 1.6 = 5.7 in (14.5 cm).
Why the math works: 112 = (2 × 29) + (2 × 27), and 112 = 14 × 8. That means both the side markers and the 14 lace repeats fit the round exactly. The wall never increases or decreases, so it rises straight from a base perimeter of 28 in (71.1 cm) at 4 sts per inch.
Final Blocking
- Before assembly, spray each basket lightly with water.
- Stuff it firmly with a towel so the walls stand straight and the base sits flat.
- Shape the leaves with your fingers, and open the center slots and mesh diamonds.
- Check the size: 11.25 in × 4 in (28.6 cm × 10.2 cm) at the base and 5.7 in (14.5 cm) tall.
- For extra stiffness, mist with starch.
- Let it dry completely, at least 24 hours, before adding the tabs and dowels.
Final Quality-Control Checklist
- Both baskets have 112 sts in every wall round.
- Each basket has 14 complete leaves, and each leaf has a closed tip and an open slot.
- Both bases measure 11.25 in × 4 in (28.6 cm × 10.2 cm) and lie flat.
- Both walls are 5.7 in (14.5 cm) tall.
- The tabs are centered on the ends and sewn securely inside and out.
- The dowels are level and 8.7 in (22.1 cm) apart.
- All knots are tight, with ends trimmed to 1 in (2.5 cm).
Troubleshooting
- Base cups upward: Your increases are tight. Loosen up, or go up a hook size for Rnds 1–9 only.
- Base ruffles: Your stitches are too loose. Go down a hook size.
- Walls flare out: Recount to make sure every wall round has exactly 112 sts.
- Leaves lean to one side: Check that each FPtr wraps the post named in the instructions and not the stitch next to it.
- Lace band too tall: Make your dc shorter by pulling the first loop up less, or go down to a 3.75 mm hook for the lace only.
- Baskets tilt: Slide the cord knots along the dowels until the baskets hang level.
- Basket sags under weight: Starch the basket, or keep heavy items in the lower basket.
Care
Take out the dowels and hand wash the baskets in cool water. Reshape them over a towel and let them air dry flat before you hang them again.
Final Notes
Here is how the measurements build on each other. A gauge of 16 sts per 4 in gives a base of 112 sts, 11.25 in × 4 in (28.6 cm × 10.2 cm). The walls never change count, so the perimeter stays at 28 in (71.1 cm). The bottom band adds 1.1 in (2.8 cm), the leaf lace adds 3 in (7.6 cm), and the border adds 1.6 in (4.1 cm), for a height of 5.7 in (14.5 cm). The two dowels hang 8.7 in (22.1 cm) apart, and the whole organizer is about 24 in (61.0 cm) tall. If you check each stage as you go, both baskets will match and hang level.
Happy crocheting!