

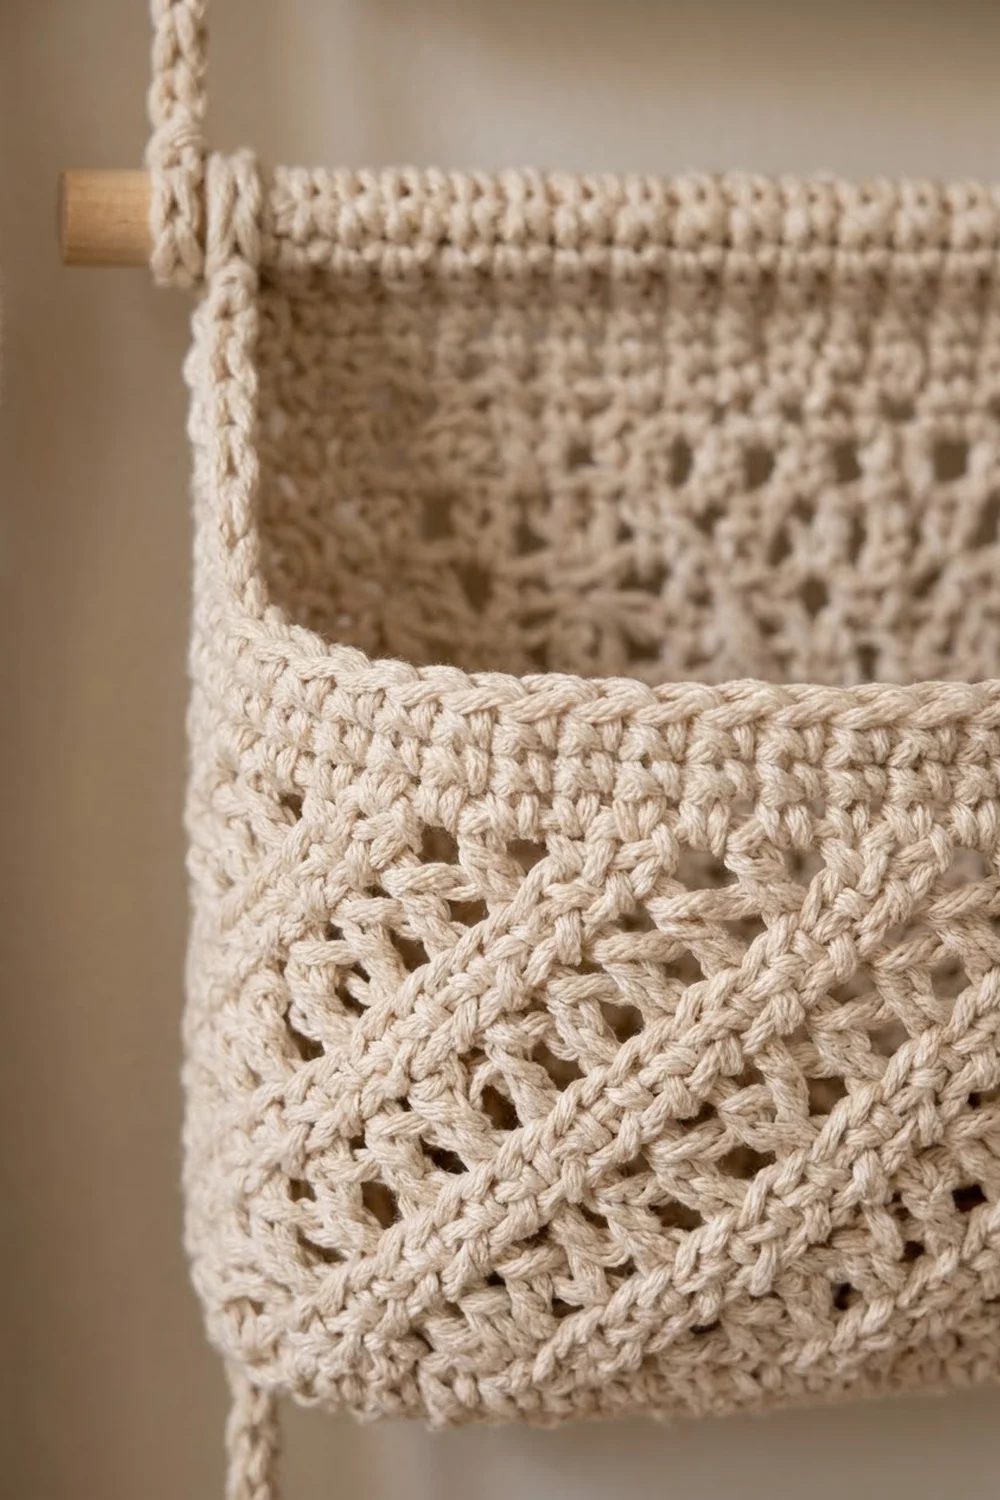
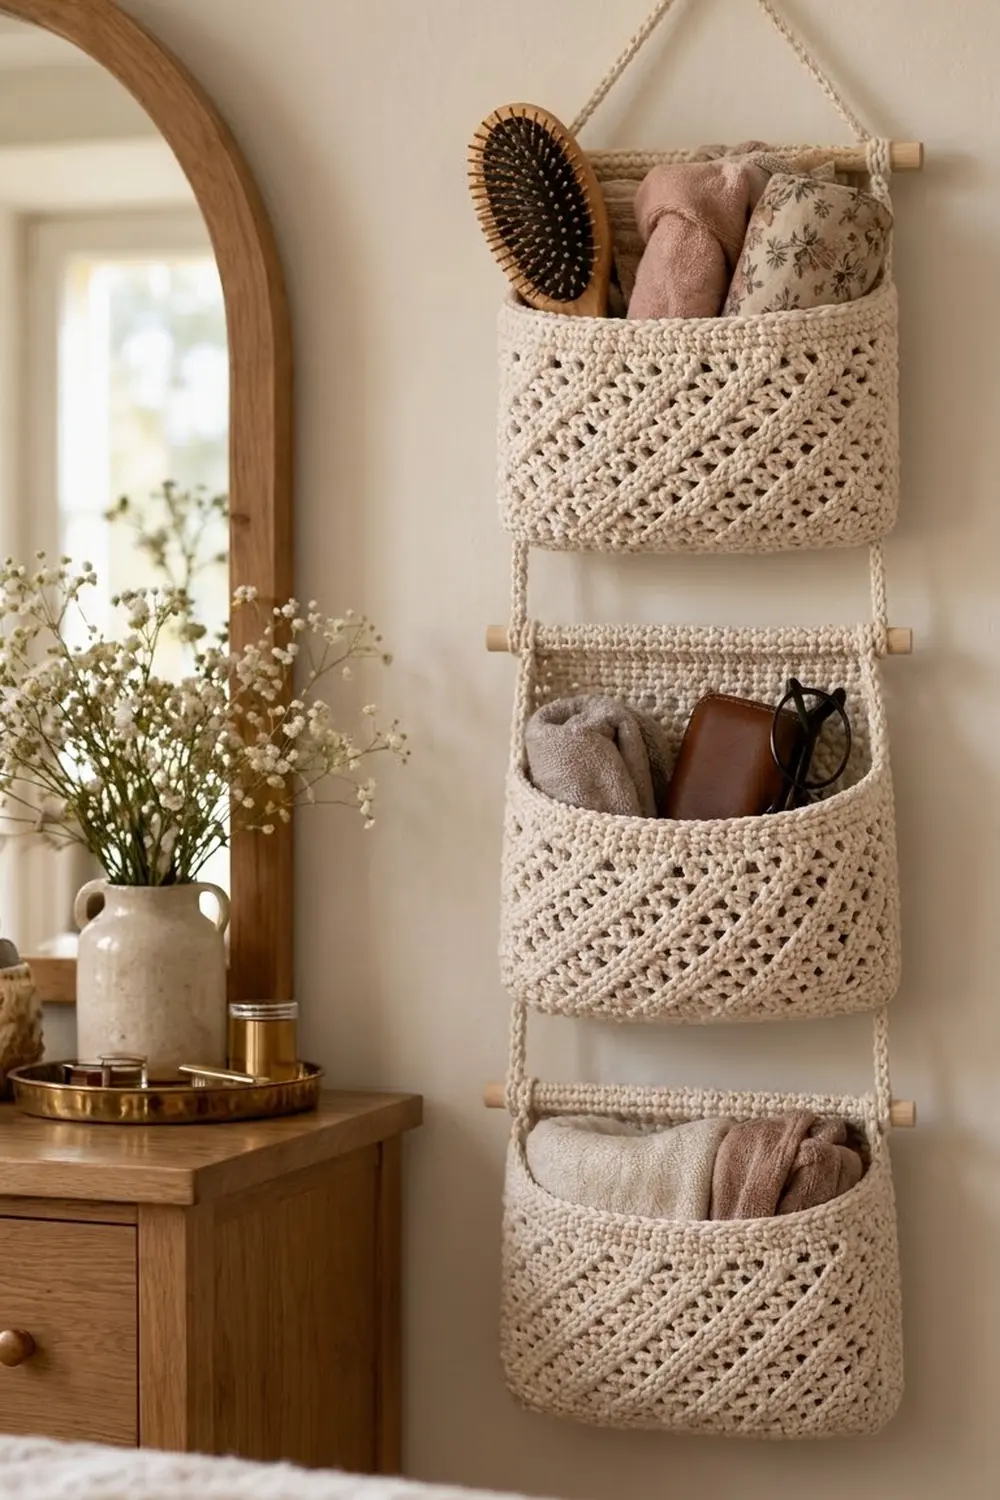
The Linen Lattice Hanging Wall Organizer has three soft, oval-bottomed pockets in a column, each hung from its own wooden dowel. Diagonal lace runs around every pocket wall. A solid back panel rises above the front and wraps the dowel, and slim crocheted cords link the dowels and loop up to a single wall peg.
The whole piece uses one warm cream cotton, so the texture does the work. It suits a bedroom, bathroom, or entryway, and holds brushes, scarves, glasses cases, and small toiletries.
The pattern uses US crochet terms. The organizer is about 12 in (30.5 cm) wide across the dowels and 33.75 in (85.7 cm) tall from the hanging peak to the bottom of the lowest pocket. Each pocket is 10 in (25.4 cm) wide at the back panel and 3.25 in (8.3 cm) deep.
For each pocket, you crochet an oval base in single crochet, turn the wall up with a back-loop round, and work diagonal lace in joined rounds. Then you add a solid rim, a flat back panel that folds into a dowel casing, and a short edging. Finally, you link the three pockets with slip-stitch cords.
Finished Size and Construction
- Finished size: 12 in (30.5 cm) wide x 33.75 in (85.7 cm) tall, hanging cord included
- Skill level: Intermediate
- Terminology: US crochet terms
- Yarn weight: Worsted (#4) cotton
- Hook: 5.0 mm (H-8)
- Number of pieces: 3 identical pockets, 4 connector cords, 1 hanging cord, 3 dowels
- Layout: 1 column of 3 pockets, dowels spaced 10 in (25.4 cm) apart
- Piece size: each pocket is 10 in (25.4 cm) wide x 8.75 in (22.2 cm) tall from casing top to base, and 3.25 in (8.3 cm) deep
- Pocket front height before border: 6 in (15.2 cm)
- Border depth: about 0.5 in (1.3 cm), for a finished front height of 6.5 in (16.5 cm)
Materials
Yarn: Use a smooth, firm, worsted-weight 100% cotton of about 190 m per 100 g. Cotton holds its shape when the pockets are loaded and shows the lace clearly. Acrylic also works, but it sags more.
- Cream: 200 g (380 m)
These quantities include about a 10% margin over the measured use of 182 g (345 m). The margin covers your test piece and small tension differences.
Tools:
- 5.0 mm (H-8) crochet hook
- 3 wooden dowels, 3/8 in (1.0 cm) diameter, cut to 12 in (30.5 cm)
- 1 wall peg or sturdy hook
- 4 locking stitch markers
- Tapestry needle
- Measuring tape and scissors
Abbreviations (US Terms)
- ch – chain
- sc – single crochet
- dc – double crochet
- sl st – slip stitch
- sk – skip
- sp – space
- st(s) – stitch(es)
- BLO – back loop only
- rev sc – reverse single crochet (crab stitch)
- RS / WS – right side / wrong side
- rep – repeat
Reverse single crochet (rev sc): Work from left to right without turning. Insert the hook into the next st to the right, yarn over, pull up a loop, yarn over, and pull through both loops. This makes a twisted, rope-like edge.
Slip-stitch cord: Chain the stated length, then sl st into the back bump of the 2nd ch from the hook and each ch across. The result is a firm cord with little stretch.
Gauge and Checkpoints
- Single crochet: 16 sts and 18 rnds = 4 in (10.2 cm)
- Diagonal lace: 20 sts (4 repeats) = 5 in (12.7 cm); 9 rnds = 4 in (10.2 cm)
Make one complete pocket first and use it as your test piece. The sc and the lace must have the same stitch width (4 sts per inch), because the wall stays at 90 sts from base to rim.
Checkpoints:
- After Rnd 4 (72 sts): base measures about 8.25 x 1.75 in (21.0 x 4.4 cm).
- After Rnd 7 (90 sts): base measures about 9.5 x 3.25 in (24.1 x 8.3 cm).
- After Rnd 10: wall is about 0.75 in (1.9 cm) tall.
- After Rnd 20: wall is about 5 in (12.7 cm) tall.
- After Rnd 24: wall is 6 in (15.2 cm) tall.
- After back panel Row 9: back measures 8 in (20.3 cm) from base edge to top.
If your piece is too big, go down 0.5 mm in hook size. If it is too small, go up 0.5 mm. If only the lace is off, change hooks for the lace rounds alone so the wall stays straight.
Pocket (Make 3)
Oval Base
Ch 27.
Rnd 1: 3 sc in 2nd ch from hook, sc in next 24 ch, 3 sc in last ch. Working along the opposite side of the foundation ch, sc in next 24 ch; join with sl st to first sc. (54 sts: 3 at each end, 24 along each side)
Rnd 2: Ch 1, 2 sc in each of next 3 sts, sc in next 24 sts, 2 sc in each of next 3 sts, sc in next 24 sts; join. (60 sts)
Rnd 3: Ch 1, *(sc in next st, 2 sc in next st) 3 times, sc in next 24 sts; rep from * once more; join. (66 sts)
Rnd 4: Ch 1, *(sc in next 2 sts, 2 sc in next st) 3 times, sc in next 24 sts; rep from * once more; join. (72 sts)
Rnd 5: Ch 1, *(sc in next 3 sts, 2 sc in next st) 3 times, sc in next 24 sts; rep from * once more; join. (78 sts)
Rnd 6: Ch 1, *(sc in next 4 sts, 2 sc in next st) 3 times, sc in next 24 sts; rep from * once more; join. (84 sts)
Rnd 7: Ch 1, *(sc in next 5 sts, 2 sc in next st) 3 times, sc in next 24 sts; rep from * once more; join. (90 sts: 21 at each end, 24 along each side)
Each round adds 3 sts at each curved end (6 per round), which keeps the oval flat.
Walls
Rnd 8 (turning round): Ch 1, sc in BLO of each st around; join. (90 sts)
The unworked front loops form a crisp ridge, and the wall rises straight up from it.
Rnds 9-10: Ch 1, sc in each st around; join. (90 sts)
Rnd 11 (lace set-up): Ch 3 (counts as dc), dc in next 2 sts, ch 2, sk next 2 sts; *dc in next 3 sts, ch 2, sk next 2 sts; rep from * 16 more times; join with sl st to top of beginning ch-3. (18 repeats: 54 dc + 36 ch = 90 sts)
Rnd 12 (lace shift): Sl st in next dc, ch 3 (counts as dc), dc in next dc, dc in next ch-2 sp, ch 2, sk next dc; *dc in next 2 dc, dc in next ch-2 sp, ch 2, sk next dc; rep from * 16 more times; join with sl st to top of beginning ch-3. (18 repeats: 54 dc + 36 ch = 90 sts)
Each repeat still covers 5 sts, but every hole moves one stitch to the left. Round after round, the holes build the diagonal lattice lines.
Rnds 13-20: Rep Rnd 12. (90 sts each round)
Rim
Rnd 21 (conversion round): Ch 1, sc in each dc and 2 sc in each ch-2 sp around; join. (54 sc, 1 per dc, + 36 sc, 2 per space = 90 sts)
Rnds 22-24: Ch 1, sc in each st around; join. (90 sts) Fasten off.
The wall now measures 6 in (15.2 cm) from the base ridge.
Back Panel and Casing
Flatten the pocket so the long sides of the base face front and back. On the back, count 40 sts centered on the back long side: the 24 straight-side sts plus 8 sts from each curved end. Mark the first and last of these 40 sts. The remaining 50 sts form the pocket front.
Row 1 (RS): Join yarn in the first marked st, ch 1, sc in same st and next 39 sts, turn. (40 sts)
Rows 2-9: Ch 1, sc in each st across, turn. (40 sts)
The back panel now stands 2 in (5.1 cm) above the rim, so the full back measures 8 in (20.3 cm).
Rows 10-15 (casing): Ch 1, sc in each st across, turn. (40 sts) Fasten off, leaving a 24 in (61.0 cm) tail.
The casing section measures 1.25 in (3.2 cm). Fold Rows 10-15 in half to the WS so the top of Row 15 meets the top of Row 9. Whipstitch across all 40 sts and leave both short ends open. The finished tube is about 0.625 in (1.6 cm) tall and fits the dowel snugly.
Make All Pieces
All pieces use Cream.
- Pockets: 3, about 58 g (110 m) each
- Connector cords: 4, each 14 in (35.6 cm) long, about 1 g (2 m) each. Ch about 56, then adjust until the finished cord measures 14 in (35.6 cm).
- Hanging cord: 1, 19 in (48.3 cm) long, about 4 g (7 m). Ch about 76, then adjust to 19 in (48.3 cm).
That totals 174 g for the pockets plus 8 g for the cords, or 182 g (345 m). Measure the cords rather than counting chains, because all four connector cords must match.
Layout grid:
           /  \           Hanging cord (peak 5 in / 12.7 cm)
   o==[ Dowel 1 ]==o
   |  [ Pocket 1 ] |      cord L1 | cord R1
   o==[ Dowel 2 ]==o      10 in (25.4 cm) dowel to dowel
   |  [ Pocket 2 ] |      cord L2 | cord R2
   o==[ Dowel 3 ]==o
      [ Pocket 3 ]
Joining
Method: The pockets don’t touch each other. Instead, cords link their dowels, one cord on each side.
- Finish the Border (below) and Final Blocking on all three pockets first.
- Slide one dowel through each casing so that 1 in (2.5 cm) sticks out on each side.
- Tie one connector cord end around the left end of Dowel 1, 0.5 in (1.3 cm) in from the tip. Wrap twice and knot, using about 2 in (5.1 cm) of cord. Tie the other end to the left end of Dowel 2 the same way.
- Repeat on the right side. Then link Dowel 2 to Dowel 3 with the last two cords.
- Tie the hanging cord ends around the outer tips of Dowel 1, outside the connector cords. Each tie uses about 2 in (5.1 cm), which leaves 15 in (38.1 cm) free and a peak about 5 in (12.7 cm) above the dowel.
Stitch-to-stitch logic: Each cord is matched by a cord of the same length on the opposite side. If the left and right cords between two dowels have different free lengths, that pocket will tilt.
Tension advice: Wrap firmly enough that the cord can’t slide along the dowel, but don’t crush it. Push the casing edges snug against the inner wraps so the pocket can’t drift sideways.
Size checkpoint: Hang the organizer before trimming the tails. You should measure 10 in (25.4 cm) between dowel centers and a 1.25 in (3.2 cm) gap between each pocket bottom and the next dowel. Total height should be 33.75 in (85.7 cm). Re-tie any cord that is off by more than 0.25 in (0.6 cm).
Border
Work this edging on each pocket after sewing the casing and before inserting the dowel.
Border gauge: 1 sc per sc row-end along the back panel sides, and 1 sc per st along the rim, at 4 sts per inch.
Row 1 (RS): With the pocket front facing you, join yarn at one side edge of the back panel at Row 9, just below the casing fold. Ch 1 and work 9 sc down the side edge (1 per row-end of Rows 1-9). Sc in each of the 50 front sts of Rnd 24. Work 9 sc up the opposite side edge to Row 9. (9 + 50 + 9 = 68 sts) Do not turn.
Row 2: Ch 1, rev sc in each st back across. (9 + 50 + 9 = 68 sts) Fasten off.
Why the math works: The front keeps exactly its own 50 sts, so the rim neither ruffles nor gathers. Along each back panel side, 9 sc rows measure 2 in (5.1 cm), while 9 sc at 4 per inch measure 2.25 in (5.7 cm). That slight extra length lets the corner turn without puckering. No stitches are added at the corners; 68 is the complete count.
The border adds about 0.5 in (1.3 cm), bringing the pocket front to 6.5 in (16.5 cm).
Final Blocking
- Make sure the dowels are not yet inserted.
- Soak each pocket in cool water for 10 minutes, then press the water out in a towel. Don’t wring.
- Stuff each pocket firmly with a rolled towel to fill out the oval shape and straight walls.
- Pat the back panel to 10 in (25.4 cm) wide and the front to 6.5 in (16.5 cm) tall.
- Ease the lace open with your fingertips so the diagonal lines run evenly.
- Let the pockets dry fully, about 24 hours, before joining.
Final Quality-Control Checklist
- Each base measures 9.5 x 3.25 in (24.1 x 8.3 cm) and lies flat.
- Every wall round has 90 sts, and every lace round has 18 repeats.
- The diagonals slant the same way on all three pockets.
- Each back panel is 40 sts and 10 in (25.4 cm) wide.
- Each border is 68 sts, with no puckers.
- Each casing fits its dowel snugly, with no gaps in the seam.
- All 4 connector cords are 14 in (35.6 cm) long, and the dowels sit 10 in (25.4 cm) apart.
- The organizer hangs level and is 33.75 in (85.7 cm) tall.
Troubleshooting
Base cups: You are working the end increases too tightly. Loosen your tension at the curved ends.
Base ruffles: You have extra stitches. Recount against the round totals.
Wall flares outward: The lace is wider than the sc. Use a 4.5 mm hook for Rnds 11-20.
Diagonals zigzag: You skipped the opening sl st on a round. Every shift round must start with sl st in the next dc.
Front sags when loaded: The gauge is too loose. Go down a hook size, or add one more sc rim round (90 sts).
Pocket tilts: The cords are uneven. Re-tie them until the free lengths match.
Casing too tight: Work 2 extra casing rows (Rows 10-17) so the fold stays centered.
Care
Remove the dowels, then hand wash the pockets in cool water with mild soap. Dry them flat over rolled towels to keep the oval shape, and never machine dry.
Final Notes
Here is the measurement chain. A 90-st base of 9.5 x 3.25 in (24.1 x 8.3 cm) carries a 90-st wall up to 6 in (15.2 cm). A 40-st back panel adds 2 in (5.1 cm) plus the folded casing, and a 68-st border brings the front to 6.5 in (16.5 cm). Hang three pockets on dowels spaced 10 in (25.4 cm) apart, add a 5 in (12.7 cm) hanging peak, and the organizer finishes at 12 x 33.75 in (30.5 x 85.7 cm). Check each link as you go, and your organizer will hang straight and keep its shape.
Happy crocheting!