

This wall-hung toilet paper holder pairs a ribbed blue scallop shell with a cream roll bar and two cream side brackets. The shell has nine raised wedges divided by sunken grooves, and each wedge ends in a rounded scallop outlined with a rope-textured edge.
The palette is calm and coastal: a dusty denim blue for the shell and hanging loop, and a soft cream for the bar, brackets, and spiral end caps. It looks great in a beach-themed bathroom, and its clean lines also suit a plain modern space.
The pattern uses US crochet terms. The finished shell measures about 10 in (25.4 cm) wide and 6.5 in (16.5 cm) tall. The hanging loop adds about 3 in (7.6 cm) on top of that.
Here’s how it’s built. You work the shell flat in turned rows from a magic ring at the base, with post-stitch grooves dividing the wedges. A scallop border goes around the curved edge. Then you make:
- a hanging cord
- two stiffened right-triangle brackets, each with a hole near the bottom
- a padded bar over a wooden dowel
- two spiral caps
Everything is sewn together, and the bar lifts out so you can change the roll.
Finished Size and Construction
- Finished size: 10 in (25.4 cm) wide x 6.5 in (16.5 cm) tall, plus a 3 in (7.6 cm) loop
- Skill level: Intermediate (post stitches, reverse single crochet, sewing)
- Terminology: US
- Yarn weight: Medium (#4) worsted or aran
- Hook: 5 mm (US H-8)
- Number of pieces: 9 (1 shell, 1 hanging cord, 4 bracket triangles, 1 bar, 2 caps)
- Layout: one shell backplate with two brackets sewn on 4.75 in (12.1 cm) apart
- Shell body before border: 8 in (20.3 cm) wide x 5 in (12.7 cm) tall
- Border depth: 1 in (2.5 cm) at the scallop tips, 0.5 in (1.3 cm) along the base
- Bracket size: 4 in (10.2 cm) tall x 3.5 in (8.9 cm) deep
- Bar: 6 in (15.2 cm) long, just under 1 in (2.5 cm) thick
Materials
Use a smooth, firm cotton or cotton blend in worsted or aran weight. Cotton shows the ribs and the rope edge clearly, and it holds its shape in a damp bathroom. The quantities below assume about 180 m per 100 g.
- Color A, Dusty Blue: 60 g / 108 m (shell, border, hanging cord)
- Color B, Cream: 40 g / 72 m (brackets, bar, caps)
Both amounts include a margin of about 30 percent for your gauge swatch and sewing tails.
Tools:
- 5 mm (US H-8) crochet hook
- Yarn needle
- 4 stitch markers
- Scissors
- 1 sheet of 7-count plastic canvas
- Wooden dowel, 3/4 in (1.9 cm) thick, cut to 5.5 in (14.0 cm)
- Small amount of polyester fiberfill
- Blocking mat, rust-proof pins, and a spray bottle
Abbreviations (US Terms)
- ch chain
- sl st slip stitch
- sc single crochet
- dc double crochet
- sc2tog single crochet 2 together
- fpdc front post double crochet
- bpdc back post double crochet
- rev sc reverse single crochet (crab stitch)
- BLO back loop only
- st(s) stitch(es)
- sp space
- RS / WS right side / wrong side
- rnd round
Special stitch – groove stitch (gr): This stitch stays in the same column every row and always sinks away from the RS. On RS rows, work a bpdc around the groove stitch below. On WS rows, work a fpdc around it. Either way the post gets pushed to the back of the work, which forms the deep channel between wedges.
The ch-3 at the start of each row counts as 1 dc. The last stitch of each row always goes into the top of the previous row’s turning chain.
Gauge and Checkpoints
Gauge: 14 dc and 8 rows = 4 in (10.2 cm) in plain dc rows. 16 sc and 18 rows = 4 in (10.2 cm) in single crochet.
Make the shell first. It’s the largest piece, and the brackets are placed to fit it. Measure it at each checkpoint:
- After Row 2: 1 in (2.5 cm) from the ring to the edge.
- After Row 4: 2 in (5.1 cm) from the ring to the edge.
- After Row 8: 4 in (10.2 cm) from the ring to the edge, and 8 in (20.3 cm) across at the widest point.
- After the border: 10 in (25.4 cm) wide x 6.5 in (16.5 cm) tall.
At Row 4, if the shell is more than 1/4 in (0.6 cm) too big, rip back and go down half a hook size. If it’s that much too small, go up half a size. Expect the wedges to puff a little. The stitch counts are set up to keep the ribs rounded.
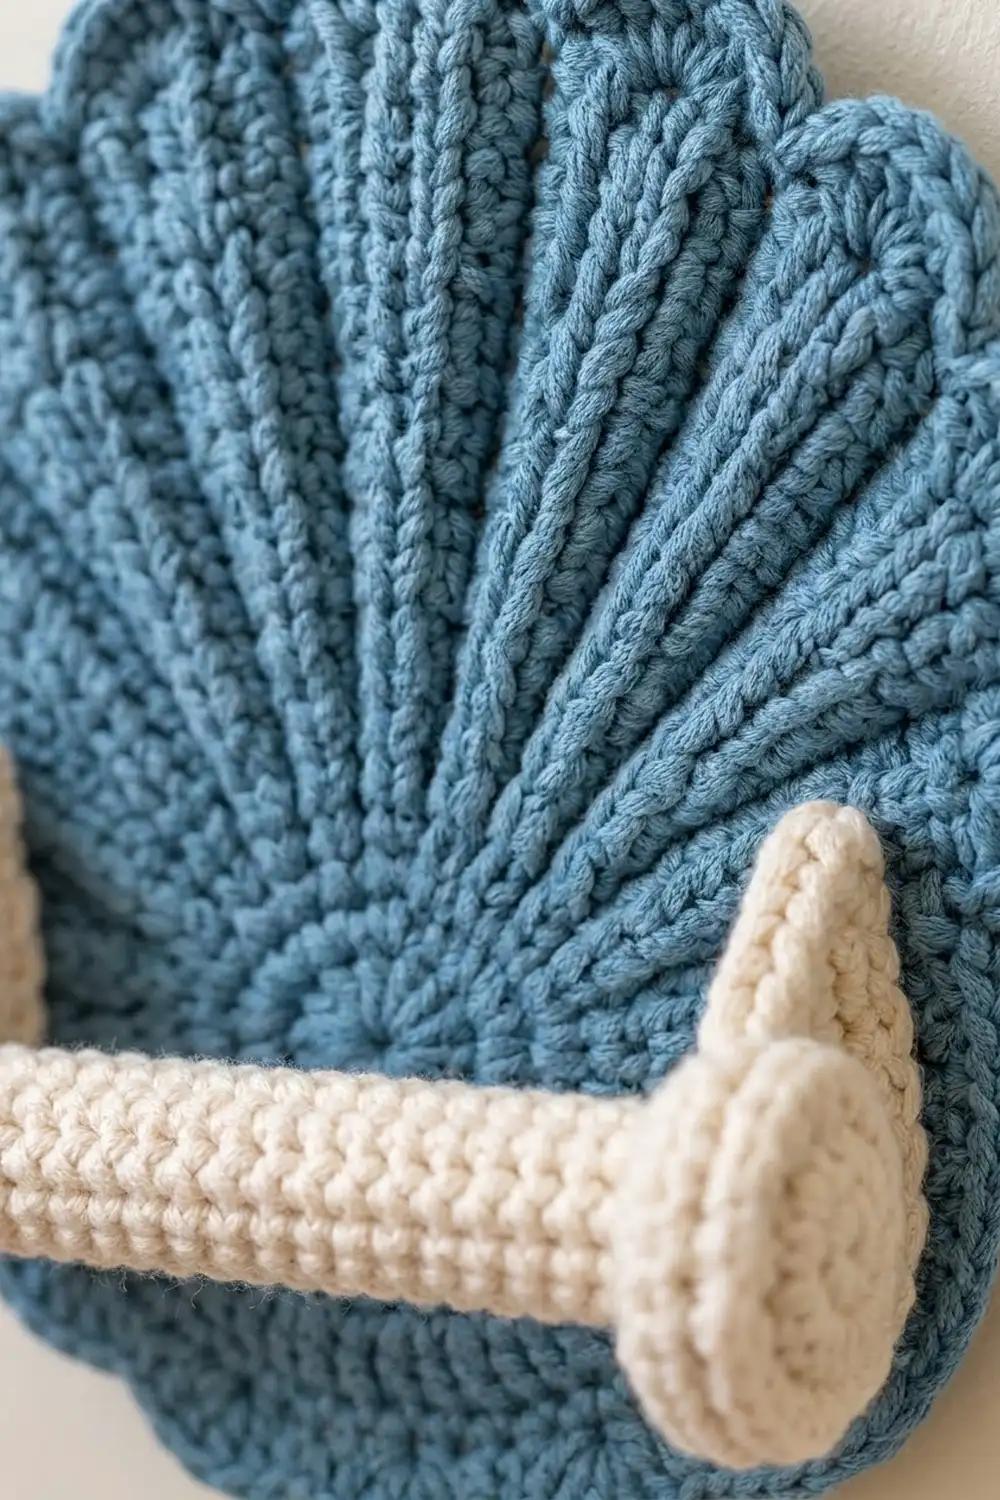
Shell Body
With Color A, make a magic ring.
Row 1 (RS): Ch 3, 8 dc in ring. Pull the ring closed and turn. (9 dc)
Row 2 (WS): Ch 3, dc in first st, 2 dc in each remaining st across. Turn. (18 dc)
Row 3 (RS, establish grooves): Ch 3, dc in next st, bpdc around next st, 2 dc in next st; repeat from * 7 more times. Turn. (26 sts: 9 wedges of 2 dc + 8 gr)
Put a marker in the first groove stitch to make counting easier.
Row 4 (WS, increase): Ch 3, 2 dc in next st, fpdc around next gr, dc in next st, 2 dc in next st; repeat from * 7 more times. Turn. (35 sts: 9 wedges of 3 dc + 8 gr)
Row 5 (RS, plain): Ch 3, dc in next 2 sts, bpdc around next gr, dc in next 3 sts; repeat from * 7 more times. Turn. (35 sts)
Row 6 (WS, increase): Ch 3, dc in next st, 2 dc in next st, fpdc around next gr, dc in next 2 sts, 2 dc in next st; repeat from * 7 more times. Turn. (44 sts: 9 wedges of 4 dc + 8 gr)
Row 7 (RS, increase): Ch 3, dc in next 2 sts, 2 dc in next st, bpdc around next gr, dc in next 3 sts, 2 dc in next st; repeat from * 7 more times. Turn. (53 sts: 9 wedges of 5 dc + 8 gr)
Row 8 (WS, plain): Ch 3, dc in next 4 sts, fpdc around next gr, dc in next 5 sts; repeat from * 7 more times. Turn. Do not fasten off. (53 sts)
Check the math: 9 x 5 + 8 = 53. The groove stitches land at stitches 6, 12, 18, 24, 30, 36, 42, and 48. Four rows add 9 stitches each, and two rows add none. That averages about six stitches gained per row, which lets the fan open just past a half circle and still lie flat.
Make All Pieces
Color A:
- Shell: 1 (above).
- Hanging cord: 1. Ch 33.
- Row 1: Sc in 2nd ch from hook and in each ch across. (32 sc)
- Row 2: Ch 1, sl st in each sc across. (32 sl sts) Fasten off. The cord measures 8 in (20.3 cm).
Color B:
Bracket triangle (make 4). Odd rows increase in the last stitch and even rows increase in the first stitch. That puts every increase on the same sloped edge.
- Row 1: Ch 2, sc in 2nd ch from hook. Turn. (1 sc)
- Row 2: Ch 1, 2 sc in st. Turn. (2 sc)
- Rows 3–14: Ch 1. On odd rows, sc across to the last st and work 2 sc in the last st. On even rows, work 2 sc in the first st, then sc across. Turn. (Each row has as many sc as its row number, so Row 14 has 14 sc)
- Row 15 (hole): Ch 1, sc in first 8 sts, ch 4, skip 4 sts, sc in last 2 sts. Turn. (10 sc + ch-4 sp = 14 sts)
- Row 16: Ch 1, sc in first 2 sts, 4 sc in ch-4 sp, sc in last 8 sts. Turn. (14 sc)
- Rows 17–18: Ch 1, sc in each st across. Turn. (14 sc) Fasten off.
Each triangle is 4 in (10.2 cm) along its straight back edge and 3.5 in (8.9 cm) across the bottom. The 1 in (2.5 cm) hole is about 2.6 in (6.6 cm) from the back edge.
Bar (make 1). Work in continuous rounds and mark the first stitch of each round.
- Rnd 1: 6 sc in magic ring. (6)
- Rnd 2: 2 sc in each st. (12)
- Rnds 3–28: Sc in each st. (12) Around Rnd 20, slide in the dowel and keep working over it. Add a pinch of fiberfill at each end.
- Rnd 29: Sc2tog 6 times. (6) Fasten off and close the opening.
The finished bar is 6 in (15.2 cm) long.
Cap (make 2).
- Rnd 1: 6 sc in magic ring. (6)
- Rnd 2: 2 sc in each st. (12)
- Rnd 3: Sc in next st, 2 sc in next st; repeat around. (18)
- Rnd 4: Sl st in BLO of each st around. (18) Fasten off, leaving a long tail.
Each cap is 1.5 in (3.8 cm) across, and the slip-stitch round gives it a spiral rim.
Layout (front view):
        [ cord loop ]
   ( ( ( SHELL, 9 scallops ) ) )
   [bracket]   roll   [bracket]
  (cap)=======bar=========(cap)
        shell base edge
Joining
Finish the border and block the shell (both covered below) before you start joining.
- Brackets: Using a crocheted triangle as a template, cut 2 triangles from plastic canvas. Trim each one 1/8 in (0.3 cm) inside the edge and cut out the hole. Stack 2 crocheted triangles with their WS together and the holes lined up, then slip one canvas insert between them. Whipstitch all three edges and around the hole through both layers, 1 stitch into each edge stitch or row end.
- Placement: On the RS of the shell, mark two vertical lines 4.75 in (12.1 cm) apart, centered side to side. The bottom of each line should be 2 in (5.1 cm) above the base edge. Sew each bracket’s 4 in (10.2 cm) back edge along one line, holes facing each other near the bottom. Catch only the front layer of shell stitches, about 1 stitch per bracket row end. Keep each stitch snug but not tight enough to pucker.
- Cord: Fold the cord in half. Sew 1 in (2.5 cm) of each end to the WS of the shell at the top center, behind the middle scallop. This leaves a 3 in (7.6 cm) loop above the edge.
- Bar: Slide the bar through a toilet roll. Ease one end through each bracket hole, then sew a cap to each end with the spiral facing out.
Size checkpoint: The gap between the brackets should be 4.75 in (12.1 cm), which leaves room for a standard 4.5 in (11.4 cm) roll. To change the roll, stretch one hole over its cap and slip that end out.
Border
Border gauge: The sc round over the dc edge adds about 1/4 in (0.6 cm). Each 9-dc scallop adds about 0.5 in (1.3 cm). The rev sc round brings the depth at the tips to 1 in (2.5 cm).
Turn so the RS is facing and continue with Color A.
Round 1: Ch 1.
– Top arc: 3 sc in first st, sc in next 51 sts, 3 sc in last st. (57 sc on the top arc, including both corner groups)
– First straight edge: 2 sc in each of the 8 row ends. (16 sc)
– Base: 1 sc into the magic ring. (1 sc)
– Second straight edge: 2 sc in each of the 8 row ends. (16 sc)
Join with a sl st to the first sc. (90 sc)
Label the three sc of the first corner group a1–a3 and the three of the last corner group b1–b3.
Round 2 (scallops):
1. Wedge 1: Ch 1, sc in a2. Skip a3 and the next st, 9 dc in the next st (the center of wedge 1), skip 2 sts, sc in the next st (groove 1).
2. Wedges 2–8: Skip 2 sts, 9 dc in next st, skip 2 sts, sc in next st; repeat from * 6 more times, ending at groove 8.
3. Wedge 9: Skip 2 sts, 9 dc in next st, skip the next st and b1, sc in b2.
4. Base edges: Sc in b3, sc in each of the next 16 sts, sc in the base st, sc in each of the next 16 sts, sc in a1.
Join to the first sc. (Top arc: 81 dc + 10 sc = 91 sts. Base edges: 1 + 16 + 1 + 16 + 1 = 35 sc. Total: 126 sts)
Round 3: Ch 1, rev sc in each st around. Join and fasten off. (126 sts)
Why the math works:
– In Round 1, the top arc keeps the 53 body stitches one for one, and the corner groups add 4 more (53 + 4 = 57).
– Each scallop uses 6 stitches: 2 skipped, 1 center, 2 skipped, and 1 anchor sc.
– Wedge 1 uses a3 as one of its skipped stitches and wedge 9 uses b1. That centers every scallop over the middle dc of its wedge and puts every anchor sc directly over a groove.
– Spreading 9 dc over a 5-stitch span gives each arch enough length to curve without ruffling.
Final Blocking
- Weave in all ends on the shell. Don’t attach the cord or brackets yet.
- Pin the shell RS up to 10 in (25.4 cm) wide x 6.5 in (16.5 cm) tall.
- Straighten the grooves so they radiate evenly from the ring, then pin each scallop tip.
- Mist until damp. Pinch each wedge so it stands up slightly, then let it dry completely.
- Before assembling the brackets, block all 4 triangles flat to 4 in (10.2 cm) x 3.5 in (8.9 cm).
Final Quality-Control Checklist
- The shell has 9 wedges, 8 sunken grooves, and 9 centered scallops.
- Round 1 has 90 sc, and Rounds 2 and 3 each have 126 sts.
- The shell measures 10 in (25.4 cm) x 6.5 in (16.5 cm).
- The brackets are 4.75 in (12.1 cm) apart and at the same height.
- The holes line up through both layers of each bracket.
- The bar turns freely, and the caps sit outside the brackets.
- The loop is centered and the shell hangs straight.
Troubleshooting
- Grooves look raised instead of sunken: You’ve mixed up the post stitches. Use bpdc on RS rows and fpdc on WS rows.
- Shell ruffles: Your rows are too short for the stitch count. Go up half a hook size or work taller dc.
- Shell cups: Your rows are too tall. Go down half a hook size.
- A scallop is off-center: Count back to the nearest groove. Each side of the 9-dc group should have exactly 2 skipped stitches.
- Brackets droop: The canvas insert is too small or missing. Cut a new one and sew it in snugly.
- Bar won’t come out: Gently stretch the edge of the hole, or switch to a slightly thinner dowel.
Care
Spot clean with mild soap and cool water, then reshape and dry flat. Take the dowel out of the bar before hand washing.

Final Notes
Each measurement depends on the one before it:
– Gauge is 14 dc = 4 in (10.2 cm).
– That makes the 8-row body 8 in (20.3 cm) x 5 in (12.7 cm).
– The border brings it to 10 in (25.4 cm) x 6.5 in (16.5 cm).
– Brackets 4.75 in (12.1 cm) apart hold a 4.5 in (11.4 cm) roll.
If you hit every checkpoint, the finished holder will come out the right size.
Happy crocheting!