

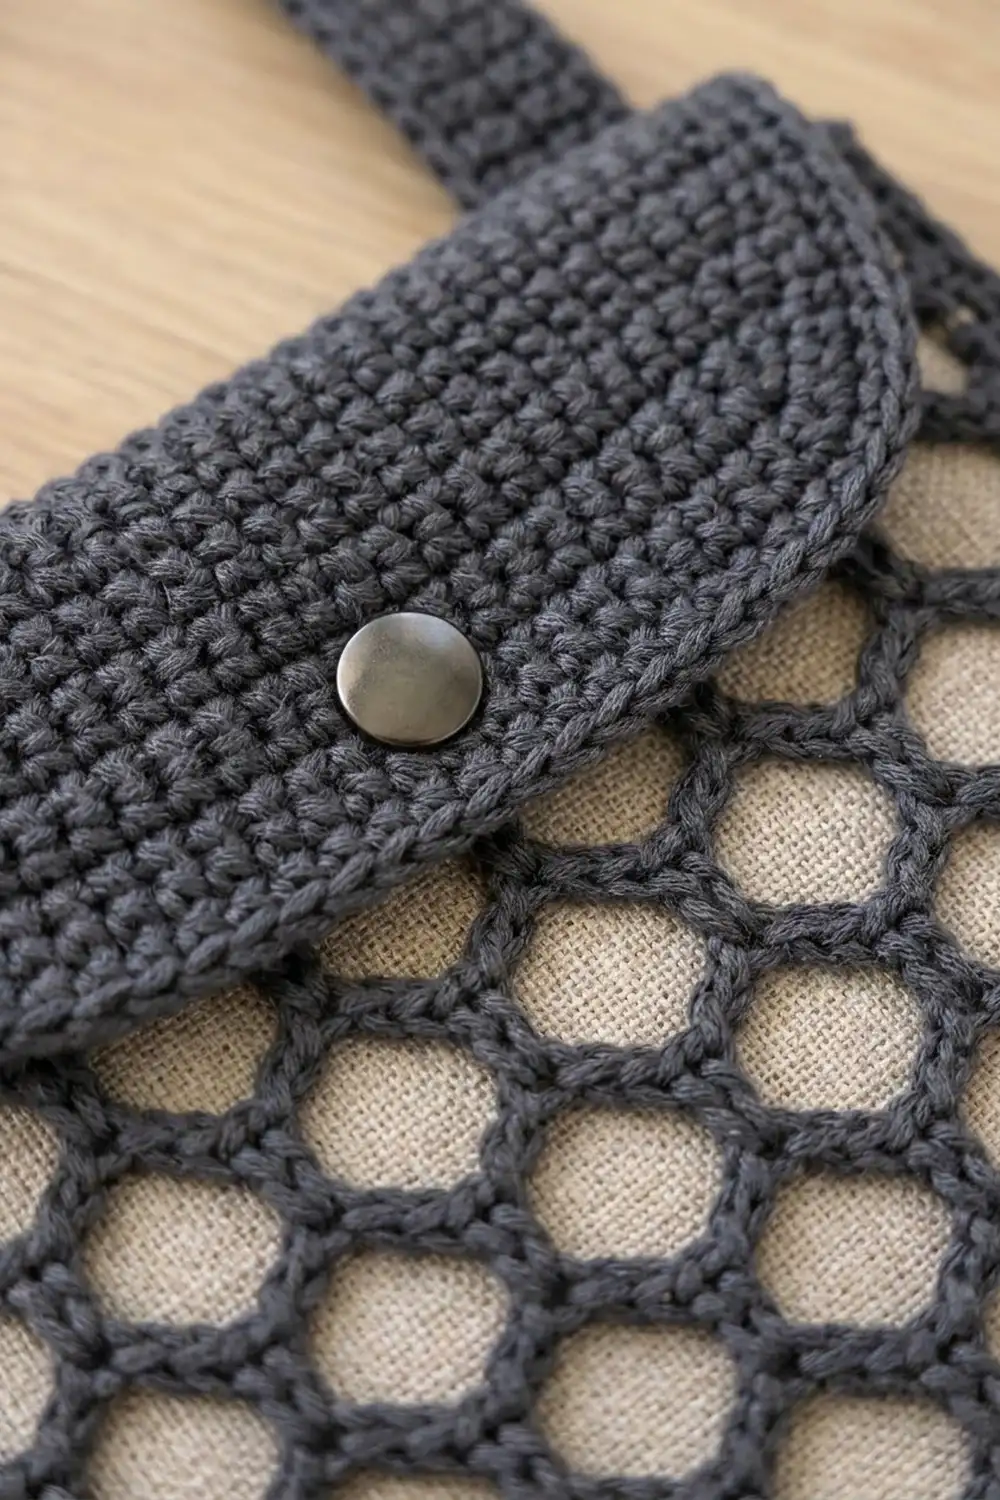
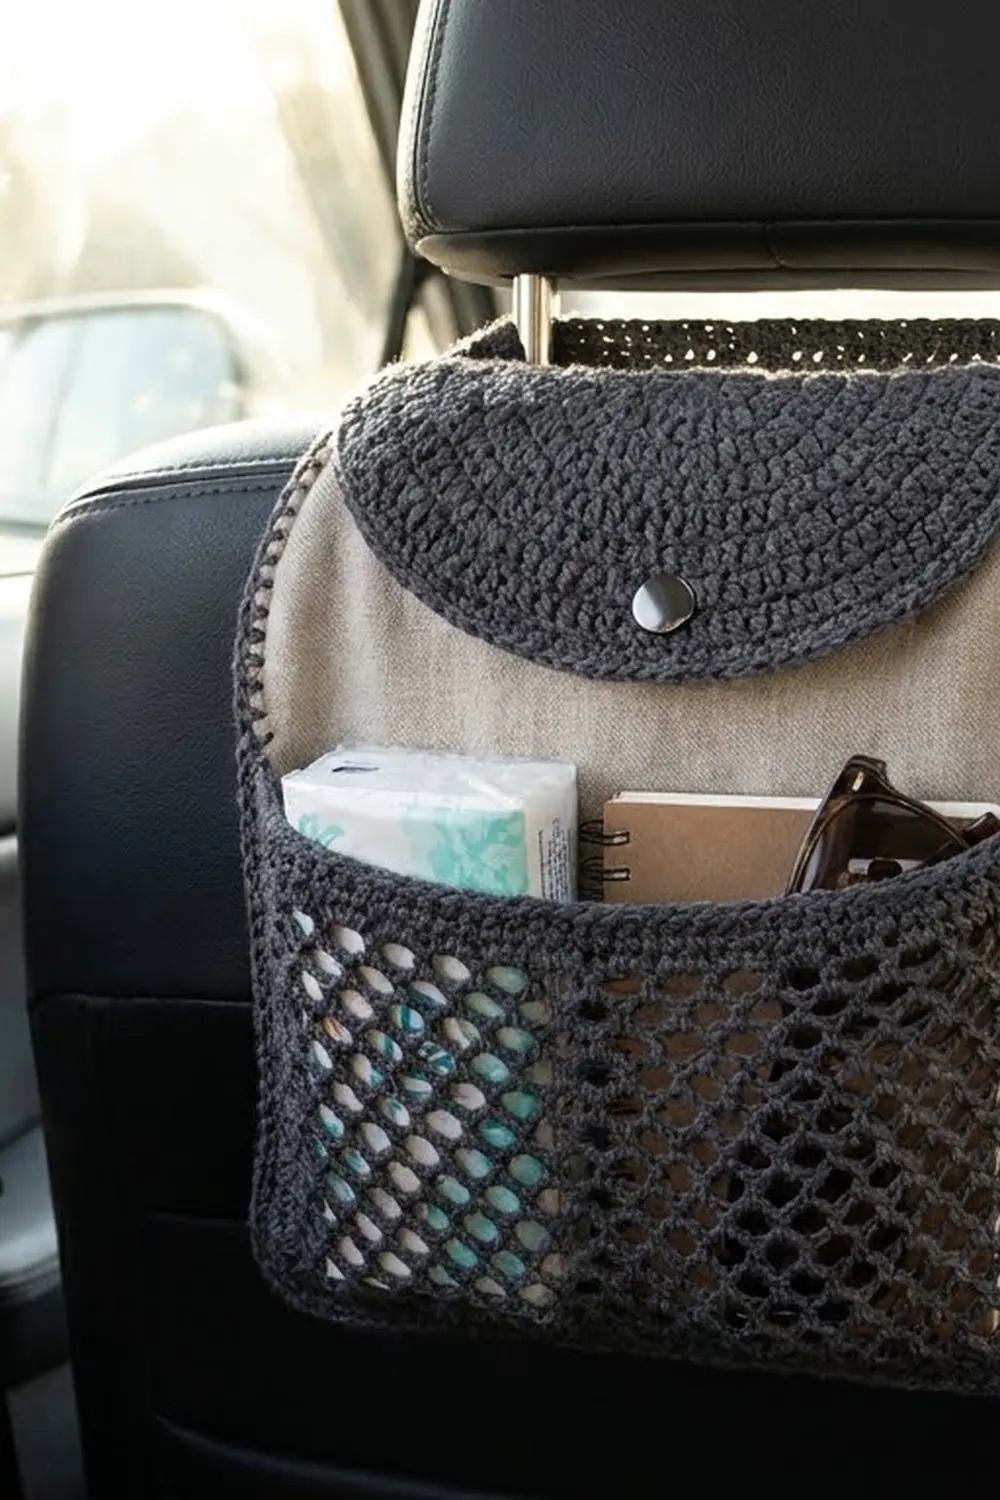
This organizer hangs from the headrest posts on the back of a car seat. The front pocket is a charcoal honeycomb mesh, and a beige linen lining shows through each open cell, so the piece looks tidy and grown-up. A solid flap with a snap button covers the top of the pocket, and a rope-like edge outlines everything.
You work it in one color: charcoal worsted-weight cotton. The fabric lining gives the contrast and keeps small items from slipping through the mesh. The style is modern and practical, sturdy enough for tissues, a wallet, sunglasses or a slim notebook.
This pattern uses US crochet terms. The finished body is 11 in (27.9 cm) wide and 12.5 in (31.8 cm) tall. The strap loops rise about 3.2 in (8.1 cm) above the top edge.
You make five crocheted pieces: a back panel, a mesh pocket, a flap and two straps. You sew the lining to the back panel, then layer the pocket on top. One two-round border joins the pocket to the back along the sides and bottom. Last, you sew on the flap, straps and snap.
Finished Size and Construction
- Finished size: 11 in x 12.5 in (27.9 cm x 31.8 cm), not counting the strap loops
- Skill level: Intermediate
- Terminology: US crochet terms
- Yarn weight: Worsted (#4) cotton
- Hook: 4.5 mm (US 7)
- Number of pieces: 5 crocheted pieces plus 1 fabric lining
- Layout: Back panel at full height; pocket over the lower part; flap over the pocket opening; one strap near each top corner
- Piece sizes before border: back panel 10.5 in x 12 in (26.7 cm x 30.5 cm); pocket 10.5 in x 9 in (26.7 cm x 22.9 cm); flap 10.5 in x 3.33 in (26.7 cm x 8.5 cm); straps 1.5 in x 8.9 in (3.8 cm x 22.6 cm)
- Border depth: 0.25 in (0.6 cm) per side, which takes the body from 10.5 in x 12 in to 11 in x 12.5 in
Materials
Yarn: Use a smooth, firmly twisted worsted-weight cotton or cotton blend. Cotton holds the honeycomb shape and doesn’t sag when the pocket is full. Avoid fuzzy or very stretchy acrylics, because they blur the mesh.
- Charcoal gray: 200 g, about 380 m (415 yd)
- Back panel: about 60 g / 114 m
- Pocket: about 45 g / 86 m
- Flap: about 22 g / 42 m
- Straps (both): about 16 g / 30 m
- Borders: about 17 g / 32 m
The 200 g total includes a margin of roughly 40 g over the measured use. That covers gauge differences and any swatching.
Tools and notions:
- 4.5 mm (US 7) crochet hook
- Linen or linen-look cotton fabric in natural beige, one piece 11.5 in x 13 in (29.2 cm x 33.0 cm)
- Sewing needle and beige thread
- One 15 mm (0.6 in / 1.5 cm) sew-on metal snap button with decorative cap, gunmetal or antique finish
- Tapestry needle
- Stitch markers (at least 4)
- Measuring tape, rust-proof pins and a blocking surface
Abbreviations (US Terms)
- ch – chain
- sc – single crochet
- sc2tog – single crochet 2 together (decrease)
- sk – skip
- sl st – slip stitch
- sp – space
- st(s) – stitch(es)
- RS / WS – right side / wrong side
- rev sc – reverse single crochet (crab stitch)
Reverse single crochet: Do not turn, so the RS still faces you, and work from left to right (right to left if you crochet left-handed). Insert the hook into the next stitch to the right, yarn over, pull up a loop, yarn over and pull through both loops. This makes the twisted, rope-like edge.
Bar: 2 sc worked side by side. Bars are the short horizontal edges of the honeycomb cells.
Gauge and Checkpoints
Gauge in sc: 16 sc x 18 rows = 4 in (10.2 cm). That is 4 sts and 4.5 rows per inch.
Gauge in mesh: one repeat (bar + ch-3 arch) covers 5 sts, or 1.25 in (3.2 cm). Two mesh rows = 1 in (2.5 cm) after blocking.
Work the straps first and treat them as your gauge test. A strap should be 1.5 in (3.8 cm) wide across 6 sc. Then check yourself at each stage:
- Back panel, after Row 4: 42 sts, 10.5 in (26.7 cm) wide.
- Back panel, after Row 54: 12 in (30.5 cm) tall.
- Pocket, after mesh Row 4: still 10.5 in (26.7 cm) wide, not flaring.
- Pocket, finished: 9 in (22.9 cm) tall.
If you are off: If the piece is too big, go down 0.5 mm. If it is too small, go up 0.5 mm. If only the mesh flares past 10.5 in (26.7 cm), work just the mesh rows with a hook 0.5 mm smaller.
Pattern
Straps (make 2)
Ch 7.
Row 1: Sc in 2nd ch from hook and in each ch across, turn. (6 sc)
Rows 2–40: Ch 1, sc in each st across, turn. (6 sc)
Fasten off and leave a 12 in (30.5 cm) tail for sewing. Each strap measures 1.5 in x 8.9 in (3.8 cm x 22.6 cm).
Back Panel
You work this from the bottom up. The first rows widen to round the bottom corners.
Ch 37.
Row 1 (RS): Sc in 2nd ch from hook and in each ch across, turn. (36 sc)
Row 2: Ch 1, 2 sc in first st, sc in next 34 sts, 2 sc in last st, turn. (38 sc)
Row 3: Ch 1, 2 sc in first st, sc in next 36 sts, 2 sc in last st, turn. (40 sc)
Row 4: Ch 1, 2 sc in first st, sc in next 38 sts, 2 sc in last st, turn. (42 sc)
Rows 5–54: Ch 1, sc in each st across, turn. (42 sc)
Fasten off. The panel measures 10.5 in x 12 in (26.7 cm x 30.5 cm).
Mesh Pocket
Bottom band: Ch 37 and work Rows 1–4 exactly as for the back panel. (42 sc)
This band matches the back panel’s rounded corners, so the two layers line up for joining.
Mesh Row 1 (RS): Ch 1, sc in first 2 sts, *ch 3, sk 3 sts, sc in next 2 sts; rep from * 7 more times, turn. (18 sc in 9 bars, 8 ch-3 sps)
Check: 2 + (8 x 5) = 42 sts used, so nothing is left over.
Mesh Row 2: Ch 1, sc in first st, ch 2, 2 sc in next ch-3 sp, *ch 3, 2 sc in next ch-3 sp; rep from * 6 more times, ch 2, sc in last st, turn. (18 sc: 2 edge sc plus 8 bars; 7 ch-3 sps, 2 ch-2 sps)
Mesh Row 3: Ch 1, sc in first st, sc in next ch-2 sp, *ch 3, 2 sc in next ch-3 sp; rep from * 6 more times, ch 3, sc in last ch-2 sp, sc in last st, turn. (18 sc in 9 bars, 8 ch-3 sps)
Row 3 has the same layout as Row 1. Each new bar sits at the middle of the arch below it, and each new arch spans the bar below. That offset gives the six-sided cells.
Mesh Rows 4–15: Repeat Mesh Rows 2–3 six more times, ending with a Row 3. (15 mesh rows total)
The mesh is 7.5 in (19.1 cm) tall.
Top band Row 1 (conversion): Ch 1, sc in each sc and 3 sc in each ch-3 sp across, turn. (18 + 24 = 42 sc)
Top band Rows 2–3: Ch 1, sc in each st across, turn. (42 sc)
Fasten off. The pocket measures 10.5 in x 9 in (26.7 cm x 22.9 cm). The bands add about 1.5 in (3.8 cm) on top of the mesh height.
Flap
The flap starts at its straight top edge. The last rows narrow to round the lower corners.
Ch 43.
Row 1: Sc in 2nd ch from hook and in each ch across, turn. (42 sc)
Rows 2–12: Ch 1, sc in each st across, turn. (42 sc)
Row 13: Ch 1, sc2tog, sc in next 38 sts, sc2tog, turn. (40 sc)
Row 14: Ch 1, sc2tog, sc in next 36 sts, sc2tog, turn. (38 sc)
Row 15: Ch 1, sc2tog, sc in next 34 sts, sc2tog. (36 sc)
Do not fasten off. Go straight to the flap border.
Flap Border Rnd 1: Ch 1. Working down the side, sc 13 sts evenly over the 15 row-ends. Sc in each of the 36 foundation-side…
Correction to keep the direction clear, since Row 15 ends at the bottom edge: Ch 1 and turn the flap so the RS faces you.
- Sc in each of the 36 sts of Row 15.
- Work 13 sc evenly up the side over 15 row-ends.
- Work 3 sc in the first foundation ch, sc in the next 40 ch, then 3 sc in the last ch.
- Work 13 sc evenly down the other side.
- Sl st to the first sc. (36 + 13 + 46 + 13 = 108 sc)
Flap Border Rnd 2: Ch 1, rev sc in each st around, sl st to first st. (108 rev sc)
Fasten off. The flap measures 11 in x 3.8 in (27.9 cm x 9.7 cm).
Make All Pieces
Every piece is charcoal gray:
- 1 back panel, about 60 g
- 1 mesh pocket, about 45 g
- 1 flap, already bordered, about 22 g
- 2 straps, about 8 g each
- 1 beige fabric lining
Layout (front view):
   [strap]                 [strap]
 +---------------------------------+
 |  FLAP (sewn below top border)   |
 |~~~~~~~~~~~~~~~~~~~~~~~~~~~~~~~~~|  <- flap overlaps pocket ~0.8 in
 |  POCKET top band                |
 |  honeycomb mesh                 |
 |  (lining shows through)         |
 |  POCKET bottom band             |
 \_________________________________/  <- rounded corners
Joining
1. Line the back panel. Fold and press a 0.5 in (1.3 cm) hem on all four edges of the fabric. That makes it 10.5 in x 12 in (26.7 cm x 30.5 cm). Trim and ease the two bottom corners into curves that match the panel.
Pin the lining to the RS of the back panel. Whipstitch it with thread one stitch in from the edge, so the border stitches still have a clear path.
2. Layer the pocket. Lay the pocket RS up over the lined panel with the bottom foundation edges matching. Pin at the bottom corners, then along both sides.
The pocket’s side edges reach 9 in (22.9 cm) up the panel. Mark that height on each side of the back panel.
3. Tension. Pin the mesh flat but not stretched. If you pull it tight, the cells close up and the pocket won’t open. If you leave it loose, it ripples. Ease the side edges so they match the back panel inch for inch.
Checkpoint: Before you start the border, the layered piece should lie flat at 10.5 in x 12 in (26.7 cm x 30.5 cm).
Border
The border gauge matches the body gauge: 4 sc per inch along every edge. Wherever the pocket covers the back panel, insert the hook through both layers. Every stitch goes into the back panel, so the counts come from the back panel only. No stitches are added where the two layers meet.
Rnd 1 (RS): Join yarn at the top right corner of the back panel. Work each side as follows:
- Top edge (back panel only): 3 sc in first st, sc in next 40 sts, 3 sc in last st. (46 sc)
- Left side: 48 sc evenly over 54 row-ends, which is about 8 sc for every 9 rows. The top 12 sc go through the back panel only. The bottom 36 sc go through both layers, from your 9 in (22.9 cm) marker down. (48 sc)
- Bottom edge (both layers): sc in each of the 36 foundation chains. Do not add corner stitches here, because the curve is already shaped by Rows 1–4. (36 sc)
- Right side: work as for the left side, 36 sc through both layers and then 12 sc through the back only. (48 sc)
Sl st to first sc. (46 + 48 + 36 + 48 = 178 sc)
Rnd 2: Ch 1, rev sc in each st around, sl st to first st. (178 rev sc)
Fasten off.
Why the math works: 40 sc across the top match the 10.5 in (26.7 cm) row, and the 3-sc groups turn the square corners. On the sides, 48 sc over 12 in (30.5 cm) is exactly 4 per inch, so the edges don’t ruffle or pull in. The 36 lower sc match the pocket’s 9 in (22.9 cm) sides at the same rate. The bottom count of 36 matches the 36 foundation chains, and the rounded corners need no extra stitches.
Two rounds add 0.25 in (0.6 cm) per side. The body becomes 11 in x 12.5 in (27.9 cm x 31.8 cm).
Finishing assembly:
- Flap: Center the flap’s top edge just below the back panel’s top border, with its WS against the panel. Whipstitch the flap’s top border to Row 54. The flap should hang down over the pocket’s top band by about 0.8 in (2.0 cm).
- Straps: Fold each strap into a loop and lay both ends on the WS of the back panel, 1.5 in (3.8 cm) in from a side edge. Let the ends overlap the panel by 1.25 in (3.2 cm). Sew each end down securely with a box of stitches. The loop rises about 3.2 in (8.1 cm) above the top and goes about 6.4 in (16.3 cm) around.
- Snap: Sew the socket half onto the pocket’s top band, centered and 0.4 in (1.0 cm) below the edge. Sew the ball half onto the underside of the flap directly over it. Fix the decorative cap on the RS of the flap.
Final Blocking
- Lightly mist the whole organizer with water. Avoid soaking the lining.
- Pin it RS up to 11 in x 12.5 in (27.9 cm x 31.8 cm), squaring the top corners and smoothing the bottom curves.
- Pin through the mesh bars, not the arches, so each cell opens into an even hexagon.
- Pin the flap flat at 11 in x 3.8 in (27.9 cm x 9.7 cm).
- Let it dry completely, then unpin.
- Press the lining from the WS with a warm iron and a pressing cloth if it has creased.
Final Quality-Control Checklist
- Body measures 11 in x 12.5 in (27.9 cm x 31.8 cm)
- Border Rnd 1 counted 178 sc: 46 / 48 / 36 / 48
- Pocket sides are caught through both layers for the full 9 in (22.9 cm)
- Honeycomb cells are open and even, with all 9 bars per row lined up
- Flap hangs straight and overlaps the pocket about 0.8 in (2.0 cm)
- Snap closes without pulling the flap off-center
- Straps are sewn level, 1.5 in (3.8 cm) in from each side
- All yarn tails are woven in through solid sc, not the mesh
Troubleshooting
- Mesh is wider than the back panel: Rework the mesh rows with a hook 0.5 mm smaller, or work ch 2 arches instead of ch 3 and recheck the width.
- Cells look like diamonds, not hexagons: Make sure each bar is 2 sc worked into the middle of an arch. Block through the bars.
- Wrong count in Mesh Row 2: You should have 8 bars, plus a single edge sc and a ch-2 at each end.
- Border sides ruffle: You’ve worked too many sc. Use 48 per side and skip about every 9th row-end.
- Border sides pull in: You’ve worked too few sc. Recount and spread the stitches evenly.
- Flap flips up: Sew the flap’s whole top edge, not just the corners, and check where the snap sits.
- Loops too tight for the headrest posts: Add 4 rows to each strap.
Care
Spot clean, or hand wash in cool water with mild soap. Lay flat to dry, reshaping the mesh while it’s damp.
Final Notes
Each stage builds on the last:
- Gauge: 16 sc = 4 in (10.2 cm).
- Back panel: 42 sts and 54 rows give 10.5 in x 12 in (26.7 cm x 30.5 cm).
- Pocket: 8 mesh repeats plus 2 sts fill the same 42 sts, and 15 mesh rows plus 7 band rows reach 9 in (22.9 cm).
- Border: 178 sts at 4 sts per inch add 0.25 in (0.6 cm) per side, for a finished 11 in x 12.5 in (27.9 cm x 31.8 cm).
Check each number before you move on, and the organizer will hang flat, open easily and hold its honeycomb shape.
Happy crocheting!