

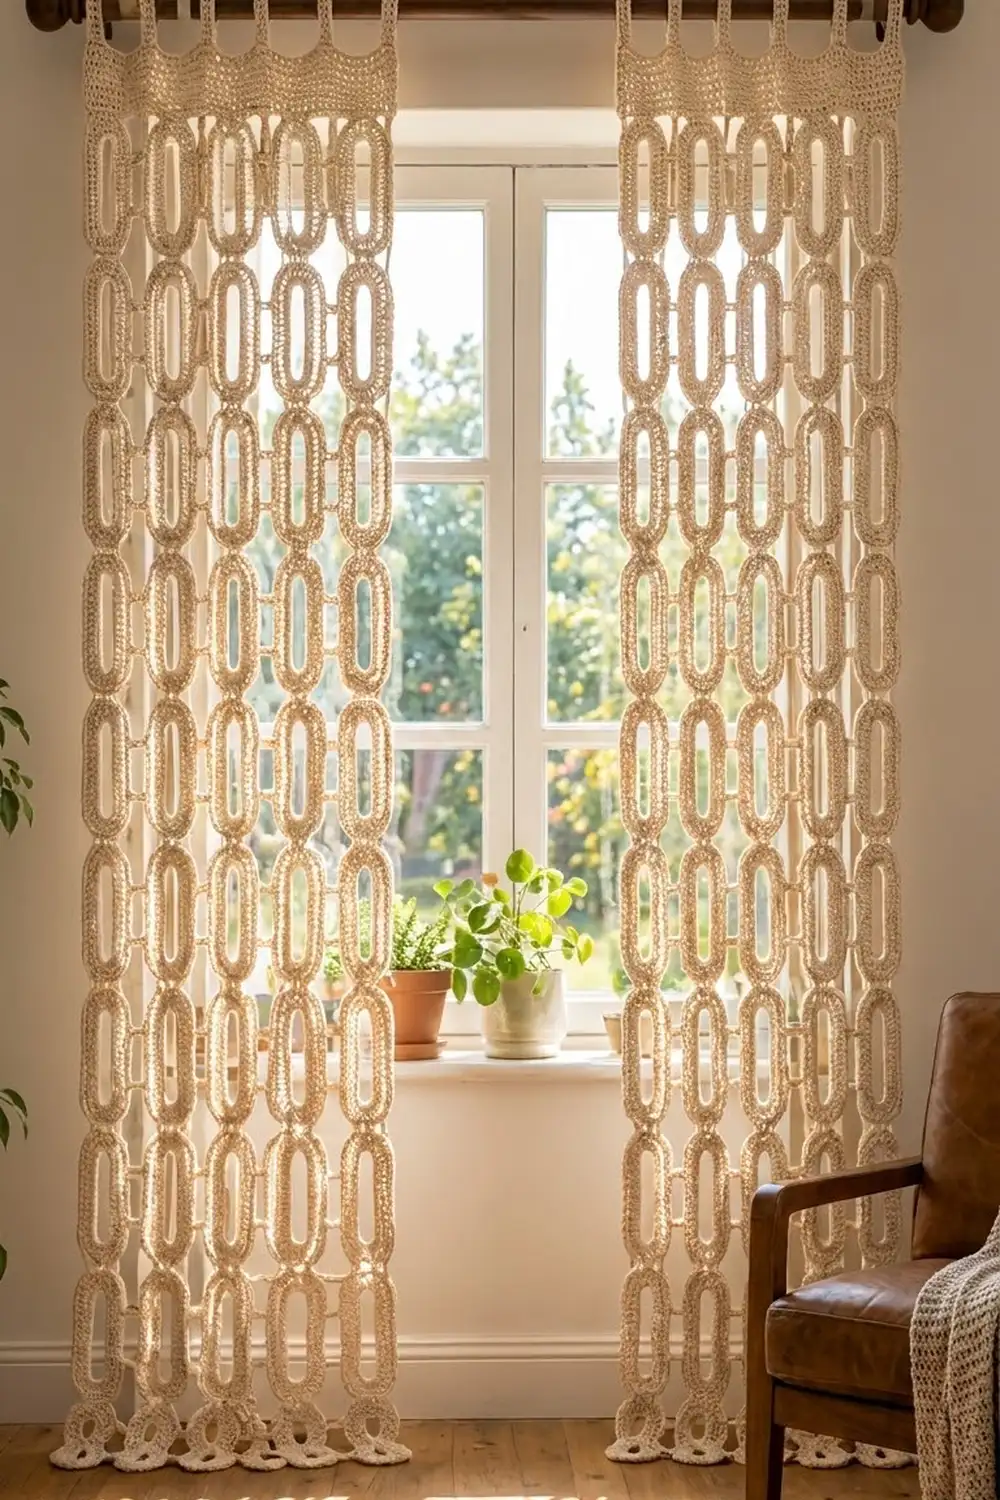
These curtain panels are built from one simple idea: a thick, rounded oval link, repeated and joined into an open grid. Hung in a window, the links make a pattern of long, light-filled openings that throws soft shadows across the floor in the afternoon.
The whole pair is worked in one natural cream cotton. That keeps the look calm and slightly boho, and the stitch texture does all the work. Each panel ends in a solid header band with five tabs that slide straight onto a curtain rod.
This pattern uses US crochet terms. Each finished panel measures 16.75 in (42.5 cm) wide and 83 in (210.8 cm) long from the bottom link to the top of the header band, plus 3 in (7.6 cm) tab loops above that. You can make the length longer or shorter one row of links at a time.
Construction is modular. You crochet each oval separately in three rounds around a chain ring. Then you join the ovals tip to tip into vertical columns and link the columns with short chain bars. Finally you work a header band across the top row of links and add the tabs.
Finished Size and Construction
- Finished panel size: 16.75 in x 83 in (42.5 cm x 210.8 cm), plus 3 in (7.6 cm) tab loops
- Skill level: Intermediate (simple stitches, lots of careful joining)
- Terminology: US crochet terms
- Yarn weight: Worsted (#4) cotton
- Hook: 5.0 mm (H-8)
- Number of pieces: 140 oval links in total, 70 per panel, plus one header band per panel
- Layout: 5 links wide x 14 links tall per panel
- Single link size: 2.75 in x 5.75 in (7.0 cm x 14.6 cm), with a center opening of about 1 in x 4 in (2.5 cm x 10.2 cm)
- Panel size before header band: 16.75 in x 80.5 in (42.5 cm x 204.5 cm)
- Header band depth: 2.5 in (6.4 cm), plus 5 tabs that fold into 3 in (7.6 cm) loops
Materials
Pick a smooth, firm worsted-weight cotton or cotton blend with good stitch definition. Mercerized or tightly plied cotton gives the crisp, rounded links you see here. Avoid very soft or splitty yarn, because the links need to hold their shape while they hang.
- Natural cream: about 800 g, roughly 1,440 m (1,575 yd), based on yarn of about 180 m per 100 g
These quantities include a safety margin of about 25%, which covers gauge differences, joining tails, and a test link or two. One panel alone uses about 300 g.
Tools:
- 5.0 mm (H-8) crochet hook
- Tapestry needle
- Stitch markers (at least 4)
- Scissors
- Measuring tape
- Blocking mats and rust-proof pins
- Spray bottle
Abbreviations (US Terms)
- ch: chain
- sl st: slip stitch
- sc: single crochet
- hdc: half double crochet
- st(s): stitch(es)
- rnd(s): round(s)
Special technique, chain ring foundation: Chain the stated number, then sl st into the first chain to form a ring, making sure the chain is not twisted. You work Rnd 1 into the chains themselves, so the ring becomes the inner edge of the link.
Gauge and Checkpoints
Gauge in sc worked in rows: 16 sts and 16 rows = 4 in (10.2 cm). The 36-ch foundation ring, laid flat as a long oval, should have straight sides of 12 ch measuring 3 in (7.6 cm).
Make one complete link before anything else and check it at each stage:
- After Rnd 1: about 1.5 in x 4.5 in (3.8 cm x 11.4 cm)
- After Rnd 2: about 2.25 in x 5.25 in (5.7 cm x 13.3 cm)
- After Rnd 3: 2.75 in x 5.75 in (7.0 cm x 14.6 cm)
If your link comes out too big, go down half a hook size. If it is too small, go up half a hook size. Don’t change the stitch counts. Every join and the header band rely on those counts. Because 70 links stack up, even a 1/8 in (0.3 cm) error per link changes the panel length by almost 2 in (5.1 cm), so check the test link carefully.
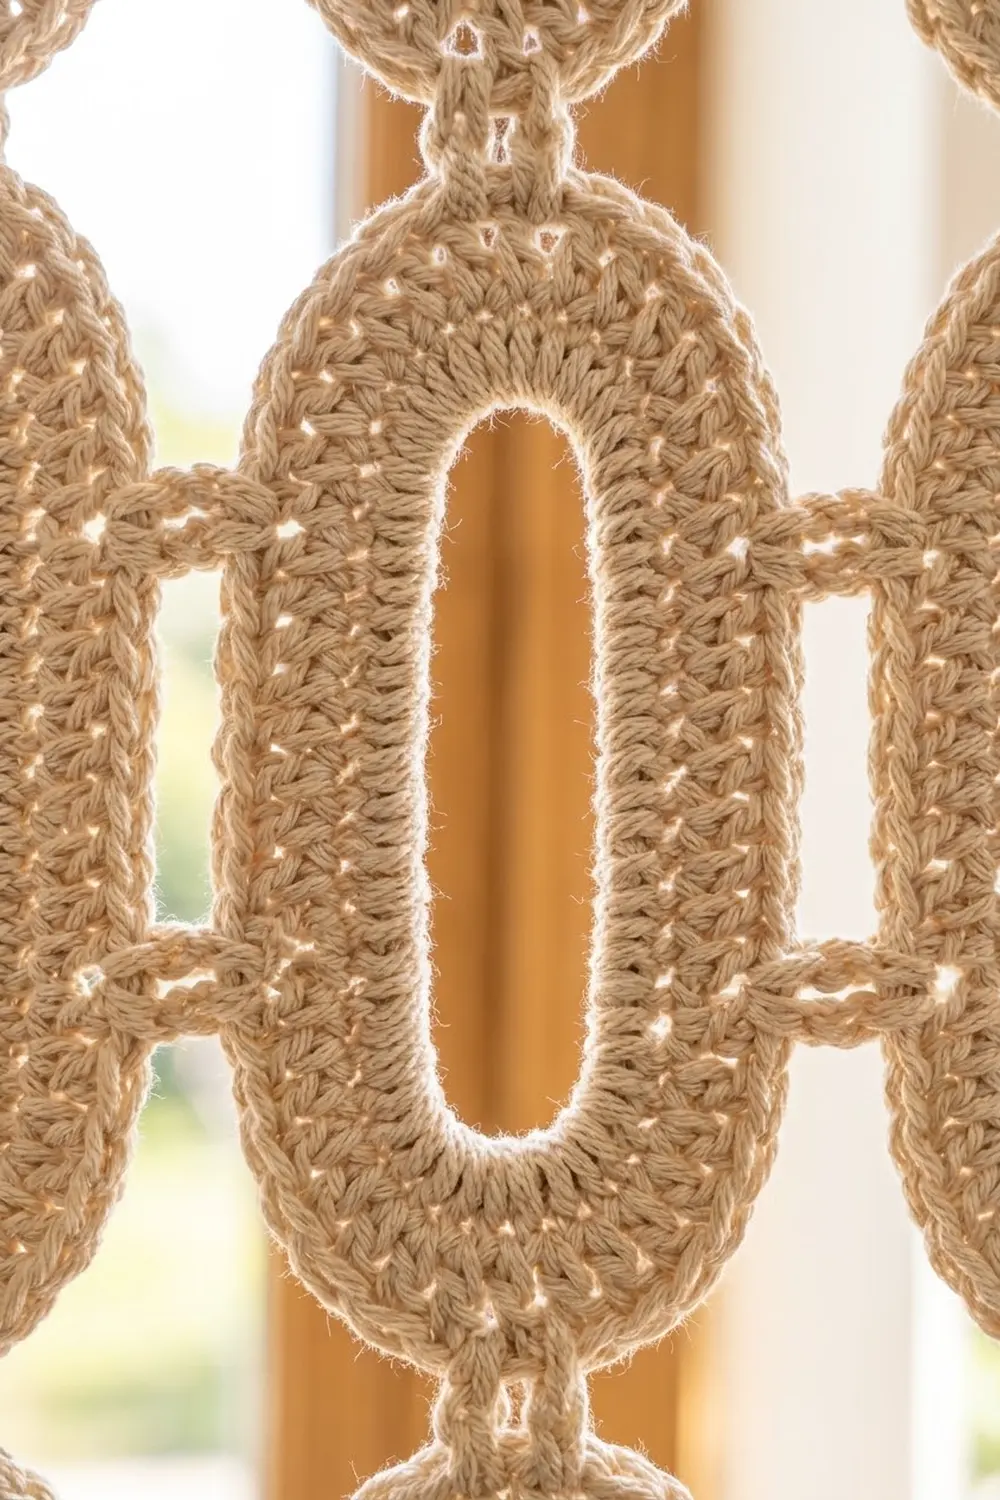
Oval Link (Make 140)
The foundation ring is split into four zones. Place markers to keep track of them:
- Side A: ch 1 to 12
- End 1: ch 13 to 18
- Side B: ch 19 to 30
- End 2: ch 31 to 36
Foundation: Ch 36, sl st into the first ch to form a ring. Don’t twist the chain.
Rnd 1 (sc): Ch 1 (does not count as a st). Sc in each of the next 12 ch (Side A). For End 1, 2 sc in next ch, sc in next ch; repeat from * 2 more times (9 sts). Sc in each of the next 12 ch (Side B). For End 2, 2 sc in next ch, sc in next ch; repeat from * 2 more times (9 sts). Sl st to the first sc.
Count: 42 sts (12 + 9 + 12 + 9).
Rnd 2 (hdc): Ch 2 (does not count as a st). Hdc in each of the next 12 sts (side). For the end, hdc in next st, 2 hdc in next st; repeat from * 3 more times, then hdc in next st (13 sts). Hdc in each of the next 12 sts (side). Repeat the end sequence (13 sts). Sl st to the first hdc.
Count: 50 sts* (12 + 13 + 12 + 13).
Rnd 3 (sc): Ch 1 (does not count as a st). Sc in each of the next 12 sts (side). For the end, sc in next st, 2 sc in next st, sc in each of next 2 sts; repeat from * 3 more times (17 sts). Sc in each of the next 12 sts (side). Repeat the end sequence (17 sts). Sl st to the first sc.
Count: 58 sts* (12 + 17 + 12 + 17).
Fasten off and leave a 6 in (15.2 cm) tail. Weave in the starting tail now and keep the ending tail for joining, where it saves weaving.
The finished link has two straight sides of 12 sts each and two rounded ends of 17 sts each. The center st of each end is st 9. The center pair on each side is sts 6 and 7.
Make All Pieces
You need 140 links in natural cream: 70 for each panel. Pin every tenth link against your test link so the sizes stay consistent.
Layout per panel (C = link column, R = link row):
      C1   C2   C3   C4   C5
R1    O -- O -- O -- O -- O     <- header band attaches here
      |    |    |    |    |
R2    O -- O -- O -- O -- O
      |    |    |    |    |
...   (repeat)
      |    |    |    |    |
R14   O -- O -- O -- O -- O     <- bottom, hangs free
| is a tip-to-tip join and -- is a ch-3 side bar.
Joining
Joining happens in two steps: vertical columns first, then side bars between the columns.
Step 1, tip-to-tip columns: Lay two links end to end. Hold the bottom end of the upper link against the top end of the lower link, right sides facing up. Attach yarn and sl st through both layers in end sts 8, 9, and 10 of each link, matching stitch to stitch, so 3 pairs are joined. Wrap the yarn tail firmly 4 times around the joint to make a neat bound collar, like the one in the photo, then fasten off and hide the tail inside the wrap. Join 14 links per column, which gives 13 joins per column. Make 5 columns per panel.
Step 2, side bars: Lay the 5 columns side by side. For each row of links, insert the hook under sts 6 and 7 of the right side of the left link together, then pull up yarn and sc. Ch 3, sc through sts 6 and 7 of the left side of the right link together, and fasten off. That makes 4 bars per row and 56 bars per panel.
Tension: Each ch-3 bar should span exactly 0.75 in (1.9 cm). If your bars are tight, the panel puckers into a curve. If they are loose, the links twist. Keep the tip joins snug but don’t let them squeeze the link ends out of shape.
Size checkpoint: The joined panel should measure 16.75 in (42.5 cm) across the link midpoints, which is 5 x 2.75 in + 4 x 0.75 in. It should measure 80.5 in (204.5 cm) long, which is 14 x 5.75 in.
Border: Header Band and Tabs
The header band is the only border, and it runs along the top edge only. The sides are left open and the bottom links hang free, as in the photo.
Border gauge: 16 sc = 4 in (10.2 cm), so 4 sts = 1 in (2.5 cm).
Row 1 (setup): With the right side facing, attach yarn to st 4 of the top end of the first link in R1. Sc in end sts 4 to 14 (11 sts), ch 3, sc in end sts 4 to 14 of the next link (11 sts); repeat from * 3 more times. Turn.
Count: 67 sts* (5 links x 11 sc = 55, plus 4 bridges x 3 ch = 12).
Row 2: Ch 1, sc in each sc and in each ch across. Turn.
Count: 67 sts.
Rows 3 to 10: Ch 1, sc in each st across. Turn.
Count: 67 sts per row. The band is now 2.5 in (6.4 cm) deep.
Why the math works: Each link plus one bar takes up 2.75 in + 0.75 in = 3.5 in (8.9 cm). At 4 sts per inch, that is 14 sts, which is exactly 11 sc over the link plus 3 ch over the bar. The band’s 67 sts (16.75 in) therefore match the joined panel width with no extra stitches added at the seams. The 11 sts are the center 11 of each 17-st end, so 3 end sts are left free on each side to round down into the bar.
Tabs (make 5 across Row 10): Lay out the 67 sts like this, from right to left:
3 skip, 5 tab, 9 skip, 5 tab, 9 skip, 5 tab, 9 skip, 5 tab, 9 skip, 5 tab, 3 skip
Check the total: 3 + (5 x 5) + (4 x 9) + 3 = 67.
For each tab, attach yarn to the first of its 5 sts. Ch 1, sc in each of the 5 sts, turn. Work 23 more rows of 5 sc, for 24 rows in total. The tab is now 6 in (15.2 cm) long and 1.25 in (3.2 cm) wide. Fasten off with a 10 in (25.4 cm) tail. Fold the tab to the back and whipstitch its last row to the back of band Row 10, directly behind its own base. This makes a 3 in (7.6 cm) loop that fits rods up to about 1.5 in (3.8 cm) across.
Final Blocking
- Weave in any remaining tails. Run each one through at least 2 in (5.1 cm) of stitches, because cotton tails work loose easily.
- Lay the panel flat on mats. Work in sections if your floor space is limited.
- Pin the header band first to 16.75 in x 2.5 in (42.5 cm x 6.4 cm).
- Working down column by column, pin each link to 2.75 in x 5.75 in (7.0 cm x 14.6 cm). Pin the center opening open, too.
- Check each bar for 0.75 in (1.9 cm) and each column for a straight vertical line.
- Spray until damp, not soaked, and let the panel dry completely, about 24 hours.
- Unpin, hang the panel on the rod, and let it settle for a day before final trimming.
Final Quality-Control Checklist
- Every link has 58 sts and measures 2.75 in x 5.75 in (7.0 cm x 14.6 cm).
- Each panel has 70 links in a 5 x 14 grid.
- There are 13 tip joins per column, each through end sts 8 to 10.
- There are 4 side bars per row, each ch 3 at 0.75 in (1.9 cm).
- The header band has 67 sts in every row, 10 rows, 2.5 in (6.4 cm).
- There are 5 tabs, evenly spaced, each folded into a 3 in (7.6 cm) loop.
- The panel measures 16.75 in x 83 in (42.5 cm x 210.8 cm).
- Both panels are the same length within 0.5 in (1.3 cm).
Troubleshooting
- Link curls or cups: Your Rnd 2 or Rnd 3 increases are too tight. Go up half a hook size for those rounds only, or check that you placed the end increases correctly.
- Link ruffles at the ends: You have too many increases. Recount Rnd 3 against 12 + 17 + 12 + 17.
- Center opening twists: The foundation chain was twisted when you joined it. Remake the link.
- Panel leans to one side: The side bars are uneven. Remake any bar that doesn’t span 0.75 in (1.9 cm).
- Header band wider than the panel: You probably worked into extra end sts. Use only sts 4 to 14 of each link.
- Panel too long or short: Add or remove a whole row of 5 links, which changes the length by 5.75 in (14.6 cm).
Care
Hand wash in cool water with a mild detergent and dry flat. Reshape the links while damp. Don’t tumble dry, because heat and agitation stretch cotton links out of shape.
Final Notes
The whole design rests on one measurement chain. Each link of 58 sts measures 2.75 in x 5.75 in (7.0 cm x 14.6 cm). Five links and four 0.75 in (1.9 cm) bars make 16.75 in (42.5 cm), which matches the 67-st header band exactly. Fourteen links make 80.5 in (204.5 cm), and the 2.5 in (6.4 cm) band brings each panel to 83 in (210.8 cm). Get the test link right, and the rest follows.
Happy crocheting!