

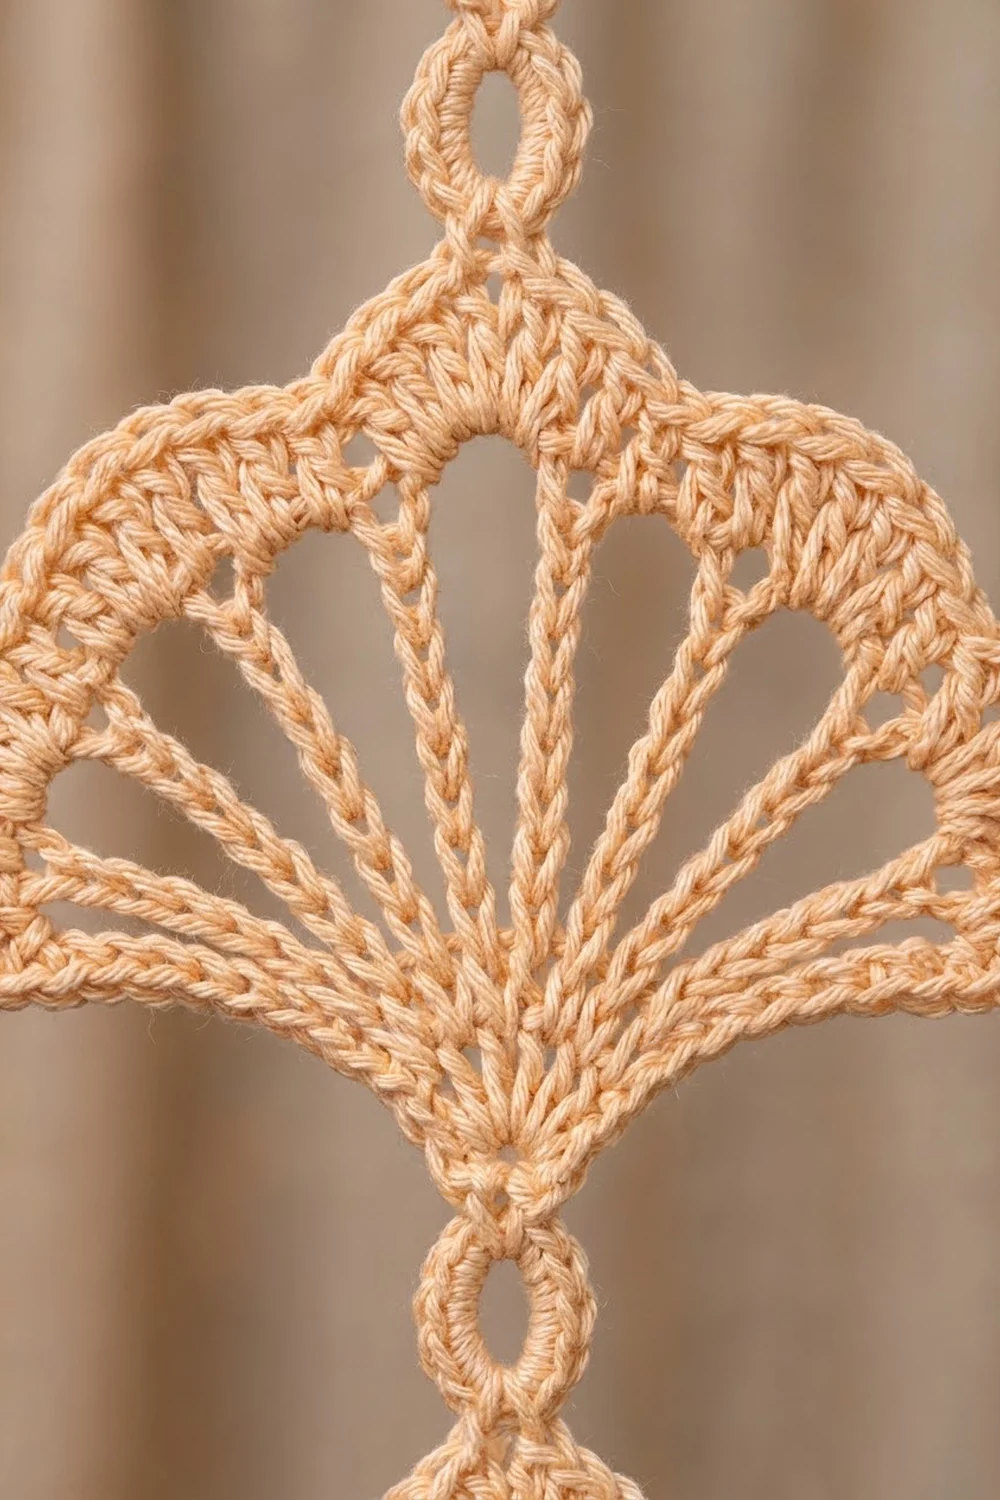
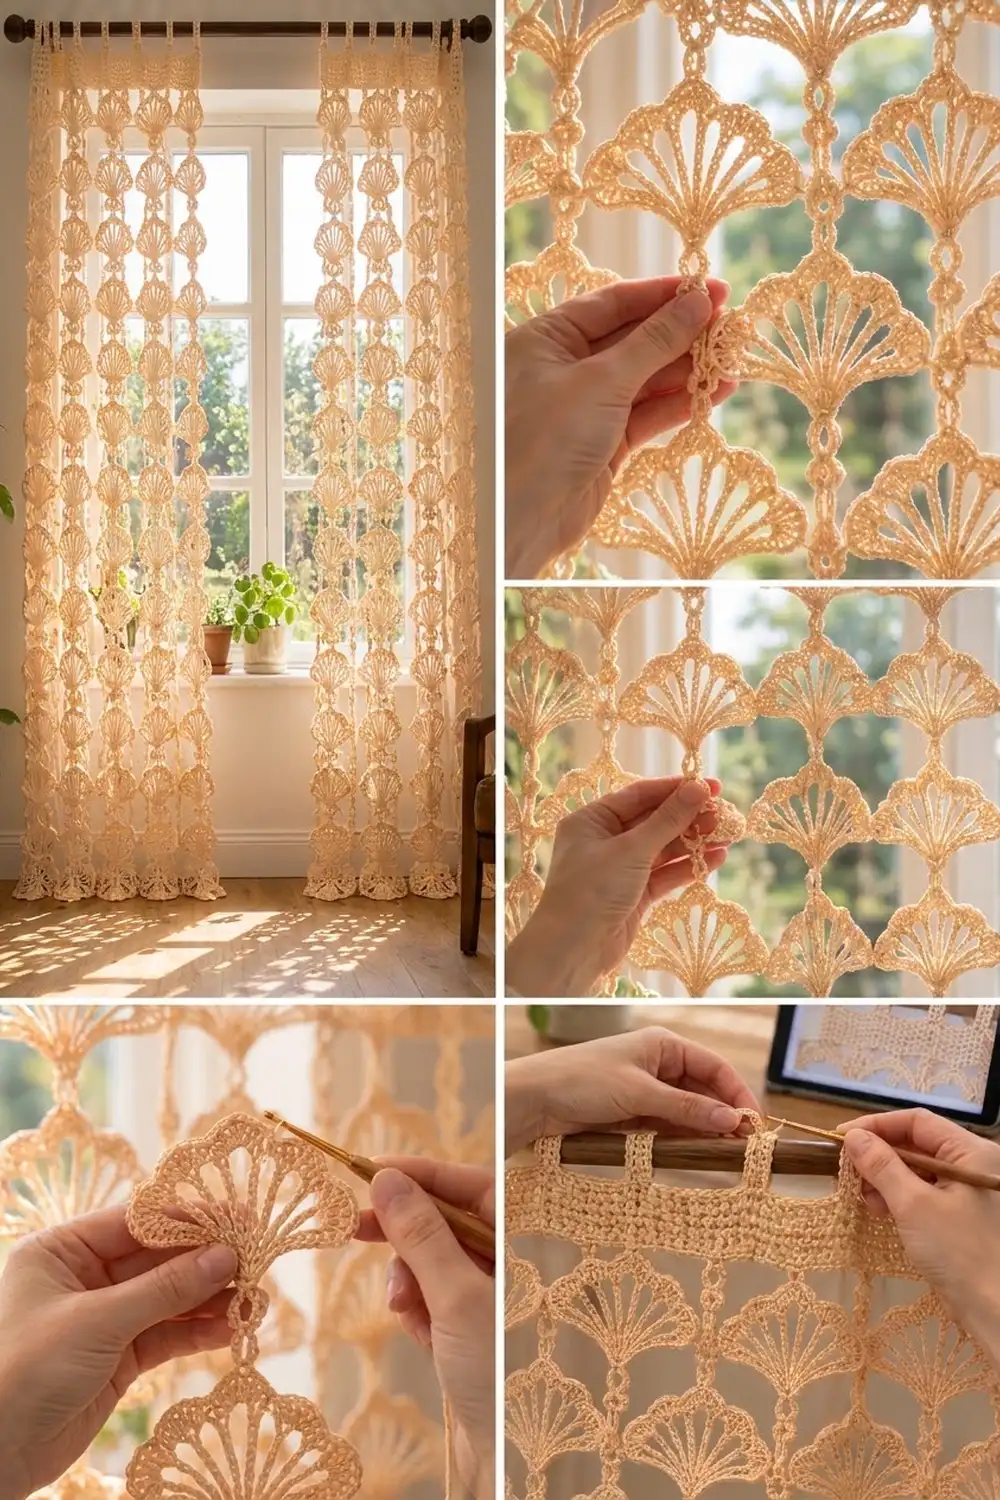
These airy curtain panels are made from columns of open fan motifs that look like ginkgo leaves or seashells. Light passes through each fan’s spokes and throws lacy shadows on the floor. Every fan hangs from the one above it by a short chain link with a small oval bead loop.
The design uses one warm peach cotton throughout. Each panel has a solid header band with six tab loops for the rod. Seven fan strands hang below the header, and every other strand is set slightly lower so the fans nest.
This pattern uses US crochet terms. Each panel is 32 in (81.3 cm) wide. It is 75.5 in (191.8 cm) long at the shorter strands and 77 in (195.6 cm) long at the longer strands, not counting the tab loops.
You’ll make each fan in four short rows, from the base ring out to the scallop edge. Fans are linked into strands of 16. You then crochet the header band, attach the strands to it, and finish with an edging round and tabs.
Finished Size and Construction
- Finished panel size: 32 in (81.3 cm) wide × 75.5–77 in (191.8–195.6 cm) long
- Skill level: Intermediate
- Terminology: US
- Yarn weight: DK (#3) mercerized cotton
- Hook: 3.5 mm (E/4)
- Number of pieces: 2 panels; each panel has 1 header and 7 strands of 16 fans (224 fans total)
- Layout: 7 strands side by side per panel, centered 4.5 in (11.4 cm) apart
- Fan size: 4 in (10.2 cm) wide × 3 in (7.6 cm) tall
- Header size before border: 31.5 in (80.0 cm) × 3 in (7.6 cm)
- Border depth: 0.25 in (0.6 cm) on each edge
Materials
Use a smooth mercerized cotton or cotton blend. It shows the spokes clearly and doesn’t stretch much under the weight of the strands. Avoid fuzzy yarns, which blur the open spaces.
- Peach/apricot DK cotton: 600 g, about 1,380 m (12 balls of 50 g / 115 m)
- 3.5 mm (E/4) crochet hook
- Tapestry needle
- Stitch markers (at least 14)
- Measuring tape
- Blocking mats, rustproof pins and a spray bottle
- Curtain rod, up to 1.25 in (3.2 cm) in diameter
The yarn amount includes a margin of about 25% for your gauge swatch, tails and tension differences.
Abbreviations (US Terms)
- ch – chain
- sl st – slip stitch
- sc – single crochet
- hdc – half double crochet
- dc – double crochet
- tr – treble crochet
- sp(s) – space(s)
- st(s) – stitch(es)
Special stitch: Link. Ch 4, ch 5, then sl st in the 5th ch from the hook to make a small oval bead loop. Ch 4 more. A finished link is about 1.5 in (3.8 cm) long.
Double link: Work the Link twice in a row, about 3 in (7.6 cm) long.
Gauge and Checkpoints
Header gauge: 16 hdc and 12 rows = 4 in (10.2 cm) square.
Fan gauge: One finished fan = 4 in (10.2 cm) wide × 3 in (7.6 cm) tall from the base of the ring to the top of the scallop.
Make one test fan before you start. Check it at these points:
- After Row 1: 1.5 in (3.8 cm) wide
- After Row 2: 2.5 in (6.4 cm) wide
- After Row 3: 3.5 in (8.9 cm) wide
- After Row 4: 4 in (10.2 cm) wide × 3 in (7.6 cm) tall
Small errors add up along a strand. A fan that is 0.25 in (0.6 cm) too tall makes a 16-fan strand 4 in (10.2 cm) too long.
- If your fan is too big, go down to a 3.25 mm hook.
- If your fan is too small, go up to a 3.75 mm hook.
Check the header gauge separately, because hdc rows often work up at a different tension than lace.
Fan Motif
The fan is worked in rows, starting from a 6-ch ring.
Ring: For the first fan of a strand, ch 6 and sl st in the first ch to form a ring. For every later fan, the ring is made at the end of a link (see Strand).
Row 1: Ch 3 (counts as dc), 8 dc in the ring. Turn. (9 dc)
Row 2: Ch 5 (counts as dc + ch 2). Dc in the next dc, ch 2; repeat from * 6 more times. Dc in the top of the turning ch. Turn. (9 dc, 8 ch-2 sps)
Row 3: Ch 7 (counts as tr + ch 3). Tr in the next dc, ch 3; repeat from * 6 more times. Tr in the 3rd ch of the turning ch. Turn. (9 tr, 8 ch-3 sps)
This makes the eight long open spokes.
Row 4 (scallop trim): Ch 1, sc in the first tr. 5 dc in the next ch-3 sp, sc in the next tr; repeat from * 7 more times. Work the last sc in the 4th ch of the turning ch.
Count: 9 sc (one in each tr) + 40 dc (five in each space) = 49 sts.
Fasten off, leaving a 4 in (10.2 cm) tail. The 5th sc of Row 4 is the center sc, sitting between the fourth and fifth scallops. Place a marker in it.
Strand
Each strand is built from the bottom up. Fan 1 hangs at the bottom.
- Fan 1: Make a complete fan, starting with a 6-ch ring.
- Fans 2–16: Join yarn with a sl st in the center sc of the previous fan. Work 1 Link. Ch 6 and sl st in the 6th ch from the hook to form the new ring. Work Rows 1–4 of the fan into this ring. Fasten off.
- Top link: Join yarn in the center sc of Fan 16.
- Odd strands (1, 3, 5, 7): Work 1 Link.
- Even strands (2, 4, 6): Work 1 Double Link.
Leave a 6 in (15.2 cm) tail and leave the last loop live on a marker.
Each fan plus one link adds 4.5 in (11.4 cm) to the strand.
- Odd strand: (16 fans × 3 in) + (16 links × 1.5 in) = 72 in (182.9 cm)
- Even strand: 72 in + 1.5 in for the extra link = 73.5 in (186.7 cm)
When you work over your tails in Row 1 of the next fan, you’ll have fewer ends to weave in later.
Strand checkpoint: After 4 fans, an odd strand should measure 16.5 in (41.9 cm). That’s 4 fans plus 3 joining links, before the top link.
Make All Pieces
For one pair of panels, make:
- 8 odd strands (16 fans + 1 Link each) = 128 fans
- 6 even strands (16 fans + 1 Double Link each) = 96 fans
- 2 header bands (see Joining)
That makes 224 fans in total, all in peach.
Layout for one panel (header at the top, positions counted from the left in Header Row 1 stitches):
[==================== HEADER: 126 sts ====================]
  st 9   st 27   st 45   st 63   st 81   st 99   st 117
   |       |       |       |       |       |       |
  S1      S2      S3      S4      S5      S6      S7
 odd     even    odd     even    odd     even    odd
 Link   D-Link   Link   D-Link   Link   D-Link   Link
Joining
Header body (one per panel):
Foundation: Ch 128.
Row 1: Hdc in the 3rd ch from the hook and in each ch across. Turn. (126 hdc)
Rows 2–9: Ch 2 (doesn’t count as a st), hdc in each st across. Turn. (126 hdc per row)
The header should measure 31.5 in (80.0 cm) × 3 in (7.6 cm). Fasten off.
Stitch-to-stitch logic: Each strand gets an 18-st block of the header: 18 sts ÷ 4 sts per inch = 4.5 in (11.4 cm). Seven blocks give 7 × 18 = 126 sts, which matches the header exactly. Each strand hangs from the 9th st of its block: sts 9, 27, 45, 63, 81, 99 and 117 along the foundation edge.
Attach the strands: Hold the header right side up, with the foundation edge at the bottom.
- For each strand, put the live loop back on your hook.
- Insert the hook through the bottom loop of its assigned foundation st and sl st.
- Fasten off and weave the tail up into the header.
Make sure no strand is twisted. The bead loops should all face forward.
Tension advice: Keep the top link at the same tension as the links inside the strand. A tight link pulls up the whole strand and leaves a gap in the nesting pattern.
Size checkpoint: Lay the panel flat. Strand centers should be 4.5 in (11.4 cm) apart. Odd strands should hang 72 in (182.9 cm) below the header and even strands 73.5 in (186.7 cm).
Border
The border is one round of sc edging around the header, followed by six tabs. It uses the same gauge as the header: 16 sts = 4 in (10.2 cm).
Edging round: With the right side facing, join yarn in the first st of Row 9 at the right-hand corner. Ch 1, then work around the header:
- Top edge: sc in each hdc across = 126 sc. Ch 1 at the corner.
- Side edge: 1 sc in the end of each row = 9 sc. Ch 1 at the corner.
- Bottom edge: sc in each foundation st = 126 sc. Work over the strand join sl sts to lock them in place. Ch 1 at the corner.
- Second side edge: 9 sc. Ch 1, then sl st to the first sc.
Count: 126 + 9 + 126 + 9 = 270 sc, plus 4 ch-1 corner spaces.
Here the corner chains are counted apart from the side totals. Each long side keeps exactly 1 sc per existing st (126 + 0 extra). That keeps the 7 × 18 strand blocks lined up with the edging. The 9 sc on each short side match the 9 header rows, so the ends stay straight. The edging adds 0.25 in (0.6 cm) on every edge, bringing the header to 32 in (81.3 cm) × 3.5 in (8.9 cm).
Tabs: Each tab is worked over 8 top-edge sc. Counting from the right, place the tabs on sts 5–12, 27–34, 49–56, 71–78, 93–100 and 115–122.
- 6 tabs × 8 sts = 48 sts
- 5 gaps × 14 sts = 70 sts
- 2 ends × 4 sts = 8 sts
- Total: 48 + 70 + 8 = 126 sts ✓
For each tab:
- Join yarn in the first st of the tab position. Ch 2, then work 8 hdc. Turn.
- Work 17 more rows of 8 hdc, for 18 rows in total = 6 in (15.2 cm).
- Fold the tab to the back and whipstitch its last row to the back of header Row 9.
Each finished loop is about 2.5 in (6.4 cm) tall. It fits a rod up to 1.25 in (3.2 cm) across.
Final Blocking
- Wet each panel in cool water and press out the excess. Don’t wring it.
- Lay the header flat and pin it to 32 in (81.3 cm) × 3.5 in (8.9 cm).
- Lay the strands out straight below the header, 4.5 in (11.4 cm) apart center to center.
- Pin each fan open to 4 in (10.2 cm) wide. Put one pin in each scallop and one in the ring.
- Pin the bead loops into neat ovals.
- Let the panel dry completely, then unpin it.
- For crisp spokes, spray the fans lightly with starch while they’re still pinned.
Final Quality-Control Checklist
- Every fan has 8 open spokes and 8 scallops (49 sts in Row 4)
- Every link starts in the center sc of the fan below
- 16 fans in every strand; 7 strands per panel
- Odd strands use a Link at the top and even strands use a Double Link
- Strands are attached at header sts 9, 27, 45, 63, 81, 99 and 117
- Edging count is 270 sc plus 4 corner chains
- 6 tabs per panel, evenly spaced and securely sewn
- No twisted strands; all bead loops face forward
- All ends are woven in and trimmed
Troubleshooting
The fan cups or curls. Row 1 may be too tight around the ring. Work the 6-ch ring more loosely, or go up 0.25 mm in hook size for Row 1 only.
The scallop edge ruffles. Use 4 dc per space instead of 5. Your Row 4 count then becomes 9 sc + 32 dc = 41 sts.
The spokes look uneven. Pull each tr up to the same height, and keep the ch-3 spaces equal.
A strand twists as it hangs. One link may be crocheted with a twisted chain. Re-block the strand, and check that each bead loop lies flat.
The header waves along the bottom. The edging is too tight. Redo it with a larger hook.
The strands are different lengths. Measure all your fans. Redo any fan that is more than 0.25 in (0.6 cm) off size.
Care
Hand wash in cool water with a mild detergent. Dry flat, reshaping and pinning the fans so the strands don’t stretch while wet.
Final Notes
The measurement chain is simple:
- Each 4 in × 3 in (10.2 cm × 7.6 cm) fan plus its 1.5 in (3.8 cm) link adds 4.5 in (11.4 cm) to a strand.
- Sixteen fans and their links make a 72 in (182.9 cm) strand, and the Double Link on even strands makes it 73.5 in (186.7 cm).
- Seven strands, each given an 18-st block, make a header of 126 sts = 31.5 in (80.0 cm).
- The edging brings each panel to 32 in (81.3 cm) wide.
If you check your gauge at each stage, both panels will come out matching.
Happy crocheting!