

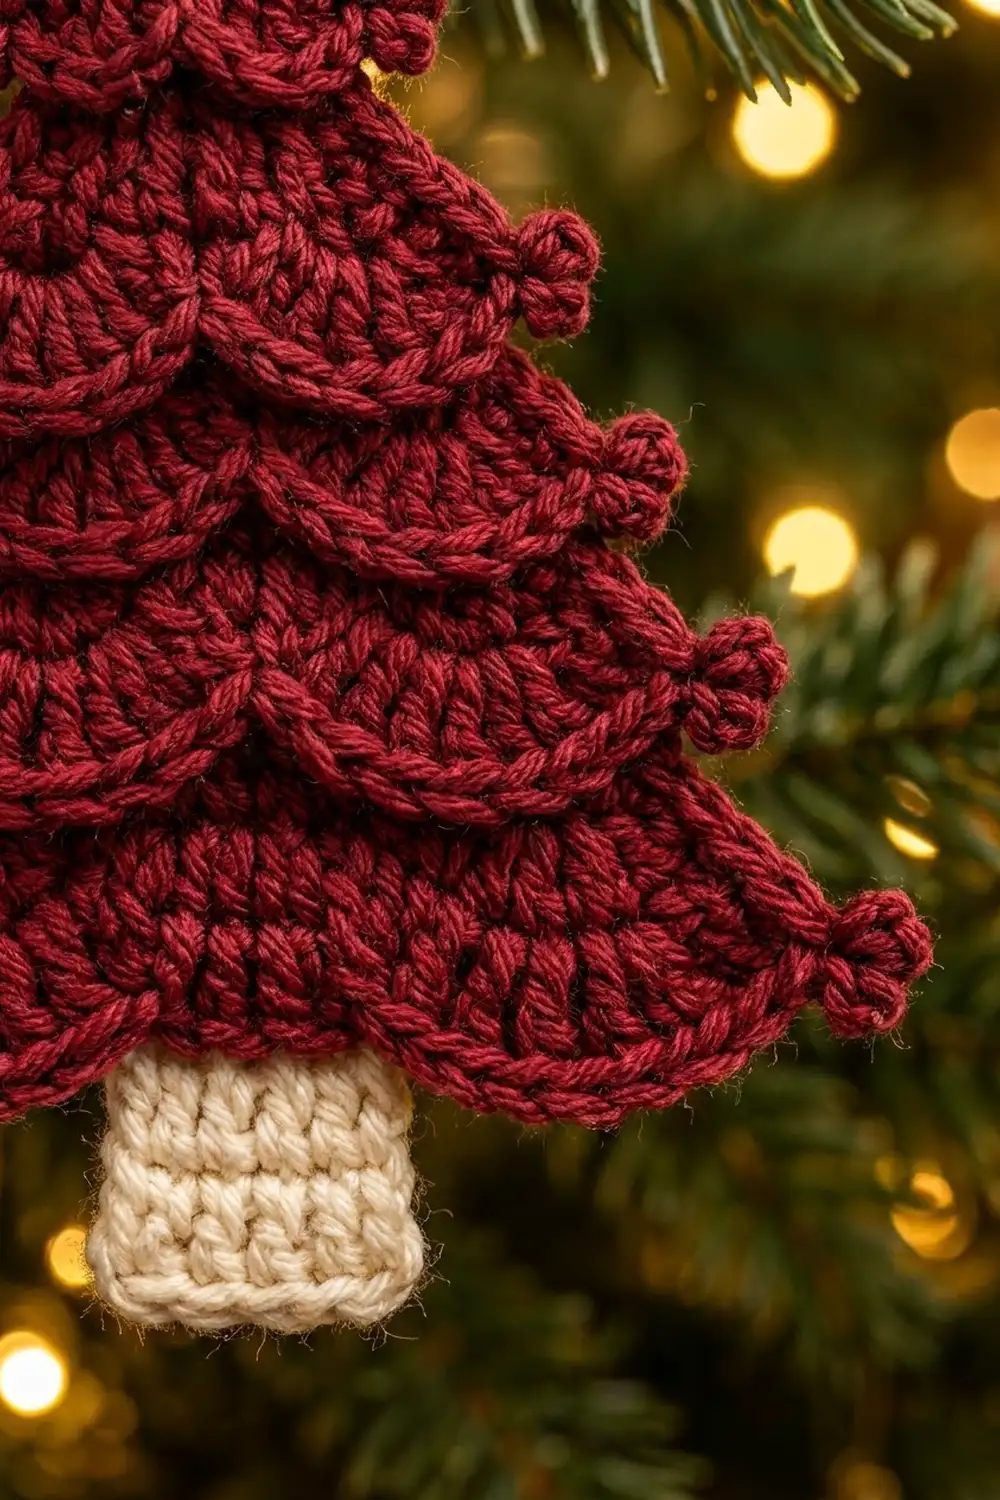
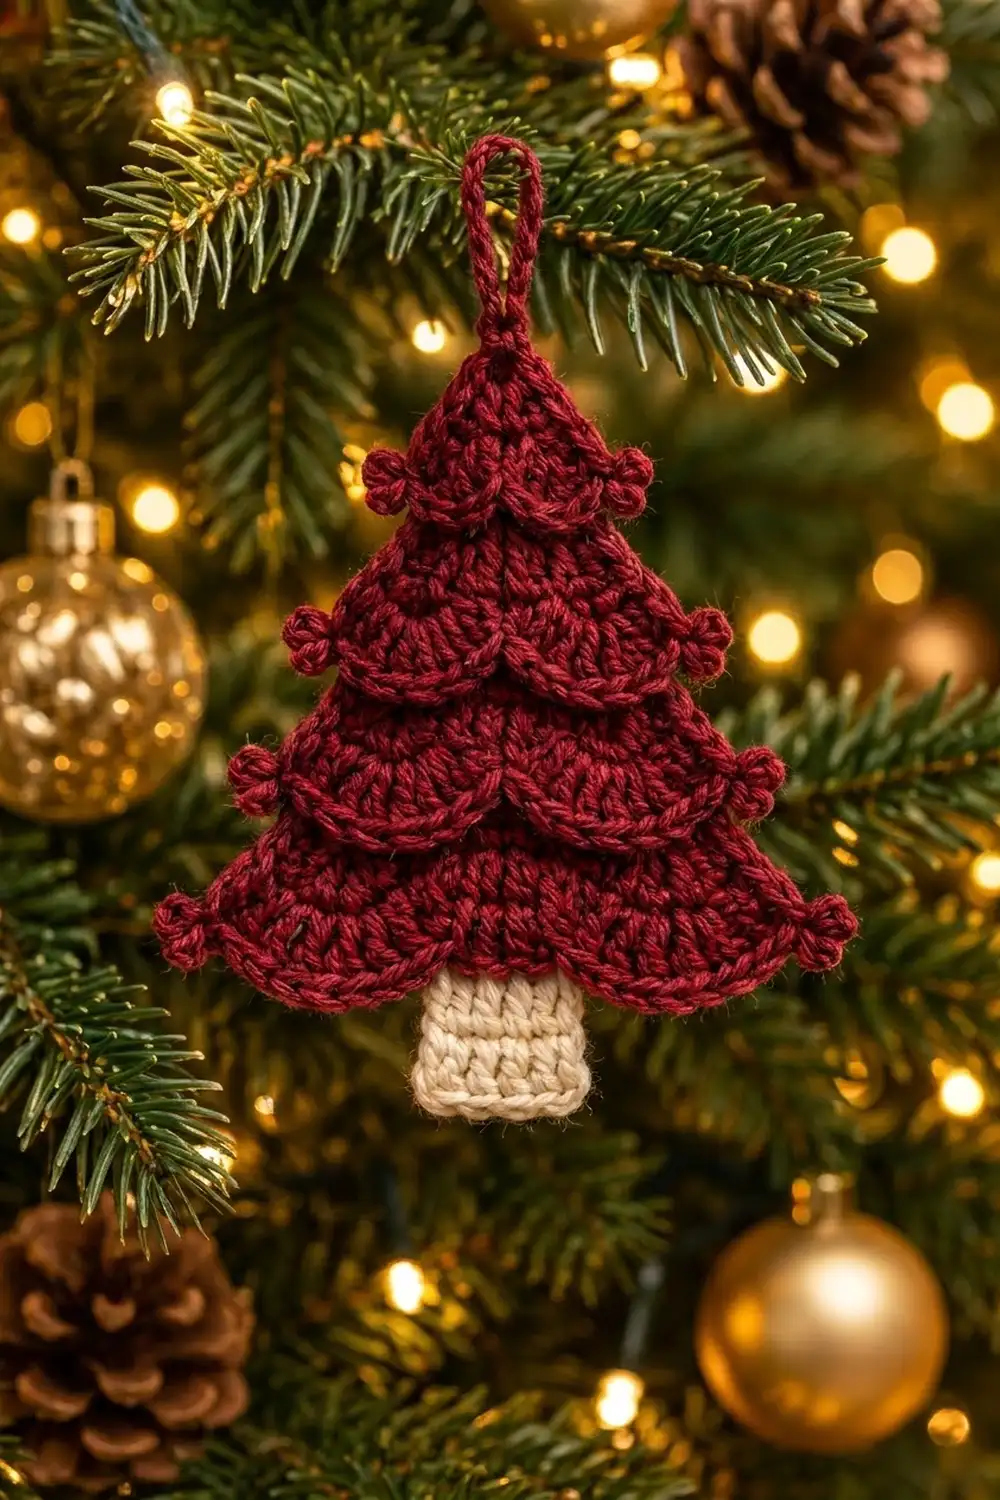
This little tree is a flat, one-piece Christmas ornament with four stepped tiers. Each tier ends in a scalloped flap that drapes over the tier below. A tiny bobble sits at both ends of every flap, like a berry on the tip of a branch.
The colors are simple and classic: a deep cranberry red for the tree and a soft cream for the trunk. The fabric is dense single crochet, so the ornament keeps its shape on a branch without stiffening. The scallops give it a lacy, layered look.
The pattern uses US crochet terms. The finished ornament measures about 3.5 in (8.9 cm) wide across the body and about 4 in (10.2 cm) across the bobbles. It is about 5.2 in (13.2 cm) tall from tip to trunk, not counting the hanging loop.
You work it from the top down in rows. Start at the tip and grow the tree in four tiers. Work the first row of each new tier through one loop only. That leaves a line of free loops on the right side, and later you work the scalloped flaps into those loops. The trunk and hanging loop go on last.
Finished Size and Construction
- Finished size: 3.5 in (8.9 cm) wide body, about 4 in (10.2 cm) across bobbles, 5.2 in (13.2 cm) tall without loop
- Skill level: Easy-intermediate
- Terminology: US crochet terms
- Yarn weight: DK (light worsted, #3)
- Hook: 3.25 mm (US D-3)
- Number of pieces: 1
- Layout: single flat ornament, four tiers plus trunk
- Piece size before scallops: 3.5 in (8.9 cm) wide x 4.2 in (10.7 cm) tall (body only)
- Trunk: 0.8 in (2.0 cm) wide x 1 in (2.5 cm) tall
- Scallop (border) depth: about 0.4 in (1.0 cm) below each tier line
Materials
Choose a smooth, tightly plied DK yarn. Cotton or a cotton blend shows the shells and bobbles most clearly. Acrylic also works and weighs less on the branch. Avoid fuzzy or brushed yarn, which hides the scallop edges.
- Color A, cranberry red: 10 g, about 23 m (25 yd)
- Color B, cream: 2 g, about 5 m (5.5 yd)
These amounts assume a DK yarn of about 230 m per 100 g. They include extra for the gauge swatch and for weaving in ends.
Tools:
- 3.25 mm (US D-3) crochet hook
- Tapestry needle
- Scissors
- Stitch markers (2)
- Ruler or tape measure
- Blocking mat and rust-proof pins
- Spray bottle with water
Abbreviations (US Terms)
- ch – chain
- sl st – slip stitch
- sc – single crochet
- dc – double crochet
- inc – 2 sc in the same stitch
- sk – skip
- FLO – front loop only
- st(s) – stitch(es)
- RS / WS – right side / wrong side
Special stitch – Bobble picot (bp): Ch 3. In the 3rd ch from hook, [yarn over, insert hook, yarn over and pull up a loop, yarn over and pull through 2 loops] 3 times. Yarn over and pull through all 4 loops on the hook, then ch 1 to close. This makes a small round ball on a short stem.
Row notes: The turning ch 1 does not count as a stitch. Odd rows are RS rows and even rows are WS rows. Mark the RS of Row 1 with a stitch marker.
Gauge and Checkpoints
Gauge: 24 sc and 24 rows = 4 in (10.2 cm), or 12 sc and 12 rows = 2 in (5.1 cm). That is 6 stitches and 6 rows per inch.
Use Tier 1 as your test piece. It is only 7 rows, so it is quick to rip out if needed. Measure it flat, without stretching.
Checkpoints:
- After Row 7 (Tier 1): 9 sts, about 1.5 in (3.8 cm) wide, 1.2 in (3.0 cm) tall
- After Row 13 (Tier 2): 13 sts, about 2.2 in (5.6 cm) wide, 2.2 in (5.6 cm) tall
- After Row 19 (Tier 3): 17 sts, about 2.8 in (7.1 cm) wide, 3.2 in (8.1 cm) tall
- After Row 25 (Tier 4): 21 sts, 3.5 in (8.9 cm) wide, 4.2 in (10.7 cm) tall
If your tree is too big, go down to a 3.0 mm hook. If it is too small or feels stiff, go up to a 3.5 mm hook. Do not add or remove stitches, because the scallop math depends on these exact counts.
Tree Body
Use Color A.
Tier 1
Row 1 (RS): Ch 2, 3 sc in 2nd ch from hook, turn. (3 sts)
Row 2 (WS): Ch 1, inc in first st, sc in next st, inc in last st, turn. (5 sts)
Row 3: Ch 1, sc in each st across, turn. (5 sts)
Row 4: Ch 1, inc in first st, sc in next 3 sts, inc in last st, turn. (7 sts)
Row 5: Ch 1, sc in each st across, turn. (7 sts)
Row 6: Ch 1, inc in first st, sc in next 5 sts, inc in last st, turn. (9 sts)
Row 7: Ch 1, sc in each st across, turn. (9 sts)
Checkpoint: about 1.5 in (3.8 cm) wide.
Tier 2
Row 8 (WS): Ch 1, working in FLO only, sc in each st across, turn. (9 sts)
The WS is facing you, so the front loop is the loop on the WS. The unworked loops of Row 7 stay on the RS as a neat horizontal line. The Tier 1 scallops go into this line later.
Row 9: Ch 1, sc in each st across, turn. (9 sts)
Row 10: Ch 1, inc in first st, sc in next 7 sts, inc in last st, turn. (11 sts)
Row 11: Ch 1, sc in each st across, turn. (11 sts)
Row 12: Ch 1, inc in first st, sc in next 9 sts, inc in last st, turn. (13 sts)
Row 13: Ch 1, sc in each st across, turn. (13 sts)
Checkpoint: about 2.2 in (5.6 cm) wide.
Tier 3
Row 14 (WS): Ch 1, working in FLO only, sc in each st across, turn. (13 sts)
Row 15: Ch 1, sc in each st across, turn. (13 sts)
Row 16: Ch 1, inc in first st, sc in next 11 sts, inc in last st, turn. (15 sts)
Row 17: Ch 1, sc in each st across, turn. (15 sts)
Row 18: Ch 1, inc in first st, sc in next 13 sts, inc in last st, turn. (17 sts)
Row 19: Ch 1, sc in each st across, turn. (17 sts)
Checkpoint: about 2.8 in (7.1 cm) wide.
Tier 4
Row 20 (WS): Ch 1, working in FLO only, sc in each st across, turn. (17 sts)
Row 21: Ch 1, sc in each st across, turn. (17 sts)
Row 22: Ch 1, inc in first st, sc in next 15 sts, inc in last st, turn. (19 sts)
Row 23: Ch 1, sc in each st across, turn. (19 sts)
Row 24: Ch 1, inc in first st, sc in next 17 sts, inc in last st, turn. (21 sts)
Row 25 (RS): Ch 1, sc in each st across. (21 sts) Fasten off.
Checkpoint: 3.5 in (8.9 cm) wide and 4.2 in (10.7 cm) tall.
The tops of Row 25 now form the bottom edge of the tree. Their front loops (on the RS) will hold the Tier 4 scallops. Their back loops (on the WS) will hold the trunk.
Trunk
With RS facing and Color B, find the center 5 sts of Row 25. These are sts 9 through 13, with 8 sts on each side.
Row 1: Join Color B with sl st in the back loop of st 9. Ch 1, sc in the back loop of the same st and in the back loops of the next 4 sts, turn. (5 sts)
Rows 2–6: Ch 1, sc in each st across, turn. (5 sts)
Fasten off at the end of Row 6. The trunk measures 0.8 in (2.0 cm) wide and 1 in (2.5 cm) tall. Because it grows from the back loops, it sits slightly behind the bottom scallops, which hide its top edge.
Scalloped Tier Edges (Border)
This is the ornament’s border: four separate scallop passes, one per tier, worked into the free front loops on the RS.
Border gauge: Each scallop uses 4 base stitches (sl st, skip, shell, skip) and is about 0.7 in (1.8 cm) wide. The 5-dc shell hangs about 0.4 in (1.0 cm) below its base line.
Why the math works: A row made of sl st + [sk 1, shell, sk 1, sl st] repeats needs a multiple of 4, plus 1, stitches. Each tier’s last row was built to fit exactly: 9 = 4 x 2 + 1, 13 = 4 x 3 + 1, 17 = 4 x 4 + 1, and 21 = 4 x 5 + 1. Each pass starts and ends on an edge stitch, so the bobbles land right at the side edges.
Scallop pass method (for every tier): With RS facing and the tree upright, work from right to left along the line of free front loops.
- Join Color A with sl st in the free loop of the first st at the right edge.
- Work 1 bp, then sl st in the same st. The bobble sits at the edge.
- Sk 1 st, 5 dc in next st, sk 1 st, sl st in next st. Repeat from * across. The last sl st lands in the last st.
- Work 1 bp, then sl st in the same last st. Fasten off.
Tier 1 (free loops of Row 7, 9 sts): 2 shells = 10 dc, 3 base sl sts, 2 bp.
Tier 2 (free loops of Row 13, 13 sts): 3 shells = 15 dc, 4 base sl sts, 2 bp.
Tier 3 (free loops of Row 19, 17 sts): 4 shells = 20 dc, 5 base sl sts, 2 bp.
Tier 4 (front loops of Row 25, 21 sts): 5 shells = 25 dc, 6 base sl sts, 2 bp. These shells cover the top of the trunk.
Base stitch check: Each pass uses (shells + 1) sl st stitches, plus (2 x shells) skipped stitches, plus (shells) shell stitches. That adds up to 4 x shells + 1, which is 9, 13, 17 and 21, so every free loop is used.
Let each flap fall down over the tier below. Each one covers about the first 2 rows of the next tier, which gives the stepped outline.
Hanging Loop
With RS facing, join Color A with sl st in the base of Row 1 at the tip. Ch 20, then sl st in the same spot. Fasten off. The loop hangs about 1.5 in (3.8 cm) above the tip.
Weave in all ends on the WS. Run each tail through stitches of its own color so no red shows through the cream trunk.
Final Blocking
- Lightly mist the ornament until it is damp, not soaked.
- Lay it RS up on a blocking mat.
- Pin the tip, then pin the bottom corners of Row 25 so the body measures 3.5 in (8.9 cm) wide.
- Check the height: 4.2 in (10.7 cm) for the body and 5.2 in (13.2 cm) to the bottom of the trunk.
- Smooth each scallop flap downward with your fingers so the shells fan out evenly.
- Pin each bobble so it points slightly out from the side edge.
- Pin the trunk straight and square.
- Let it dry completely, at least a few hours, before unpinning.
Final Quality-Control Checklist
- Four tiers, each wider than the one above
- Body is 3.5 in (8.9 cm) wide and 4.2 in (10.7 cm) tall
- Scallop counts from top to bottom: 2, 3, 4 and 5 shells
- 8 bobbles in total, one at each end of each scallop flap
- Each flap lies flat over the tier below without curling up
- Trunk is centered, with 8 sts of red on each side
- Trunk measures 0.8 in (2.0 cm) wide and 1 in (2.5 cm) tall
- Hanging loop is centered on the tip and secure
- All ends are woven in on the WS
Troubleshooting
The scallops curl upward. Your dc shells are too tight. Loosen your tension on the shells only, or use a 3.5 mm hook for the scallop passes.
The scallops ruffle or wave. Your shells are too loose. Use a 3.0 mm hook for the scallop passes.
The free-loop line is on the wrong side. You worked the FLO row on a RS row. Rows 8, 14 and 20 must be WS rows, so check your RS marker.
A scallop pass ends with a leftover stitch. Recount that tier’s last row. It must be 9, 13, 17 or 21 sts.
The tree edges look jagged. Make each increase in the very first and very last stitch, and don’t skip the turning ch 1.
The trunk is off-center. Count again from both edges of Row 25. There should be 8 sts on each side.
The whole ornament curls. Block it flat, and check that your gauge is no tighter than 6 sts per inch.
Care
Hand wash in cool water with mild soap and lay flat to dry. Reshape the scallops and bobbles while the ornament is damp.
Final Notes
The measurement chain is short and easy to check. Gauge is 6 sc and 6 rows per inch. Tier 1 ends at 9 sts, about 1.5 in (3.8 cm) wide. Tiers 2 and 3 end at 13 and 17 sts. Tier 4 ends at 21 sts, giving a body 3.5 in (8.9 cm) wide and 4.2 in (10.7 cm) tall. Each last-row count is a multiple of 4, plus 1, so the scallops fit exactly with a bobble at each end. The cream trunk adds 1 in (2.5 cm), for a total height of 5.2 in (13.2 cm).
Make one to top a gift, or a handful for the tree.
Happy crocheting!