

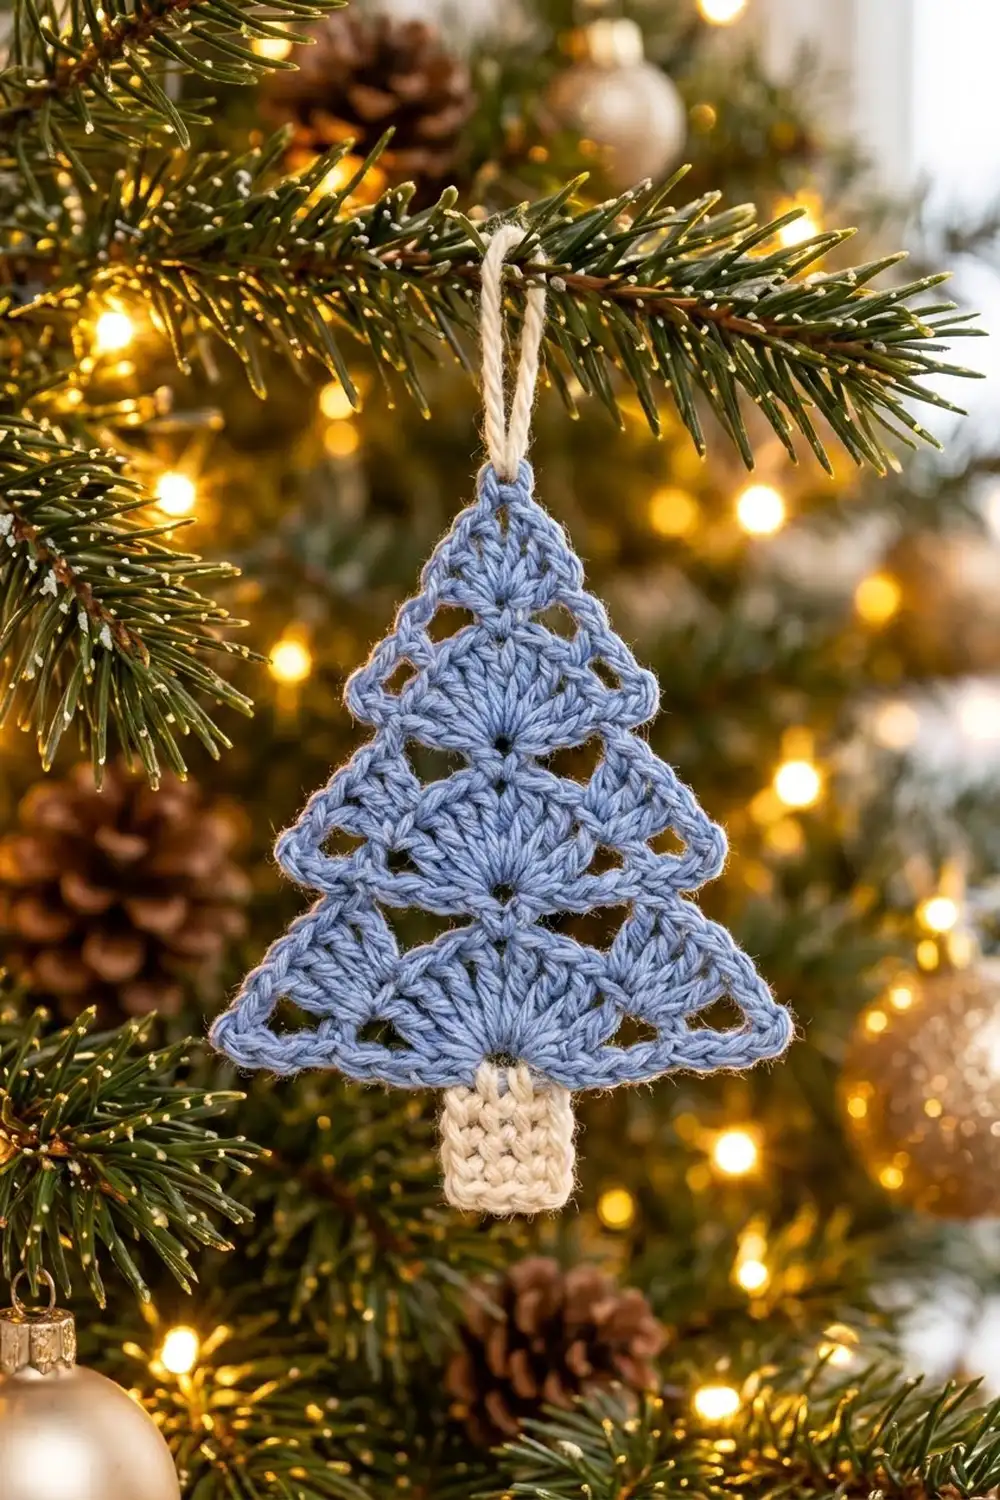
The Frosted Fan Tree is a small, lacy Christmas tree ornament. Four stacked tiers of fans sit on top of each other, and small open triangles between the fans let the light through. It is crocheted in a soft periwinkle blue, with a cream trunk and a cream hanging loop.
The look is simple and Scandinavian-inspired. Each tier has a full fan in the center with a half fan at each outer edge. Every tier ends in a small chain point at each side, so the outline reads as a classic stepped tree. A thin blue edging runs around the whole shape and keeps the edges crisp.
This pattern uses US crochet terms. The finished tree body measures 3.6 in (9.1 cm) wide and 3.5 in (8.9 cm) tall. With the trunk, the ornament is 4.5 in (11.4 cm) tall, plus a 1.5 in (3.8 cm) hanging loop.
Construction is quick. You work the blue tree flat in rows, from the bottom up. Each tier has a base row, a fan row and a closing row, and each new tier starts a little further in from the edges. A single round of edging follows, then you work the trunk in cream rows off the bottom edge and add the loop at the tip. There is no sewing apart from weaving in ends.
Finished Size and Construction
- Finished size: 3.6 in (9.1 cm) wide x 4.5 in (11.4 cm) tall, trunk included, loop not included
- Skill level: Advanced beginner
- Terminology: US crochet terms
- Yarn weight: DK (light worsted, #3), cotton or cotton blend
- Hook: 3.5 mm (E-4)
- Number of pieces: 1 (single ornament; the trunk and loop are worked directly onto it)
- Layout: Four tiers stacked bottom to top, trunk centered below
- Piece size: Tree body 3.6 in (9.1 cm) wide x 3.5 in (8.9 cm) tall
- Size before border: 3.4 in (8.6 cm) wide x 3.3 in (8.4 cm) tall
- Border depth: about 0.1 in (0.3 cm) on each edge
Materials
Use a smooth DK cotton or cotton blend. Cotton gives clear stitch definition, so the fans and open triangles stand out, and it holds its shape on a branch. Do not use fuzzy or brushed yarns, because they blur the lace.
- Color A, periwinkle blue: 6 g (about 14 m)
- Color B, cream: 2 g (about 5 m)
These quantities include a margin for the gauge check and weaving in ends. A standard 50 g ball of each color makes many trees.
Tools:
- 3.5 mm (E-4) crochet hook
- Tapestry needle
- Scissors
- Stitch marker (optional)
- Rust-proof pins and a blocking mat or folded towel
- Spray bottle with water
Abbreviations (US Terms)
- ch – chain
- sl st – slip stitch
- sc – single crochet
- hdc – half double crochet
- dc – double crochet
- sk – skip
- sp(s) – space(s)
- st(s) – stitch(es)
- RS – right side
Special stitch – Point: (sc, ch 2, sc) in the stitch given. These points make the small tips at each tier corner.
Half fan: 3 dc in the same stitch. At the start of a row, ch 3 counts as the first dc, so you work ch 3, 2 dc in the first stitch.
Fan: 7 dc in the same stitch.
Gauge and Checkpoints
Gauge: 20 sc and 20 sc rows = 4 in (10.2 cm). One dc row with fans is about 0.4 in (1.0 cm) tall.
The ornament is small, so test it on the piece itself. Work Rows 1–3 first and measure before you go on.
Checkpoints (before the edging):
- After Row 1: 17 sc measure 3.4 in (8.6 cm) across.
- After Row 3: total height 0.8 in (2.0 cm).
- After Row 4: the 13 sc base measures 2.6 in (6.6 cm).
- After Row 6: total height 1.6 in (4.1 cm).
- After Row 7: the 9 sc base measures 1.8 in (4.6 cm).
- After Row 9: total height 2.4 in (6.1 cm).
- After Row 10: the 5 sc base measures 1 in (2.5 cm).
- After Row 12: total height 3.3 in (8.4 cm).
If your piece is too big: go down to a 3.25 mm hook, or tighten the chains between the fans. If it is too small: go up to a 3.75 mm hook. Change hooks only after measuring Row 1, because that row sets the width of the whole tree.
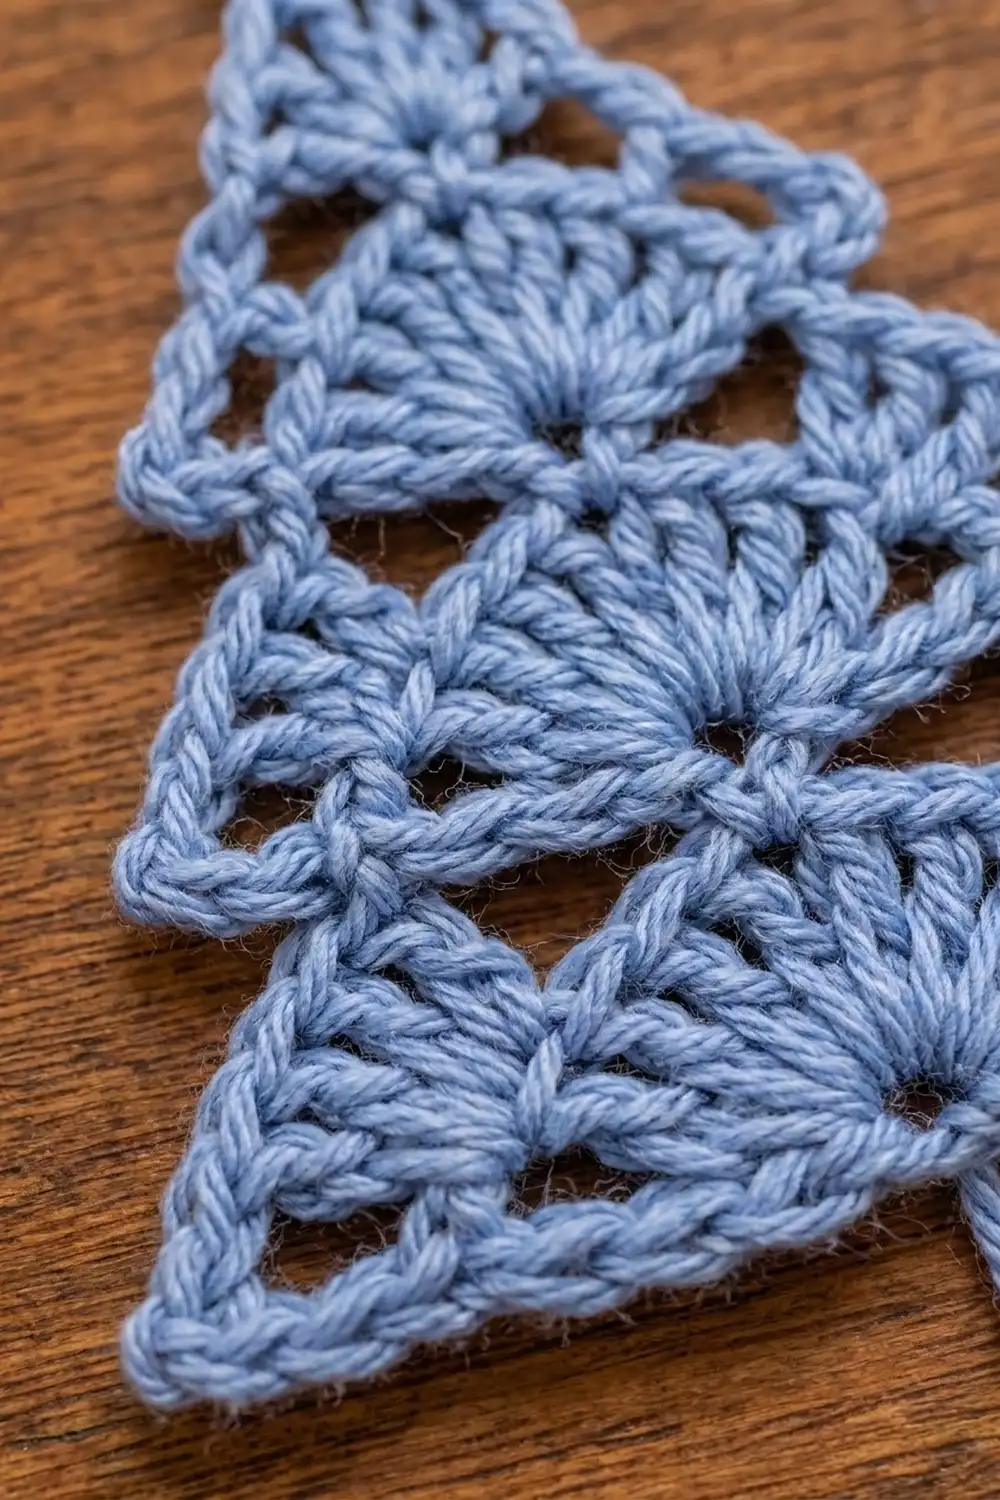
Tree Body
Work with Color A. Rows are worked flat, and you turn at the end of every row. The ch 3 at the start of a fan row counts as a dc. The ch 1 at the start of an sc row does not count as a stitch.
The four tiers all follow the same rhythm: a base row of sc, a fan row, and a closing row of sc that bridges the gaps between fans. Once you have made Tier 1, the rest will feel familiar.
Tier 1 (Bottom)
Row 1: Ch 18. Sc in 2nd ch from hook and in each ch across. Turn. (17 sc)
Row 2 (fan row): Ch 3 (counts as dc), 2 dc in first sc (half fan made). Ch 3, sk 3 sc, sc in next sc. Ch 3, sk 3 sc, 7 dc in next sc (fan made, in the 9th st). Ch 3, sk 3 sc, sc in next sc. Ch 3, sk 3 sc, 3 dc in last sc (half fan made). Turn. (15 sts: 3 dc, 1 sc, 7 dc, 1 sc, 3 dc; plus 4 ch-3 sps)
You work into stitches 1, 5, 9, 13 and 17. The fans stand upright, with their rays coming out of a single base stitch.
Row 3 (closing row): Ch 1, sc in each of first 3 dc. Ch 3, sk (ch-3 sp, sc, ch-3 sp), sc in each of next 7 dc. Ch 3, sk (ch-3 sp, sc, ch-3 sp), sc in each of last 3 dc (the last one goes in the top of the ch-3). Turn. (13 sc plus 2 ch-3 sps)
Each ch-3 bridges a V-shaped valley. This leaves an open triangle between the center fan and each half fan.
Tier 2
Row 4 (base row): Sl st in each of first 3 sc, sl st in ch-3 sp. Ch 1, 3 sc in same sp, sc in each of next 7 sc, 3 sc in next ch-3 sp. Leave the last 3 sc unworked. Turn. (13 sc)
Row 5 (fan row): Ch 3, 2 dc in first sc. Ch 2, sk 2 sc, sc in next sc. Ch 2, sk 2 sc, 7 dc in next sc (7th st). Ch 2, sk 2 sc, sc in next sc. Ch 2, sk 2 sc, 3 dc in last sc. Turn. (15 sts plus 4 ch-2 sps)
You work into stitches 1, 4, 7, 10 and 13.
Row 6 (closing row): Ch 1, sc in each of first 3 dc. Ch 3, sk (ch-2 sp, sc, ch-2 sp), sc in each of next 7 dc. Ch 3, sk (ch-2 sp, sc, ch-2 sp), sc in each of last 3 dc. Turn. (13 sc plus 2 ch-3 sps)
Tier 3
Row 7 (base row): Sl st in each of first 3 sc, sl st in ch-3 sp. Ch 1, sc in same sp, sc in each of next 7 sc, sc in next ch-3 sp. Leave the last 3 sc unworked. Turn. (9 sc)
Row 8 (fan row): Ch 3, 2 dc in first sc. Ch 1, sk 1 sc, sc in next sc. Ch 1, sk 1 sc, 7 dc in next sc (5th st). Ch 1, sk 1 sc, sc in next sc. Ch 1, sk 1 sc, 3 dc in last sc. Turn. (15 sts plus 4 ch-1 sps)
You work into stitches 1, 3, 5, 7 and 9.
Row 9 (closing row): Ch 1, sc in each of first 3 dc. Ch 2, sk (ch-1 sp, sc, ch-1 sp), sc in each of next 7 dc. Ch 2, sk (ch-1 sp, sc, ch-1 sp), sc in each of last 3 dc. Turn. (13 sc plus 2 ch-2 sps)
Tier 4 (Top)
Row 10 (base row): Sl st in each of first 3 sc, sl st in ch-2 sp, sl st in next sc. Ch 1, sc in each of next 5 sc. Leave the remaining sc, ch-2 sp and 3 sc unworked. Turn. (5 sc)
Row 11 (fan row): Ch 1, sc in first sc. Ch 1, sk 1 sc, 7 dc in next sc (center st). Ch 1, sk 1 sc, sc in last sc. Turn. (9 sts: 1 sc, 7 dc, 1 sc; plus 2 ch-1 sps)
Row 12 (tip row): Ch 1, sk first sc and ch-1 sp. Working only in the 7 dc: sc in first dc, hdc in next dc, dc in next dc, (dc, ch 3, dc) in center dc, dc in next dc, hdc in next dc, sc in last dc. Leave the ch-1 sp and sc unworked. Fasten off. (8 sts plus 1 ch-3 tip sp)
The graded sc–hdc–dc stitches lift the center, so the top tier comes to a point.
Border
Border gauge: Each sc row end gets 1 sc, and each dc row end gets 2 sc. This matches the stitch height of the edging to the row height, so the edges lie flat without ruffling or cupping.
Round 13 (edging): With RS facing and Color A, join with a sl st in the remaining loop of the first foundation ch at the bottom-right corner. Ch 1.
Bottom edge: 3 sc in same ch (corner), sc in each of next 15 ch, 3 sc in last ch (corner). (21 sc)
Left side, worked upward:
- Tier 1: 1 sc in Row 1 end, 2 sc in Row 2 end, Point in the outermost sc of Row 3, sc in each of next 2 step sts (work into the sl sts or the unworked sc, whichever is there). (7 sc plus 1 ch-2 point)
- Tier 2: 1 sc in Row 4 end, 2 sc in Row 5 end, Point in the outermost sc of Row 6, sc in each of next 2 step sts. (7 sc plus 1 ch-2 point)
- Tier 3: 1 sc in Row 7 end, 2 sc in Row 8 end, Point in the outermost sc of Row 9, sc in each of next 2 step sts, sc in ch-2 sp, sc in next step st. (9 sc plus 1 ch-2 point)
- Tier 4: 1 sc in Row 10 end, 1 sc in Row 11 end, 1 sc in ch-1 sp of Row 11, sc in each of next 4 sts of Row 12 (sc, hdc, dc, dc). (7 sc)
Tip: (2 sc, ch 2, 2 sc) in ch-3 tip sp. (4 sc plus 1 ch-2 sp)
Right side, worked downward: Repeat the left side in reverse order: Tier 4 (7 sc), Tier 3 (9 sc plus point), Tier 2 (7 sc plus point), Tier 1 (7 sc plus point). Sl st to first sc. Fasten off.
Round total: 21 + 30 + 4 + 30 = 85 sc plus 7 ch-2 sps (3 points per side plus the tip).
Why the math works: Each side follows the same rule for every tier. Every row end gets sc in proportion to its height. Each step gets exactly one sc for each stitch left exposed beside the next tier. The Point’s 2 sc replace the single sc that the corner stitch would otherwise get, so nothing is counted twice. Because the rows are mirrored, both sides take the same number of stitches (30 sc each), and the tree stays symmetric. The 3-sc corners at the bottom turn the corner without pulling.
Trunk
With the bottom edge facing up, count the 15 sc between the two corner groups. Join Color B in the 6th of those 15 sc.
Row 1: Ch 1, sc in same st and in each of next 4 sc. Turn. (5 sc)
Rows 2–5: Ch 1, sc in each sc across. Turn. (5 sc)
Fasten off after Row 5. The trunk measures 1 in (2.5 cm) wide x 1 in (2.5 cm) tall and sits centered under the bottom tier, with 5 unworked sc on each side.
Hanging Loop
Join Color B with a sl st in the ch-2 tip sp. Ch 16, sl st in same sp. Fasten off, leaving a 6 in (15.2 cm) tail. Weave the tail through the base of the loop twice to secure it. The loop hangs about 1.5 in (3.8 cm) above the tip.
Final Blocking
- Weave in all ends along the back of the edging, away from the open triangles.
- Lay the ornament RS up on a blocking mat or folded towel.
- Spray lightly until damp. Do not soak it.
- Pin the bottom corners 3.6 in (9.1 cm) apart.
- Pin the tip so the body measures 3.5 in (8.9 cm) tall, and the full piece with trunk measures 4.5 in (11.4 cm).
- Pin each ch-2 point outward so the tier corners line up in a straight slope.
- Gently open each open triangle with your fingertip and smooth the fan rays straight.
- Pin the trunk square at 1 in (2.5 cm) x 1 in (2.5 cm).
- Let it dry completely before unpinning.
For extra stiffness, spray with a light fabric stiffener before pinning.
Final Quality-Control Checklist
- Body measures 3.6 in (9.1 cm) wide x 3.5 in (8.9 cm) tall.
- Total height with trunk is 4.5 in (11.4 cm).
- Four tiers are visible, each with a center fan of 7 dc.
- Tiers 1–3 each have a half fan at both edges and two open triangles.
- The edging has 85 sc and 7 ch-2 sps.
- The left and right sides match point for point.
- The trunk has 5 sc in each of its 5 rows and is centered.
- The hanging loop is secure and sits straight above the tip.
- All ends are woven in and hidden.
Troubleshooting
Fans cup or ruffle: Your dc are too loose compared with your sc. Tighten your dc tension, or go down half a hook size for the fan rows only.
Open triangles collapse: The chain bridges in the closing rows are too tight. Make each chain a little looser, about the width of one dc.
Tree leans to one side: Check that each base row starts with the correct sl sts and leaves the same number unworked at the end.
Fan count is off: Count the stitches you skip before each fan. The fan must land in the 9th, 7th, 5th and 3rd stitch of Rows 1, 4, 7 and 10.
Edging ripples: You worked too many sc into row ends. Use exactly 1 sc per sc row end and 2 sc per dc row end.
Edges pull in: You skipped a row end or step stitch. Count each side again; it should have 30 sc.
Trunk is off-center: Rejoin at the 6th of the 15 bottom-edge sc so that 5 sc remain on each side.
Care
Hand wash in cool water with mild soap, press out the water in a towel, and reshape it flat to dry. Store it flat in tissue paper between seasons so the points and loop keep their shape.
Final Notes
The measurements build on each other. Row 1 sets the width at 3.4 in (8.6 cm). Each of the three lower tiers adds 0.8 in (2.0 cm) of height, and the top tier with its tip row brings the body to 3.3 in (8.4 cm). The edging adds 0.1 in (0.3 cm) on each edge, for a finished body of 3.6 in (9.1 cm) x 3.5 in (8.9 cm). The trunk adds 1 in (2.5 cm), for a total of 4.5 in (11.4 cm). If Row 1 measures correctly and your edging counts match, the tree will come out the right size.
Make one, check it against the checkpoints, and then make a few more for your branches.
Happy crocheting!