

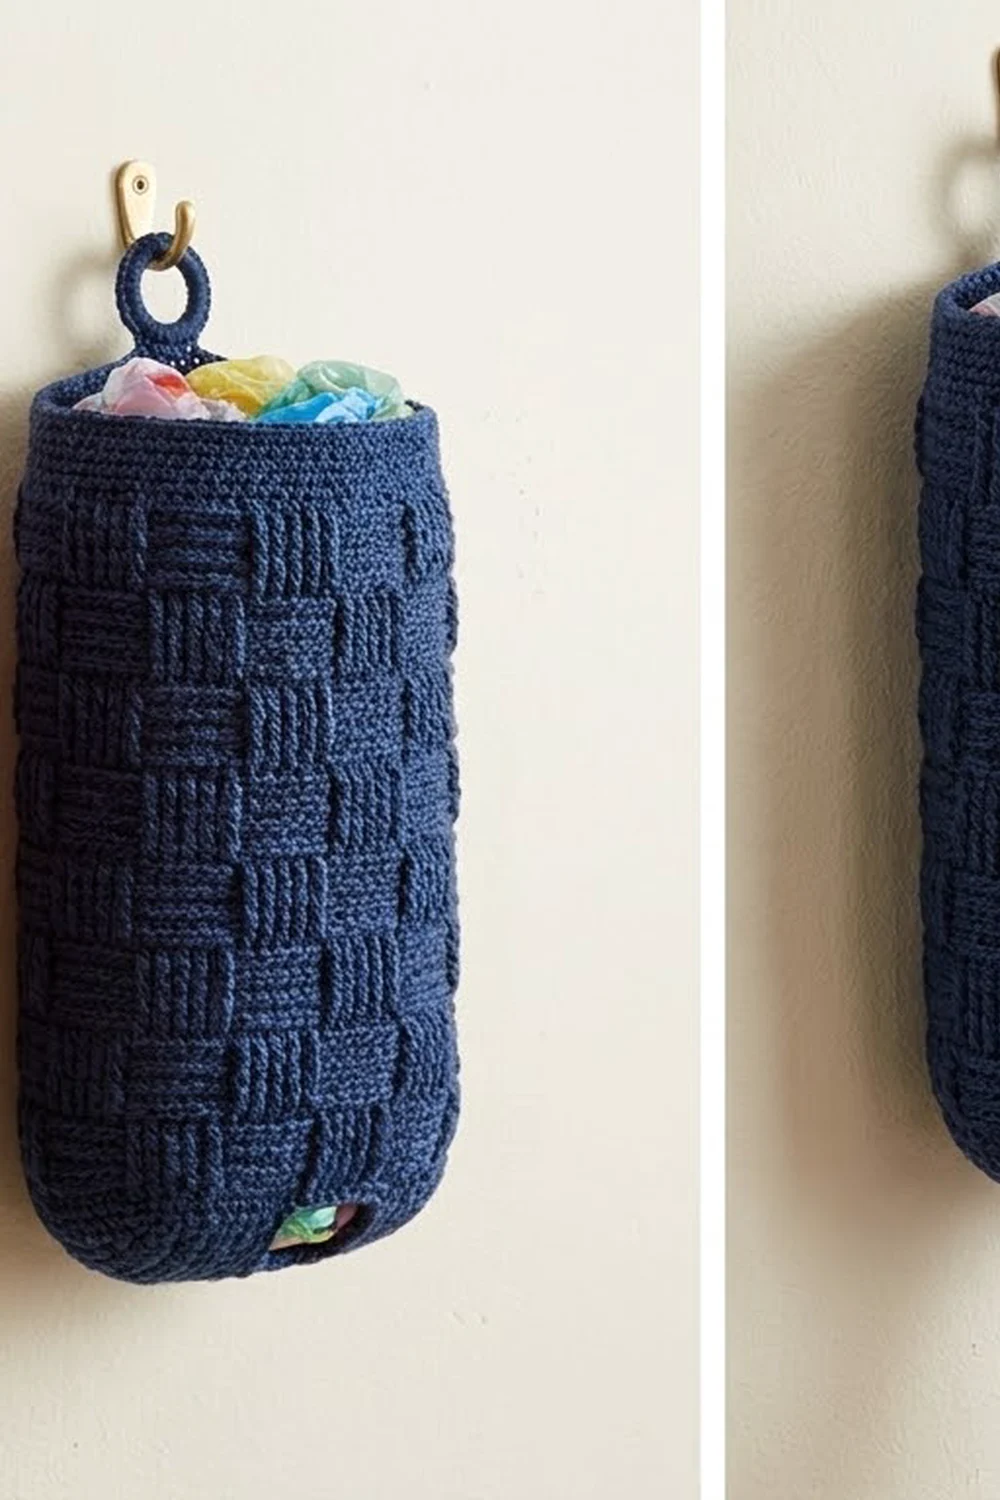
This crochet bag holder keeps your plastic grocery bags off the floor and out of the drawer. You push bags in through the wide top opening and pull them out one at a time through a small slot at the bottom. A covered ring at the back center of the rim slips over any wall hook or cabinet knob.
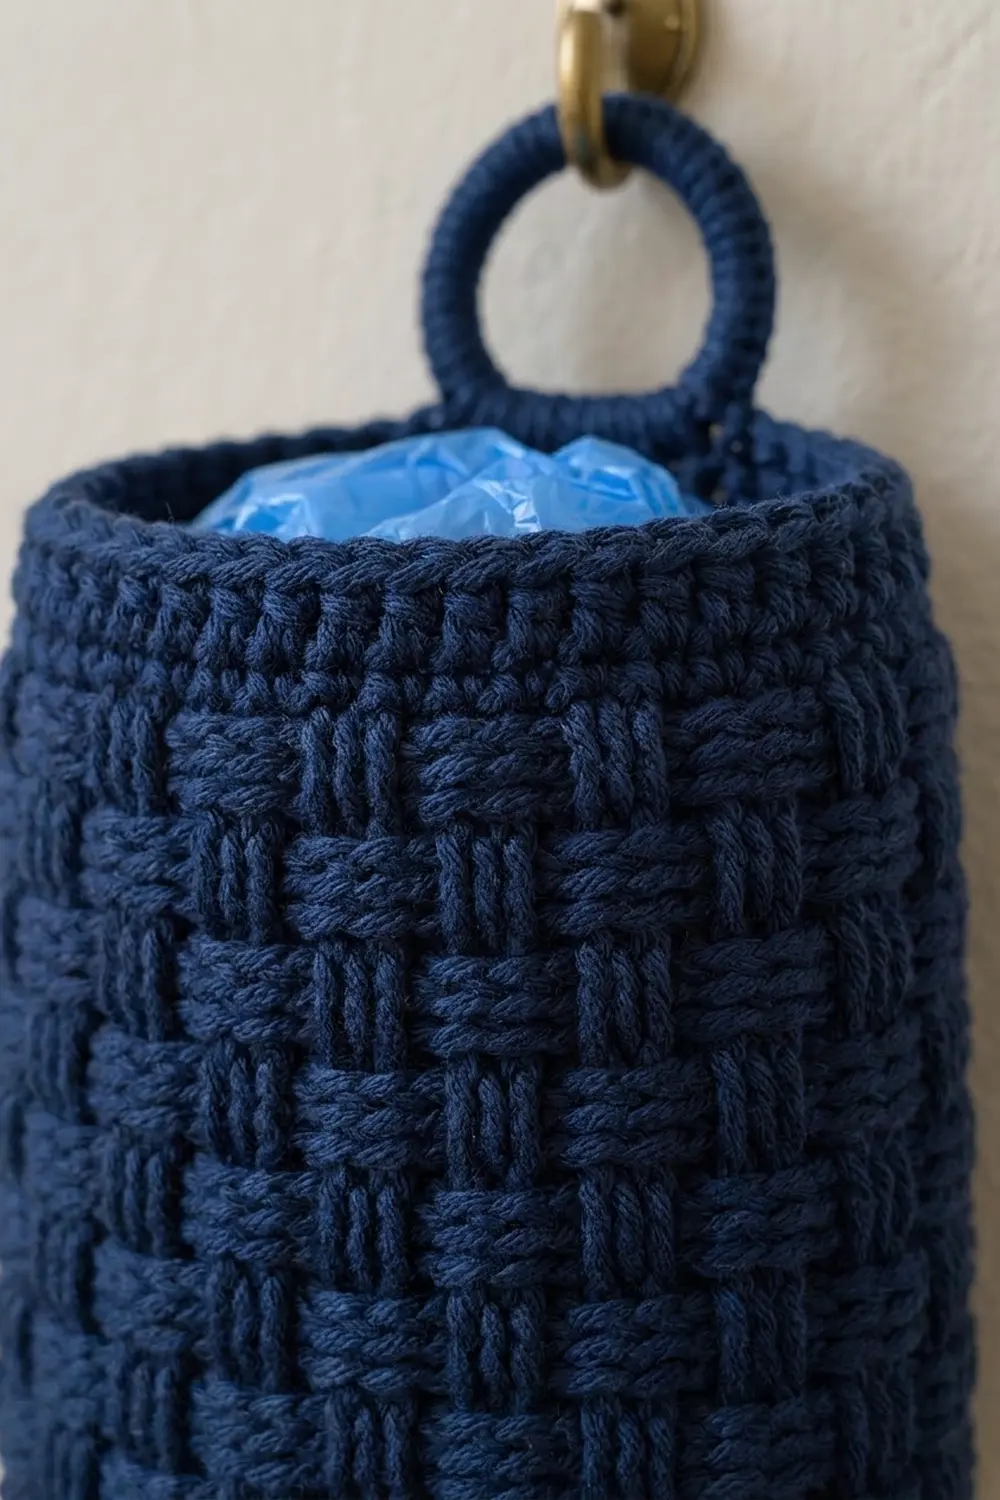
The texture is a classic basketweave. Blocks of raised and recessed post stitches alternate like a checkerboard, which gives a thick fabric that holds its shape when full. The sample is in dusty rose, and the same pattern works in navy or any solid color. Solid shades show the weave best.
The pattern uses US crochet terms. The finished holder measures 8″ (20.3 cm) wide when flat and 11.75″ (29.8 cm) tall, not counting the ring.
You work one flat basketweave panel in rows, seam it into a tube, and add a single-crochet rim at the top. Then you shape and partly close the bottom, leaving a center opening. Finally, you cover a ring with stitches and sew it to the back of the rim.
Finished Size and Construction
- Finished size: 8″ (20.3 cm) wide flat × 11.75″ (29.8 cm) tall; circumference 16″ (40.6 cm)
- Skill level: Intermediate (front and back post stitches, seaming)
- Terminology: US crochet terms
- Yarn weight: Aran / worsted (#4 medium)
- Hook: 5.5 mm (US I-9)
- Number of pieces: 1 main body plus 1 covered hanging ring
- Layout: a single tube with the seam at center back
- Panel size before seaming: about 16.5″ (41.9 cm) wide × 10″ (25.4 cm) tall
- Size before rim and bottom: 16″ (40.6 cm) circumference × 10″ (25.4 cm) tall
- Top rim depth: 1″ (2.5 cm)
- Bottom shaping depth: 0.75″ (1.9 cm)
- Bottom opening: about 2.25″ (5.7 cm) wide
Materials
Choose a smooth, firm yarn such as a cotton blend or acrylic. Fuzzy or very soft yarn hides the basketweave and lets the fabric sag.
- Main color (dusty rose, or navy for the alternate): 200 g, about 330 m
- Ring: one plastic or wooden ring, 2″ (5.1 cm) outer diameter
- Tools:
- 5.5 mm (US I-9) hook
- Tapestry needle
- Scissors
- 4 stitch markers
- Tape measure
- Blocking pins
The yarn quantity includes about a 15% margin for your gauge swatch and seaming tails. Post stitches use more yarn than plain double crochet, so don’t cut it close.
Abbreviations (US Terms)
- ch – chain
- sl st – slip stitch
- sc – single crochet
- hdc – half double crochet
- dc – double crochet
- sc2tog – single crochet 2 together
- st(s) – stitch(es)
- rnd(s) – round(s)
- RS / WS – right side / wrong side
- rep – repeat
Special stitches
- FPdc (front post double crochet): Yarn over. Insert the hook from front to back to front around the post of the stitch below. Yarn over, pull up a loop, then [yarn over, pull through 2] twice.
- BPdc (back post double crochet): Yarn over. Insert the hook from back to front to back around the post of the stitch below. Complete the stitch as for a dc.
Edge stitches: The hdc at each end of every pattern row is the seam allowance. It is never part of the basketweave.
Gauge and Checkpoints
Gauge in basketweave: 14 sts and 8 rows = 4″ (10.2 cm).
Gauge in sc: 14 sts and 16 rnds = 4″ (10.2 cm).
Test swatch first. Make a small flat sample before starting the holder.
- Ch 28.
- Work Row 1 as written below. You should have 26 sts.
- Work 12 rows of the pattern with 3 repeats of the 8-st block, keeping 1 hdc at each edge.
The swatch should be about 7.4″ (18.8 cm) wide and 6″ (15.2 cm) tall. Measure 14 sts across the middle of the swatch, not the edges.
Checkpoints on the main panel:
– After Row 1: the panel is about 16.5″ (41.9 cm) wide.
– After Row 7: about 3.5″ (8.9 cm) tall.
– After Row 13: about 6.5″ (16.5 cm) tall.
– After Row 20: 10″ (25.4 cm) tall.
If your swatch is too big (fewer than 14 sts per 4″), go down half a hook size. If it’s too small, go up half a size. Row height matters less than width, because you can add or remove one 6-row repeat. Do this only in whole repeats so the blocks stay square.
Main Body Panel
The panel is worked flat in turned rows. Its 56 pattern sts make 14 blocks of 4 sts, an even number, so the checkerboard continues around the seam. Ch 2 at the start of a row never counts as a stitch.
Foundation: Ch 60.
Row 1 (WS): Dc in the 4th ch from the hook. The 3 skipped chains count as the first dc. Dc in each ch across. Turn. (58 dc: 1 edge + 56 pattern + 1 edge)
Row 2 (RS): Ch 2. Hdc in the first st. *FPdc in each of the next 4 sts, BPdc in each of the next 4 sts; rep from * 6 more times (7 repeats). Hdc in the last st. Turn. (58 sts: 2 hdc + 28 FPdc + 28 BPdc)
Row 3 (WS): Ch 2. Hdc in the first st. *FPdc in each of the next 4 sts, BPdc in each of the next 4 sts; rep from * 6 more times. Hdc in the last st. Turn. (58 sts)
Why the WS row reads the same: Row 2 ends with 4 BPdc. Those stitches are recessed on the RS, which means they stand out on the WS. You therefore work FPdc around them from the WS, which keeps them recessed on the RS. Because the block count is even, every row’s wording starts the same way.
Row 4 (RS): Rep Row 2. (58 sts) The first tier of blocks is now 3 rows tall.
Row 5 (WS): Ch 2. Hdc in the first st. *BPdc in each of the next 4 sts, FPdc in each of the next 4 sts; rep from * 6 more times. Hdc in the last st. Turn. (58 sts)
Row 6 (RS): Ch 2. Hdc in the first st. *BPdc in each of the next 4 sts, FPdc in each of the next 4 sts; rep from * 6 more times. Hdc in the last st. Turn. (58 sts)
Row 7 (WS): Rep Row 5. (58 sts) The blocks have now swapped positions, which forms the checkerboard.
Rows 8–19: Rep Rows 2–7 twice more. (58 sts in every row)
You now have 6 tiers of blocks. The panel should measure about 9.5″ (24.1 cm) tall.
Row 20 (RS): Ch 2. Hdc in the first st. Dc in each of the next 56 sts, working into the tops of the stitches as normal. Hdc in the last st. (58 sts) Fasten off, leaving a 24″ (61 cm) tail for seaming.
Panel checkpoint: about 16.5″ (41.9 cm) wide × 10″ (25.4 cm) tall.
Seaming the Tube
- Fold the panel with the RS facing out, bringing the two short edges together.
- Using the long tail and a tapestry needle, mattress stitch the edges. Catch the inner leg of each edge stitch, working 2 passes per row because each row is a tall stitch.
- Pull the seam snug every 1″ (2.5 cm) until the edge stitches roll to the inside.
The 2 edge sts per row disappear into the seam, leaving 56 sts around.
Tube checkpoint: circumference 16″ (40.6 cm). Flattened with the seam at center back, the tube is 8″ (20.3 cm) wide.
Covered Hanging Ring
- Make a slip knot on the hook. Working over the ring, sc 40 sts around it, packing them tightly so no ring shows.
- Sl st to the first sc. (40 sc)
Tab: Make the short stem that connects the ring to the holder.
- Row 1: Ch 1. Sc in the same st and in each of the next 4 sts. Turn. (5 sc)
- Rows 2–6: Ch 1. Sc in each st across. Turn. (5 sc)
The tab is about 1.5″ (3.8 cm) long and 1.4″ (3.6 cm) wide. Fasten off, leaving a 12″ (30.5 cm) tail.
Set the ring aside until the rim is finished.
Border: Top Rim and Bottom Shaping
Border gauge: 14 sc = 4″ (10.2 cm), which is the same stitch gauge as the basketweave. One sc per pattern stitch therefore keeps the circumference at exactly 16″ (40.6 cm).
Top Rim
Hold the tube with Row 20 at the top. Join yarn at the seam.
Rnd 1: Ch 1. Sc in each of the 56 dc of Row 20, skipping the 2 hdc edge sts hidden in the seam. Sl st to the first sc. (56 sc)
Rnds 2–4: Ch 1. Sc in each st around. Sl st to the first sc. (56 sc each rnd)
Fasten off. Rim checkpoint: 1″ (2.5 cm) deep, and it lies flat without ruffling or pulling in.
Bottom Shaping
- Flatten the tube with the seam at center back.
- Place a marker at each side fold. This gives 28 sts on the front and 28 on the back.
- Join yarn into the foundation chain at the right-hand fold.
Rnd 1: Ch 1. Sc in each foundation ch around (1 per pattern st), skipping the 2 edge sts in the seam. Sl st to the first sc. (56 sc: 28 front + 28 back)
Rnd 2: Ch 1. [Sc2tog, sc in each of the next 24 sts, sc2tog] twice. Sl st to the first sc. (52 sc: 26 front + 26 back)
Rnd 3: Ch 1. [Sc2tog, sc in each of the next 22 sts, sc2tog] twice. Sl st to the first sc. (48 sc: 24 front + 24 back)
Why the math works: Each bracket covers one layer, and the 2 sc2tog per bracket sit on either side of a fold. Every round loses 2 sts at each side fold, so 4 per round, which pulls the corners in and rounds them. 56 − 4 = 52, and 52 − 4 = 48. That leaves 24 sts on each layer, and 24 divides evenly into 8 + 8 + 8.
Closing the Bottom
Flatten the tube again with the front 24 sts directly in front of the back 24 sts.
Closing row: Working through both layers at once, sl st through the next 8 pairs of sts.
Opening: Ch 1. Sc in each of the next 8 front sts only, then sc in each of the matching 8 back sts only. This finishes the edges of the opening.
Closing row continued: Sl st through both layers in the last 8 pairs of sts. Fasten off.
Stitch check:
– Front edge: 8 closed + 8 open + 8 closed = 24.
– Back edge: the same, 24.
The opening is 8 sts, about 2.25″ (5.7 cm) wide. That is wide enough to pull a bag through but narrow enough to hold the rest in.
Height checkpoint: 0.75″ (1.9 cm) bottom + 10″ (25.4 cm) panel + 1″ (2.5 cm) rim = 11.75″ (29.8 cm).
Attaching the Ring
- Center the tab on the inside back of the rim, directly over the seam.
- Let 0.5″ (1.3 cm) of the tab overlap the rim, so the ring rises about 2.5″ (6.4 cm) above the top edge.
- Whipstitch all 4 sides of the overlap through the rim rounds only, so the stitches don’t show on the front.
- Go over the top edge a second time for strength.
Final Blocking
- Weave in all ends along the seam or inside the rim.
- Mist the holder evenly with water until it is damp but not soaked.
- Stuff it firmly with a rolled towel or plastic bags to open out the tube.
- Shape it to 8″ (20.3 cm) wide when flat and 11.75″ (29.8 cm) tall. Smooth the bottom corners into even curves.
- Pin the rim into a level oval and let it dry completely, usually 24 hours.
- Remove the stuffing. Steam-block lightly only if your yarn label allows it, and never press post stitches flat.
Final Quality-Control Checklist
- 56 pattern sts around, with 14 blocks per tier and 6 tiers
- The blocks alternate cleanly across the back seam
- The seam lies flat with no edge stitches showing on the RS
- The rim is 1″ (2.5 cm) deep with 56 sc and lies flat
- The bottom rounds have 56, 52, then 48 sts, with even, rounded corners
- The bottom opening is centered and about 2.25″ (5.7 cm) wide
- The ring is fully covered (40 sc) and the tab is stitched securely at center back
- The holder measures 8″ × 11.75″ (20.3 × 29.8 cm)
Troubleshooting
The blocks don’t alternate. You probably started a WS row with the wrong post stitch. Rows 2–4 begin with FPdc, and Rows 5–7 begin with BPdc. Frog back to the last correct row.
The panel leans or narrows. You may have skipped the hdc edge stitch or worked into the turning ch. Count to 58 at the end of every row.
The rim ruffles or pulls in. Make sure you work exactly 1 sc per pattern stitch. If the rim still flares, go down one hook size for the rim only.
The bottom corners look pointy. The sc2tog stitches have drifted away from the side folds. Re-mark the folds and work the decreases right next to them.
The opening is too tight for bags. Rework the closing row with 7 closed + 10 open + 7 closed sts. That still totals 24.
The ring tilts forward. Stitch the tab lower inside the rim so more of it overlaps, and secure the top edge twice.
Care
Hand wash in cool water, press out the excess, and dry flat, stuffed lightly to keep the shape. Don’t tumble dry. Heat can loosen the basketweave texture.
Final Notes
Everything in this holder depends on one measurement: 14 sts = 4″ (10.2 cm). That gauge turns 56 pattern sts into a 16″ (40.6 cm) tube, which flattens to 8″ (20.3 cm) wide.
Twenty rows give a 10″ (25.4 cm) body. The 1″ (2.5 cm) rim keeps the same 56 sts. The 0.75″ (1.9 cm) bottom decreases evenly from 56 to 48 sts, which leaves a 24-st edge on each layer and a centered 8-st opening. If you check your width at each checkpoint, the finished holder will come out at 8″ × 11.75″ (20.3 × 29.8 cm), ready to hang and fill.
Happy crocheting!