

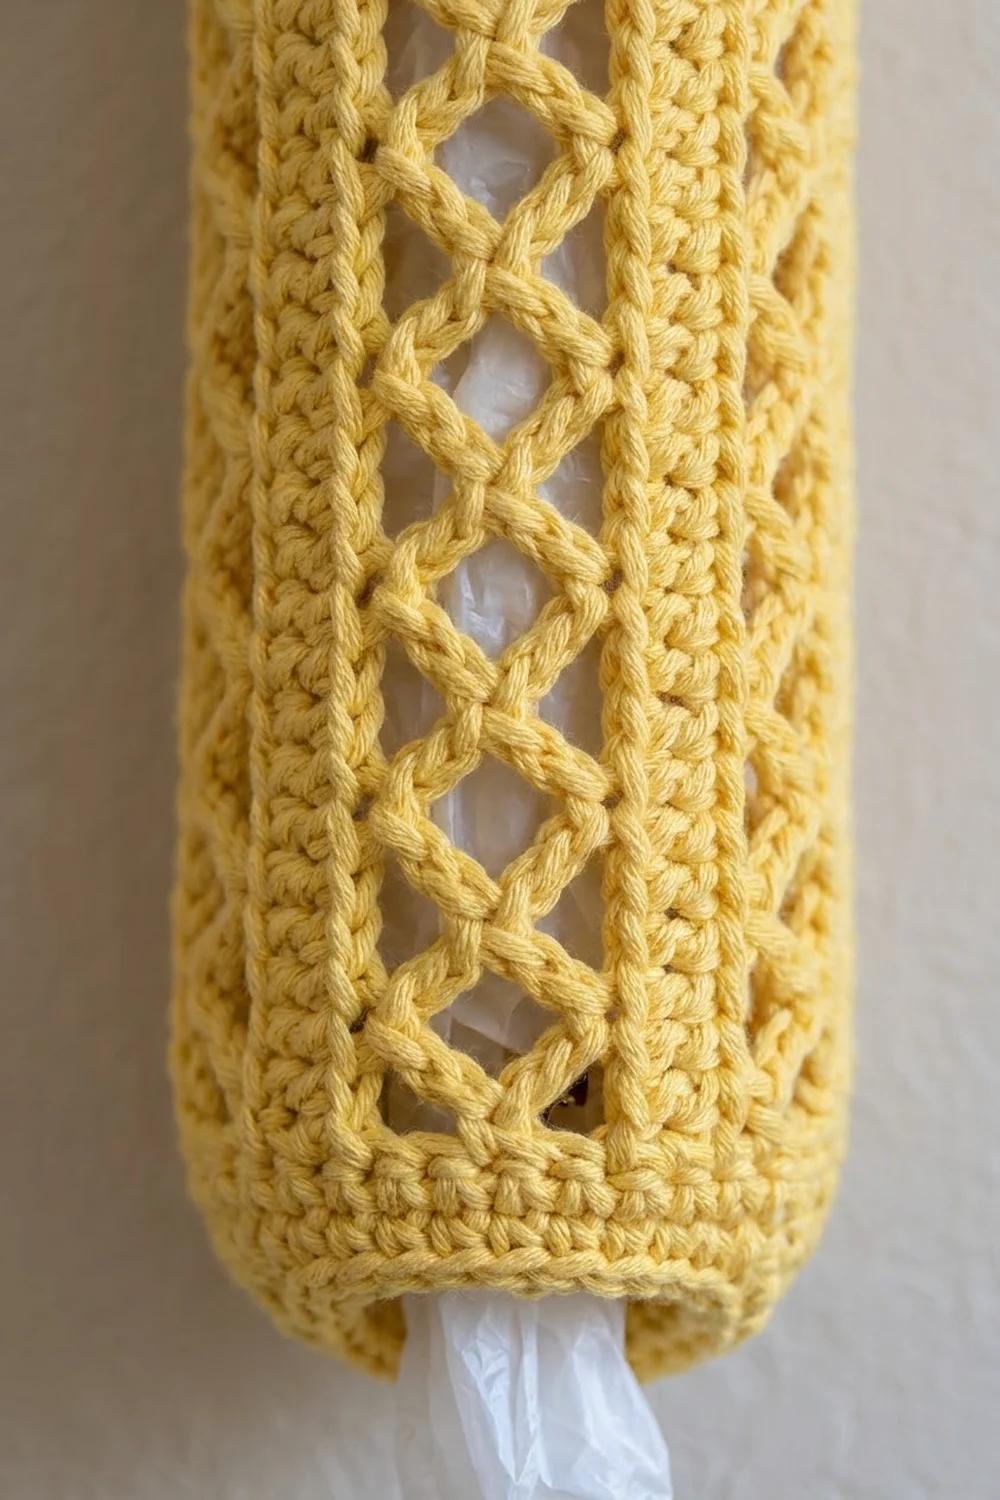
This bag holder is one long, open-work tube that hangs from a wall hook by a crocheted-over ring. Vertical columns of crossed treble “X” stitches run down the body. Solid treble columns separate them, and a firm band of single crochet closes off each end. You push bags in at the top and pull them out of the bottom opening one at a time.
The sample is worked in a soft buttery yellow cotton, and the ring is covered in the same yarn. A deep denim-blue version works just as well. Since the lattice is open, the bags show through, so a bright bag color behind the X’s becomes part of the look.
This pattern uses US crochet terms. The finished tube is 10″ (25.4 cm) around, which is 5″ (12.7 cm) wide laid flat, and 14.7″ (37.3 cm) long. With the ring added, the holder hangs about 16.7″ (42.4 cm) from the top of the ring to the bottom edge.
You work it bottom-up in joined rounds without turning. First comes a 6-round single crochet band, then 12 lattice rounds and a 6-round single crochet top band. A slip stitch edge finishes each opening. Last, you cover a ring with single crochet and sew it to the back of the top band.
Finished Size and Construction
- Finished size: 10″ (25.4 cm) circumference, 5″ (12.7 cm) flat width, 14.7″ (37.3 cm) tube length
- Skill level: Easy-intermediate
- Terminology: US crochet terms
- Yarn weight: Worsted (#4) cotton
- Hook: 4.5 mm (US 7)
- Number of pieces: 1 tube plus 1 covered hanging ring, sewn together
- Layout: 4 lattice panels alternating with 4 solid columns around the tube
- Piece size: 40 stitches around, 24 rounds tall
- Size before border: 13.3″ (33.8 cm) long, made up of the bottom band and lattice body
- Border depth: 1.3″ (3.3 cm) top band, plus a slip stitch edge at both openings
Materials
Yarn: Use a smooth worsted-weight cotton or cotton blend. Cotton holds the tube’s shape, doesn’t stretch much under the weight of the bags, and survives the wash. Acrylic also works, but the tube will sag a little more.
- Main color (sample: buttery yellow): 100 g (approx. 155 m / 170 yd)
- Optional second colorway (sample: denim blue): 100 g (approx. 155 m / 170 yd) for a second holder
These quantities include a margin. The holder itself uses about 80 g, ring cover included.
Tools:
- 4.5 mm (US 7) crochet hook
- 1 metal or plastic ring, 2.5″ (6.4 cm) outer diameter
- 2 stitch markers
- Tapestry needle
- Scissors
- Measuring tape
- Rustproof pins and a blocking mat or towel
Abbreviations (US Terms)
- ch – chain
- sl st – slip stitch
- sc – single crochet
- tr – treble crochet
- sk – skip
- st(s) – stitch(es)
- sp – space
- rep – repeat
- Rnd – round
Special stitch – Open Cross (OX), worked over 4 sts: Sk the next 3 sts and tr in the 4th st. Ch 2. Then, working in front of the tr you just made, tr in the first skipped st. One OX = 4 sts (tr, ch, ch, tr). The two trebles cross into an X, and the 2 chains form a small bar across the top.
Working an OX over an OX: The previous round’s OX gives you a tr, 2 ch and a tr. Sk the first tr and both ch, tr in the last tr, ch 2, then tr in the first tr (the skipped one), working in front. That way each new X sits exactly on top of the old one.
Gauge and Checkpoints
- Single crochet: 16 sc and 18 rounds = 4″ (10.2 cm)
- Lattice: 16 sts and 4 lattice rounds = 4″ (10.2 cm), so each tr round is 1″ (2.5 cm) tall
Make a test piece before you start. Chain 40, join in the round, and work Rnds 1–8 of the pattern. Lay it flat without stretching. It should measure 5″ (12.7 cm) wide, and its 6 sc rounds plus 2 lattice rounds should come to about 3.3″ (8.4 cm) tall. If it does, carry on from that piece. There’s no need to restart.
Checkpoints:
- After Rnd 6: 5″ (12.7 cm) flat width, 1.3″ (3.3 cm) tall
- After Rnd 10: 5.3″ (13.5 cm) tall
- After Rnd 18: 13.3″ (33.8 cm) tall
- After Rnd 24: 14.7″ (37.3 cm) tall
Too big? If the flat width is over 5.25″ (13.3 cm), go down one hook size to 4 mm (US G-6).
Too small? If the flat width is under 4.75″ (12.1 cm), go up to 5 mm (US H-8).
Rounds too tall or short? Wrap the yarn twice for every tr, and pull each loop up to the same height. Treble height changes most from crocheter to crocheter. You can also add or remove lattice rounds in pairs, adjusting by 2″ (5.1 cm) each time.
Tube Body
Join each round with a sl st to the first stitch. Don’t turn. Keep the right side facing you the whole time. Place a marker in the first stitch of every round and move it up as you go. The round join sits at the back of the holder.
Bottom Band
Foundation: Ch 40. Make sure the chain isn’t twisted, then sl st into the first ch to form a ring.
Rnd 1: Ch 1, sc in each ch around, join. (40 sc)
Rnds 2–6: Ch 1, sc in each sc around, join. (40 sc)
Checkpoint: the band measures 1.3″ (3.3 cm) tall and lies 5″ (12.7 cm) wide when flat.
Lattice Body
Rnd 7 (conversion round): Ch 4 (counts as first tr), tr in next 3 sc. Ch 1, sk 1 sc, OX over next 4 sc, ch 1, sk 1 sc, tr in next 4 sc. Rep from * around, ending the last rep at *. Join to the top of the beginning ch-4.
Count: 40 sts = 40 worked one-for-one over the 40 sc + 0 extra. In each of the 4 repeats you have 4 solid tr, 1 ch, 1 OX (2 tr + 2 ch) and 1 ch, which makes 10 sts. Across the round that’s 24 tr + 16 ch.
Rnd 8: Ch 4 (counts as first tr), tr in next 3 tr. Ch 1, sk the ch-1, OX over the next OX, ch 1, sk the ch-1, tr in next 4 tr. Rep from * around, ending the last rep at . Join. (40 sts: 24 tr + 16 ch)*
Rnds 9–18: Rep Rnd 8 ten more times. (40 sts each round)
You now have 12 lattice rounds, 12″ (30.5 cm) tall. Each lattice panel is a single column of 12 stacked X’s, with small diamond-shaped openings between them and narrow triangular gaps at the sides where the ch-1s sit. The solid 4-tr columns line up exactly between the panels.
Checkpoint: the tube measures 13.3″ (33.8 cm) from the foundation edge and still lies 5″ (12.7 cm) wide.
Border
The border is the solid top band, plus a slip stitch edge around both openings. It closes off the lattice and gives the ring a firm place to attach.
Border gauge: 16 sc = 4″ (10.2 cm), which is 4 sc per inch. The tube is 10″ (25.4 cm) around, so it needs 40 sc. That’s exactly what the lattice round gives you when you work one sc into every tr and every chain.
Rnd 19 (conversion round): Ch 1. Sc in each of the 4 tr of the solid column. Sc in the ch-1, sc in the first OX tr, sc in each of the 2 OX ch, sc in the second OX tr, sc in the ch-1, sc in next 4 tr. Rep from * around, ending at *. Join.
Count: 40 sc = 40 worked one-for-one into the 24 tr + 16 ch + 0 extra. Each repeat is 4 + 6 = 10 sc, times 4 repeats.
Always work into the chain stitch itself, not around it into the space. That keeps the count at 40, and the top band won’t pull in or flare.
Rnds 20–24: Ch 1, sc in each sc around, join. (40 sc)
The top band is 6 rounds, or 1.3″ (3.3 cm), the same depth as the bottom band.
Top edge: Sl st loosely in each sc around, join. (40 sl st) Fasten off and leave a 24″ (61.0 cm) tail for sewing on the ring.
Bottom edge: Join yarn in the back loop of any foundation ch. Sl st loosely in each foundation ch around, join. (40 sl st) Fasten off and weave in the end.
Why the math works: All 24 rounds hold exactly 40 sts. The lattice rounds swap stitch types but never add or lose stitches. 40 sts at 4 sts per inch gives 10″ (25.4 cm) around, so both bands and the lattice body share the same 5″ (12.7 cm) flat width. The tube hangs straight with no flare at either end.
Covered Hanging Ring
Hold the 2.5″ (6.4 cm) ring and leave a 12″ (30.5 cm) starting tail. Work sc tightly around the ring until it is completely covered, which takes about 36 sc. Slide the stitches together as you go so no plastic or metal shows. Join with a sl st to the first sc. Fasten off.
Attaching: Flatten the tube with the round join at center back. Center the ring above stitches 40 and 1–5 of the top band. The middle of those 6 sts falls between sts 2 and 3, right over the solid column that starts each round. Overlap the ring onto the band by 0.5″ (1.3 cm). Use the long top-edge tail to whipstitch the lower 6 sc of the ring cover to those 6 band sts, working through the back layer only. Go around twice to make it strong, then weave in.
The ring should stand about 2″ (5.1 cm) above the top edge.
Final Blocking
- Weave in all ends except any you still need for adjustments.
- Soak the holder in cool water for 10 minutes, then press out the water gently. Don’t wring it.
- Roll it in a towel to take out extra moisture.
- Slide a rolled towel or a 3″ (7.6 cm) cardboard tube inside to hold the shape.
- Lay it flat at 5″ (12.7 cm) wide and 14.7″ (37.3 cm) long, and pin the edges straight.
- Use your fingers to open each X and line up the solid columns so they run straight down.
- Let it dry completely, then remove the form.
Final Quality-Control Checklist
- Every round has 40 sts. Lattice rounds have 24 tr + 16 ch.
- There are 4 lattice panels, each with 12 stacked X’s.
- All 4 solid columns run straight with no spiral.
- Both bands are 6 rounds, 1.3″ (3.3 cm) deep.
- Flat width is 5″ (12.7 cm) at the top, middle and bottom.
- The tube length is 14.7″ (37.3 cm).
- The ring is fully covered, centered at the back, and sewn securely through the back layer only.
- Both openings have an even sl st edge.
- All ends are woven in securely.
Troubleshooting
The columns spiral around the tube. You’ve probably joined into the wrong stitch, or you’re turning by habit. Always join to the top of the beginning ch-4 and never turn.
The X’s lean or stack off-center. Check that you’re skipping the first tr and both ch of the old OX, so the new legs land in the old tr tops.
The top band flares or puckers. Count Rnd 19. It must have exactly 40 sc, worked into the chains, not into the spaces.
The bottom opening lets bags fall out. Pack bags in loosely and twist each one as you feed it in. Friction against the sc band holds them.
The ring tilts forward. Sew through the back layer only, and add a second pass of whipstitch.
The tube is too short. Add 2 lattice rounds (Rnd 8) before the top band. Each pair adds 2″ (5.1 cm).
Care
Machine wash cold on a gentle cycle in a mesh bag, then reshape and lay flat to dry. If you used a metal ring, dry the holder quickly to prevent rust marks.

Final Notes
Everything comes back to one number: 40 stitches at 4 stitches per inch, which makes 10″ (25.4 cm) around and 5″ (12.7 cm) flat. The bottom band is 1.3″ (3.3 cm). Twelve lattice rounds at 1″ (2.5 cm) each add 12″ (30.5 cm), which brings you to 13.3″ (33.8 cm). The top band adds another 1.3″ (3.3 cm) for a finished tube of 14.7″ (37.3 cm). With the ring standing 2″ (5.1 cm) above, the holder hangs about 16.7″ (42.4 cm). Check your gauge at each of those points and the holder will come out right.
Happy crocheting!