

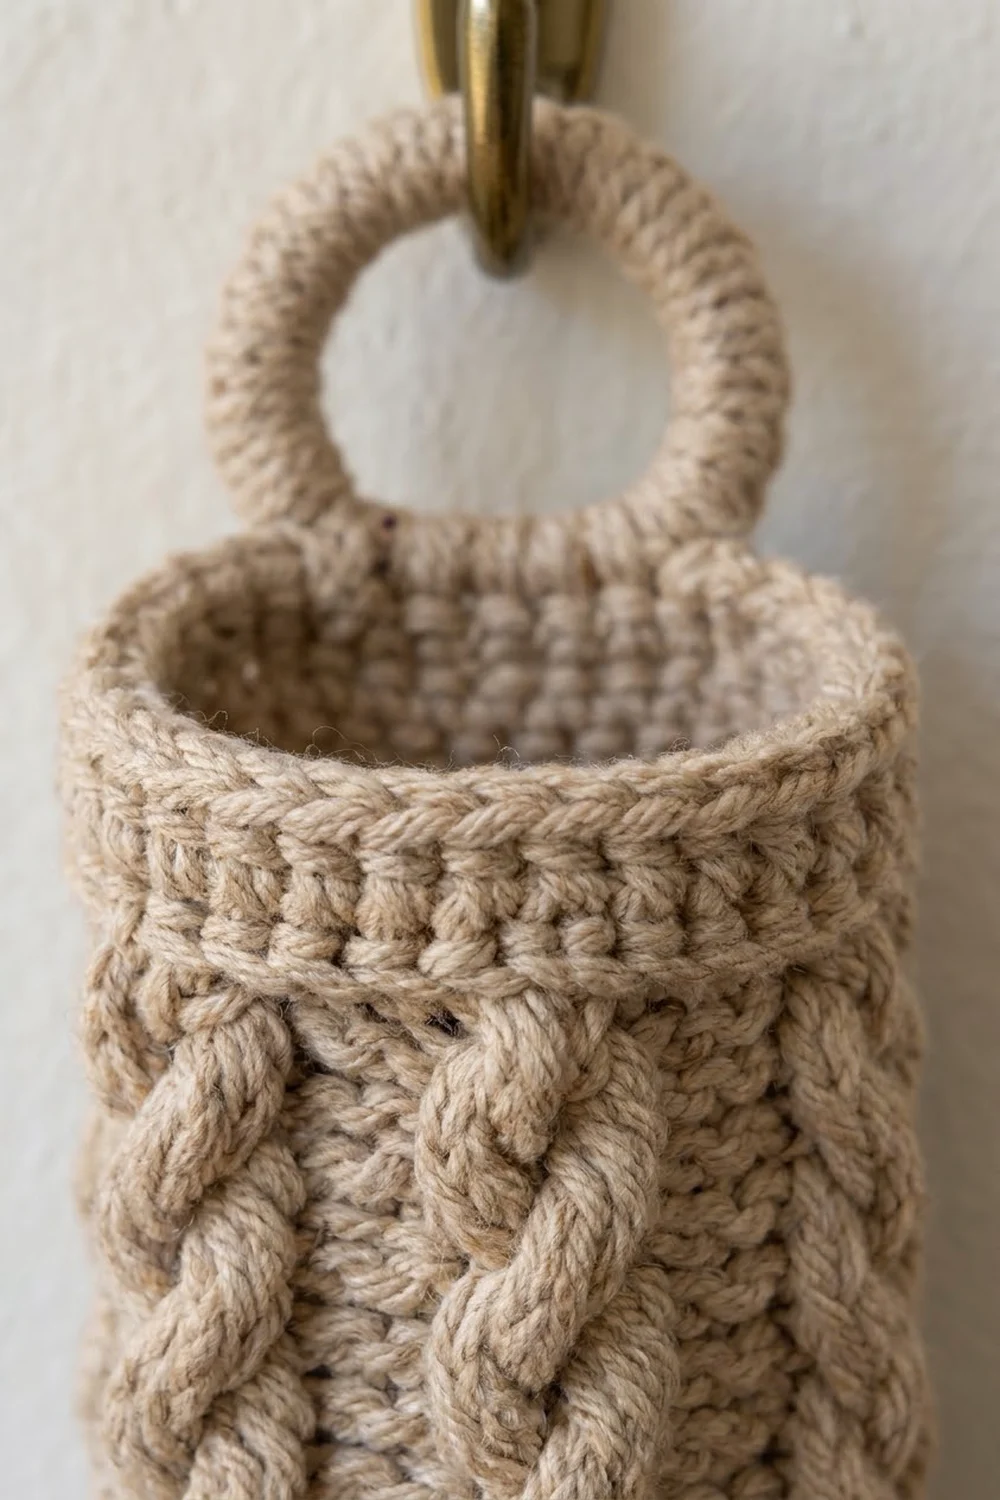
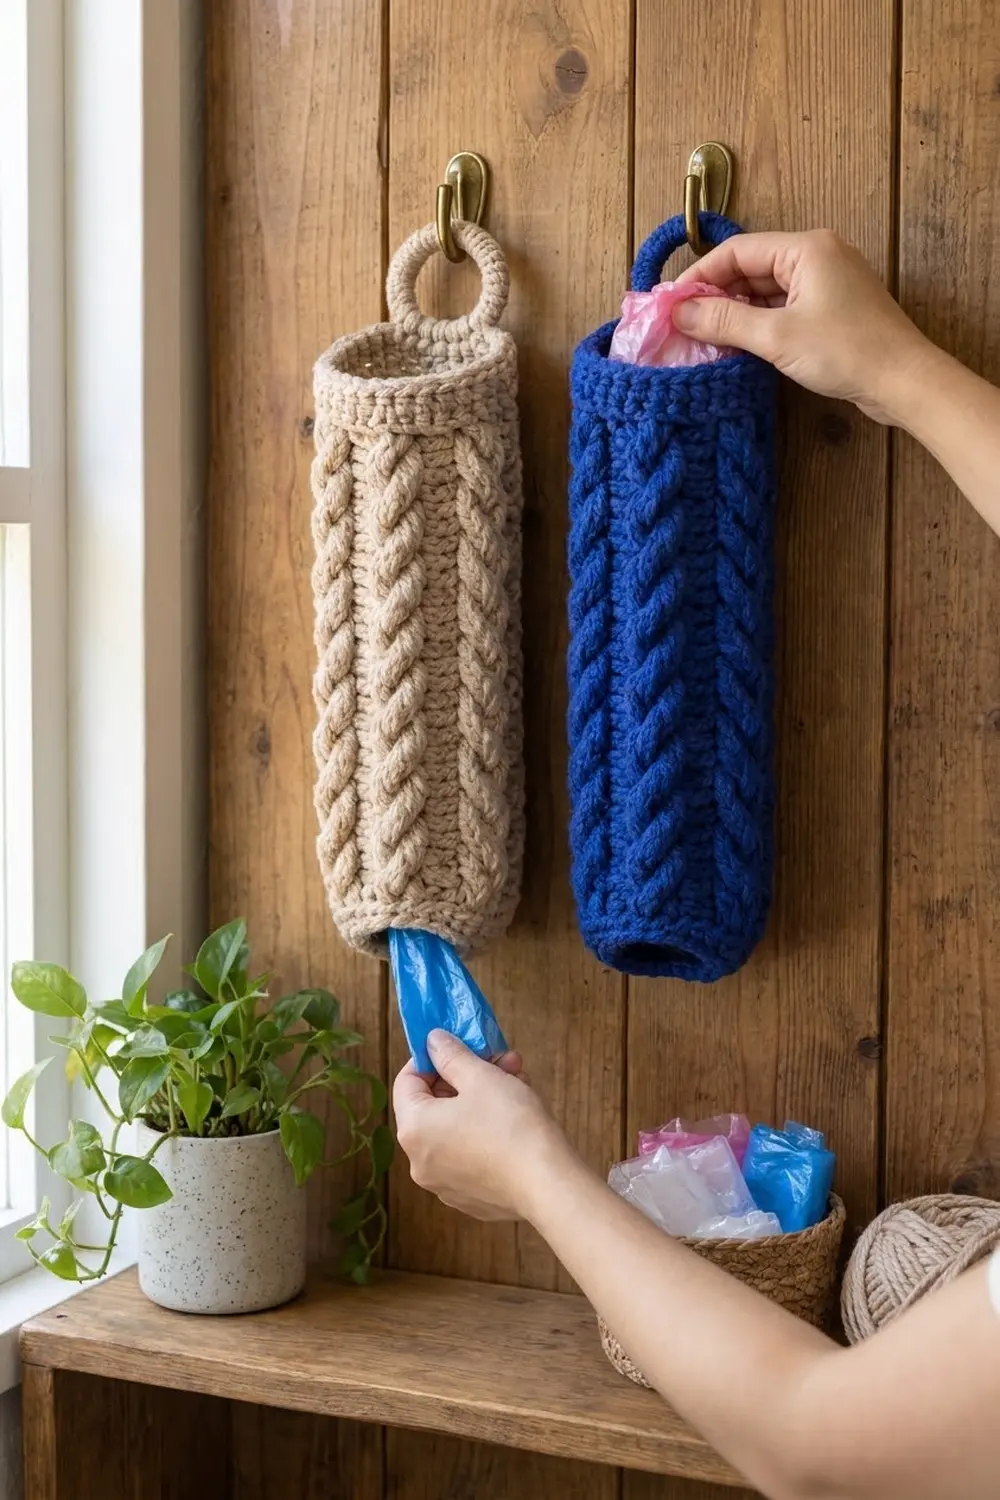
This holder turns a kitchen chore into something you won’t mind leaving out on the wall. You stuff plastic bags in at the top and pull them out one at a time from the bottom. Rope-twist cables run all the way around the tube, and a crochet-covered ring lets it hang neatly from a hook or a cabinet knob.
The sample is shown in a warm beige, and a second one is in royal blue. Both look good in a modern farmhouse kitchen. Solid, light-to-medium colors show off the cables best. Very dark or variegated yarn hides the twists.
This pattern uses US crochet terms. The finished holder measures 15 in (38.1 cm) tall and 6 in (15.2 cm) wide when flat, which is a 12 in (30.5 cm) circumference. With the ring added, the total hanging length is about 17.25 in (43.8 cm).
You work the holder bottom-up in joined rounds, in one continuous piece. First comes a short single-crochet bottom band that grows from 24 to 36 stitches. Next is the cabled body, made with front-post stitches over a half double crochet background. Last comes a single-crochet top band with a slip-stitch rim. You then cover a ring with single crochet and sew it to the back of the top band.
Finished Size and Construction
- Finished size: 15 in (38.1 cm) tall × 6 in (15.2 cm) wide when flat
- Circumference: 12 in (30.5 cm) at the body; 8 in (20.3 cm) at the bottom opening
- Hanging length with ring: about 17.25 in (43.8 cm)
- Skill level: Intermediate (front-post stitches and cable crosses)
- Terminology: US
- Yarn weight: Bulky (#5)
- Hook: 6.0 mm (J-10)
- Number of pieces: 1 holder body, plus 1 small covered ring
- Layout: a single tube worked in joined rounds; the ring is sewn to the center back
- Body: 36 stitches around, 6 cable repeats of 6 stitches each
- Size before border: 13 in (33.0 cm) tall (bottom band plus cabled body)
- Border depth: 2 in (5.1 cm) for the top band and rim
Materials
Yarn: Use a smooth bulky (#5) yarn. Cotton, a cotton blend or soft acrylic all work. Plied, round yarns give the clearest cable definition. Avoid fuzzy or brushed yarns.
- Main color (one color per holder; beige or royal blue in the samples): 150 g / about 210 m (230 yd)
These quantities include about a 15% margin. Cables use noticeably more yarn than flat stitches.
Tools:
- 6.0 mm (J-10) crochet hook
- One 2.5 in (6.4 cm) metal or wooden ring (a macramé ring works well)
- Stitch marker
- Tapestry needle
- Scissors
- Measuring tape
- Rust-proof pins and a spray bottle for blocking
Abbreviations (US Terms)
- ch – chain
- sl st – slip stitch
- sc – single crochet
- hdc – half double crochet
- sc2tog – single crochet 2 together
- FPdc – front post double crochet
- FPtr – front post treble crochet
- st(s) – stitch(es)
- sk – skip
- rnd(s) – round(s)
Special stitch: 2/2 Front Cross (2/2 FC). Skip the next 2 stitches. Work FPtr around the post of each of the next 2 stitches. Then, working in front of the stitches you just made, work FPtr around each of the 2 skipped stitches, in order. This makes 4 stitches and a rope twist that leans to the left.
Post-stitch note: When you work a front post stitch, the stitch directly behind it in the current round is skipped. Never work a hdc into the top of a stitch that already holds a post stitch.
Gauge and Checkpoints
- Sc in rounds: 12 sts and 12 rnds = 4 in (10.2 cm)
- Cable pattern in rounds: 12 sts and 9 rnds = 4 in (10.2 cm)
Test one piece first. Treat the start of the holder as your swatch. Work Rnds 1–12 and measure before you go any further.
Checkpoints:
- After Rnd 1: 24 sts. The circumference is 8 in (20.3 cm), or 4 in (10.2 cm) flat.
- After Rnd 3: 36 sts. The work is 6 in (15.2 cm) flat and 1 in (2.5 cm) tall.
- After Rnd 12: The work is 5 in (12.7 cm) tall and still 6 in (15.2 cm) flat.
- After Rnd 30: The work is 13 in (33.0 cm) tall.
- After Rnd 36: The work is 15 in (38.1 cm) tall.
If your piece is too big (more than 6.25 in / 15.9 cm flat), go down one hook size to 5.5 mm (I-9). If it is too small (under 5.75 in / 14.6 cm flat), go up to 6.5 mm (K-10.5). Fix the width first. If the height is off, you can add or remove plain cable rounds before the top band.
Bottom Band
The holder starts at the bottom opening. Start every round with ch 1 for sc rounds or ch 2 for hdc rounds. The starting chain never counts as a stitch. Work the first stitch into the same stitch as the join, then join each round with sl st to the first stitch. Move your marker up each round.
Foundation: Ch 24. Join with sl st to the first ch to form a ring, taking care not to twist the chain.
Rnd 1: Ch 1, sc in each ch around, join. (24 sts)
Rnd 2: Ch 1, sc in next 3 sts, 2 sc in next st; repeat from * 5 more times, join. (30 sts)
Rnd 3: Ch 1, sc in next 4 sts, 2 sc in next st; repeat from * 5 more times, join. (36 sts)
Checkpoint: the piece should measure 6 in (15.2 cm) flat and 1 in (2.5 cm) tall. The opening is narrower than the body, which is what holds the bags in.
Cabled Body
Each repeat is 6 sts: 2 hdc background stitches plus 4 cable stitches. Six repeats make 36 sts.
Rnd 4 (setup): Ch 2, hdc in next 2 sts, FPdc around each of next 4 sts; repeat from * 5 more times, join. (36 sts: 12 hdc + 24 FPdc)
Rnd 5 (plain): Ch 2, hdc in next 2 hdc, FPdc around each of next 4 FPdc; repeat from * 5 more times, join. (36 sts)
Rnd 6 (cross): Ch 2, hdc in next 2 hdc, 2/2 FC over next 4 FPdc; repeat from * 5 more times, join. (36 sts: 12 hdc + 24 FPtr)
Rnd 7 (plain): Ch 2, hdc in next 2 hdc, FPdc around each of next 4 post sts; repeat from * 5 more times, join. (36 sts)
Rnd 8 (plain): Repeat Rnd 7. (36 sts)
Rnds 9–29: Repeat Rnds 6–8 seven more times. Cross rounds fall on Rnds 9, 12, 15, 18, 21, 24 and 27. (36 sts in each rnd)
Rnd 30 (plain): Repeat Rnd 7. (36 sts)
The body has 27 rounds (Rnds 4–30) and 8 twists per cable. At 9 rnds per 4 in, 27 rnds = 12 in (30.5 cm).
Checkpoint: the piece should measure 13 in (33.0 cm) tall and 6 in (15.2 cm) flat. The six cables should run straight up the tube. If they spiral, see Troubleshooting.
Border: Top Band and Rims
Border gauge: 12 sc and 12 rnds = 4 in (10.2 cm). Each sc is 1/3 in (0.8 cm) wide.
Rnd 31 (conversion): Ch 1, sc in each st around, join. Work 1 sc into the top of every hdc and every post stitch. (36 sc worked 1 per existing st + 0 added = 36 sts; 18 per side when flat)
Rnds 32–36: Ch 1, sc in each st around, join. (36 sts each rnd; 18 per side when flat)
Rnd 37 (top rim): Do not chain. Sl st loosely in each st around and join to the first sl st. (36 sl sts; 18 per side) Fasten off and weave in the end.
Bottom rim: Join yarn at the back of the foundation chain. Sl st loosely into each of the 24 foundation chs and join. (24 sl sts; 12 per side) Fasten off and weave in the end.
Why the math works: The body has 36 sts, which is exactly 6 repeats of 6. The top band converts those 36 sts one-for-one, with nothing added, so its edge matches the body. At 12 sc per 4 in (10.2 cm), 36 sts make a 12 in (30.5 cm) circumference, so 18 sts per side is exactly 6 in (15.2 cm) flat. The bottom rim’s 24 sts give an 8 in (20.3 cm) opening, or 4 in (10.2 cm) flat. The top band is 6 rnds deep, or 2 in (5.1 cm), which brings the height from 13 in (33.0 cm) to 15 in (38.1 cm). The slip-stitch rims firm up the edges without adding measurable height.
Hanging Ring
Ring cover: Make a slipknot on your hook. Holding the 2.5 in (6.4 cm) ring, insert the hook through the center of the ring, yarn over, pull up a loop, yarn over and pull through both loops. You now have 1 sc worked over the ring. Work about 28 sc over the ring, or as many as it takes to cover it completely with the stitches packed snugly side by side. Join with sl st to the first sc. Fasten off, leaving a 12 in (30.5 cm) tail.
Rotate the stitches so their top edges face the inside of the ring. The covered ring measures about 3.25 in (8.3 cm) across.
Attach the ring: Flatten the holder and find the center back, which is directly opposite the round joins. Slide the bottom of the ring 1 in (2.5 cm) down inside the back of the top band, over Rnds 34–37. Using the tail, whipstitch through about 5 ring stitches and the band stitches behind them. Go around twice for strength. About 2.25 in (5.7 cm) of the ring should stand above the rim. Weave in the end.
Final Blocking
- Spray the holder evenly until it is damp but not dripping.
- Stuff it loosely with a rolled towel so it holds a 6 in (15.2 cm) flat width without stretching.
- Pinch each cable gently to lift it, and straighten the hdc columns so they run vertically.
- Check the height: 15 in (38.1 cm) from the bottom rim to the top rim.
- Shape the bottom band so it curves inward slightly.
- Leave it to dry completely, standing upright or lying flat, before you take out the towel.
Final Quality-Control Checklist
- [ ] The body has 36 sts all the way around and 6 cables of equal width
- [ ] Each cable has 8 twists, all leaning the same way
- [ ] The hdc columns run straight up the tube
- [ ] The top band has 6 sc rnds plus a sl st rim of 36 sts
- [ ] The bottom opening is 8 in (20.3 cm) around and 4 in (10.2 cm) flat
- [ ] The holder is 15 in (38.1 cm) tall and 6 in (15.2 cm) flat
- [ ] The ring is fully covered and centered on the back, opposite the round joins
- [ ] The ring stitching survives a firm tug
- [ ] All ends are woven in on the inside
Troubleshooting
The cables spiral around the tube. You are probably working the first stitch into the wrong place after the join. Always start in the same stitch as the join, and count 36 at the end of each round.
There are holes beside the cables. These come from post stitches pulling the fabric. Work the hdc stitches next to each cable a little more snugly.
The cables look flat. Pull each post loop up to the full height of the round, and make sure you are working the cross in front of the stitches.
The stitch count drifts. You have worked a hdc into a stitch that sits behind a post stitch. Recount each repeat as 2 + 4.
The top band flares or pulls in. Change hook size by 0.5 mm for Rnds 31–37 only.
The bags fall out of the bottom. Work one more round of sc2tog every 4th st (24 down to 18 sts) before the bottom rim. Do this from the foundation side.
The ring tilts. Re-sew it so it is centered over the stitch exactly opposite the joins.
Care
Hand wash in cool water and lay flat to dry, reshaping the cables while the holder is damp. Cotton versions can go through a gentle machine wash in a laundry bag if needed.
Final Notes
The measurements build on each other:
- Rnd 1: 24 sts = 8 in (20.3 cm) around.
- Rnd 3: 36 sts = 6 in (15.2 cm) flat, 1 in (2.5 cm) tall.
- Cabled body: 27 rounds add 12 in (30.5 cm), for 13 in (33.0 cm) tall.
- Top band: 6 rounds add 2 in (5.1 cm), for a finished 15 in (38.1 cm).
- Ring: stands 2.25 in (5.7 cm) above the rim, for about 17.25 in (43.8 cm) of total hanging length.
Check the width once at Rnd 3 and once at Rnd 12. If it is right at both, the rest of the holder will fall into place.
Happy crocheting!