

Plastic grocery bags pile up fast, and this cone keeps them tidy and easy to reach. You stuff bags in through the wide top and pull them out one at a time through the small opening at the bottom. A padded ring at the back slips over any wall hook, door knob, or cabinet peg.
The sample is periwinkle blue, and a second one in raspberry pink shows how well the design works in bolder colors. The body is an open granny-cluster mesh, so you can see the bags inside and air moves through freely. Solid single-crochet bands at the top and bottom give the cone a firm rim and a neat dispensing hole.
This pattern uses US crochet terms. The finished holder is 11.35 in (28.8 cm) tall, not counting the ring. The top circumference is 22 in (55.9 cm), which is about 7 in (17.8 cm) across, and the bottom opening is about 1.9 in (4.8 cm) across.
You work the cone in joined rounds from the bottom up. It starts with a small solid band, grows through 16 mesh rounds, and finishes with a 4-round solid rim. You then cover a ring with single crochet, add a short tab, and sew the tab to the back of the rim.
Finished Size and Construction
- Finished size: 11.35 in (28.8 cm) tall; 22 in (55.9 cm) top circumference; 11 in (27.9 cm) wide at the top when pressed flat
- Skill level: Easy / advanced beginner
- Terminology: US
- Yarn weight: Worsted (#4), cotton or cotton blend
- Hook: 5 mm (H-8)
- Number of pieces: 1 finished item made of 2 parts (cone body + ring hanger)
- Layout: Single cone with the hanger centered on the back of the rim
- Body size before rim: 10.35 in (26.3 cm) tall, 22 in (55.9 cm) circumference
- Rim (border) depth: 1 in (2.5 cm), 4 rounds of sc
- Hanger: 2 in (5.1 cm) ring, about 3 in (7.6 cm) across once covered
Materials
Choose a smooth worsted-weight cotton or cotton blend. Cotton holds the cone shape well, doesn’t stretch much under the weight of the bags, and washes easily. Acrylic also works, but the cone will be a bit softer and may lean when it’s full.
- Main color (periwinkle blue, or raspberry pink for the alternate): 100 g, about 190 m (208 yd)
- 5 mm (H-8) crochet hook
- One 2 in (5.1 cm) plastic or metal ring (a plastic macramé ring or a sturdy bangle-style ring)
- Tapestry needle
- 4 stitch markers
- Scissors and a measuring tape
The quantities include a margin of about 25 percent for your gauge swatch, a slightly tighter or looser tension, and the sewing tails.
Abbreviations (US Terms)
- ch – chain
- sl st – slip stitch
- sc – single crochet
- dc – double crochet
- sp – space
- st(s) – stitch(es)
- rnd – round
Special stitches
- Granny group (grp): 3 dc worked into the same space, followed by ch 1. Each group, including its ch-1, counts as 4 sts.
- Increase group (inc grp): (3 dc, ch 1, 3 dc, ch 1) worked into the same ch-1 space. This turns one space into 2 groups.
Gauge and Checkpoints
Gauge:
– 16 sc = 4 in (10.2 cm), and 4 rnds of sc = 1 in (2.5 cm)
– 4 granny groups (with their ch-1s) = 4 in (10.2 cm), and 5 granny rounds = 3 in (7.6 cm), which is 0.6 in (1.5 cm) per round
Make the cone itself as your test. Gauge matters here because the cone has to taper evenly. Check your measurements at each of these points, measuring height straight up from the bottom edge:
| After | Groups | Circumference | Flat width | Height |
|---|---|---|---|---|
| Rnd 3 | – | 6 in (15.2 cm) | 3 in (7.6 cm) | 0.75 in (1.9 cm) |
| Rnd 7 | 10 | 10 in (25.4 cm) | 5 in (12.7 cm) | 3.15 in (8.0 cm) |
| Rnd 11 | 14 | 14 in (35.6 cm) | 7 in (17.8 cm) | 5.55 in (14.1 cm) |
| Rnd 15 | 18 | 18 in (45.7 cm) | 9 in (22.9 cm) | 7.95 in (20.2 cm) |
| Rnd 19 | 22 | 22 in (55.9 cm) | 11 in (27.9 cm) | 10.35 in (26.3 cm) |
| Rnd 23 | – | 22 in (55.9 cm) | 11 in (27.9 cm) | 11.35 in (28.8 cm) |
- If your cone is too big (more than 0.5 in / 1.3 cm wider at Rnd 7), switch to a 4.5 mm hook.
- If it’s too small, switch to a 5.5 mm hook.
Small differences in height are fine. Width matters more, because it sets the rim size.
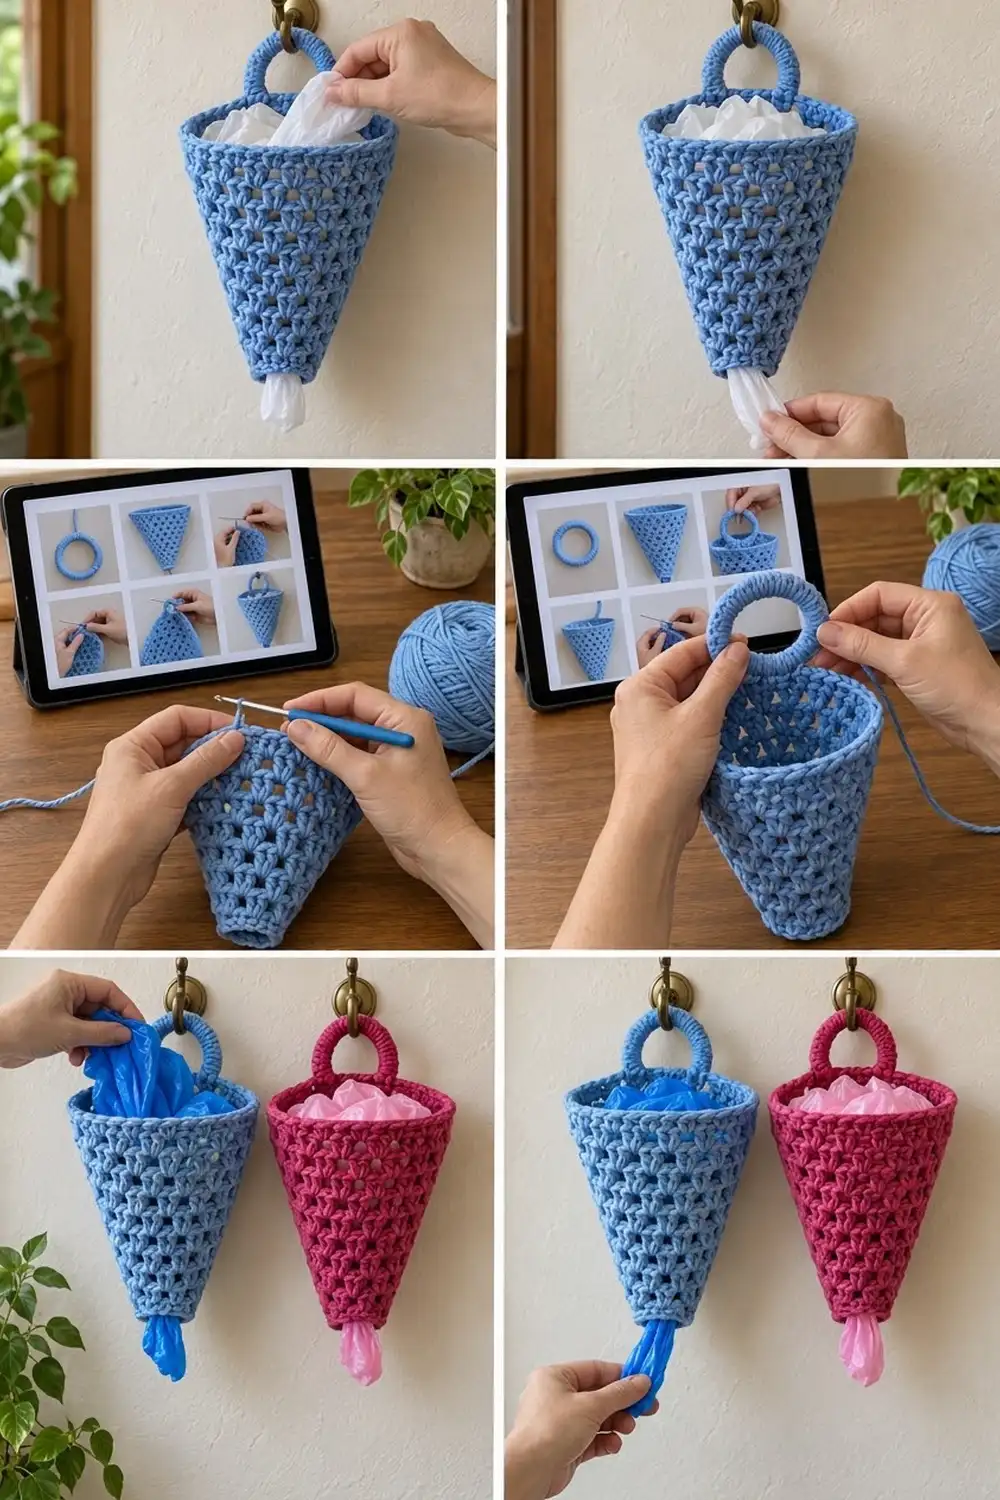
Cone Body
Bottom Band
Foundation: Ch 24 and join with a sl st to the first ch to form a ring, taking care not to twist the chain. Keep this chain loose, because it becomes the dispensing opening.
Rnd 1: Ch 1, sc in each ch around. Join with a sl st to the first sc. (24 sc)
Rnds 2–3: Ch 1, sc in each st around, join. (24 sc)
Checkpoint: The band is 0.75 in (1.9 cm) tall, 6 in (15.2 cm) around, and 3 in (7.6 cm) wide when flattened.
Mesh Section
Work every mesh round the same way, starting from the first ch-1 space:
- Sl st into the next ch-1 sp.
- Ch 3 (this counts as the first dc), then work 2 dc in the same sp and ch 1. That completes the first group.
- Work a group in each remaining sp, using an inc grp wherever the instructions say so.
- Join with a sl st to the top of the beginning ch-3.
If space 1 is an increase space, start with ch 3, 2 dc, ch 1, 3 dc, ch 1, all in that same space.
Count spaces from the first space of the round. The increases are staggered by one space each time so they spiral around the cone and don’t stack into a visible seam.
Rnd 4 (set-up): Ch 3 (counts as dc), 2 dc in the same st as the join, ch 1, skip 3 sts. 3 dc in the next st, ch 1, skip 3 sts. Repeat from * 4 more times, then join. (6 groups: 18 dc + 6 ch = 24 sts)
Rnd 5: Work an inc grp in spaces 1 and 4 and a grp in every other space. (8 groups, 32 sts)
Rnd 6: Inc grp in spaces 2 and 6, grp in the rest. (10 groups, 40 sts)
Rnd 7: Grp in each sp. (10 groups, 40 sts)
Rnd 8: Inc grp in spaces 3 and 8, grp in the rest. (12 groups, 48 sts)
Rnd 9: Grp in each sp. (12 groups, 48 sts)
Rnd 10: Inc grp in spaces 4 and 10, grp in the rest. (14 groups, 56 sts)
Rnd 11: Grp in each sp. (14 groups, 56 sts)
Rnd 12: Inc grp in spaces 5 and 12, grp in the rest. (16 groups, 64 sts)
Rnd 13: Grp in each sp. (16 groups, 64 sts)
Rnd 14: Inc grp in spaces 6 and 14, grp in the rest. (18 groups, 72 sts)
Rnd 15: Grp in each sp. (18 groups, 72 sts)
Rnd 16: Inc grp in spaces 7 and 16, grp in the rest. (20 groups, 80 sts)
Rnd 17: Grp in each sp. (20 groups, 80 sts)
Rnd 18: Inc grp in spaces 8 and 18, grp in the rest. (22 groups, 88 sts)
Rnd 19: Grp in each sp. (22 groups: 66 dc + 22 ch = 88 sts)
In each increase round, the 2 increase spaces sit exactly halfway around from each other (3, 4, 5, 6, 7, 8, 9, then 10 spaces apart). This keeps the cone symmetrical. The 8 increase rounds add 2 groups each, which takes you from 6 groups to 22.
Checkpoint: The body is 10.35 in (26.3 cm) tall and 22 in (55.9 cm) around at the top edge. Don’t fasten off.
Ring Hanger
Covering the ring: Make a slip knot on your hook. Holding the 2 in (5.1 cm) ring, work sc around the ring, inserting the hook through the center of the ring for each stitch.
Rnd 1: Work 40 sc around the ring, sliding them together as you go so no ring shows. Join with a sl st to the first sc. If you can still see the ring, add sc in groups of 2 until it’s fully hidden. Firm, packed stitches give the padded look.
Tab:
- Row 1: Ch 1, sc in the next 5 sts along the outer edge of the ring, turn. (5 sc)
- Rows 2–5: Ch 1, sc in each st across, turn. (5 sc)
Fasten off, leaving a 12 in (30.5 cm) tail. The tab is 1.25 in (3.2 cm) wide and 1.25 in (3.2 cm) long, and the covered ring is about 3 in (7.6 cm) across.
Border (Top Rim)
Border gauge: 4 sc = 1 in (2.5 cm), and 4 rnds = 1 in (2.5 cm).
Continue from Rnd 19 without fastening off. Place 4 markers at even quarters on Rnd 20 to check your count.
Rnd 20 (conversion): Ch 1, sc in each dc and sc in each ch-1 sp around, then join.
– 66 sc (one per dc) + 22 sc (one per ch-1 sp) = 88 sc
– That’s 22 sc per quarter.
Rnds 21–23: Ch 1, sc in each st around, then join. (88 sc, 22 per quarter)
Fasten off and weave in the end.
Why the math works: Each granny group with its ch-1 is 4 sts and measures 1 in (2.5 cm), and the sc border gauge is also 4 sts per 1 in (2.5 cm). Working 1 sc into each dc and each space therefore gives exactly 88 sc for 22 in (55.9 cm). The rim lies flat without ruffling or pulling in. The 4 rounds add 1 in (2.5 cm), so the total height is 10.35 + 1 = 11.35 in (28.8 cm).
Attaching the hanger:
- Lay the cone flat and choose the back, centered between the 2 increase lines of Rnd 18.
- Place the tab on the outside of the rim so it overlaps Rnds 20–23 by 1 in (2.5 cm). That leaves 0.25 in (0.6 cm) of tab as a neck between the rim and the ring.
- Whipstitch all 4 edges of the tab to the rim with the tail. Stitch through both layers of the solid band for strength.
- Go around a second time along the top edge of the rim, then weave in the end.
Final Blocking
- Wet the cone and ring hanger in cool water, then gently press out the water in a towel. Don’t wring it.
- Stuff the cone firmly with a rolled towel or plastic bags so it takes a smooth, round taper.
- Shape the top rim into a circle about 7 in (17.8 cm) across, and the bottom opening into a circle about 1.9 in (4.8 cm) across.
- Check that the height is 11.35 in (28.8 cm) and nudge the mesh into even rows of holes.
- Stand the cone upside down on its rim, or hang it from the ring, and let it dry completely.
- Remove the stuffing once it’s dry.
Final Quality-Control Checklist
- The bottom band is 24 sc and the opening is about 1.9 in (4.8 cm) across.
- Rnd 19 has exactly 22 groups (88 sts).
- The increases spiral around the cone instead of lining up.
- The rim has 88 sc on every round and lies flat at 22 in (55.9 cm) around.
- No part of the ring shows through the sc covering.
- The tab is centered on the back and sewn on all 4 edges.
- The total height is 11.35 in (28.8 cm).
- All ends are woven in securely.
Troubleshooting
- The cone twists or spirals: Join every round at the top of the ch-3, and start each round in the very next ch-1 space.
- The rim ruffles: You probably added sts in Rnd 20. Recount to 88. If the count is right, go down one hook size for the border only.
- The rim pulls in: Your sc is tighter than your dc. Go up one hook size for Rnds 20–23.
- Bags fall out on their own: Make the foundation chain with 20 ch instead of 24 and set up 5 groups in Rnd 4. Then increase as written for a slightly smaller final top.
- Bags won’t pull through: Work the foundation chain with a 5.5 mm hook.
- The ring sags forward: Sew the top edge of the tab again so it sits snugly against the rim.
Care
Hand wash in cool water with mild soap, then reshape and dry flat or hanging. Cotton versions can go through a gentle machine cycle inside a laundry bag.

Final Notes
Here’s how the measurements build. The 24-sc bottom band is 6 in (15.2 cm) around. Sixteen mesh rounds widen it from 6 groups to 22 groups, which is 22 in (55.9 cm) around and 10.35 in (26.3 cm) tall. The 88-sc rim adds 1 in (2.5 cm) for a finished height of 11.35 in (28.8 cm). As long as you match the gauge at the Rnd 7 checkpoint, every later number follows. Make one in blue, one in raspberry, and give every pile of bags a home.
Happy crocheting!