

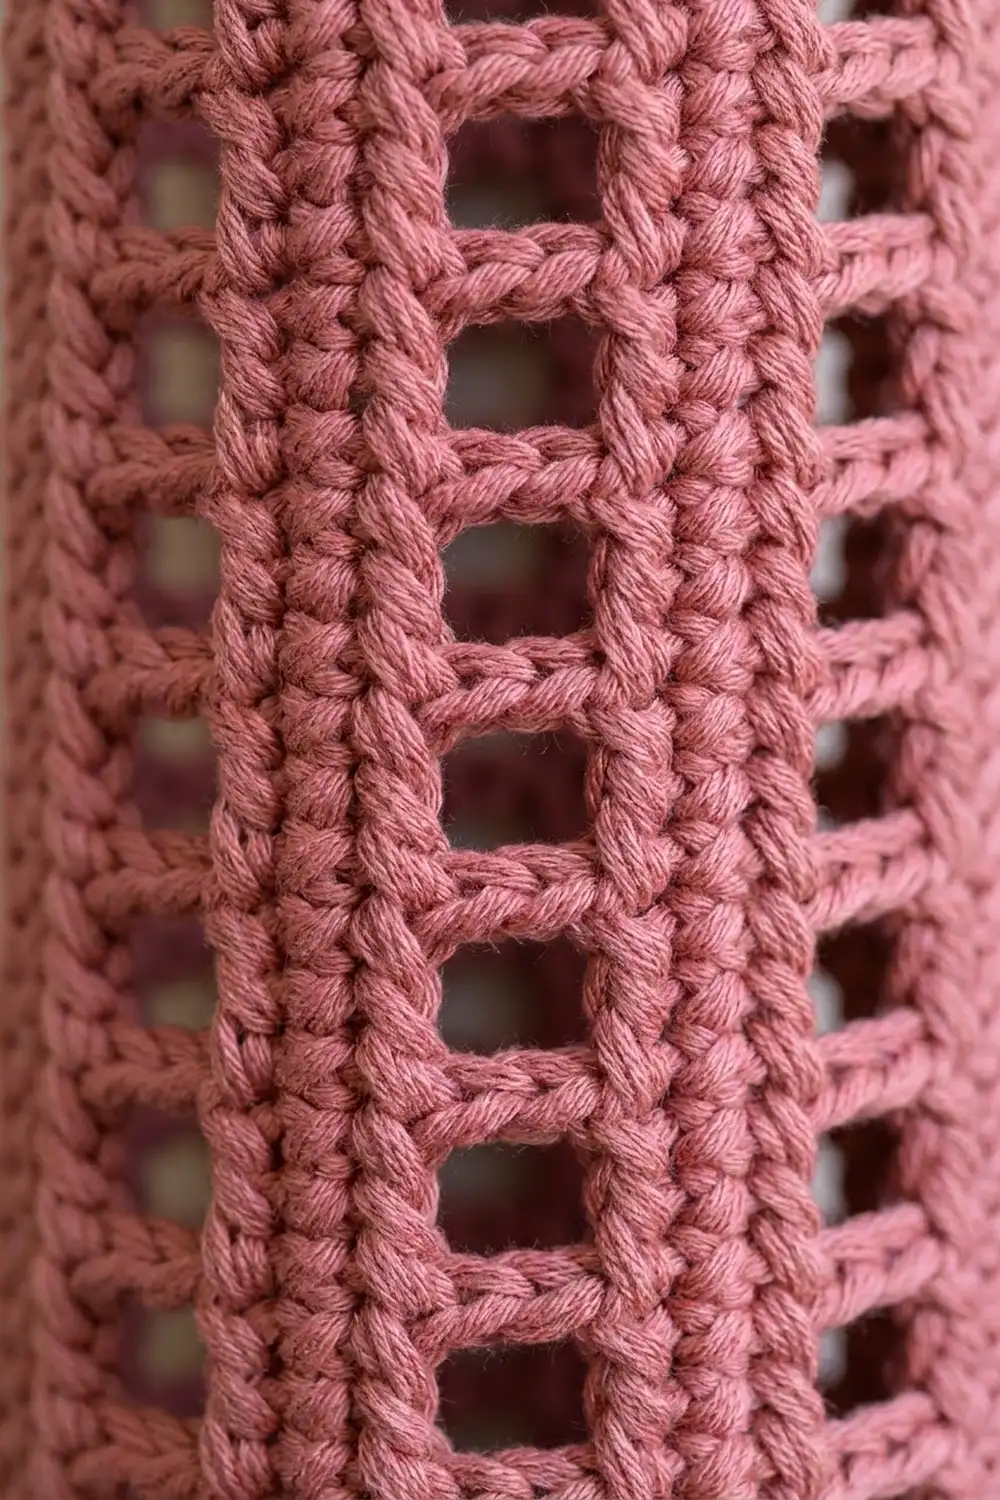
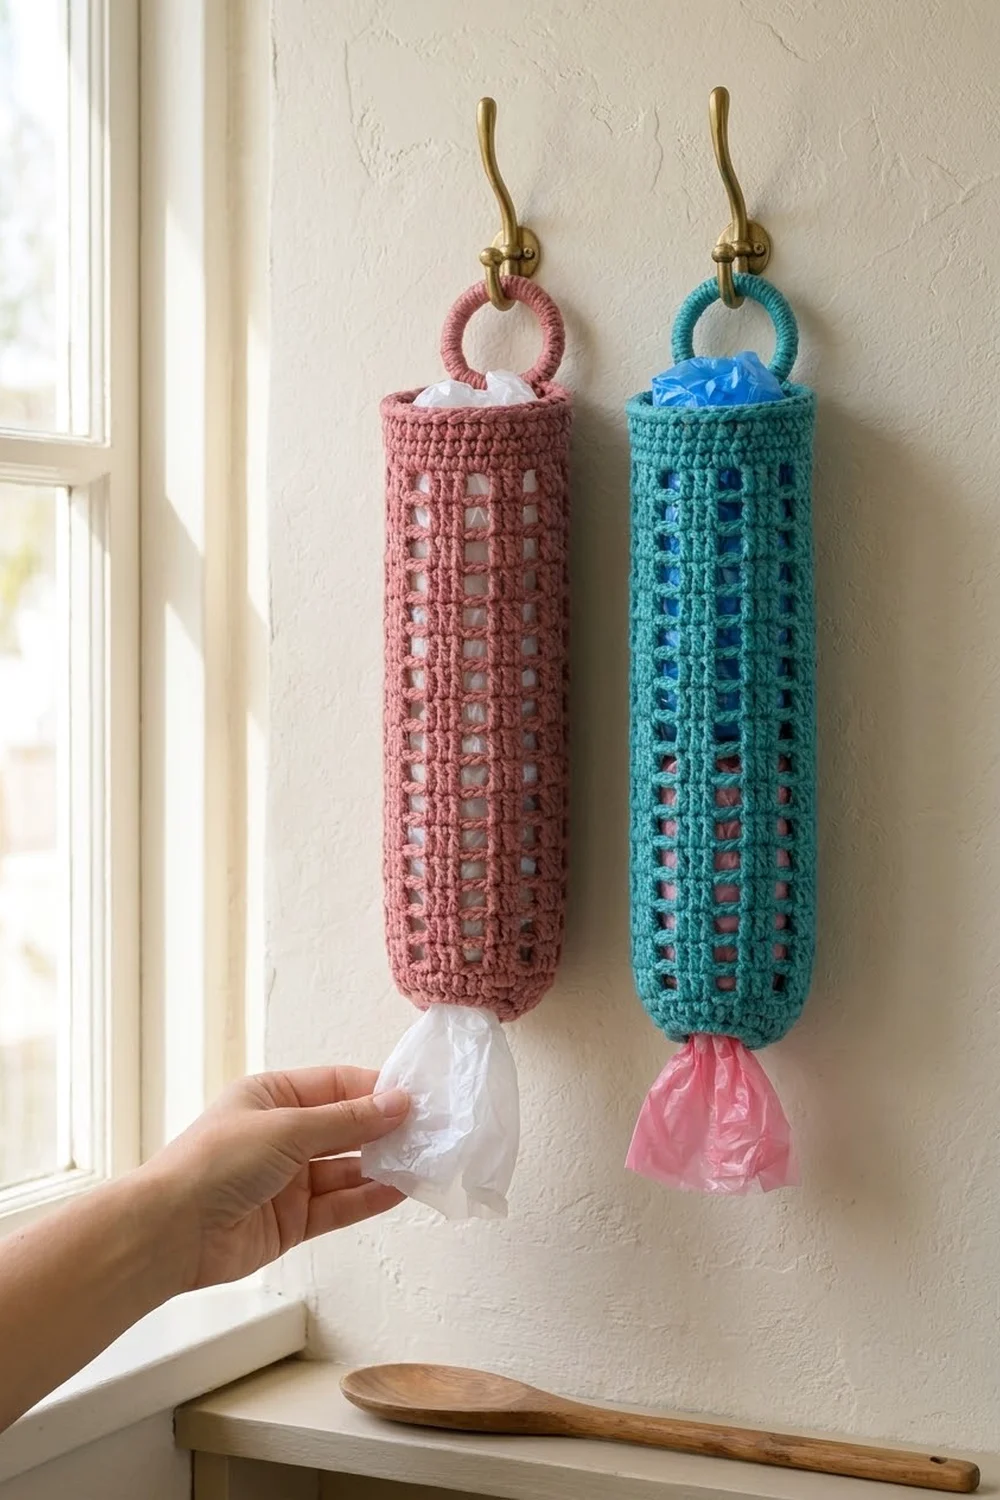
This grocery bag holder is a slim tube with rows of small windows, and it hangs on a wall hook from a covered ring. You push used plastic bags in at the top and pull them out one at a time through the narrower opening at the bottom. Columns of solid double crochet alternate with ladders of small square windows. You can see through the windows how many bags are left, and the holder looks neat on a pantry wall.
The sample uses a warm dusty rose cotton. A teal version made from the same pattern works just as well if you want a matching pair. Both colors suit a farmhouse or modern kitchen, and cotton keeps the holder firm and washable.
The pattern uses US crochet terms. The finished holder is 16.5 in (41.9 cm) long and 4.5 in (11.4 cm) wide when flat. The circumference is 9 in (22.9 cm), and the bottom opening is 3 in (7.6 cm) wide when flat.
You work the holder in joined rounds from the bottom up:
– A short single crochet band forms the narrow bottom opening.
– One increase round widens the tube.
– The body alternates a window round of double crochet with a bar round of single crochet.
– A solid single crochet band finishes the top.
– A ring covered in single crochet is sewn to the back of the rim for hanging.
Finished Size and Construction
- Finished size: 16.5 in (41.9 cm) long x 4.5 in (11.4 cm) wide, laid flat
- Circumference: 9 in (22.9 cm) at the body, 6 in (15.2 cm) at the bottom opening
- Skill level: Easy
- Terminology: US crochet terms
- Yarn weight: Worsted (#4) cotton
- Hook: US 7 (4.5 mm)
- Number of pieces: 1 tube body, plus 1 covered ring sewn to the top
- Layout: Single tube, hung vertically from the ring
- Piece size: 36 stitches around, 38 rounds tall
- Size before border: 16.5 in (41.9 cm) x 4.5 in (11.4 cm) flat
- Border depth: Flat slip stitch rim at the top and bottom; it adds no measurable height
Materials
Choose a smooth worsted weight cotton or cotton blend. Cotton holds the tube shape and keeps the windows square. Soft acrylic will work, but the tube will be floppier and may sag once it is full of bags.
- Main color (dusty rose): 70 g, about 120 m (131 yd)
- Optional second holder (teal): 70 g, about 120 m (131 yd)
- 4.5 mm (US 7) crochet hook
- 1 metal or wooden ring, 2 in (5.1 cm) outer diameter
- Tapestry needle
- 1 stitch marker
- Scissors
- Measuring tape
- Rustproof pins and a rolled towel for blocking
Each quantity covers one holder, including the ring cover. It includes a margin of about 15 percent for swatching and weaving in ends.
Abbreviations (US Terms)
- ch – chain
- sc – single crochet
- dc – double crochet
- sl st – slip stitch
- sk – skip
- sp(s) – space(s)
- st(s) – stitch(es)
- rnd(s) – round(s)
- rep – repeat
Special technique – ring cover: Hold the ring in front of the working yarn. Insert the hook through the center of the ring, yarn over and pull up a loop. Yarn over again and pull through both loops on the hook. That makes 1 sc worked around the ring.
Gauge and Checkpoints
Single crochet gauge: 16 sc and 16 rows = 4 in (10.2 cm).
Pattern gauge: 1 pattern repeat (1 window round plus 1 bar round) = 1 in (2.5 cm) tall. Each window is 2 stitches, or 0.5 in (1.3 cm), wide.
Use the start of the holder as your gauge test. Work Rnds 1 to 8, then check these measurements:
- After Rnd 2: The tube measures 3 in (7.6 cm) wide when flat. This is the bottom opening.
- After Rnd 4: The tube measures 4.5 in (11.4 cm) wide when flat and 1 in (2.5 cm) tall.
- After Rnd 12: The piece measures 5 in (12.7 cm) from the bottom edge.
- After Rnd 32: The piece measures 15 in (38.1 cm) from the bottom edge.
- After Rnd 38: The piece measures 16.5 in (41.9 cm) from the bottom edge.
If the tube is too wide, go down one hook size to 4 mm. If it is too narrow, go up one size to 5 mm. Do not add or remove stitches, because the window pattern needs a multiple of 6.
If the tube is too tall after the same number of rounds, your double crochet is loose. Pull up a shorter loop on the first yarn over, or leave out one repeat. If it is too short, add one repeat before the top band.
Bottom Band
Begin with a loose chain, or use a hook one size larger for the chain. A tight chain will pucker the bottom opening.
Foundation: Ch 24. Join with a sl st to the first ch to form a ring, making sure the chain is not twisted.
Rnd 1: Ch 1, sc in each ch around. Join with a sl st to the first sc. (24 sc)
Place the stitch marker in the first stitch of each round, and move it up as you go.
Rnd 2: Ch 1, sc in each st around. Join. (24 sc)
Rnd 3 (increase round): Ch 1, *sc in next st, 2 sc in next st; rep from * around. Join. (24 sc worked 1 per existing stitch + 12 extra sc = 36 sc)
Rnd 4: Ch 1, sc in each st around. Join. (36 sc)
The increases in Rnd 3 give the bottom a slight taper. Because the opening is smaller than the body, it holds the bags in until you pull one out.
Ladder Body
The body is made of 6 repeats of a 6-stitch unit. Each unit is a 4-stitch solid column next to a 2-stitch window. Every window round sits directly on top of the round below, so the windows stack into straight vertical ladders.
Rnd 5 (window round): Ch 3 (counts as first dc), dc in next 3 sts, ch 2, sk next 2 sts, *dc in next 4 sts, ch 2, sk next 2 sts; rep from * 4 more times. Join with a sl st to the top of the beginning ch-3. (24 dc and 6 ch-2 sps)
Rnd 6 (bar round): Ch 1, sc in the same st as the join and in next 3 dc, 2 sc in next ch-2 sp, *sc in next 4 dc, 2 sc in next ch-2 sp; rep from * 4 more times. Join with a sl st to the first sc. (24 sc worked 1 per dc + 12 sc worked into the 6 spaces = 36 sc)
The bar round closes the top of each window with 2 sc, which forms the horizontal rungs of the ladder.
Rnds 7–32: Rep Rnds 5 and 6 thirteen more times, for 14 pattern repeats in total. End with a bar round. (36 sc)
Start every window round with the ch-3 in the stitch where you joined. Each group of dc then sits directly over the 4 sc of its column. The 2 skipped stitches sit over the 2 sc worked into the space below them. If a window shifts sideways, you started the round in the wrong stitch.
Checkpoint: The ladder section measures 14 in (35.6 cm), and the full piece measures 15 in (38.1 cm). You should count 6 ladders around and 14 windows in each ladder.
Top Band
Rnds 33–38: Ch 1, sc in each st around. Join. (36 sc)
These 6 rounds form a solid band 1.5 in (3.8 cm) deep. Do not fasten off; go straight on to the border.
Checkpoint: The piece measures 16.5 in (41.9 cm) from the bottom edge and 4.5 in (11.4 cm) wide when flat.
Covered Ring
Join the yarn with a sl st around the 2 in (5.1 cm) ring.
Rnd 1: Ch 1, work 40 sc around the ring, pushing the stitches together so the ring is completely hidden. Join with a sl st to the first sc. (40 sc)
If the ring still shows through, add 2 to 4 sc. If the stitches ruffle, remove 2 to 4. Fasten off and leave a 12 in (30.5 cm) tail for sewing.
Rotate the stitches around the ring so the stitch tops face the inside of the ring. This gives a smooth, rounded outer edge.
Border
The border is a slip stitch rim worked 1 stitch into each stitch. It firms the top and bottom openings so they don’t stretch out over time.
Border gauge: 1 sl st per existing stitch, on the same hook, with no added stitches.
Top rim: Continuing from Rnd 38, sl st loosely in each st around. Join to the first sl st. (36 sl st) Fasten off.
Bottom rim: Turn the piece upside down. Join the yarn in any free loop of the foundation chain. Sl st in each remaining loop around and join. (24 sl st) Fasten off.
Why the math works: A tube has no corners, so each round is one continuous side. The top rim matches the 36 stitches of Rnd 38 exactly, and the bottom rim matches the 24 foundation chains exactly. Because nothing is added or skipped, the rims can’t flare or pull in. The top stays 9 in (22.9 cm) around and the bottom stays 6 in (15.2 cm) around.
Attaching the ring: Lay the holder flat with the round joins centered at the back. Place the ring above the back of the rim so that 4 sc of the ring cover overlap the top rim. Use the tail to whipstitch those 4 sc to the top 2 rounds of the band. Go around twice, sewing through both the ring cover and the band. Weave the tail down the inside and secure it.
Final Blocking
- Weave in all ends on the inside of the tube. Run them along the solid columns so they can’t show through the windows.
- Roll a hand towel into a cylinder about 9 in (22.9 cm) around and slide it into the holder.
- Mist the holder with water until it is evenly damp but not soaked.
- Straighten the solid columns and square up each window with your fingertips.
- Ease the piece lengthwise to 16.5 in (41.9 cm), then check that it is 4.5 in (11.4 cm) wide when flat.
- Let it dry completely on its side, turning it once so both sides dry evenly.
- Remove the towel and hang the holder by its ring.
Final Quality-Control Checklist
- There are 6 straight ladders around the tube, each with 14 windows.
- Every window is the same size, about 0.5 in (1.3 cm) wide.
- The bottom opening measures 3 in (7.6 cm) flat and holds a folded bag in place.
- The top opening measures 4.5 in (11.4 cm) flat and opens easily.
- The total length is 16.5 in (41.9 cm).
- The ring is fully covered and centered above the back rim.
- The ring is sewn through both layers and doesn’t tilt forward when the holder is full.
- No ends show through the windows.
Troubleshooting
The ladders spiral around the tube. You are starting each round one stitch off. Always begin in the stitch where you joined, and check the marker every round.
The windows close up or look like slits. The ch-2 is too tight. Loosen the chains, or work ch 3 instead and still put 2 sc into each space.
The bottom opening is too loose and bags fall out. Start again with ch 18. Work Rnds 1–2 with 18 sc, then work Rnd 3 as 2 sc in each st around (18 sc worked 1 per stitch + 18 extra sc = 36 sc). Another option is to work a second slip stitch rim at the bottom.
The bottom opening is too tight to pull bags through. Make the foundation chain looser, or leave out the bottom rim.
The top band flares. Go down one hook size for Rnds 33–38.
The holder leans forward on the hook. Sew the ring so it overlaps 1 more round of the band, and make sure it sits at the exact back center.
Care
Machine wash cold on a gentle cycle inside a mesh bag. Reshape the holder over a rolled towel and let it air dry; don’t tumble dry, because heat can shrink cotton and distort the windows.
Final Notes
The measurements build on each other and are easy to check. At 16 sc = 4 in (10.2 cm), 24 stitches give a bottom opening 3 in (7.6 cm) wide when flat, and 36 stitches give a body 4.5 in (11.4 cm) wide. The bottom band adds 1 in (2.5 cm) of length, the 14 ladder repeats add 14 in (35.6 cm), and the top band adds 1.5 in (3.8 cm). Together they make the finished 16.5 in (41.9 cm) holder. If your measurements match at Rnds 4, 12, 32 and 38, the finished piece will match too.
Make one in dusty rose and add a teal twin beside it on the wall.
Happy crocheting!