

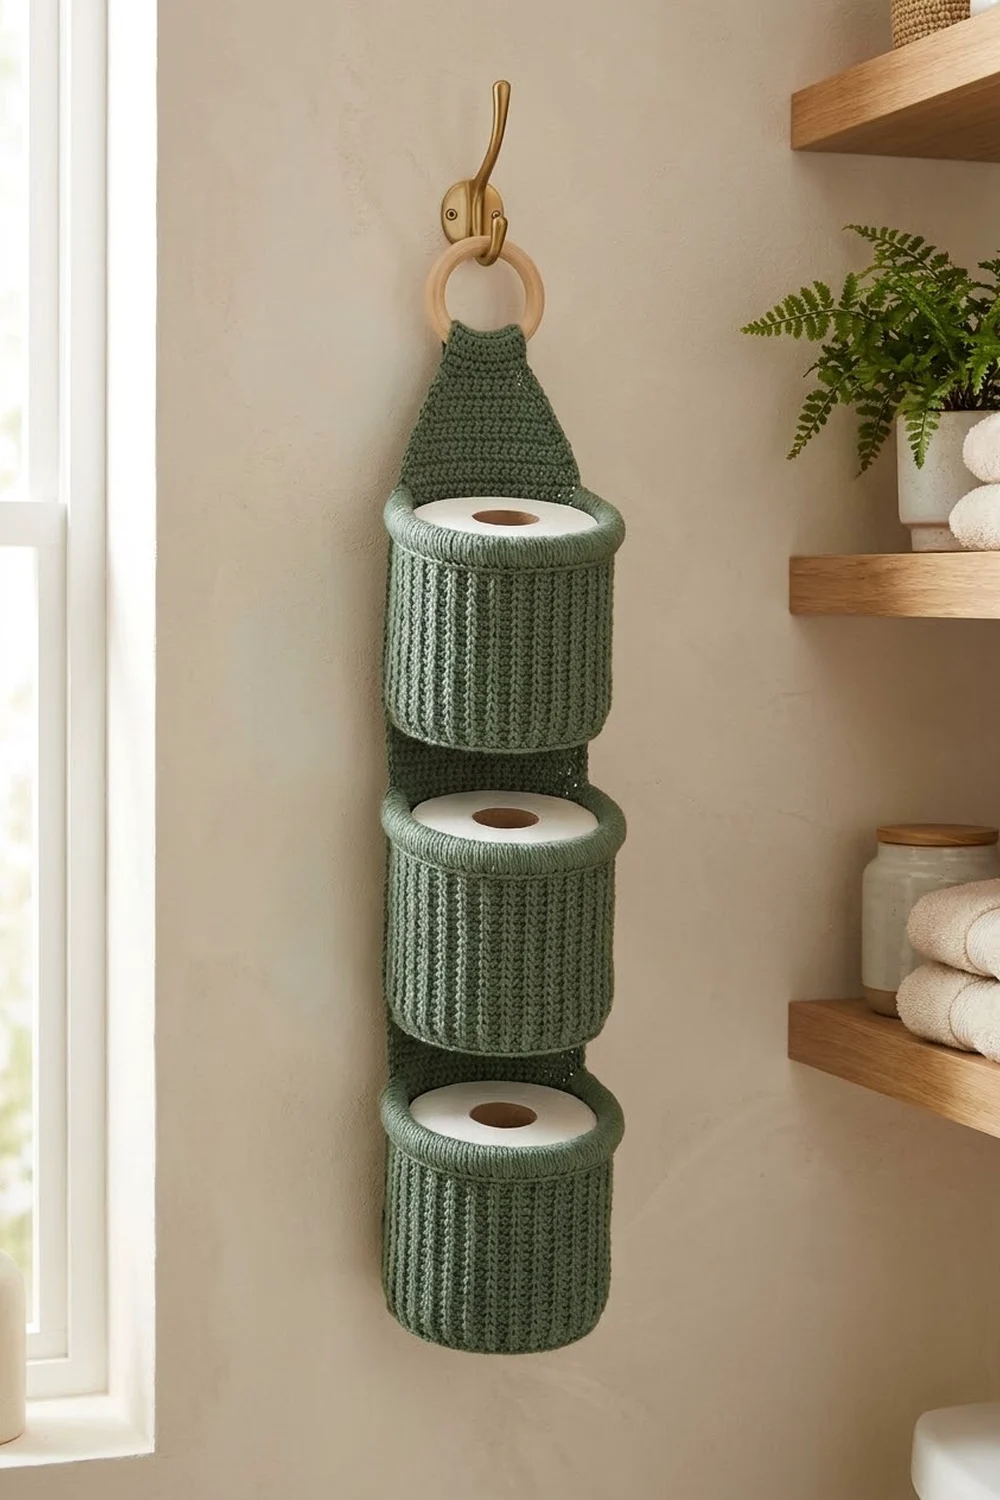
The Sage Stack is a simple, practical bathroom storage piece. It is three ribbed cups stacked one on top of another, joined at the back, and hung from a wooden ring. Each cup holds one standard roll, so the rolls stay off the floor and out of sight while still being easy to reach.
The sample is worked in one color, a deep sage green. Bold vertical ribs give the cups a knit-like texture, and a smooth rim finishes each opening. With natural wood, white rolls, and green plants, it looks calm, modern, and slightly Scandinavian.
This pattern uses US crochet terms. The finished holder measures about 5 in (12.7 cm) wide and about 14.25 in (36.2 cm) long without the ring. With the ring it is about 16 in (40.6 cm) long.
You start each cup as a flat single crochet circle and turn the edge upward with a back-loop round. Then you work the ribbed walls in front post and back post double crochet. You make three cups, add a tapered hanging tab to the top cup, sew the cups together along the back, and finish every rim with a slip stitch border.
Finished Size and Construction
- Finished size: 5 in (12.7 cm) wide × 14.25 in (36.2 cm) long without the ring; about 16 in (40.6 cm) with the ring
- Skill level: Easy–Intermediate
- Terminology: US crochet terms
- Yarn weight: Worsted (#4), cotton or cotton blend
- Hook: 5.0 mm (US H-8)
- Number of pieces: 3 cups; the tab is worked directly onto the top cup
- Layout: 1 column × 3 cups, stacked vertically
- Piece size: each cup is 5 in (12.7 cm) across × 3.75 in (9.5 cm) tall
- Size before border: cup wall 3.5 in (8.9 cm) high
- Border depth: 1/8 in (0.3 cm) slip stitch rim on each cup
Materials
Yarn: Use a firm worsted-weight cotton or cotton blend. Cotton holds its shape, handles bathroom humidity well, and makes the ribs stand out clearly. Avoid soft, drapey acrylics, because the cups will sag.
- Sage green: 150 g, about 250 m (273 yd)
This amount includes a margin of about 20% for swatching and tails. The holder itself uses about 125 g.
Tools:
– 5.0 mm (US H-8) crochet hook
– 3 in (7.6 cm) wooden macramé ring
– Tapestry needle
– 4 stitch markers
– Scissors
– Measuring tape
– Spray bottle and 3 standard rolls or jars about 4.5 in (11.4 cm) wide for blocking
Abbreviations (US Terms)
- ch – chain
- sl st – slip stitch
- sc – single crochet
- dc – double crochet
- inc – 2 sc in the same stitch
- sc2tog – single crochet 2 together
- BLO / FLO – back loop only / front loop only
- MR – magic ring
- st(s) – stitch(es)
Special stitches:
– fpdc (front post double crochet): Yarn over. Insert the hook from front to back to front around the post of the stitch. Complete a dc.
– bpdc (back post double crochet): Yarn over. Insert the hook from back to front to back around the post of the stitch. Complete a dc.
Round note: Join every round with a sl st to the first stitch. The beginning ch-1 or ch-2 does not count as a stitch. Keep the joins in one line, because that line becomes the center back.
Gauge and Checkpoints
Gauge:
– 14 sc × 15 rounds = 4 in (10.2 cm)
– 14 dc × 8 rounds = 4 in (10.2 cm)
Make one complete cup before you start the others. It works as your real gauge swatch. Check these measurements as you go:
- After Round 3: the base is 1.6 in (4.1 cm) across
- After Round 6: the base is 3.3 in (8.4 cm) across
- After Round 9: the base is about 5 in (12.7 cm) across
- After Round 11: the wall is 0.75 in (1.9 cm) high
- After Round 16: the wall is 3.25 in (8.3 cm) high, and the circumference is 15.4 in (39.1 cm)
- After Round 17: the wall is 3.5 in (8.9 cm) high
If your cup is too big: Change to a hook 0.5 mm smaller. A loose cup lets the roll slide and makes the stack lean forward.
If your cup is too small: Change to a hook 0.5 mm larger. Before you go further, check that a roll drops in easily. The roll should fit snugly but not stretch the ribs.
Cup Pattern (Make 3)
Part 1: Flat Base
Round 1: MR, ch 1, 6 sc in the ring. Join. (6)
Round 2: Ch 1, inc in each st around. Join. (12)
Round 3: Ch 1, sc 1, inc 6 times. Join. (18)
Round 4: Ch 1, sc 2, inc 6 times. Join. (24)
Round 5: Ch 1, sc 3, inc 6 times. Join. (30)
Round 6: Ch 1, sc 4, inc 6 times. Join. (36)
Round 7: Ch 1, sc 5, inc 6 times. Join. (42)
Round 8: Ch 1, sc 6, inc 6 times. Join. (48)
Round 9: Ch 1, sc 7, inc 6 times. Join. (54)
The base should lie flat with no ruffles and no cupping. Pull the magic ring closed tightly and weave in that tail.
Part 2: Ribbed Walls
Round 10 (turning ridge): Ch 1, sc in BLO of each st around. Join. (54)
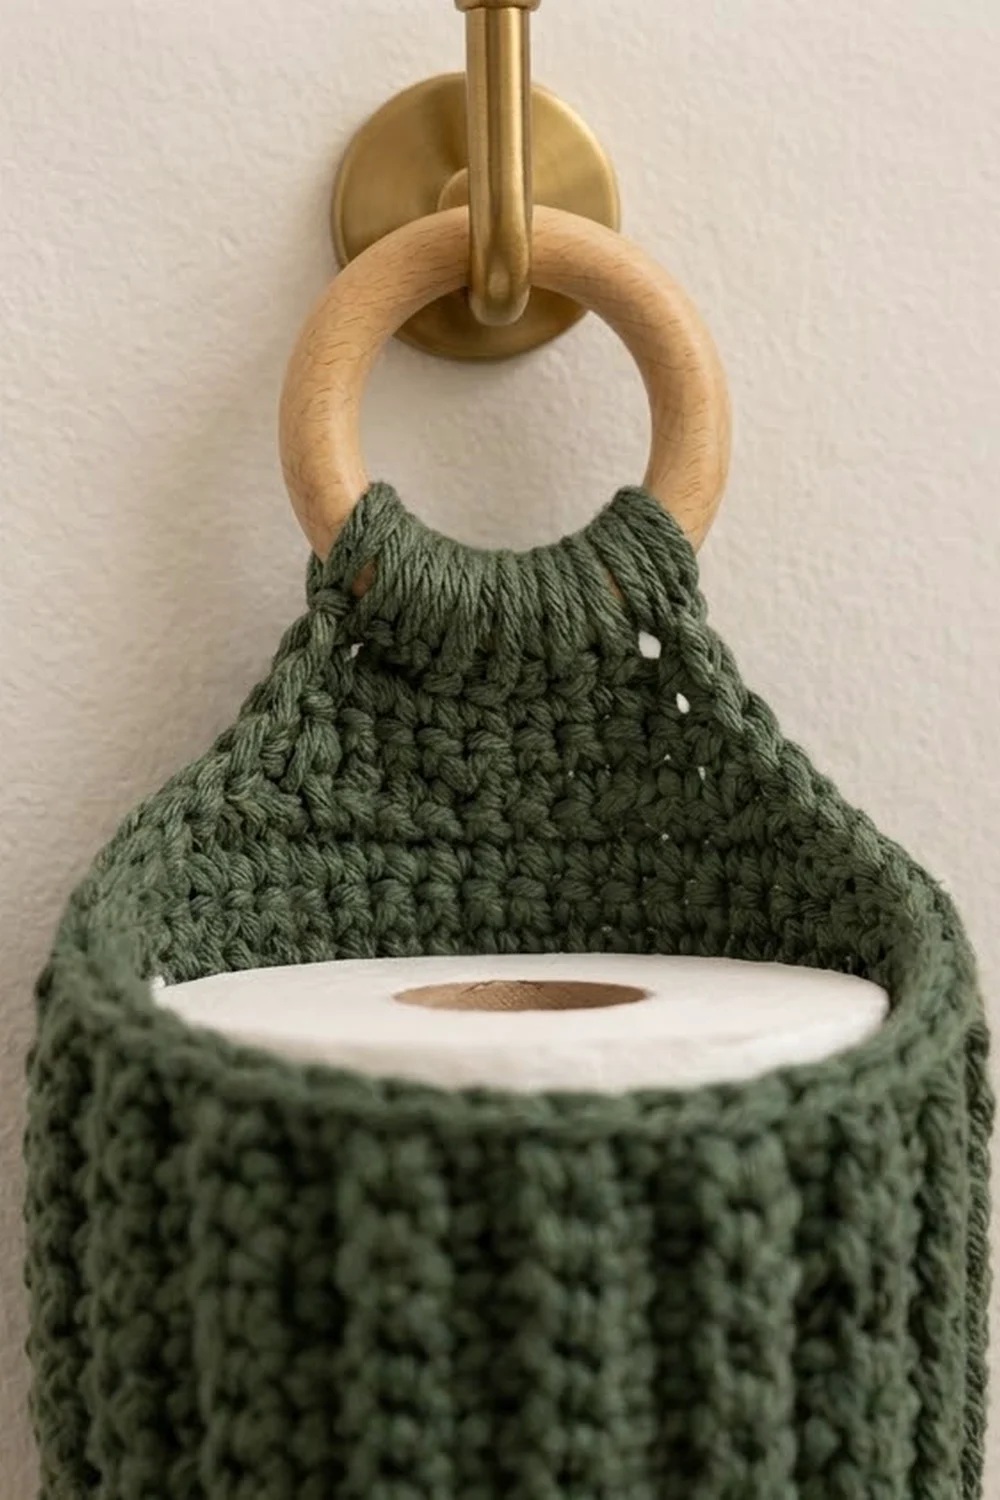
Working in the back loops only turns the edge upward and leaves the front loops of Round 9 as a ridge around the bottom. You will use this ridge for joining later.
Round 11 (foundation): Ch 2, dc in each st around. Join. (54)
Round 12 (rib): Ch 2, fpdc around each of the next 2 sts, bpdc around the next st 18 times. Join. (54)
Rounds 13–16: Ch 2. Work fpdc around each fpdc and bpdc around each bpdc. Join. (54 each round)
This gives you 18 raised ribs, each 2 stitches wide, with a recessed line between them. Those are the vertical columns you see in the photo.
Round 17 (rim base): Ch 1, sc in each st around. Join. (54)
For Cups A and B, fasten off and weave in the tails. For Cup C, fasten off and continue with Part 3.
Part 3: Hanging Tab (Cup C Only)
First find the center back stitch, which is the stitch at the round joins. Count 7 stitches to the left and 7 to the right and mark them. That gives 15 tab stitches.
Row 1: Join yarn at the right marker. Sc in BLO of each of the 15 marked Round 17 sts. (15)
Row 2: Ch 1, turn, sc across. (15)
Row 3: Ch 1, turn, sc2tog, sc 11, sc2tog. (13)
Row 4: Ch 1, turn, sc across. (13)
Row 5: Ch 1, turn, sc2tog, sc 9, sc2tog. (11)
Row 6: Ch 1, turn, sc across. (11)
Row 7: Ch 1, turn, sc2tog, sc 7, sc2tog. (9)
Row 8: Ch 1, turn, sc across. (9)
Row 9: Ch 1, turn, sc2tog, sc 5, sc2tog. (7)
Row 10: Ch 1, turn, sc across. (7)
Row 11: Ch 1, turn, sc2tog, sc 3, sc2tog. (5)
Rows 12–16: Ch 1, turn, sc across. (5 each row)
Fasten off and leave a 12 in (30.5 cm) tail. The tab tapers from 4.3 in (10.9 cm) wide to 1.4 in (3.6 cm). Rows 1–11 make about 3 in (7.6 cm) of visible tab. Rows 12–16 make 1.3 in (3.3 cm) to wrap around the ring.
Attach the ring: Fold Rows 12–16 over the wooden ring toward the back. Sew Row 16 to the back of Row 11 with the tail. Stitch through both layers so the ring sits snugly in the fold.
Make All Pieces
Make 3 cups in sage green.
- Cup A (bottom): cup pattern only
- Cup B (middle): cup pattern only
- Cup C (top): cup pattern plus hanging tab and ring
Layout grid (front view):
      ( ring )
      [  tab  ]
   [   Cup C   ]
   [   Cup B   ]
   [   Cup A   ]
Joining
Method: Whipstitch with the tapestry needle and a 24 in (61.0 cm) length of yarn.
Placement: Put Cup B on top of Cup A, and line up their round-join seams at the center back. On Cup A, mark the 12 back stitches of Round 17, 6 on each side of the seam. On Cup B, mark the 12 matching stitches of the free Round 9 front-loop ridge.
Stitch-to-stitch logic: Both rounds have 54 stitches, so the join is exactly 1 to 1. Whipstitch each free front loop of Cup B’s Round 9 ridge to the back loop only of the matching Round 17 stitch on Cup A. Work all 12 pairs. The seam spans 3.4 in (8.6 cm) across the back.
Leave the 42 front stitches unjoined. The front of each lower cup stays open, so you can tip the upper cup forward to put in a roll. Using only the back loops of Round 17 leaves its front loops free for the border.
Join Cup C to Cup B the same way.
Tension: Pull each stitch snug, but don’t pull so hard that the rim puckers. Make 2 passes over the outer 2 stitches at each end of the seam, because those stitches carry the most weight.
Size checkpoint: The stacked cups should measure 11.25 in (28.6 cm) from the bottom of Cup A to the rim of Cup C. With the 3 in (7.6 cm) tab, the total is 14.25 in (36.2 cm).
Border
Border gauge: 1 sl st per Round 17 stitch, worked loosely in the front loops.
Rim border (each cup):
Round 18: Join yarn at the center back. Sl st in FLO of each Round 17 st around. Join to the first sl st. (54)
Work this round on all 3 cups. That is 3 × 54 = 162 slip stitches in total.
Tab edging (Cup C): Join yarn at the lower right corner of the tab. Work 11 sc evenly up the right side (1 per row end of Rows 1–11). Then sl st across the folded tab top and work 11 sc down the left side (1 per row end). Fasten off.
Why the math works: The rim takes exactly 1 slip stitch per existing stitch and adds nothing, so the rim cannot flare or pull in. The front-loop slip stitch rolls the edge slightly outward, which gives the rim its smooth, rounded look.
The tab is sc rows, and sc rows (15 per 4 in) are nearly as tall as sc stitches are wide (14 per 4 in). That means 1 sc per row end keeps the tab sides flat. The border adds only 1/8 in (0.3 cm), so each finished wall measures about 3.6 in (9.1 cm).
Final Blocking
- Weave in all tails along the inside of the walls, following the post stitches.
- Put a roll, or a jar about 4.5 in (11.4 cm) wide, inside each cup.
- Mist the cups lightly until they are damp but not soaked.
- Press each base flat with your palm. Make sure the cups stand straight above each other.
- Shape the ribs with your fingers so each column runs straight up and down.
- Lay the holder on its back and stretch the tab gently to 3 in (7.6 cm) long.
- Let it dry completely, usually 24 hours, before you hang it.
Final Quality-Control Checklist
- Each base lies flat and measures about 5 in (12.7 cm) across.
- Each cup has 18 straight ribs.
- Every wall is 3.5 in (8.9 cm) before the border.
- All round joins line up down the center back.
- Each back seam covers 12 stitches with no gaps.
- The front of each lower cup opens freely.
- Each rim is 54 slip stitches and does not ruffle.
- The tab is centered, and the ring is sewn in securely.
- The total length is 14.25 in (36.2 cm) without the ring.
Troubleshooting
The base ruffles: Your tension is loose for the increases. Go down a hook size, or work the base only with a hook 0.5 mm smaller.
The base cups upward: Your stitches are too tight. Relax your tension or go up a hook size.
The ribs spiral: You missed a joining stitch or worked a post around the wrong stitch. Count to 54 every round.
The roll is too tight: Add 6 stitches to the base with Round 10 worked as sc 8, inc. That gives 60 stitches. Then work the rib as 20 repeats.
The stack leans forward: Check that the seams sit at the exact center back. Add a second pass of whipstitch.
The tab stretches: Use a firmer cotton, or line the back of the tab with a strip of felt.
Care
Hand wash in cool water and lay flat to dry over a jar so the cups keep their shape. Do not tumble dry.
Final Notes
The measurements build on each other. A base of 54 stitches measures 5 in (12.7 cm) across. The walls keep those 54 stitches and grow to 3.5 in (8.9 cm) by Round 17. Three cups, each about 3.75 in (9.5 cm) tall, stack to 11.25 in (28.6 cm). The 3 in (7.6 cm) tab brings the length to 14.25 in (36.2 cm), and the ring adds the last stretch to about 16 in (40.6 cm). If your first cup hits its checkpoints, the other two will match it and the stack will hang straight.
Happy crocheting!