

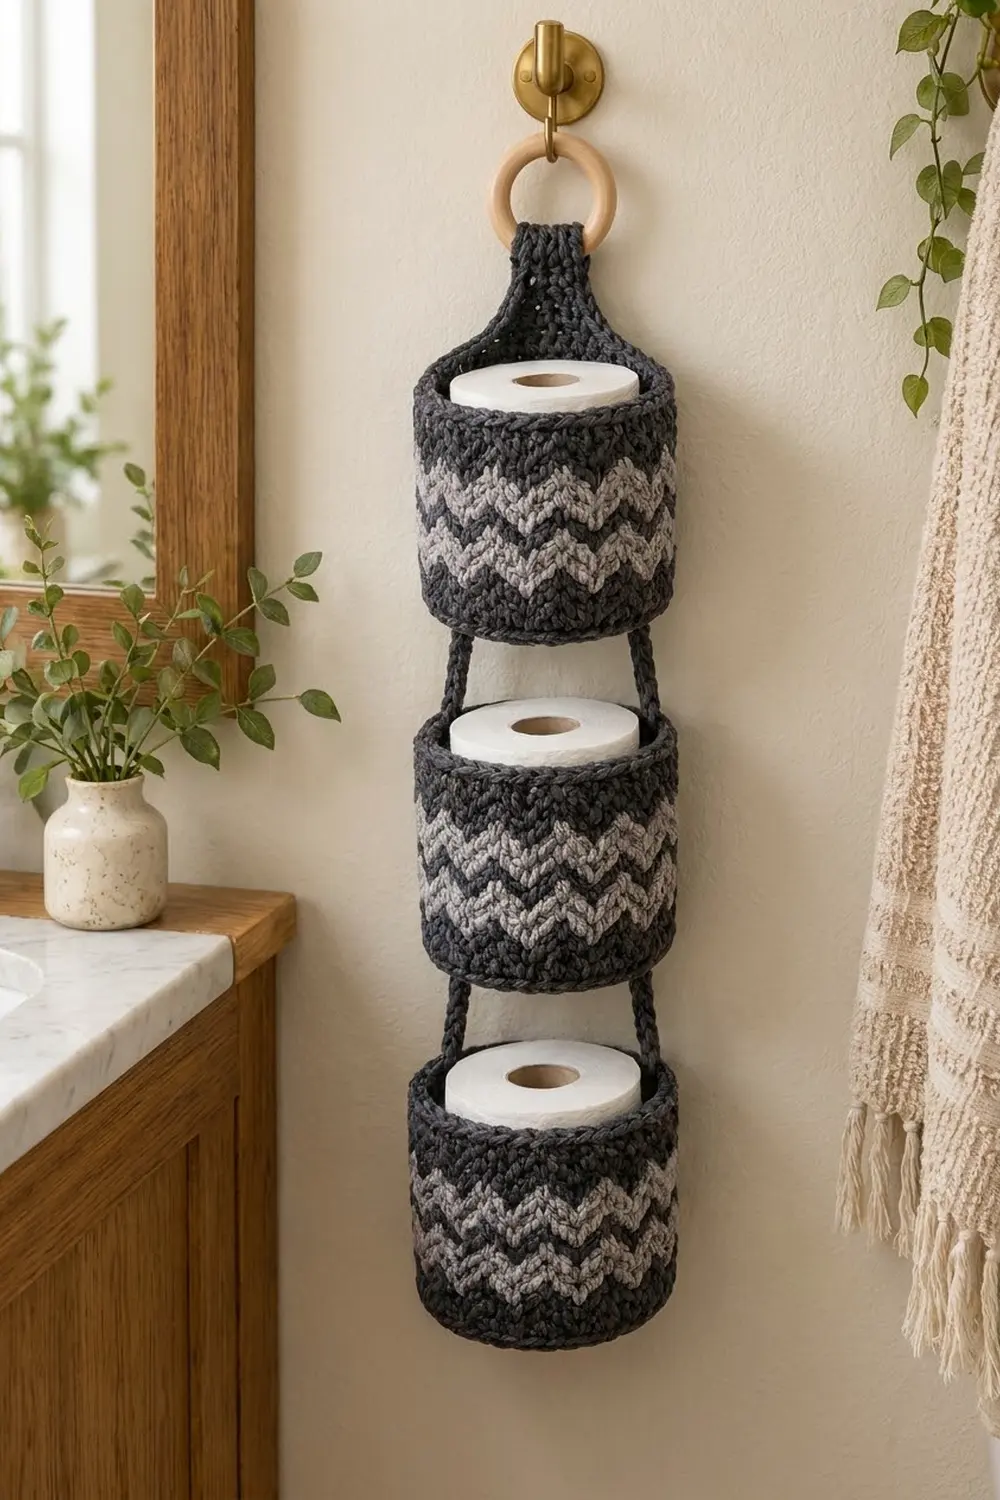
This hanging toilet paper holder stores three spare rolls in a slim vertical column. Each cup is a sturdy cylinder worked in tight tapestry single crochet, so it keeps its shape even when empty.
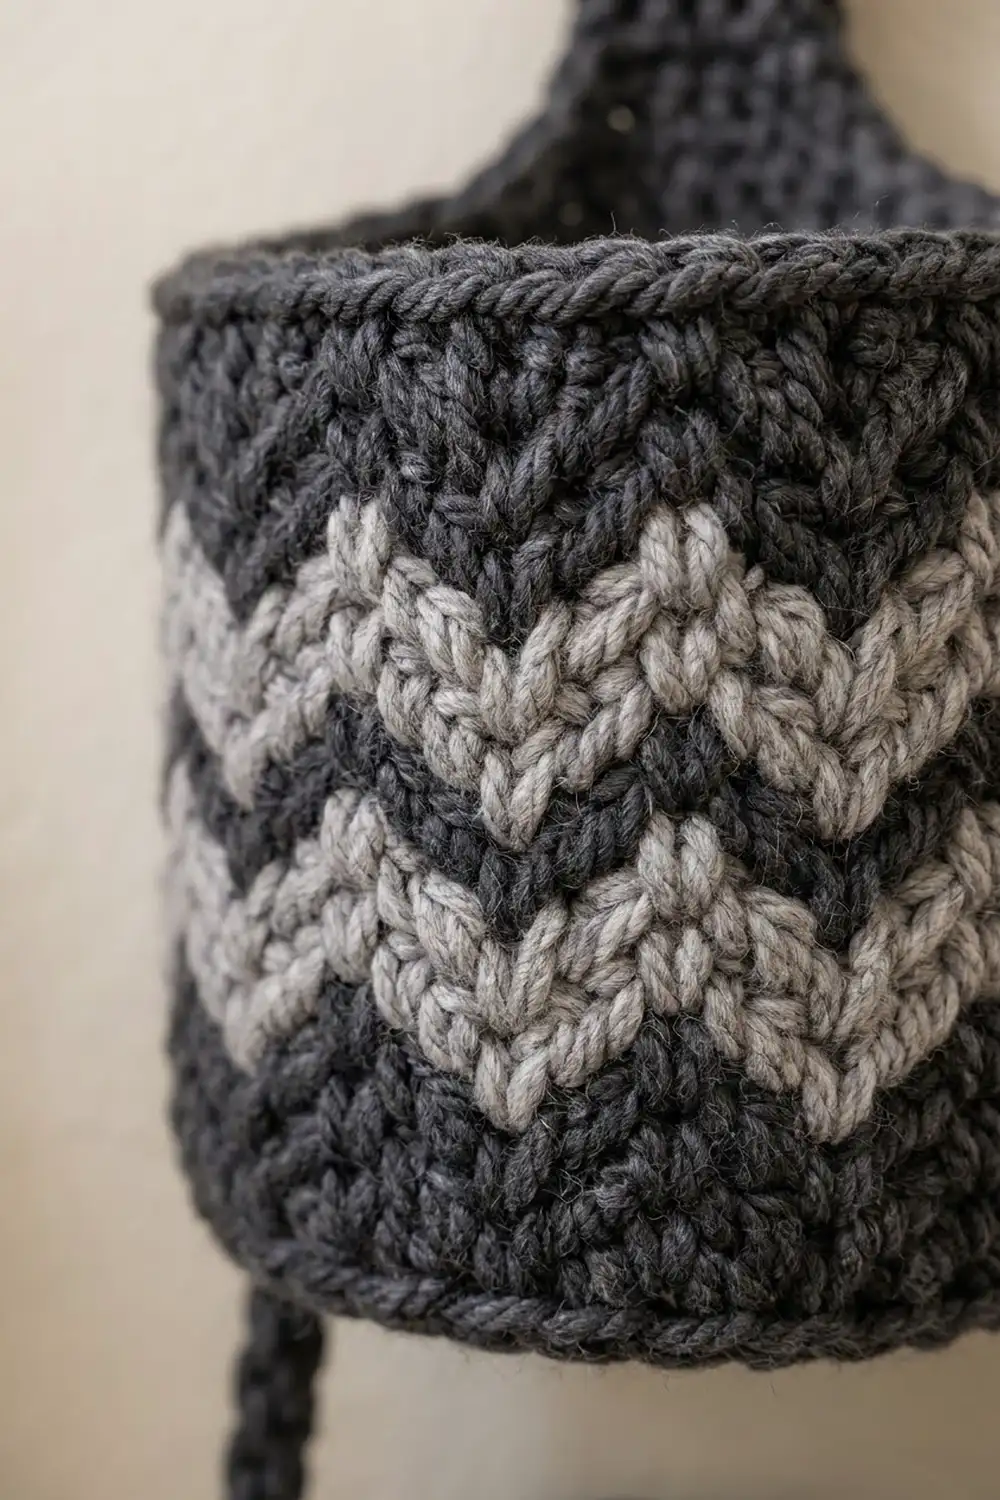
The colors are calm and modern: deep charcoal as the main color, with two light gray zigzag bands on every cup. The chevrons give a graphic, knit-like look that suits farmhouse, Scandinavian, and modern bathrooms.
The pattern uses US crochet terms. The finished holder is about 4.75 in (12.1 cm) wide. It is about 19 in (48.3 cm) long from the bottom of the lowest cup to the top of the folded hanger strap, not counting the wooden ring.
The construction is simple. You crochet three identical cups from the base up and add a tapered hanger tab to the top cup only. Then you make four short cords and sew them between the cups. Finally, the tab strap wraps around a wooden ring.
Finished Size and Construction
- Finished size: 4.75 in (12.1 cm) wide x about 19 in (48.3 cm) long
- Skill level: Intermediate (tapestry crochet in the round)
- Terminology: US
- Yarn weight: Worsted (#4)
- Hook: 5 mm (H-8)
- Number of pieces: 3 cups, 1 hanger tab (worked onto the top cup), 4 connecting cords
- Layout: 1 column of 3 cups, stacked vertically
- Cup size: 4.75 in (12.1 cm) diameter x 4.25 in (10.8 cm) tall
- Cup size before border: 4.75 in (12.1 cm) diameter x 3.75 in (9.5 cm) tall
- Border depth: 2 rounds, about 0.5 in (1.3 cm)
Materials
Choose a smooth worsted-weight yarn with good stitch definition. Cotton or a cotton blend gives the firmest cups. Acrylic also works but makes slightly softer cups. Avoid fuzzy yarns, because they blur the chevrons.
- Color A, Charcoal: 150 g, about 300 m (328 yd)
- Color B, Light Gray: 50 g, about 100 m (109 yd)
- 5 mm (H-8) crochet hook
- 1 wooden ring, 3 in (7.6 cm) outside diameter
- Tapestry needle
- 4 stitch markers
- Scissors and a measuring tape
- Straight pins
The yarn quantities include a margin of about 15 percent for gauge differences and swatching.
Abbreviations (US Terms)
- ch – chain
- sl st – slip stitch
- sc – single crochet
- sc2tog – single crochet 2 together
- BLO – back loop only
- st(s) – stitch(es)
- A / B – Color A / Color B
Special stitch – tapestry sc (color change): Work the last sc before a color change until 2 loops remain on the hook. Yarn over with the new color and pull through. Lay the unused color along the top of the round and work over it with every stitch, so it stays hidden inside the fabric.
Gauge and Checkpoints
Gauge: 16 sc and 17 rounds = 4 in (10.2 cm) in tapestry sc worked in the round.
Make one complete cup first and check it against a toilet roll before you make the others. That cup is your real gauge swatch.
Checkpoints:
- After Round 5 of the base (30 sts): about 2.4 in (6.1 cm) across.
- After Round 10 of the base (60 sts): 4.75 in (12.1 cm) across.
- Wall circumference: 15 in (38.1 cm), which is 60 sts at 4 sts per inch.
- After Round 26 (before the border): wall about 3.75 in (9.5 cm) tall.
- After Round 28: wall about 4.25 in (10.8 cm) tall.
If your cup is too big: go down to a 4.5 mm hook. If it is too small: go up to a 5.5 mm hook. Keep the stitch count at 60 so the chevron repeat stays even.
Cup (Make 3)
Work in continuous rounds without joining unless the pattern says otherwise. Place a marker in the first st of each round and move it up as you go.
Base
With A, make a magic ring.
Round 1: 6 sc in ring. (6 sts)
Round 2: 2 sc in each st around. (12 sts)
Round 3: [Sc in next st, 2 sc in next st] 6 times. (18 sts)
Round 4: [Sc in next 2 sts, 2 sc in next st] 6 times. (24 sts)
Round 5: [Sc in next 3 sts, 2 sc in next st] 6 times. (30 sts)
Round 6: [Sc in next 4 sts, 2 sc in next st] 6 times. (36 sts)
Round 7: [Sc in next 5 sts, 2 sc in next st] 6 times. (42 sts)
Round 8: [Sc in next 6 sts, 2 sc in next st] 6 times. (48 sts)
Round 9: [Sc in next 7 sts, 2 sc in next st] 6 times. (54 sts)
Round 10: [Sc in next 8 sts, 2 sc in next st] 6 times. (60 sts)
Check that the base lies flat and measures 4.75 in (12.1 cm) across.
Wall
Round 11: Sc in BLO of each st around. (60 sts) The unused front loops form the crisp edge where the base turns up into the wall.
Rounds 12–13: Sc in each st around. (60 sts each)
Chevron Chart
Each chevron band is 4 rounds tall. The chart has a 6-st repeat, worked 10 times per round (6 x 10 = 60 sts). Join B at the start of the first band round. Carry the unused color inside the stitches for the whole band.
- Band Round 1: [1 B, 4 A, 1 B] 10 times. (60 sts: 20 B, 40 A)
- Band Round 2: [2 B, 2 A, 2 B] 10 times. (60 sts: 40 B, 20 A)
- Band Round 3: [1 A, 4 B, 1 A] 10 times. (60 sts: 40 B, 20 A)
- Band Round 4: [2 A, 2 B, 2 A] 10 times. (60 sts: 20 B, 40 A)
The last B st of one repeat sits next to the first B st of the next repeat. This turns the light gray into a continuous zigzag that is 2 rounds thick.
Rounds 14–17: Work Band Rounds 1–4. (60 sts each)
Rounds 18–20: With A only, sc in each st around while still carrying B. (60 sts each) Carrying B keeps the wall thickness even.
Rounds 21–24: Work Band Rounds 1–4. (60 sts each) Cut B, leaving a 4 in (10.2 cm) tail.
Rounds 25–26: With A, sc in each st around. (60 sts each)
Checkpoint: the wall now measures about 3.75 in (9.5 cm) from the turned base edge (16 wall rounds).
Border (Cup Rim)
The rim keeps the opening firm and stops the top from flaring.
Border gauge: same as the cup, 16 sts = 4 in (10.2 cm).
Round 27: With A, sc in each st around. (60 sts: 30 across the front half, 30 across the back half)
Round 28: Sl st loosely in each st around. (60 sts: 30 front, 30 back) Join with a sl st to the first sl st.
Why the math works: The rim uses exactly the 60 sts of the wall, one stitch into each stitch. The circumference stays 15 in (38.1 cm) and the rim sits straight above the base. Because no increases are added, the cup holds a roll snugly. The 18 wall rounds (Rounds 11–28) give 4.25 in (10.8 cm) of height.
For cups 2 and 3, fasten off and weave in the ends. For cup 1 (the top cup), fasten off and continue with the Hanger Tab.
Hanger Tab (Top Cup Only)
Flatten the top cup with the round-start seam at the center back. Count 10 sts to each side of the seam and mark these 20 back sts of Round 28.
Work in rows into the back loops of the Round 28 slip stitches, with A.
Row 1: Join A in the first marked st, ch 1, sc in each of the 20 marked sts, turn. (20 sts)
Row 2: Ch 1, sc2tog, sc in next 14 sts, sc2tog, turn. (16 sts + 2 decreases = 18 sts)
Wait — work the decreases this way instead, so every row ends with the correct count:
Row 2: Ch 1, sc2tog, sc in next 16 sts, sc2tog, turn. (18 sts)
Row 3: Ch 1, sc2tog, sc in next 12 sts, sc2tog, turn. (16 sts)
Row 4: Ch 1, sc2tog, sc in next 10 sts, sc2tog, turn. (14 sts)
Row 5: Ch 1, sc2tog, sc in next 8 sts, sc2tog, turn. (12 sts)
Row 6: Ch 1, sc2tog, sc in next 6 sts, sc2tog, turn. (10 sts)
Row 7: Ch 1, sc2tog, sc in next 4 sts, sc2tog, turn. (8 sts)
Row 8: Ch 1, sc2tog, sc in next 2 sts, sc2tog, turn. (6 sts)
The tab is now about 1.9 in (4.8 cm) tall. It tapers from 5 in (12.7 cm) wide to 1.5 in (3.8 cm) wide.
Rows 9–20: Ch 1, sc in each st across, turn. (6 sts each)
The strap is 12 rows, about 2.8 in (7.1 cm) long. Fasten off, leaving a 12 in (30.5 cm) tail for sewing.
Connecting Cords (Make 4)
With A, ch 13.
Row 1: Sc in 2nd ch from hook and in each ch across. (12 sts)
Rotate the piece to work along the opposite side of the foundation chain.
Row 2: Sl st in each ch across. (12 sts)
Each cord measures 3 in (7.6 cm) long and about 0.5 in (1.3 cm) wide. Fasten off, leaving an 8 in (20.3 cm) tail.
Make All Pieces
- Cups: 3. Each uses A for the base, walls, and rim, and B for 2 chevron bands.
- Hanger tab: 1, in A, worked onto the top cup
- Cords: 4, in A
Layout (front view):
        [ring]
        [ tab ]
   [   Cup 1 (top)   ]
     |             |
   [   Cup 2 (mid)   ]
     |             |
   [  Cup 3 (bottom) ]
Each “|” is one cord.
Joining
Method: Whipstitch with A, using the cord tails.
- Flatten each cup with the round-start seam at the center back. Place markers at the left and right fold lines, 15 sts from the center back on each side. On a 60-st round, these markers sit exactly opposite each other.
- Lay Cup 1 above Cup 2, leaving a 1.5 in (3.8 cm) gap between the base of Cup 1 and the rim of Cup 2.
- Pin the top 0.75 in (1.9 cm) of one cord to the outside of Cup 1 at a side marker, covering Rounds 11–13. Pin the bottom 0.75 in (1.9 cm) of the same cord to the outside of Cup 2 at the matching marker, covering Rounds 26–28.
- Whipstitch each cord end down, catching one cord st and one wall st on each pass. Each overlap covers 3 sts of the cord against 3 rounds of the cup.
- Repeat on the other side. Then join Cup 2 to Cup 3 the same way.
Tension advice: Sew firmly, but don’t pull the wall in. The cup should stay round, not dented, at the joins.
Size checkpoint: Each gap shows 1.5 in (3.8 cm) of cord. The three cups plus two gaps measure 3 x 4.25 in + 2 x 1.5 in = 15.75 in (40.0 cm).
Attaching the ring: Wrap the strap over the wooden ring from front to back. Whipstitch Row 20 to the back of Row 8. The folded strap forms a loop about 1.4 in (3.6 cm) tall. Together with the 1.9 in (4.8 cm) tab, this brings the total length to about 19 in (48.3 cm).
Final Blocking
- Weave in all ends inside the cups, along the carried strands.
- Lightly mist each cup with water.
- Slide a toilet roll into each cup to set the round shape.
- Smooth the chevrons with your fingers so the zigzags sit level.
- Lay the holder flat on a towel with the tab straightened and the cords hanging straight.
- Let it dry completely, for at least 12 hours, before hanging.
Final Quality-Control Checklist
- Each cup has 60 sts in every wall round.
- Each base measures 4.75 in (12.1 cm) across.
- Each cup is 4.25 in (10.8 cm) tall.
- Both chevron bands on every cup show the same 10 peaks.
- No carried B strands show on the outside.
- The cords sit exactly opposite each other on every cup.
- Each gap is 1.5 in (3.8 cm).
- The tab tapers evenly from 20 sts to 6 sts.
- The ring is sewn on securely and the holder hangs straight.
Troubleshooting
Base curls up like a bowl: Your tension is tight on the base. Use a hook 0.5 mm larger for Rounds 1–10 only.
Base ruffles: Your tension is loose. Use a hook 0.5 mm smaller for the base.
Chevrons lean or spiral: A slight lean is normal in continuous rounds. Keep your tension even and block with a roll inside to straighten it.
Carried color peeks through: Keep the unused strand slightly snug along the top of the round and work tightly over it.
Roll won’t fit: Check your gauge. If you have more than 4 sts per inch, the cup is too small, so go up a hook size.
Holder tilts: The cords aren’t exactly opposite. Recount 15 sts from the center back on each side and resew.
Tab stretches: The tab rows are worked flat and can lengthen. Use cotton yarn, or work the tab with a hook 0.5 mm smaller.
Care
Hand wash in cool water with mild soap. Lay flat to dry with a roll inside each cup to keep the shape, and remove the wooden ring before washing if you can.
Final Notes
Everything in this pattern follows one measurement chain:
- A gauge of 16 sts = 4 in (10.2 cm) gives a 60-st base that is 4.75 in (12.1 cm) across.
- Those 60 sts become a 15 in (38.1 cm) wall circumference that holds 10 chevron repeats of 6 sts.
- The 18 wall rounds make a 4.25 in (10.8 cm) cup.
- Three cups and two 1.5 in (3.8 cm) gaps add up to 15.75 in (40.0 cm).
- The tab and folded strap add the rest, for a holder about 19 in (48.3 cm) long.
Check your first cup carefully, and the other two will follow easily.
Happy crocheting!