

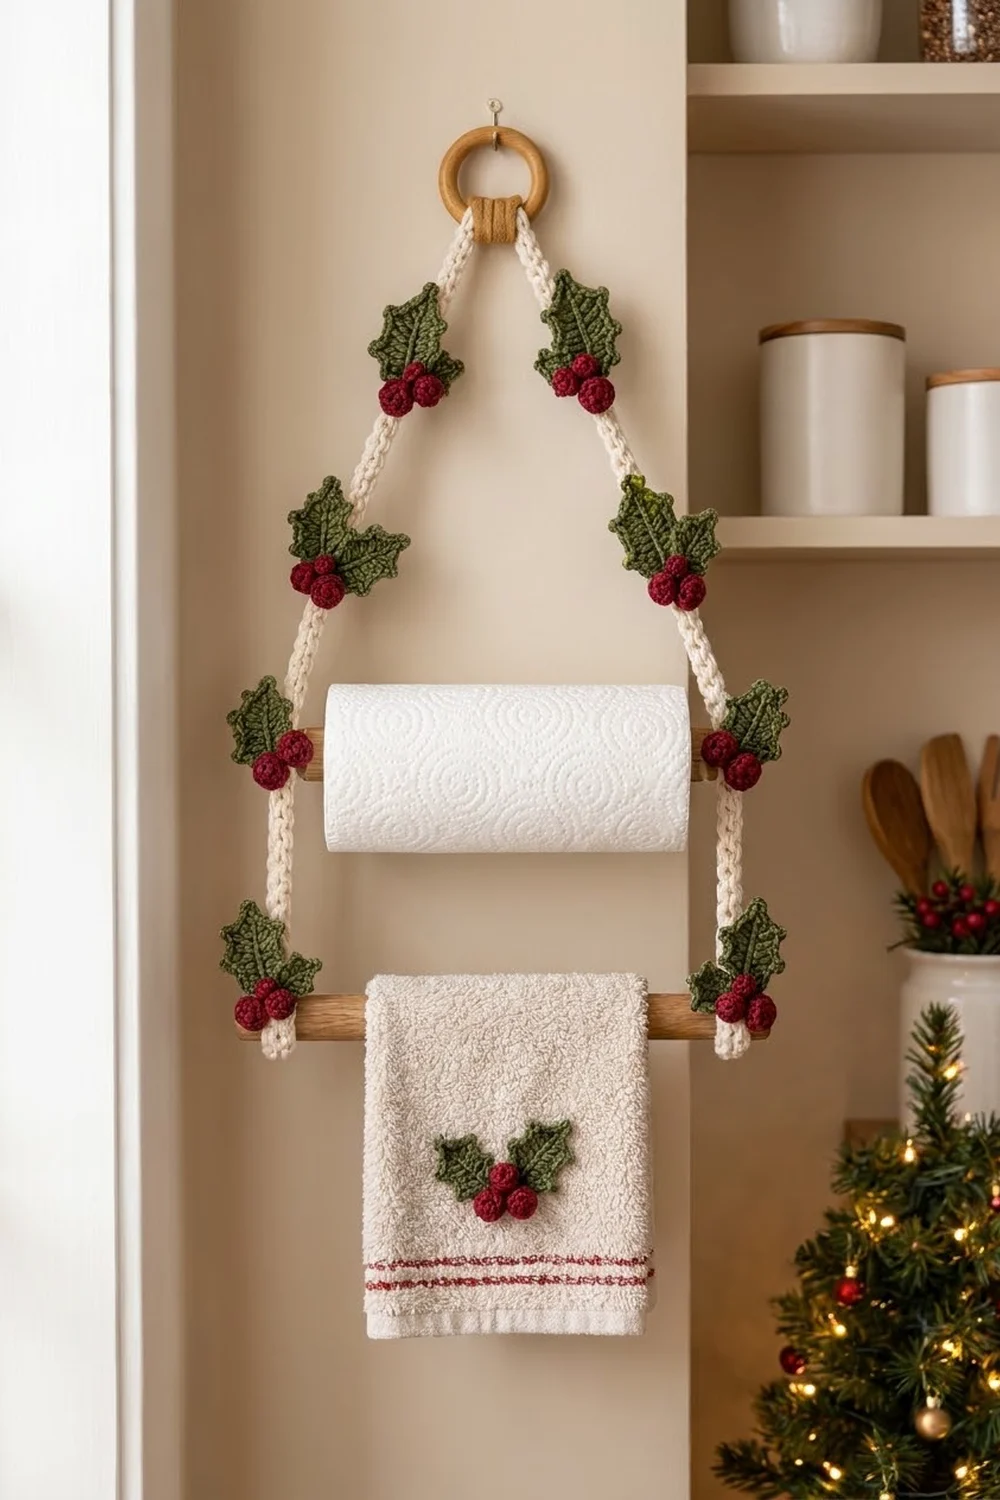
This hanging holder takes care of two kitchen jobs at once: it holds a paper towel roll on the upper dowel and a tea towel on the lower one. Two cream cords hang from a wooden ring in an A-frame, and eight small holly clusters dress them up for the holidays.
The colors are cream for the cords, sage green for the leaves and deep cranberry red for the berries. It has a cozy farmhouse look, and the cord’s braided texture goes nicely with natural wood. A ninth cluster gets sewn onto a plain tea towel so the set matches. When the season is over, you can snip the clusters off and the cream hanger works year-round.
The pattern is written in US crochet terms. The finished hanger is about 14 in (35.6 cm) wide at the dowels and 22.6 in (57.4 cm) tall from the top of the ring to the lower dowel.
Here’s how it’s built. You crochet four cord segments, eighteen holly leaves and twenty-seven berries, and then join each set of two leaves and three berries into a cluster. After that, you fold the cord ends into loops around the ring and dowels and sew the clusters in place. Every piece is small, so this is a good project to carry around and work on in short sessions.
Finished Size and Construction
- Finished size: 14 in (35.6 cm) wide × 22.6 in (57.4 cm) tall
- Skill level: Easy to intermediate
- Terminology: US
- Yarn weight: Worsted (#4)
- Hooks: 4.0 mm (G-6) for leaves and berries; 5.0 mm (H-8) for cords
- Number of pieces: 4 cord segments, 18 leaves, 27 berries
- Layout: A-frame. There are 4 clusters on each side and 1 on the towel.
- Leaf size: 3 in (7.6 cm) long × 1.75 in (4.4 cm) wide
- Leaf before edging: 2.75 in (7.0 cm) × 1.25 in (3.2 cm)
- Edging depth: 0.25 in (0.6 cm) on each side
- Berry size: 0.75 in (1.9 cm) diameter
Materials
Use a smooth worsted-weight cotton or cotton blend. It gives crisp leaf points and a firm cord that won’t stretch under the weight of a damp towel. Stay away from fuzzy yarns, because they blur the picots.
- Cream: 50 g / 90 m (cords)
- Sage green: 45 g / 80 m (leaves)
- Cranberry red: 30 g / 55 m (berries)
The quantities include a margin of about 20 percent for gauge swatches and sewing tails.
Tools:
- 4.0 mm (G-6) and 5.0 mm (H-8) crochet hooks
- One wooden ring, 2 in (5.1 cm) diameter
- Two wooden dowels, 14 in (35.6 cm) long × 5/8 in (1.6 cm) diameter
- Tapestry needle
- Stitch markers
- Small amount of fiberfill, or red yarn scraps for stuffing
- Pins and a blocking mat
Abbreviations (US Terms)
- ch – chain
- sl st – slip stitch
- sc – single crochet
- hdc – half double crochet
- dc – double crochet
- sc2tog – single crochet 2 together
- MR – magic ring
- st(s) – stitch(es)
- sp – space
- picot – ch 3, sl st in 3rd ch from hook
Romanian cord (special stitch): Ch 2, then sc in the 2nd ch from hook. Turn the work clockwise (counterclockwise if you’re left-handed), insert the hook in the vertical side loop of the first ch, and sc. That counts as 2 turns. For each turn after that: rotate the work again the same way, insert the hook under the 2 loops now sitting on the left side, yarn over and pull up a loop, then yarn over and pull through both loops on the hook. Each rotation plus stitch is 1 turn.
Gauge and Checkpoints
Leaf gauge: 16 sc = 4 in (10.2 cm) with the 4.0 mm hook. On the foundation chain that works out to 4 ch per inch.
Cord gauge: 4 turns = 1 in (2.5 cm) with the 5.0 mm hook and yarn held double. The cord measures 0.5 in (1.3 cm) wide.
Make one leaf, one berry and 20 turns of cord before you start the full set. Check them against these measurements:
- Leaf after Round 1: 2.75 in (7.0 cm) × 1.25 in (3.2 cm)
- Leaf after Round 2: 3 in (7.6 cm) × 1.75 in (4.4 cm)
- Berry: 0.75 in (1.9 cm) across
- Cord, 20 turns: 5 in (12.7 cm)
If your pieces come out too big, go down one hook size. If they’re too small, go up one size. The cord matters most, because its length sets the hanger’s shape. If you’d rather keep your hook, you can add or remove turns, as long as you hit the target lengths given below. Measure the cord lying flat and relaxed, not stretched.
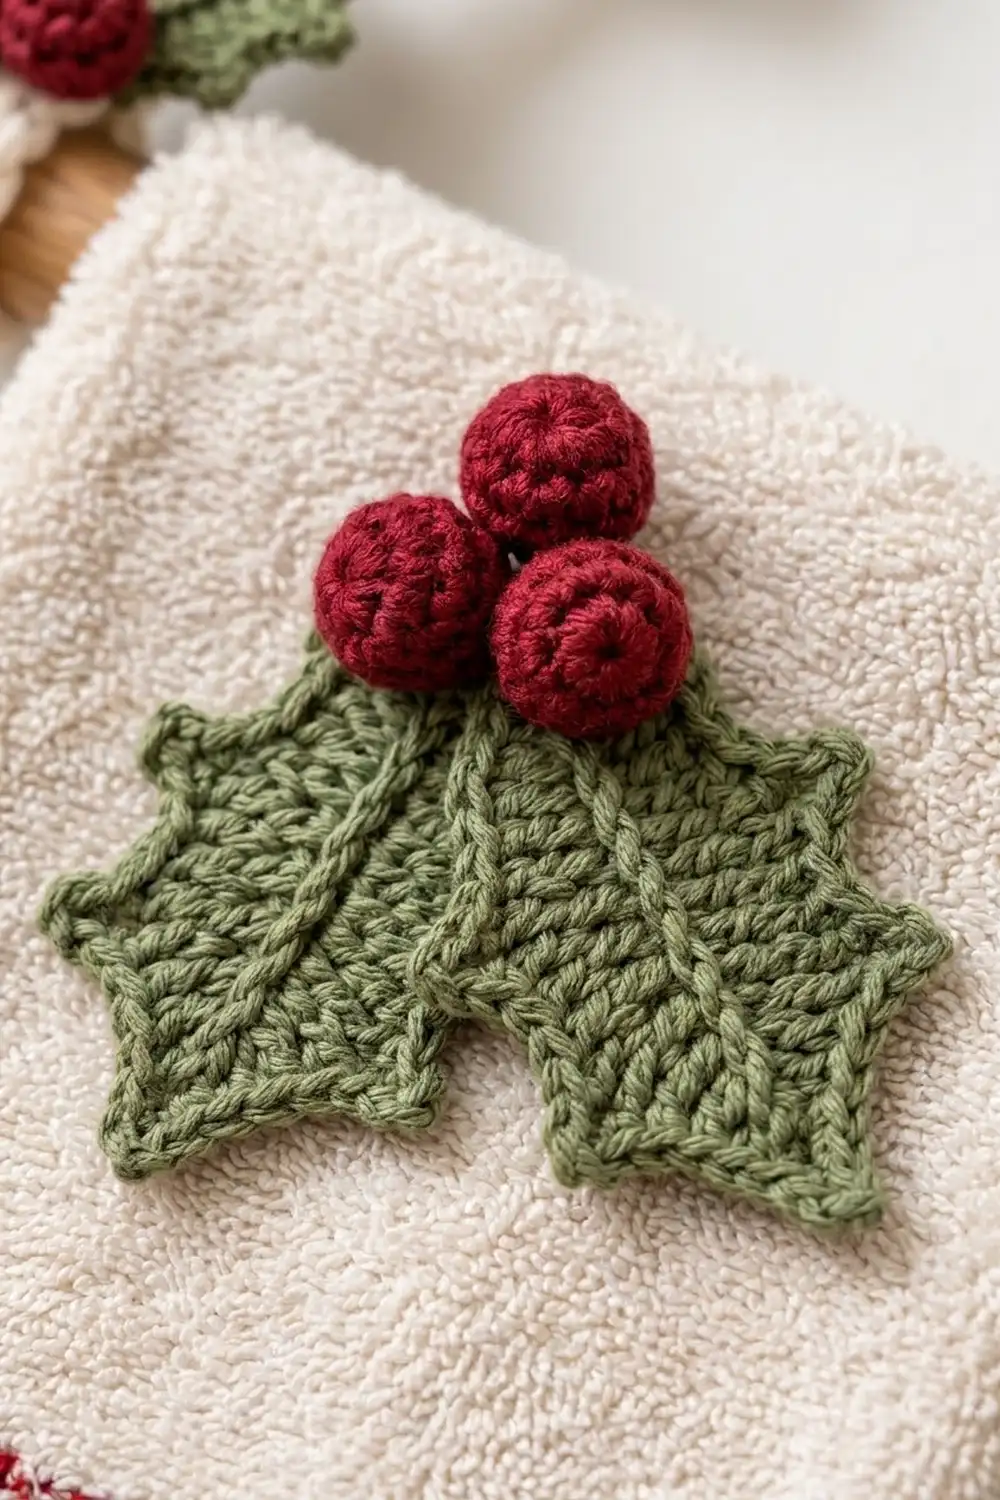
Holly Leaf (make 18)
With green and the 4.0 mm hook, ch 12.
Round 1: Work along the first side of the chain. Sc in the 2nd ch from hook, hdc in next ch, dc in next 7 ch, hdc in next ch, and work 3 sc in the last ch (this is the base). Rotate the piece and work along the underside of the chain: hdc in next ch, dc in next 7 ch, hdc in next ch, sc in next ch. Ch 2 for the tip and sl st in the first sc to join. (23 sts + ch-2 tip sp: 10 per side + 3 at base.)
Checkpoint: the leaf measures 2.75 in (7.0 cm) × 1.25 in (3.2 cm).
Round 2 is the pointed edging, written out under “Border” below. Once that’s done, fasten off and leave a 12 in (30.5 cm) tail.
Center vein: Use green and hold the yarn behind the leaf. Starting at the base, surface sl st along the foundation chain toward the tip, 10 sl sts in total. Fasten off and weave in the end. This gives you the raised center line.
Holly Berry (make 27)
With red and the 4.0 mm hook:
- Round 1: 6 sc in MR. (6)
- Round 2: 2 sc in each st around. (12)
- Round 3: Sc in each st around. (12)
- Round 4: Sc in each st around. (12)
Stuff firmly.
- Round 5: Sc2tog 6 times. (6)
Fasten off, leaving an 8 in (20.3 cm) tail. Weave the tail through the front loops of the last 6 sts and pull tight to close. Keep the tail for sewing.
Cord Segments (make 4)
Using the 5.0 mm hook and cream held double, work Romanian cord.
- Segment A (make 2, diagonals): 68 turns = 17 in (43.2 cm)
- Segment B (make 2, verticals): 44 turns = 11 in (27.9 cm)
Fasten off each segment and leave a 12 in (30.5 cm) tail at each end.
Each segment loses 1.5 in (3.8 cm) at each end when you fold it into a loop. That leaves 14 in (35.6 cm) showing on Segment A and 8 in (20.3 cm) showing on Segment B.
Make All Pieces
| Piece | Color | Quantity |
|---|---|---|
| Holly leaf | Green | 18 |
| Berry | Red | 27 |
| Cord segment A | Cream | 2 |
| Cord segment B | Cream | 2 |
Clusters: Make 9 clusters, each with 2 leaves and 3 berries. 8 go on the hanger and 1 goes on the towel.
Layout grid:
              [ RING ]
           C1          C1
        C2                C2
     C3 ===upper dowel=== C3
      |                     |
     C4 ===lower dowel=== C4
            [ towel: C ]
Joining
Clusters: Overlap the bases of two leaves by 0.5 in (1.3 cm), with the tips spread into a V about 4 in (10.2 cm) across. Whipstitch the overlap closed with a green tail. Then sew three berries in a triangle over the joined bases, two below and one on top. Work through the leaf layer only and pull just snug, so the berries sit round instead of flattened.
Top loops: Pass one end of each Segment A through the wooden ring. Fold 1.5 in (3.8 cm) back against the cord and whipstitch it stitch to stitch: each turn of the folded end gets sewn to the matching turn on the cord behind it. Do this for 6 turns, since 6 turns is 1.5 in.
Upper dowel: Fold the lower end of each Segment A around the upper dowel, 1 in (2.5 cm) in from the dowel end, and sew 6 turns the same way. Then fold the top end of each Segment B around the same dowel, right inside the Segment A loop, and sew 6 turns.
Lower dowel: Fold the lower end of each Segment B around the lower dowel, 1 in (2.5 cm) in from the end, and sew 6 turns.
Tension: Make your stitches firm but not tight. If you pull too hard, the folded loop puckers and the cord twists. Keep the loops loose enough that the dowels slide out, because you’ll need to remove them when you change the paper towel roll.
Cluster placement: On each Segment A, sew clusters (C1 and C2) at 5 in (12.7 cm) and 10 in (25.4 cm) below the ring loop. Sew C3 over each upper dowel loop and C4 over each lower dowel loop. Sew the ninth cluster centered on the towel.
Size checkpoint: The cords should sit 12 in (30.5 cm) apart at both dowels. The ring should hang about 12.6 in (32.0 cm) above the upper dowel, and the overall height from the top of the ring to the lower dowel should be 22.6 in (57.4 cm).
Border
The border on this design is the leaf edging, Round 2. Its gauge is the same as the leaf: 16 sc = 4 in (10.2 cm).
Round 2: Ch 1. Work around the leaf as follows:
- Side A (10 sts, tip to base): Sc in the first st. [(hdc, picot, hdc) in next st, sc in next st, sl st in next st] 3 times. (13 sts + 3 picots)
- Base: Sc in each of the 3 base sc. (3 sts)
- Side B (10 sts, base to tip): [sl st in next st, sc in next st, (hdc, picot, hdc) in next st] 3 times, then sc in the last st. (13 sts + 3 picots)
- Tip: (Sc, picot, sc) in the ch-2 sp. (2 sts + 1 picot)
Sl st in the first sc to join. (31 sts + 7 picots)
Why the math works: Each side has 10 sts. The 3-st point repeat, worked 3 times, uses 9 of them, and the single sc uses the 10th. The sl st after each point pulls the edge in, which makes the scalloped dips between holly points. Side B is a mirror of Side A, so the points line up on both sides. Round 2 adds 0.25 in (0.6 cm) all around, which takes the leaf from 1.25 in (3.2 cm) to 1.75 in (4.4 cm) wide. The tip picot adds 0.25 in (0.6 cm) of length, bringing it to 3 in (7.6 cm).
Final Blocking
- Block only the leaves, before you assemble the clusters.
- Dampen the leaves with a spray bottle.
- Pin each leaf to 3 in (7.6 cm) × 1.75 in (4.4 cm). Put a pin in every picot point and in the tip.
- Let the leaves dry completely.
- Hang the finished cords and leave them under the weight of the dowels overnight to relax any twist.
- Don’t block the berries. Just roll each one between your palms to round it.
Final Quality-Control Checklist
- Each leaf has 7 points: 3 per side plus the tip.
- The leaves measure 3 in (7.6 cm) × 1.75 in (4.4 cm).
- The berries are firm, closed and 0.75 in (1.9 cm) across.
- Segment A has 68 turns and Segment B has 44 turns.
- Every loop is sewn through 6 turns.
- The cords sit 12 in (30.5 cm) apart and hang evenly.
- There are 4 clusters per side, mirrored.
- All ends are woven in securely.
Troubleshooting
- Leaf curls: Round 1 is too tight. Go up a hook size, or block the leaf firmly.
- Points look rounded: Pull each picot snug and pin it sharply when blocking.
- Cord twists: Always rotate the work in the same direction.
- Hanger tilts: Compare the turn counts on the two matching segments and redo any loop that’s uneven.
- Stuffing shows through a berry: Use a smaller hook or stuff with red yarn scraps instead of fiberfill.
- Loops are too tight for the dowel: Undo the stitching and resew it 1 turn looser.
Care
Slide out the dowels and hand wash the hanger in cool water, then lay it flat to dry. Wash the towel with its cluster on a gentle cycle, inside a laundry bag.
Final Notes
Each step in this pattern sets up the next. The 4-turns-per-inch cord gauge gives you 17 in (43.2 cm) and 11 in (27.9 cm) segments. Folding the loops leaves a 14 in (35.6 cm) diagonal and an 8 in (20.3 cm) vertical, and together those set the 22.6 in (57.4 cm) height. The leaf gauge gives the 2.75 in (7.0 cm) Round 1, and the edging builds that up to a 3 in (7.6 cm) leaf. If you check each of these measurements as you go, your hanger will hang straight.
Happy crocheting!