

The Harbor Bloom Curtain Panel is a tab-top window panel made of flower granny squares. Each square has a deep navy center, a cream flower with eight petals, a ring of soft sage clusters and an open navy frame. Cream seams join the squares into a lattice. When light comes through the window, the open chain gaps show up clearly.
The palette is navy, sage green and cream, so it suits coastal, farmhouse or cottage rooms. Make two panels for a classic pair.
This pattern uses US crochet terms. One finished panel measures 25.5 in x 73.5 in (64.8 cm x 186.7 cm) without the tabs. The tabs add a loop about 3.5 in (8.9 cm) tall above the top edge.
How it’s built: you make 48 identical squares, join them into a grid 4 squares wide and 12 squares tall, add a three-round border, then work five strap tabs along the top edge.
Finished Size and Construction
- Finished panel size: 25.5 in x 73.5 in (64.8 cm x 186.7 cm), without tabs
- Skill level: Intermediate
- Terminology: US crochet terms
- Yarn weight: Worsted (#4), cotton or cotton blend
- Hook: 5.0 mm (US H-8)
- Number of pieces: 48 squares per panel
- Layout: 4 squares across x 12 squares down
- Square size (blocked): 6 in x 6 in (15.2 cm x 15.2 cm)
- Size before border: 24 in x 72 in (61.0 cm x 182.9 cm)
- Border depth: 0.75 in (1.9 cm) on every side
- Tabs: 5 tabs, each 2 in (5.1 cm) wide
Materials
Cotton or a cotton blend hangs well, keeps the stitches crisp and stands up to sunlight better than most acrylics. Choose a worsted yarn of about 170 m per 100 g (186 yd per 100 g).
Yarn per panel:
– Navy: 450 g, about 765 m (837 yd)
– Cream: 500 g, about 850 m (930 yd), which covers petals, square edges, joining, border and tabs
– Sage green: 200 g, about 340 m (372 yd)
For a pair of panels, double every amount. All quantities include a margin of about 10–15% for gauge differences and a test square.
Tools:
– 5.0 mm (US H-8) crochet hook
– Tapestry needle
– Scissors
– Stitch markers
– Blocking mats and rust-proof pins
– Spray bottle
– Measuring tape
– Curtain rod, up to 1.5 in (3.8 cm) in diameter
Abbreviations (US Terms)
- ch – chain
- sl st – slip stitch
- sc – single crochet
- hdc – half double crochet
- dc – double crochet
- tr – treble crochet
- sp – space
- st(s) – stitch(es)
- RS / WS – right side / wrong side
- rep – repeat
Special stitches:
- Beg cl (beginning cluster): Ch 3, then yarn over, insert hook in the indicated place, pull up a loop, yarn over, pull through 2 loops 3 times, yarn over, pull through all 4 loops on the hook.
- Cl (4-dc cluster): Yarn over, insert hook, pull up a loop, yarn over, pull through 2 loops 4 times in the same place, yarn over, pull through all 5 loops.
- Tr-cl (3-tr cluster): Yarn over twice, insert hook, pull up a loop, (yarn over, pull through 2 loops) twice 3 times in the same place, yarn over, pull through all 4 loops.
- Beg tr-cl: Ch 4, then work a 2-tr cluster in the same place (as above, but 2 times instead of 3).
Gauge and Checkpoints
Make one complete test square before anything else. Every panel measurement depends on it.
Gauge: One blocked square measures 6 in x 6 in (15.2 cm x 15.2 cm). On the last round, 23 sc measures 6 in (15.2 cm) from corner to corner.
Diameter checkpoints (unblocked):
– After Round 1: 1.25 in (3.2 cm)
– After Round 2: 2.75 in (7.0 cm)
– After Round 3: 4 in (10.2 cm)
– After Round 4: 5 in (12.7 cm), now square
– After Round 5: 5.5 in (14.0 cm)
– After Round 6: 5.75 in (14.6 cm), blocking to 6 in (15.2 cm)
If your square is too big: Go down to a 4.5 mm hook. If it’s too small: Go up to a 5.5 mm hook. Don’t change stitch counts. The joining and border math depend on exactly 23 sts per side.
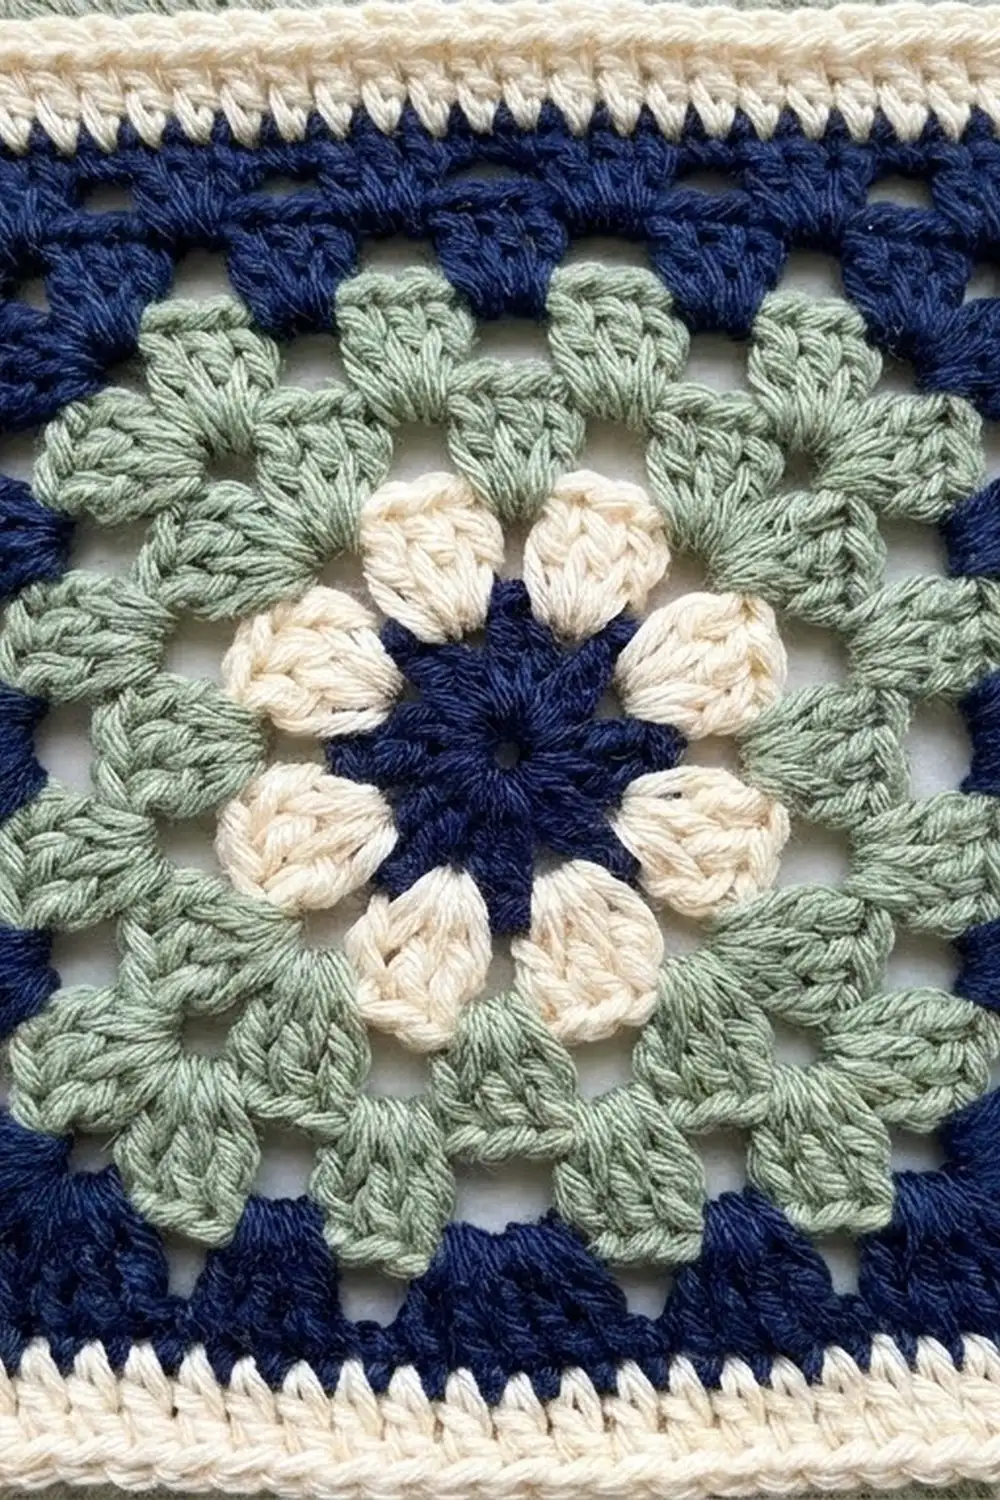
Square (Make 48)
Round 1 (navy): Make a magic ring. Ch 3 (counts as dc), work 15 dc in the ring, then sl st to the top of the ch-3. (16 dc) Pull the ring closed and fasten off.
Round 2 (cream): Join cream in any st. Work a beg cl in the same st, ch 3, skip the next st. Cl in the next st, ch 3, skip the next st. Rep from * to * 6 more times. Sl st to the top of the beg cl. (8 cl, 8 ch-3 sps) These are the 8 rounded cream petals. Fasten off.
Round 3 (sage): Join sage in any ch-3 sp. Work (beg cl, ch 2, cl) in the same sp, then ch 2. (Cl, ch 2, cl) in the next ch-3 sp, ch 2. Rep from * to * 6 more times. Sl st to the top of the beg cl. (16 cl, 16 ch-2 sps) This makes the sage ring, with 2 clusters behind each cream petal. Fasten off.
Round 4 (navy, squaring round): Join navy in any ch-2 sp. This is your first corner sp.
– Work (beg tr-cl, ch 3, tr-cl) in the same sp, then ch 1.
– 3 dc in the next sp, ch 1. 3 hdc in the next sp, ch 1. 3 dc in the next sp, ch 1.
– (Tr-cl, ch 3, tr-cl) in the next sp, ch 1. 3 dc in the next sp, ch 1. 3 hdc in the next sp, ch 1. 3 dc in the next sp, ch 1. Rep from * to * 2 more times.
– Sl st to the top of the beg tr-cl.
(8 tr-cl, 24 dc, 12 hdc, 16 ch-1 sps, 4 ch-3 corner sps)
Each side now has 15 sts and chains from corner sp to corner sp: tr-cl, ch 1, 3 dc, ch 1, 3 hdc, ch 1, 3 dc, ch 1, tr-cl. The tall tr-clusters lift the corners and the short hdc pull in the middle of each side, which turns the circle into a square. The ch-1 gaps make the open navy frame. Don’t fasten off.
Round 5 (navy): Sl st into the next ch-3 corner sp. Ch 3 (counts as dc), then work (dc, ch 2, 2 dc) in the same corner sp.
– Dc in each st and each ch-1 sp across the side (15 dc).
– (2 dc, ch 2, 2 dc) in the next corner sp.
– Rep from * to * twice more, then work 15 dc across the last side.
– Sl st to the top of the ch-3.
(19 dc per side: 2 + 15 + 2. 76 dc total, plus 4 ch-2 corner sps.) Fasten off.
Round 6 (cream): Join cream in any ch-2 corner sp. Work 3 sc in the same sp, then sc in each dc across (19 sc), 3 sc in the next corner sp. Rep from * to * twice more, then work 19 sc across the last side. Sl st to the first sc. Fasten off and leave a 6 in (15.2 cm) tail.
Count: 88 sc total (76 + 12). The middle sc of each 3-sc corner group is the corner st. Counted from corner st to corner st, both included, each side has 23 sts: corner st + 1 + 19 + 1 + corner st. Check: 4 x 23 − 4 shared corners = 88. ✓
Weave in all ends on the WS, going back through stitches of the same color.
Make All Pieces
Make 48 squares per panel, or 96 for a pair. Per panel, that is:
- Navy: 48 centers (Round 1) and 48 frames (Rounds 4–5)
- Cream: 48 petal rounds (Round 2) and 48 edge rounds (Round 6)
- Sage: 48 cluster rings (Round 3)
To save time, work in batches: make all Round 1s, then all Round 2s, and so on. Lightly block all squares to 6 in (15.2 cm) before joining. Same-size squares give straight seams.
Layout grid (one panel, 4 across x 12 down; every square is the same):
Row 1:   [A] [A] [A] [A]   <- top edge (tabs)
Row 2:   [A] [A] [A] [A]
Row 3:   [A] [A] [A] [A]
Row 4:   [A] [A] [A] [A]
Row 5:   [A] [A] [A] [A]
Row 6:   [A] [A] [A] [A]
Row 7:   [A] [A] [A] [A]
Row 8:   [A] [A] [A] [A]
Row 9:   [A] [A] [A] [A]
Row 10:  [A] [A] [A] [A]
Row 11:  [A] [A] [A] [A]
Row 12:  [A] [A] [A] [A]   <- bottom edge
Joining
Method: Single crochet seam in cream, worked with wrong sides together so a raised cream ridge forms on the RS. This ridge is the cream lattice between the squares.
Step 1 – Join rows: Hold two squares with WS together and their edges aligned. Join cream in the matching corner sts. Working through the outer loops of both squares, sc in each pair of matching sts from corner st to corner st. 23 sc per seam. Without fastening off, line up the next square and continue. Make 12 rows of 4 squares, each with 3 short seams.
Step 2 – Join rows to each other: Hold Row 1 and Row 2 with WS together. Sc through matching sts across the full width: 4 x 23 = 92 sc.
At each intersection, the corner sts of the square on the left and the square on the right are separate stitches. Each gets its own sc, with no skips and no extras. Step over the short seam ridge without working into it. Join all 12 rows this way, which takes 11 long seams.
Stitch-to-stitch logic: Each seam pairs one stitch with exactly one stitch, so no fabric is gained or lost. The grid stays square.
Tension: The seam sc should match the width of the square’s edge. If a seam puckers, loosen up or go up 0.5 mm for joining only. If it ruffles, tighten.
Size checkpoint: Before the border, the joined panel measures 24 in x 72 in (61.0 cm x 182.9 cm). If it is off by more than 0.5 in (1.3 cm), find the seam that is too tight or too loose and redo it.
Border
Border gauge: 23 sc = 6 in (15.2 cm), and 4 sc rounds = 1 in (2.5 cm).
Starting counts: Each square contributes its own 23 sts along the panel edge.
– Top and bottom: 4 squares x 23 = 92 sts
– Sides: 12 squares x 23 = 276 sts
The 4 outer panel corner sts are each shared by two sides, so there are 2 x 92 + 2 x 276 − 4 = 732 distinct edge sts.
Round 1 (cream): Join in the top-right panel corner st. Work 3 sc in that corner st, then sc in each st around, working 3 sc in each of the remaining 3 panel corner sts. Sl st to the first sc.
– Count: 732 sts worked 1-per-stitch, plus 8 extra sc at the corners (2 per corner) = 740 sc.
– Per side, from corner st to corner st inclusive: 94 on the top and bottom (92 + 2), 278 on the sides (276 + 2).
Round 2: Ch 1. Sc in each st, working 3 sc in each corner sc. Sl st to the first sc.
– Count: 740 + 8 = 748 sc.
– Per side: 96 on the top and bottom, 280 on the sides.
Round 3: Ch 1. Sc in each st, working 3 sc in each corner sc. Sl st to the first sc. Don’t fasten off yet if you’d like to start the tabs from this round; otherwise fasten off.
– Count: 748 + 8 = 756 sc.
– Per side: 98 on the top and bottom, 282 on the sides. Check: 2 x 98 + 2 x 282 − 4 = 756. ✓
Why the math works: Each round adds 0.25 in (0.6 cm) on every side, so each edge grows 0.5 in (1.3 cm) per round. At 23 sts per 6 in, that is about 2 sts, and the 3-sc corner adds exactly 2 sts per side. The corners stay flat. Three rounds add 0.75 in (1.9 cm) on each side, so the panel becomes 25.5 in x 73.5 in (64.8 cm x 186.7 cm).
Tabs (Make 5)
The top edge has 98 sts. Leaving out the 2 corner sts, there are 96 working sts. Lay them out as: tab (8) + gap (14) + tab (8) + gap (14) + tab (8) + gap (14) + tab (8) + gap (14) + tab (8). That is 40 + 56 = 96. ✓ Place markers at each tab.
Row 1: With the RS facing, join cream in the first st of a tab section. Ch 1, then sc in the same st and in the next 7 sts. Turn. (8 sc)
Rows 2–28: Ch 1, sc in each st across, then turn. (8 sc) The tab now measures 7 in (17.8 cm).
Fasten off and leave a 12 in (30.5 cm) tail. Fold the tab to the WS and whipstitch the last row to the base of Border Round 1. This makes a loop about 3.5 in (8.9 cm) tall. Repeat for all 5 tabs.
Final Blocking
- Weave in all remaining ends.
- Lay the panel on mats or a clean towel-covered floor.
- Pin it to 25.5 in x 73.5 in (64.8 cm x 186.7 cm). Pin the corners first, then the middles of the sides.
- Line up the seam ridges so the columns and rows are straight.
- Mist evenly until damp. Gently open each sage ring and navy chain gap with your fingers.
- Let it dry completely, at least 24 hours.
- Unpin and hang. The panel’s own weight will settle it a little.
Final Quality-Control Checklist
- Every square has 88 sts in Round 6 and 23 sts per side.
- Each of the 48 squares measures 6 in (15.2 cm).
- Short seams have 23 sc and long seams have 92 sc.
- The joined panel measured 24 in x 72 in (61.0 cm x 182.9 cm).
- Border Round 3 has 756 sc, with 98 on the top and bottom and 282 on the sides.
- There are 5 tabs, each 8 sts wide, evenly spaced.
- All ends are woven in and nothing shows on the RS.
- The finished panel measures 25.5 in x 73.5 in (64.8 cm x 186.7 cm).
Troubleshooting
- Square cups: Round 4 is too tight. Loosen the ch-3 corners or use a looser tension on the tr-clusters.
- Square ruffles: Your clusters are too loose. Go down 0.5 mm.
- Round 4 sides bow outward: Check that the middle group on each side is hdc, not dc.
- Wrong cluster count in Round 3: Each ch-3 sp gets 2 clusters, so 8 sps x 2 = 16.
- Seam puckers: Loosen the joining tension, or redo it with a 5.5 mm hook.
- Border corners curl: Make sure you work 3 sc into the corner st, not into the space beside it.
- Tabs are uneven: Count the 14-st gaps again, and don’t count the corner sts.
- Panel stretches when hung: Cotton relaxes. Block again and let it dry fully flat.
Care
Hand wash or machine wash on a cold, gentle cycle in a mesh laundry bag, then dry flat. To limit stretching, don’t hang the panel while it’s wet.
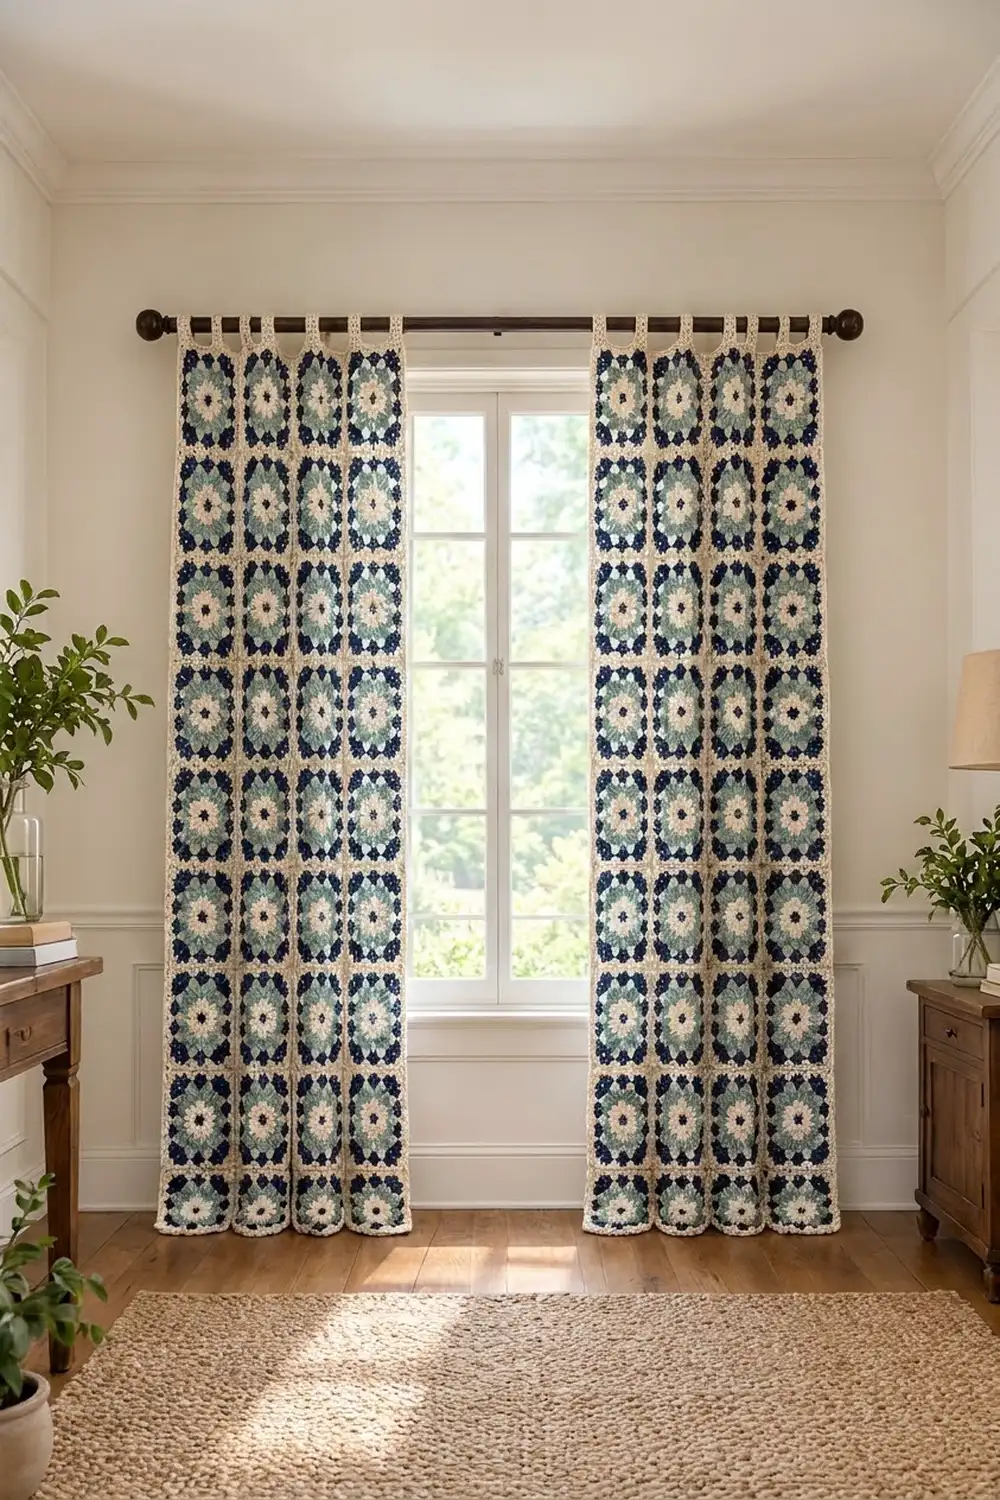
Final Notes
Everything in this pattern depends on the measurement chain:
- One square has 23 sts per side and measures 6 in (15.2 cm).
- 48 squares join into a panel 24 in x 72 in (61.0 cm x 182.9 cm).
- Three border rounds add 0.75 in (1.9 cm) on every side, for a finished panel of 25.5 in x 73.5 in (64.8 cm x 186.7 cm).
- Five tabs hang it from the rod.
If your test square checks out, the rest of the panel will measure correctly too.
Happy crocheting!