

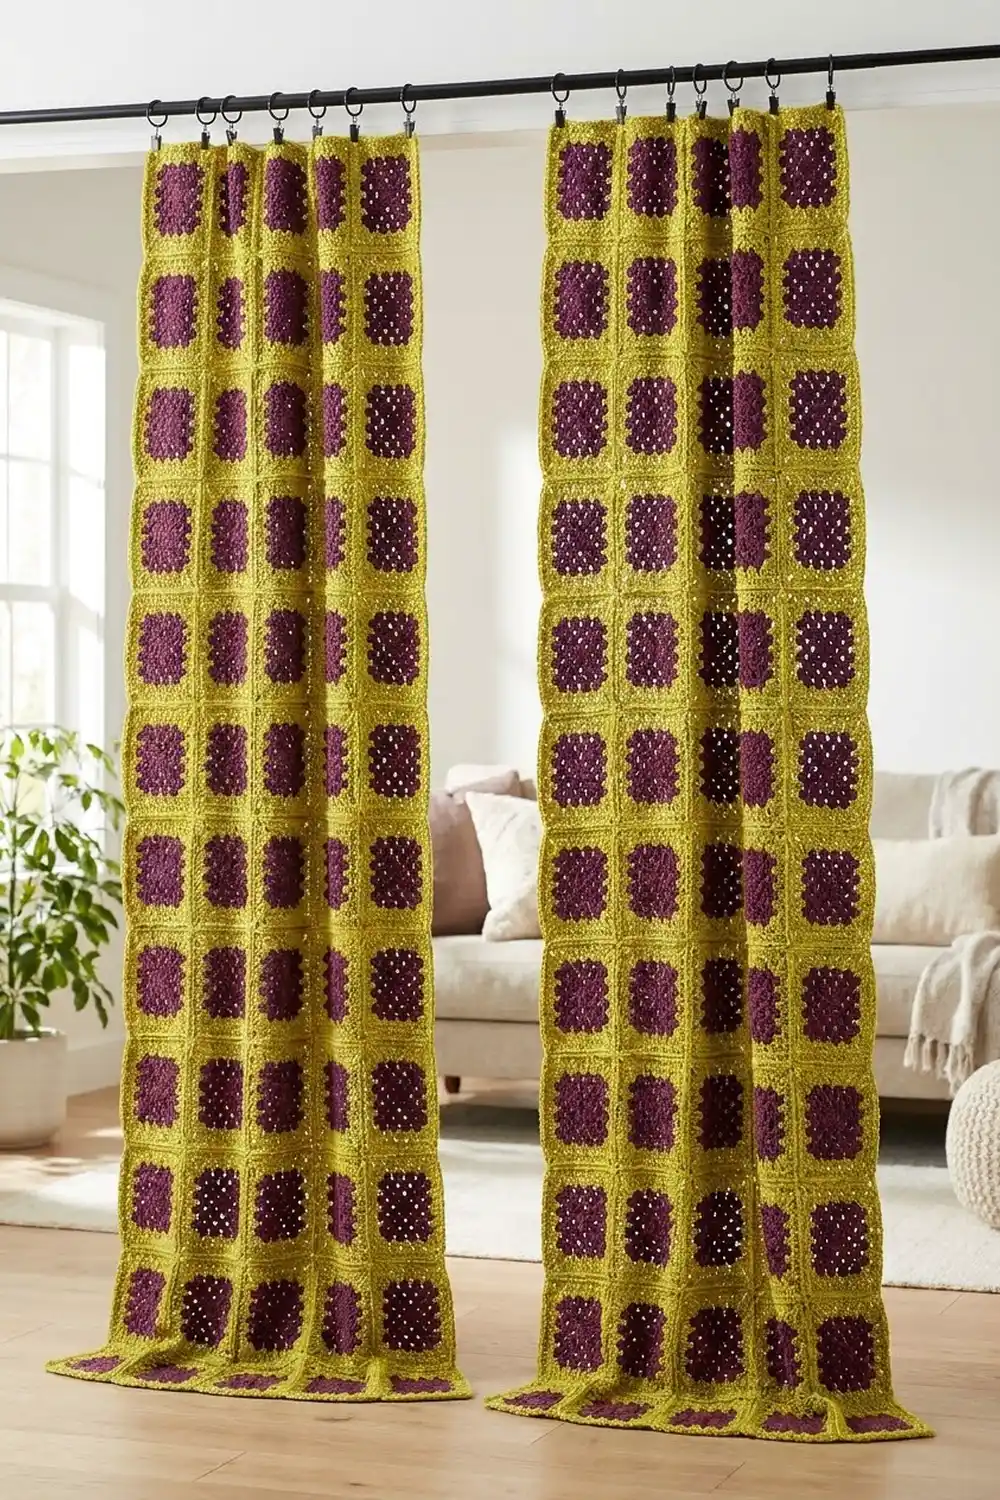
These curtains turn the classic granny square into window décor. Each square has a rich plum center surrounded by bright chartreuse. When the squares are joined, the lime frames form a clean grid and the plum centers look like a repeating flower pattern. In sunlight the open granny spaces glow, so the panels filter light without blocking it.
The style is retro but tidy. Each plum center has three traditional granny rounds. The chartreuse rounds fill the gaps, then square the motif off with solid edges so the joins sit straight and flat. A raised single crochet seam gives the front a crisp lime ridge between every square.
This pattern uses US crochet terms. Each finished panel measures 32 x 86 in (81.3 x 218.4 cm) after the border. The pattern makes a matching pair of panels, as shown.
Construction is simple and repetitive. You make 70 squares per panel, join them in a 5 x 14 grid with single crochet ridge seams, and add a three-round border. Then you block the panel and hang it with clip rings.
Finished Size and Construction
- Finished panel size: 32 x 86 in (81.3 x 218.4 cm)
- Skill level: Easy / Advanced Beginner
- Terminology: US crochet terms
- Yarn weight: Worsted (#4)
- Hook: 5.0 mm (H-8)
- Number of pieces: 70 squares per panel, 140 squares for the pair
- Layout: 5 squares wide x 14 squares tall per panel
- Square size: 6 x 6 in (15.2 x 15.2 cm)
- Panel size before border: 30 x 84 in (76.2 x 213.4 cm)
- Border depth: 1 in (2.5 cm) on every side
Materials
Yarn: Use a smooth worsted-weight yarn with good stitch definition. Cotton-acrylic blends hang well and don’t stretch much, which matters for long curtains. Pure acrylic is lighter, but long panels can grow slightly over time. Avoid fuzzy yarns, because they blur the granny clusters.
The quantities below assume about 200 m per 100 g.
- Color A – Plum: 1,000 g / approx. 2,000 m (about 6 g / 12 m per square)
- Color B – Chartreuse: 2,200 g / approx. 4,400 m (about 13 g / 26 m per square, plus joining and border)
Both quantities cover two panels and include a margin of roughly 10%. Buy all skeins of each color from the same dye lot.
Tools:
– 5.0 mm (H-8) crochet hook
– Tapestry needle
– Scissors
– Stitch markers
– Measuring tape
– Blocking mats, rust-proof pins, and a spray bottle
– 12 curtain clip rings (6 per panel)
Abbreviations (US Terms)
- ch – chain
- sl st – slip stitch
- sc – single crochet
- dc – double crochet
- sp(s) – space(s)
- st(s) – stitch(es)
- RS / WS – right side / wrong side
- [ ] – repeat the instructions inside the brackets as directed
Special stitch – Granny corner: (3 dc, ch 2, 3 dc) worked into the same corner space.
Note: The ch-3 at the start of a dc round counts as 1 dc throughout.
Gauge and Checkpoints
Make one complete square, block it, and measure it before you start production. With 140 squares, a small gauge difference adds up to inches.
Gauge: 1 finished square = 6 x 6 in (15.2 x 15.2 cm). On Round 6, 14 sc = 4 in (10.2 cm), which is 3.5 sc per inch.
Checkpoints (measured flat, edge to edge):
– After Round 1: 1.5 in (3.8 cm)
– After Round 2: 2.5 in (6.4 cm)
– After Round 3: 3.5 in (8.9 cm)
– After Round 4: 4.5 in (11.4 cm)
– After Round 5: 5.5 in (14.0 cm)
– After Round 6: 6 in (15.2 cm)
If the square is too big, go down to a 4.5 mm hook. If it’s too small, go up to a 5.5 mm hook. Keep the same hook for every square. Adjust your gauge before joining, never during.
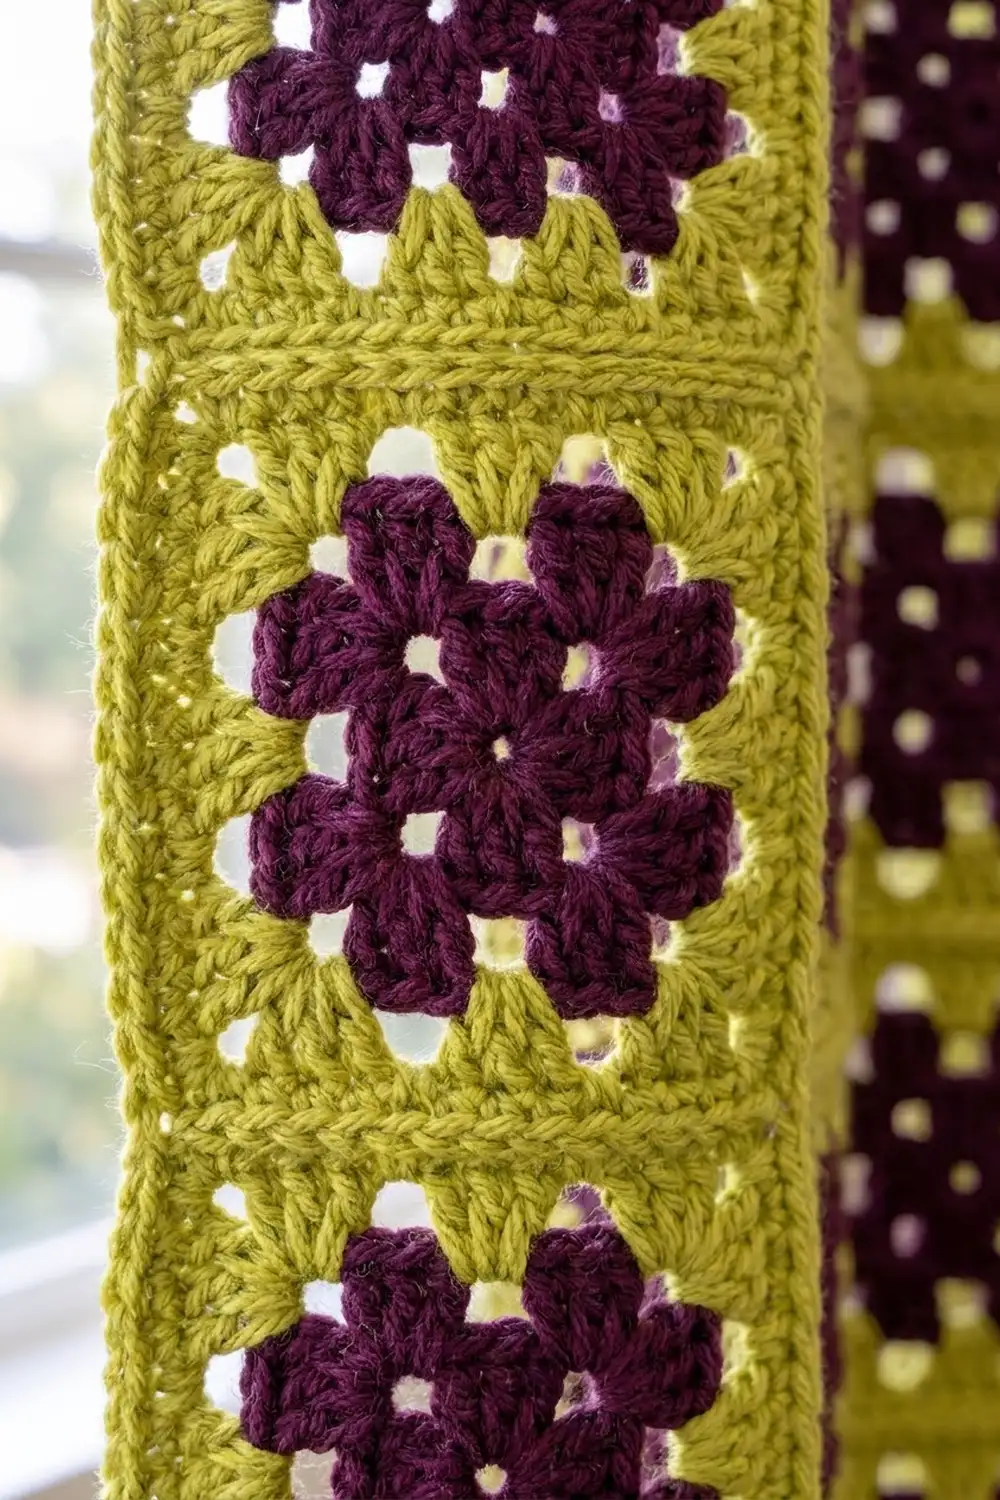
Granny Square (Make 70 per panel)
Round 1 (Plum)
With Color A, ch 4 and sl st to the first ch to form a ring.
Ch 3, 2 dc in ring, ch 2. [3 dc in ring, ch 2] 3 times. Sl st to the top of the beginning ch-3.
Count: 12 dc (4 groups) and 4 ch-2 corner sps.
Round 2 (Plum)
Sl st in the next 2 dc and into the ch-2 sp.
Ch 3, (2 dc, ch 2, 3 dc) in the same sp, ch 1. [Granny corner in the next ch-2 sp, ch 1] 3 times. Sl st to the top of the ch-3.
Count: 24 dc (8 groups), 4 ch-2 corner sps, and 4 ch-1 sps.
Round 3 (Plum)
Sl st in the next 2 dc and into the corner sp.
Ch 3, (2 dc, ch 2, 3 dc) in the same sp, ch 1, 3 dc in the next ch-1 sp, ch 1. [Granny corner in the next corner sp, ch 1, 3 dc in the next ch-1 sp, ch 1] 3 times. Sl st to the top of the ch-3.
Count: 36 dc (12 groups), 4 corner sps, and 8 ch-1 sps.
Fasten off Color A and weave in the end. This completes the plum cross-shaped center.
Round 4 (Chartreuse, Growth Round)
Join Color B in any corner sp.
Ch 3, (2 dc, ch 2, 3 dc) in the same sp, ch 1. [3 dc in the next ch-1 sp, ch 1] twice. *Granny corner in the next corner sp, ch 1, [3 dc in the next ch-1 sp, ch 1] twice. Repeat from * 2 more times. Sl st to the top of the ch-3.
Count: 48 dc (16 groups) and 12 ch-1 sps. Each side has 12 dc (4 groups) and 3 ch-1 sps.
The chartreuse groups fill the notches between the plum clusters, which gives the center its flower-like outline.
Round 5 (Chartreuse, Conversion Round)
This round turns the open granny edge into a solid edge.
Sl st in the next 2 dc and into the corner sp. Ch 3, dc in the same sp.
Dc in each dc and in each ch-1 sp across to the next corner. (2 dc, ch 2, 2 dc) in the corner sp. Repeat from * to * 2 more times. Dc in each dc and ch-1 sp across the last side, 2 dc in the first corner sp, ch 2, and sl st to the top of the ch-3.
Count per side: 15 sts worked 1 per existing st or sp (12 dc + 3 ch-1 sps) + 4 corner dc added (2 at each end) = 19 dc.
Total: 76 dc and 4 ch-2 corner sps.
Round 6 (Chartreuse, Trim Round)
Ch 1. Sc in each dc across the side, then (sc, ch 2, sc) in the corner sp. Repeat from * around and sl st to the first sc.
Count per side: 19 sts worked 1 per existing dc + 2 corner sc added = 21 sc. Those 21 sc include that side’s 2 corner sc. The ch-2 sps are not counted as stitches.
Total: 84 sc and 4 ch-2 corner sps.
Fasten off and leave a 6 in (15.2 cm) tail. Weave in all ends securely.
Make All Pieces
Each panel needs 70 identical squares. The pair needs 140 squares, all with Rounds 1–3 in Plum and Rounds 4–6 in Chartreuse.
Spray-block each square to 6 x 6 in (15.2 x 15.2 cm) before joining. Squares of matching size make the seams much easier.
Layout per panel (5 wide x 14 tall, S = square):
Row 1:  S S S S S
Row 2:  S S S S S
Row 3:  S S S S S
Row 4:  S S S S S
Row 5:  S S S S S
Row 6:  S S S S S
Row 7:  S S S S S
Row 8:  S S S S S
Row 9:  S S S S S
Row 10: S S S S S
Row 11: S S S S S
Row 12: S S S S S
Row 13: S S S S S
Row 14: S S S S S
Every square is identical, so orientation doesn’t matter. Just keep the RS facing up.
Joining
Method: Single crochet ridge seam in Color B, worked through both loops of both squares.
Hold two squares with WS together and RS facing out. Work the seam with the front of the work facing you. This leaves a raised chartreuse ridge on the front, which is the grid you see in the finished curtains.
Stitch-to-stitch logic:
– Each square edge has 21 sc, so the seam pairs them 1 to 1 for 21 seam sc per square.
– Start in the joined corner ch-2 sps with 1 sc.
– Work 1 sc through each matching pair of stitches (21 pairs).
– When you reach the next pair of squares, work 1 sc through the 4 stacked corner sps: the two corner sps you are finishing plus the two corner sps of the next squares.
– Work the next 21 pairs. At the end of the seam, work 1 sc in the last joined corner sps.
Order:
1. Join the squares in each row of 5 using 4 short seams per row.
2. Join the 14 rows to each other with 13 long horizontal seams. Each runs 5 x 21 = 105 stitch pairs plus the corner-space stitches.
The vertical seams line up as you go, so the grid stays continuous.
Tension: Keep the seam stitches as relaxed as your square stitches. Tight seams make the panel pucker and shorten it. If the ridge pulls, go up half a hook size for joining only.
Checkpoint: Lay the joined panel flat. It should measure 30 x 84 in (76.2 x 213.4 cm), within 0.5 in (1.3 cm) either way.
Border
Border gauge: 14 sc = 4 in (10.2 cm), or 3.5 sc per inch. This matches Round 6 of the squares, so the border lies flat without ruffling or cupping.
Starting counts: The border uses only the square stitches along the panel’s outer edge. Skip the joined corner sps where the seams meet the edge, and add no stitches at the seams.
- Short sides (top and bottom): 5 squares x 21 sc = 105 sts
- Long sides: 14 squares x 21 sc = 294 sts
The panel’s 4 outer corners are the free ch-2 sps of the 4 corner squares.
Border Round 1 (Sc, Trim Round)
Join Color B in any outer corner sp. Ch 1.
Work (sc, ch 2, sc) in each outer corner sp. Sc in each sc along every side, skipping the seam sps.
- Short side: 105 sts worked 1 per existing st + 2 corner sc added = 107 sc
- Long side: 294 + 2 = 296 sc
- Total: 2 x 10⁷ + 2 x 296 = 806 sc and 4 ch-2 corner sps
Sl st to the first sc.
Border Round 2 (Dc, Trim Round)
Sl st into the corner sp. Ch 3, (dc, ch 2, 2 dc) in the same sp. Dc in each sc along each side, and work (2 dc, ch 2, 2 dc) in each corner sp.
- Short side: 107 sts worked 1 per existing st + 4 corner dc added = 111 dc
- Long side: 296 + 4 = 300 dc
- Total: 2 x 111 + 2 x 300 = 822 dc
Sl st to the top of the ch-3.
Border Round 3 (Sc, Trim Round)
Ch 1. Sc in each dc along each side, and work (sc, ch 2, sc) in each corner sp.
- Short side: 111 sts worked 1 per existing st + 2 corner sc added = 113 sc
- Long side: 300 + 2 = 302 sc
- Total: 2 x 113 + 2 x 302 = 830 sc
Sl st to the first sc, fasten off, and weave in the ends.
Why the math works: At 3.5 sts per inch, 105 sts make 30 in (76.2 cm) and 294 sts make 84 in (213.4 cm), so the first border round matches the joined panel exactly. Each round adds only the stitches needed to turn the corners, which keeps the corners square and the sides flat. The three rounds add 1 in (2.5 cm) on every side, for a final size of 32 x 86 in (81.3 x 218.4 cm).
Final Blocking
- Lay the panel flat on blocking mats or a clean carpet covered with towels. You may need to block it in two halves.
- Measure and pin each short edge to 32 in (81.3 cm).
- Pin the long edges to 86 in (218.4 cm), keeping the sides straight.
- Check that the seam grid runs in straight lines, and nudge any crooked squares into place.
- Spray the panel evenly until it’s damp but not soaked.
- Let it dry completely, which usually takes 24–48 hours, before unpinning.
- Repeat for the second panel. Measure both panels side by side to confirm they match.
Final Quality-Control Checklist
- Every square has 84 sc and 4 ch-2 corner sps on Round 6.
- Each panel has 70 squares in a 5 x 14 grid.
- All seam ridges are on the front, and the grid lines are straight.
- Before the border, the panel measures 30 x 84 in (76.2 x 213.4 cm).
- The border has 113 sc on each short side and 302 sc on each long side.
- After blocking, the panel measures 32 x 86 in (81.3 x 218.4 cm).
- All ends are woven in securely, with no tails showing against the light.
- Both panels match in length to within 0.5 in (1.3 cm).
Troubleshooting
The square ruffles or cups. Check the Round 5 count of 19 dc per side. An extra or missing dc in a ch-1 sp is the usual cause.
The square is twisted. You may have skipped a ch-1 between groups. Recount Round 4: there should be 3 ch-1 sps per side.
The seams pucker. Your joining tension is too tight. Undo the seam and rework it with a larger hook.
The border waves. You probably added stitches at the seam sps. Skip them, and recount 105 sts on each short side and 294 on each long side.
The panels have different lengths. Re-block the shorter panel and pin it firmly to 86 in (218.4 cm).
The curtains sag over time. Use a cotton-blend yarn, and add an extra clip ring along the top.
Care
Hand wash in cool water, or machine wash on a gentle cycle in a large mesh bag. Lay flat to dry, reshaping to 32 x 86 in (81.3 x 218.4 cm), and never hang the panels to dry while wet.
Final Notes
The measurement chain is what makes these curtains work. Each square measures 6 in (15.2 cm) with 21 sc per side. Five squares make 30 in (76.2 cm) across, and 14 squares make 84 in (213.4 cm) tall. The 1 in (2.5 cm) border brings each panel to 32 x 86 in (81.3 x 218.4 cm). If you hit each checkpoint, the border counts will match on the first try.
To hang a panel, clip 6 rings along the top: one at each top corner and one at each of the 4 vertical seam lines.
Happy crocheting!