

These lace curtains look like a field of tiny daisies caught in a net. Each panel is made of small flower motifs, each with a golden center, eight puffy butter-yellow petals and a square frame of chain loops. Once the motifs are joined, the frames blend into one airy mesh, and the flowers seem to float in the sunlight.
The colors are soft and warm. Pale butter yellow is used for the petals, mesh and border, and a deeper golden yellow fills each flower center. The style is classic cottage: light enough to let the sun through, but sturdy enough to hang straight.
This pattern uses US crochet terms. Each finished panel measures 43.5 x 85.5 in (110.5 x 217.2 cm) after blocking, and the pattern makes a pair.
The construction is simple and repetitive. You make one motif in six rounds. Every motif after that joins to its neighbors while you work its last round (join-as-you-go). When all 288 motifs of a panel are joined, a three-round border squares off the edges.
Finished Size and Construction
- Finished size (each panel): 43.5 x 85.5 in (110.5 x 217.2 cm)
- Skill level: Intermediate (easy stitches, large scale)
- Terminology: US crochet terms
- Yarn weight: Sport weight (2) mercerized cotton
- Hook: 3.5 mm (E-4)
- Number of pieces: 288 motifs per panel, 576 for the pair
- Layout: 12 motifs wide x 24 motifs long per panel
- Motif size: 3.5 x 3.5 in (8.9 x 8.9 cm), blocked
- Size before border: 42 x 84 in (106.7 x 213.4 cm)
- Border depth: 0.75 in (1.9 cm) on each side
Materials
Choose a smooth, mercerized cotton or cotton blend in sport weight, with about 150 m per 50 g. Cotton keeps the lace open, resists stretching on the rod and shows the petal texture clearly. Avoid fuzzy yarns, because they fill in the mesh.
- Color A – Golden Yellow (centers): 300 g, about 900 m
- Color B – Butter Yellow (petals, mesh, border): 1,600 g, about 4,800 m
These quantities are for two panels. They include a margin of roughly 15-20% for gauge swatches, tails and differences in tension.
Tools:
- 3.5 mm (E-4) crochet hook
- Tapestry needle
- Scissors
- Stitch markers
- Rust-proof pins and blocking mats (or a large towel-covered surface)
- Spray bottle
- Measuring tape
- Curtain clip rings, about 12 per panel (optional, for hanging)
Abbreviations (US Terms)
- ch: chain
- sl st: slip stitch
- sc: single crochet
- hdc: half double crochet
- dc: double crochet
- sp: space
- st(s): stitch(es)
- rep: repeat
- JAYGO: join-as-you-go
Special stitch – Joining Loop (JL): Ch 3, sl st into the matching ch-6 sp of the neighboring motif, ch 3. This replaces one ch-6 loop and connects the two motifs at its midpoint.
Petal: (Hdc, 3 dc, hdc) all in the same st.
Gauge and Checkpoints
Make one complete motif before you start anything else, then wet-block it. It should measure 3.5 x 3.5 in (8.9 x 8.9 cm).
Checkpoints for that test motif (unblocked, measured across):
- After Rnd 2: 1 in (2.5 cm)
- After Rnd 3: 2 in (5.1 cm), petal tip to petal tip
- After Rnd 4: 2.25 in (5.7 cm)
- After Rnd 5: 3 in (7.6 cm)
- After Rnd 6: 3.25 in (8.3 cm) unblocked, 3.5 in (8.9 cm) blocked
If your motif is too big, go down to a 3.25 mm hook. If it is too small, go up to a 3.75 mm hook. Match gauge closely: being off by only 1/8 in (0.3 cm) per motif adds up to 1.5 in (3.8 cm) across the width and 3 in (7.6 cm) along the length.
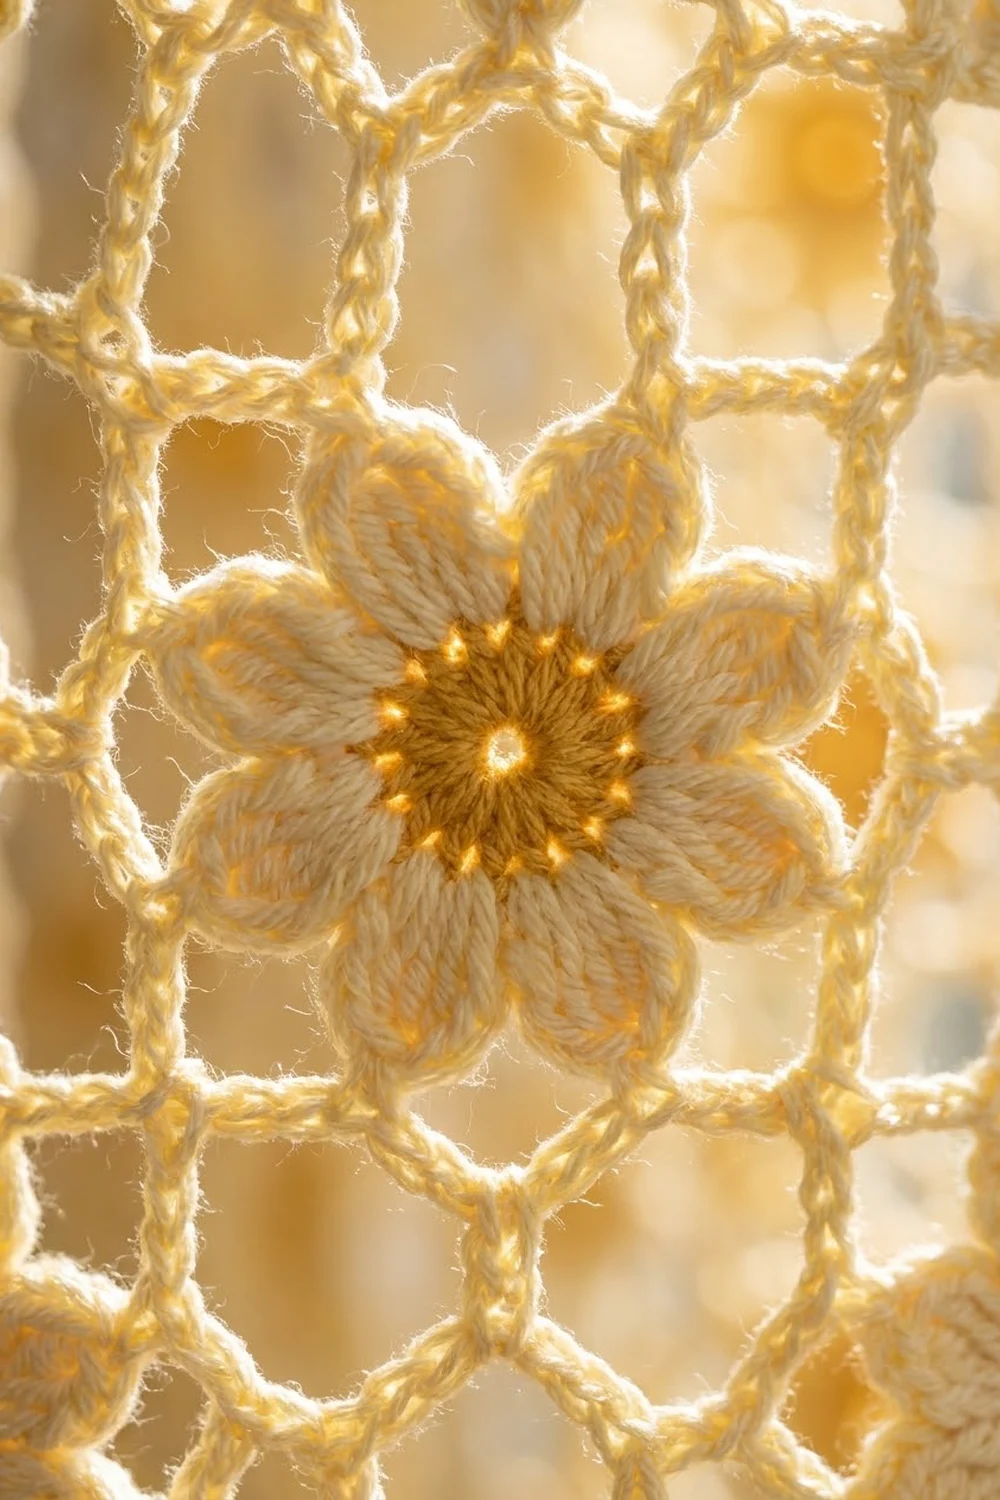
Motif
Each motif is worked in the round from the center out. Do not turn.
Rnd 1 (Color A): Make a magic ring, ch 1, 8 sc in ring, sl st to first sc. Pull the ring closed. (8 sc)
Rnd 2: Ch 1, 2 sc in each sc around, sl st to first sc. Fasten off Color A. (16 sc)
Rnd 3 (Color B): Join Color B with a sc in any sc. Petal in next sc, sc in next sc; rep from * 6 more times, then from * to ** once more. Sl st to first sc. (8 petals: 8 sc + 40 petal sts = 48 sts)
Each petal sits on one sc of Rnd 2, with one sc between petals, so the eight petals lie flat and evenly spaced.
Rnd 4: Sl st in next hdc and next dc to reach the center dc of the first petal. Ch 1, sc in same center dc. Ch 5, sc in center dc of next petal; rep from * 6 more times, ch 5, sl st to first sc. (8 sc, 8 ch-5 sps)
These chains connect the petal tips and begin the mesh.
Rnd 5: Sl st into first ch-5 sp. Ch 1, (sc, ch 7, sc) in same sp, ch 5, sc in next ch-5 sp, ch 5. (Sc, ch 7, sc) in next ch-5 sp, ch 5, sc in next ch-5 sp, ch 5; rep from * 2 more times. Sl st to first sc. (12 sc; 4 corner ch-7 sps + 8 side ch-5 sps = 12 sps)
The four ch-7 sps are the corners, and the circle has now become a square.
Rnd 6 (first motif only): Sl st in next 3 ch, then sl st into the ch-7 corner sp. Ch 1, sc in same corner sp (corner sc). [Ch 6, sc in next ch-5 sp] twice, ch 6, sc in next ch-7 corner sp (corner sc); rep from * 2 more times, then from * to ** once more. Sl st to first sc. Fasten off, leaving a 6 in (15.2 cm) tail. (12 sc, 12 ch-6 sps)
Per side: 4 sc (including both corner sc) and 3 ch-6 sps. Each corner sc is shared by two sides, so 4 sides x 4 sc = 16, minus 4 shared corners, gives 12 sc in total.
Make All Pieces
Each panel needs 288 motifs. For the pair, make:
- Rnds 1-2 in Color A: 576 centers
- Rnds 3-5 in Color B: 576 motifs
- Rnd 6 in Color B: 2 complete first motifs, plus 574 worked with JAYGO
Work Rnds 1-5 in batches of 24 to 48, and weave in the Color A tails as you go. Only Rnd 6 is worked during joining.
Layout grid (one panel, F = flower motif):
Row  1:  F F F F F F F F F F F F   (12 motifs)
Row  2:  F F F F F F F F F F F F
Row  3:  F F F F F F F F F F F F
  ...    (same for Rows 4-23)
Row 24:  F F F F F F F F F F F F
         12 across x 24 down = 288 motifs
Row 1 is the top edge. Build the panel one row at a time, from left to right.
Joining
All joining happens during Rnd 6, using the Joining Loop.
Stitch-to-stitch logic: A joined side matches its neighbor 1:1. Corner sc meets corner sc, and each of the 3 ch-6 sps meets the ch-6 sp facing it. A JL (ch 3, sl st, ch 3) uses the same 6 chains as a regular loop, so joined loops stay the same length as free ones.
Joining a corner: When you reach a corner sc that touches a motif you have already made, work the corner sc, then sl st into that neighbor’s corner sc. Where four motifs meet, always sl st into the first corner made at that point, so all four corners share one anchor.
One side joined (Row 1, Motifs 2-12): Work Rnd 6 as written until you reach the side that faces the previous motif. Work the corner sc and join it, then [JL, sc in next ch-5 sp] twice, JL. Then work the next corner sc and join it. Finish the remaining sides as normal.
Two sides joined (Rows 2-24, Motifs 2-12): Join the top side to the motif above and the left side to the motif on the left, in the same way. The first motif of each row joins on its top side only.
Tension advice: Keep the joining sl st as loose as your normal chains. A tight sl st shortens the loop and puckers the seam. Hold the finished part of the panel to your left with the right side facing you, so you never have to twist it.
Size checkpoint: After Row 1, lay the strip flat without stretching it. It should measure about 39 in (99.1 cm) unblocked, which blocks out to 42 in (106.7 cm). After every 6 rows, check that the length has grown by about 21 in (53.3 cm) blocked. If the width is off by more than 1 in (2.5 cm), change your hook size for the next row.
Border
Border gauge: 18 sc = 3.5 in (8.9 cm), which is about 5 sc per 1 in (2.5 cm). This matches the blocked motif width, so the edge lies flat.
Each outer motif side gives 18 sc: 6 sc in each of its 3 ch-6 sps. Skip the joined seam points between motifs. Go straight from the last sc in one motif’s loop to the first sc in the next motif’s loop, so no stitches are added at the seams.
- Short sides: 12 motifs x 18 sc = 216 sc
- Long sides: 24 motifs x 18 sc = 432 sc
Rnd 1 (Color B): Join with a sc in the first ch-6 sp after the top right corner. Along each side, work 6 sc in each ch-6 sp, and work 3 sc in each of the 4 panel corner sc. Sl st to first sc. (216 + 432 + 216 + 432 = 1,296 side sts, plus 4 corners x 3 sc = 12; total 1,308 sts)
Rnd 2: Ch 2 (does not count as a st), hdc in each st around, working 3 hdc in the center st of each corner group. Sl st to first hdc. (1,308 sts worked 1 per st + 8 extra corner sts = 1,316 sts: 218 per short side, 434 per long side, plus 3 at each corner)
Rnd 3: Ch 1, sc in each st around, working 3 sc in the center st of each corner group. Sl st to first sc. Fasten off. (1,316 sts worked 1 per st + 8 extra corner sts = 1,324 sts: 220 per short side, 436 per long side, plus 3 at each corner)
Why the math works: Each motif side spans 3.5 in (8.9 cm), and 18 sc at border gauge also measure 3.5 in (8.9 cm). Picking up exactly 18 sc per motif side keeps the border the same length as the mesh. Adding 2 extra sts at each corner every round turns the corner without cupping. The border adds 0.75 in (1.9 cm) on each side, so the panel becomes 42 + 1.5 = 43.5 in (110.5 cm) wide and 84 + 1.5 = 85.5 in (217.2 cm) long.
Repeat everything for the second panel.
Final Blocking
- Weave in all remaining ends, running each tail through the solid sts of a petal or the border.
- Soak the panel in cool water for 15 minutes, then gently squeeze out the water. Do not wring it.
- Roll the panel in towels and press to remove extra moisture.
- Lay it flat on the mats and pin the four outer corners to 43.5 x 85.5 in (110.5 x 217.2 cm).
- Pin the border straight every 3.5 in (8.9 cm), at each seam point.
- Open the mesh: pin the corner points of the inner motifs in a grid so the ch-6 loops pull into even, rounded openings.
- Shape the petals with your fingertips so they lie flat and evenly spaced.
- Let the panel dry completely, at least 24 hours, before you unpin it.
Final Quality-Control Checklist
- Every motif has 8 petals and a solid golden center.
- Every motif side has 4 sc and 3 ch-6 sps.
- All four corners meet at one shared anchor point.
- No JL is missing: tug gently along each seam to check.
- The border totals 1,324 sts on Rnd 3.
- The panel measures 43.5 x 85.5 in (110.5 x 217.2 cm).
- Both panels match within 0.5 in (1.3 cm).
- All tails are woven in and trimmed.
Troubleshooting
Petals cup or ruffle: Your Rnd 2 is too tight. Make sure you have exactly 16 sc, or go up a hook size for Rnds 1-2 only.
The center hole won’t close: Pull the magic ring tail firmly before Rnd 2, then weave the tail in a circle around the ring.
Seams pucker: Your joining sl st is too tight. Loosen it, or work ch 3 + sl st + ch 4 if your chains run short.
The panel is narrower than expected: Block it harder. Or, for the second panel, add one more motif per row, and add 18 sc to each short side in Border Rnd 1.
The border waves: You picked up more than 6 sc per loop. Count again; each motif side should have 18 sc.
The border pulls in: Go up one hook size for the border only.
Care
Hand wash in cool water with mild soap, roll in a towel and dry flat, reblocking lightly. Do not tumble dry, and do not hang wet panels, because the weight can stretch the lace.

Final Notes
Everything rests on one chain of measurements. One motif measures 3.5 in (8.9 cm) and has 4 sc and 3 ch-6 sps per side. Twelve motifs make 42 in (106.7 cm), and twenty-four make 84 in (213.4 cm). The border picks up 18 sc per motif side, which gives 216 sc on each short side and 432 sc on each long side. It adds 0.75 in (1.9 cm) on each edge, for a finished panel of 43.5 x 85.5 in (110.5 x 217.2 cm). Check your first motif, your first row and your first border round, and the rest will follow.
Happy crocheting!