

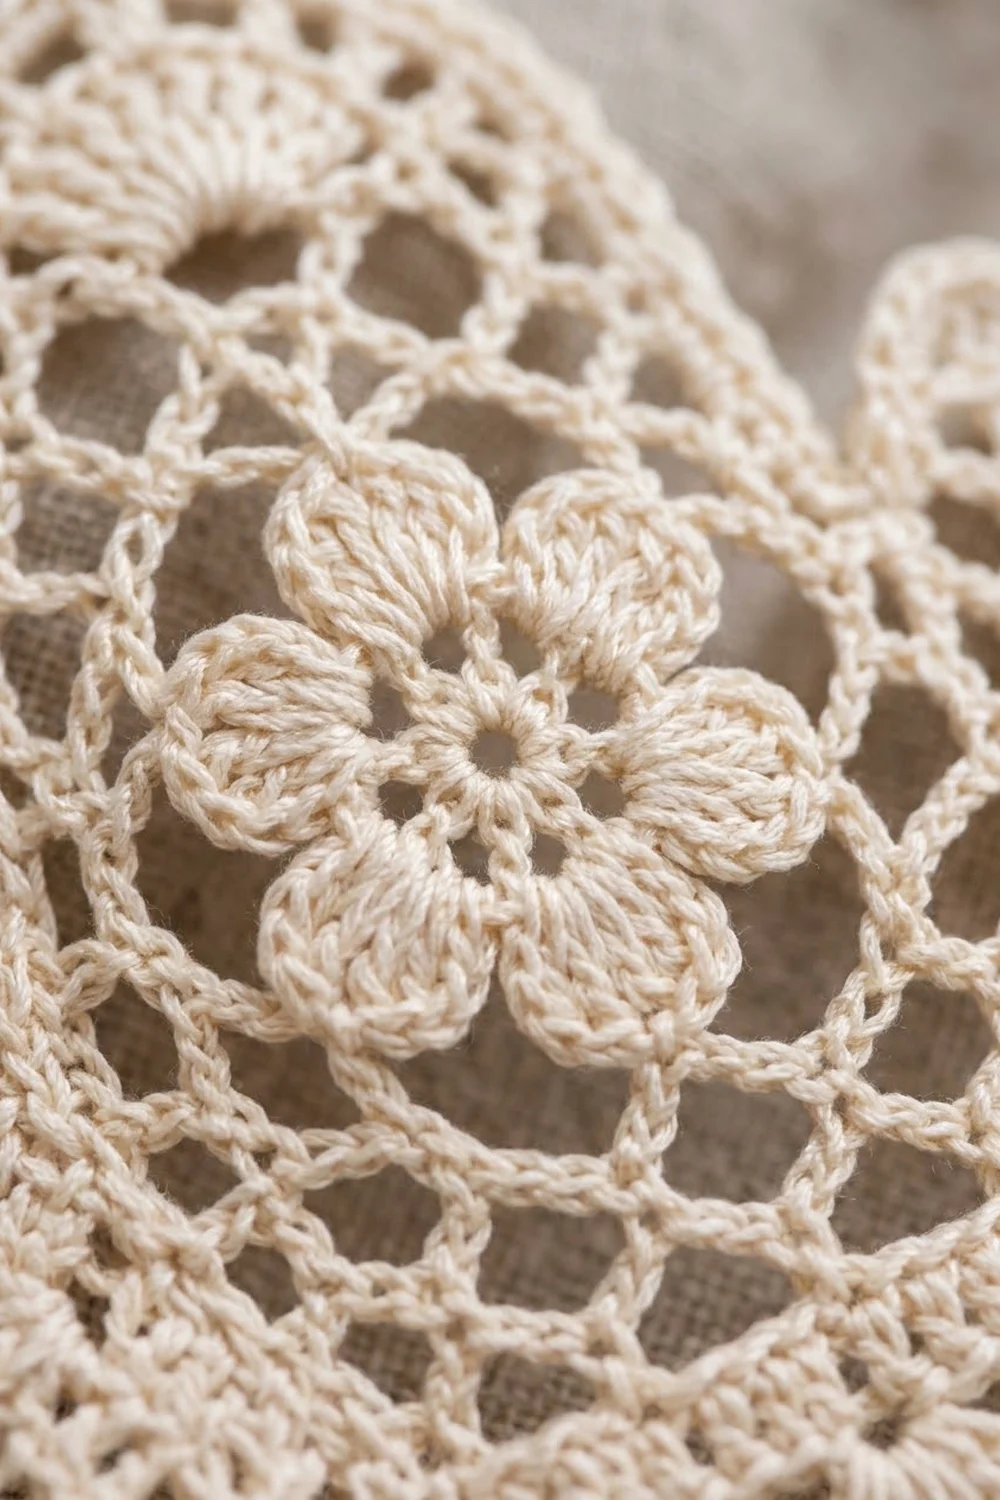
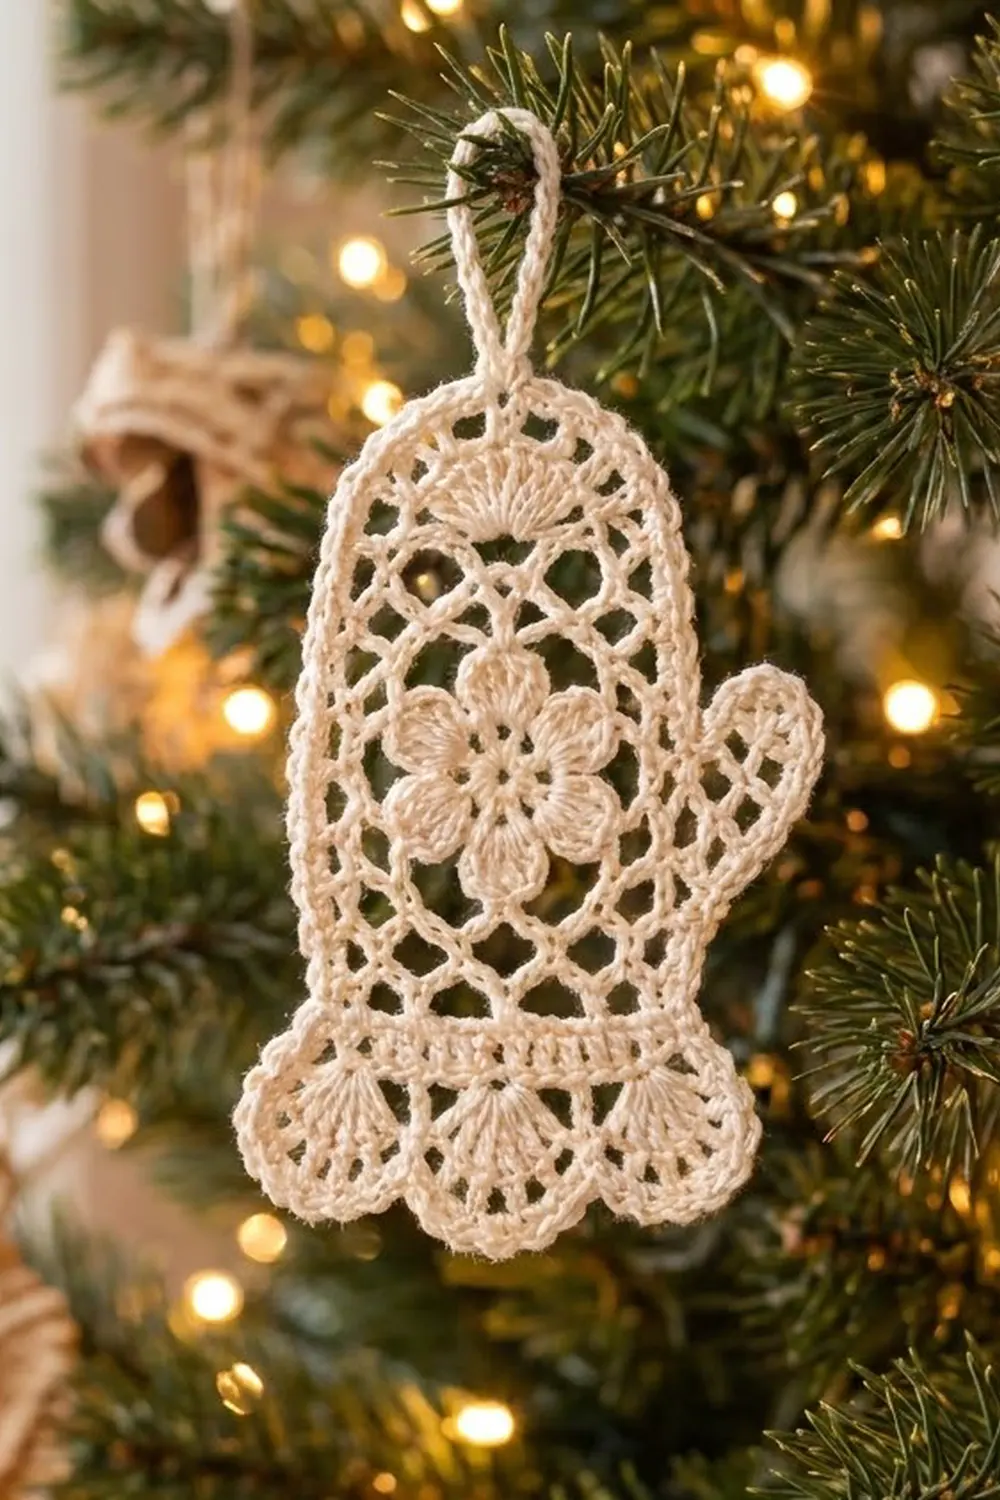
The Frostbloom Mitten is a small lace ornament worked in cream cotton thread. It has an open diamond mesh, a six-petal flower at the center, a solid cuff band and a row of fan scallops along the bottom. It looks like vintage doily lace, but the whole ornament is one small project you can finish in an evening.
There’s just one color, cream or ivory. That gives it a clean, heirloom look against green branches and warm lights. A white or pale gold thread works just as well.
This pattern uses US crochet terms. The finished ornament measures 2.7 in (6.9 cm) wide across the hand, 3.5 in (8.9 cm) across the thumb and 5 in (12.7 cm) tall. The hanging loop adds about 1 in (2.5 cm), for a total of about 6 in (15.2 cm).
Here’s the construction. First you make the flower medallion. Next you work the mitten body in rows from the cuff up, then add the thumb to the side edge. A single border round outlines the whole mitten, and the scallops are worked along the cuff. Last, you add the loop and sew the medallion to the center of the mesh.
Finished Size and Construction
- Finished size: 2.7 in (6.9 cm) wide at the hand, 3.5 in (8.9 cm) across the thumb, 5 in (12.7 cm) tall, not counting the loop
- Skill level: Intermediate (thread work, mesh, shaping)
- Terminology: US
- Yarn weight: Size 10 cotton crochet thread
- Hook: 1.5 mm steel hook
- Number of pieces: 1 ornament (mitten body plus 1 sewn-on flower medallion)
- Layout: Single standalone piece
- Medallion size: 1.75 in (4.4 cm) across
- Size before border: 2.5 in (6.4 cm) wide at the hand, 3.3 in (8.4 cm) across the thumb, 4.4 in (11.2 cm) tall
- Border depth: 0.1 in (0.3 cm) on the sides and top, 0.5 in (1.3 cm) at the scalloped cuff
Materials
Thread: Use a mercerized size 10 cotton thread of about 280 m per 50 g. Mercerized cotton holds crisp stitch definition and blocks well. Don’t use acrylic, because the lace won’t hold its shape.
- Cream/ivory: 8 g, about 45 m (49 yd)
That amount includes a margin for your gauge swatch, the sewing tail and blocking adjustments. One ornament actually uses about 6 g.
Tools:
– 1.5 mm steel crochet hook
– Fine tapestry needle
– Stitch markers (2)
– Rustproof pins and a foam blocking board
– Spray bottle, plus spray starch or a diluted fabric stiffener
– Ruler or tape measure
Abbreviations (US Terms)
- ch: chain
- sl st: slip stitch
- sc: single crochet
- hdc: half double crochet
- dc: double crochet
- sc2tog: single crochet 2 together
- sk: skip
- sp(s): space(s)
- tch: turning chain
- MR: magic ring
- RS: right side
Special stitch:
– Shell: 9 dc worked into the same stitch.
Gauge and Checkpoints
Make the medallion first and treat it as your gauge test. Measure it after Rnd 5, lightly pressed:
- Medallion after Rnd 5: 1.75 in (4.4 cm) across
- Body after Row 4: 25 sc = 2.5 in (6.4 cm) wide; Rows 1–4 = 0.7 in (1.8 cm) tall
- Body after Row 15: the mesh (Rows 5–15) is 3 in (7.6 cm) tall; total height is 3.7 in (9.4 cm)
- Body after Row 20: 4.4 in (11.2 cm) tall
- Thumb: sticks out 0.8 in (2.0 cm) from the side edge
Too big? Switch to a 1.4 mm or 1.25 mm hook, or work your chains more tightly.
Too small? Switch to a 1.65 mm or 1.75 mm hook.
Even a small difference gets bigger across 11 mesh rows, so check each checkpoint before you move on.
Flower Medallion
Work in joined rounds with the RS facing you. Don’t turn.
Rnd 1: Make a MR. Ch 1, then work 12 sc in the ring. Sl st to the first sc and pull the ring closed. (12 sc)
Rnd 2: Ch 1, sc in the same st. Ch 3, sk 1, sc in next st. Repeat from * 4 more times, then ch 3 and sl st to the first sc. (6 sc, 6 ch-3 sps)
Rnd 3 (petals): Sl st into the first ch-3 sp. In each ch-3 sp, work (sc, hdc, 3 dc, hdc, sc). Sl st to the first sc. (6 petals, 42 sts)
Rnd 4: Sl st across the first sc, hdc and dc so you reach the center dc of the first petal. Ch 1, sc in that center dc. Ch 4, sc in the gap between this petal and the next one, ch 4, sc in the center dc of the next petal. Repeat from * around, leaving out the last sc. Sl st to the first sc. (12 sc, 12 ch-4 sps)
Rnd 5: Sl st into the first ch-4 sp. Ch 1, sc in the same sp. Ch 5, sc in next ch-4 sp. Repeat from * 10 more times, then ch 5 and sl st to the first sc. (12 sc, 12 ch-5 loops)
Fasten off and leave a 12 in (30.5 cm) tail for sewing. Check that the medallion is 1.75 in (4.4 cm) across. The ring of 12 loops frames the flower, just like the circle you see around the center of the finished mitten.
Mitten Body
Work in turned rows, starting at the bottom of the cuff.
Cuff Band
Row 1: Ch 26. Sc in the 2nd ch from the hook and in each ch across. Turn. (25 sc)
Row 2: Ch 3 (counts as a dc), then dc in each st across. Turn. (25 dc)
Row 3: Ch 3 (counts as a dc), then dc in each st across, working the last dc into the top of the tch. Turn. (25 dc)
Row 4: Ch 1, sc in each st across. Turn. (25 sc)
Checkpoint: The piece should be 2.5 in (6.4 cm) wide and 0.7 in (1.8 cm) tall.
Diamond Mesh
The mesh alternates between two kinds of rows. Odd rows are full-loop rows, and even rows are half-loop rows.
Row 5: Ch 1, sc in the first st. Ch 5, sk 3, sc in next st. Repeat from * 5 more times. Your sc’s land in sts 1, 5, 9, 13, 17, 21 and 25. Turn. (7 sc, 6 ch-5 loops)
Row 6: Ch 5 (counts as a dc plus ch 2), sc in the first loop. Ch 5, sc in next loop. Repeat from * 4 more times, then ch 2 and dc in the last sc. Turn. (5 ch-5 loops plus 2 half-loops)
Row 7: Ch 1, sc in the dc. Ch 5, sc in next ch-5 loop. Repeat from * 4 more times. Then ch 5 and sc in the 3rd ch of the tch. Turn. (7 sc, 6 ch-5 loops)
Rows 8–15: Repeat Rows 6 and 7 four more times. Row 15 is a full-loop row with 6 loops. Don’t turn yet.
Checkpoint: The mesh from Row 5 to Row 15 should be 3 in (7.6 cm) tall, and the body should be 3.7 in (9.4 cm) tall in total. The width should still be 2.5 in (6.4 cm).
Domed Top
Row 16 (conversion): Turn. Ch 1, sc in the first sc. 3 sc in next loop, sc in next sc. Repeat from * across. That’s 7 sc worked into the existing sc plus 18 sc worked into the loops. Turn. (25 sc)
Row 17: Ch 1, (sc2tog) twice, sc in the next 17 sts, (sc2tog) twice. Turn. (21 sc)
Row 18: Ch 1, (sc2tog) twice, sc in the next 13 sts, (sc2tog) twice. Turn. (17 sc)
Row 19 (fan): Ch 1, sc2tog, sc in the next 3 sts, sk 3, shell in the next st (the 9th st, which is the center), sk 3, sc in the next 3 sts, sc2tog. Turn. (17 sts: 8 sc plus a 9-dc fan)
Row 20: Ch 1, sc2tog, sc in the next 13 sts, sc2tog. (15 sc)
Fasten off.
Checkpoint: The body should be 4.4 in (11.2 cm) tall. Under the arch you’ll see the fan, which gives the top its rounded, scalloped-dome look.
Thumb
Decide which side will be the front. The medallion gets sewn to this side later. With the front facing you, find the row ends on the right-hand edge.
Thumb Row 1: Join the thread with a sl st at the end of Row 7. Ch 1, sc in the same row end, ch 5, sc in the end of Row 9, ch 5, sc in the end of Row 11. Turn. (3 sc, 2 ch-5 loops)
Thumb Row 2: Ch 5 (counts as a dc plus ch 2), sc in the first loop, ch 5, sc in the next loop, ch 2, dc in the last sc. Turn. (1 ch-5 loop plus 2 half-loops)
Thumb Row 3: Ch 1, sc in the dc, ch 5, sc in the ch-5 loop, ch 5, sc in the 3rd ch of the tch. Turn. (3 sc, 2 ch-5 loops)
Thumb Row 4 (conversion): Ch 1, sc in the first sc, 4 sc in the next loop, sc in the next sc, 4 sc in the next loop, sc in the last sc. That’s 3 sc worked into the existing sc plus 8 sc in the loops. (11 sc)
Fasten off.
Checkpoint: The thumb should stick out 0.8 in (2.0 cm), and the piece should be 3.3 in (8.4 cm) across the thumb.
Border
Border gauge: 10 sc = 1 in (2.5 cm) along every edge. Along the side edges, use these counts:
- 3 sc for each mesh row end
- 2 sc for each dc row end
- 1 sc for each sc row end
Border Rnd 1 (Outline)
Hold the piece with the front facing you. Join the thread at the bottom-left corner, working into the underside of the foundation chain.
- Bottom edge: 1 sc in each of the 25 foundation chs. (25 sc) Ch 1 for the corner. This chain is a turning space, not a stitch.
- Right side, Rows 1–6: 1 sc each for Rows 1 and 4, 2 sc each for Rows 2 and 3, and 3 sc each for Rows 5 and 6. (12 sc)
- Lower edge of the thumb: 3 sc in each of the ends of Thumb Rows 1–3 and 1 sc in the end of Thumb Row 4. (10 sc)
- Thumb tip: 1 sc in each st of Thumb Row 4. (11 sc)
- Upper edge of the thumb: Work it the same way as the lower edge. (10 sc)
- Right side, Rows 12–15: 3 sc for each row end. (12 sc)
- Right side, dome: 1 sc each for Rows 16, 17, 18 and 20, and 2 sc for Row 19. (6 sc)
- Right side total: 61 sc
- Top edge: 2 sc in the first st of Row 20, 1 sc in each of the next 13 sts, 2 sc in the last st. (17 sc)
- Left side, top to bottom: 6 sc on the dome, 33 sc across Rows 15–5, 4 sc for Rows 3–2, and 2 sc for Rows 4 and 1. (45 sc) Ch 1 for the corner.
Sl st to the first sc. (Total: 25 + 61 + 17 + 45 = 148 sc, plus 2 corner ch-1s)
Fasten off.
Border Row 2 (Scallops)
With the front facing you, join the thread in the first sc of the bottom edge (the bottom-right corner).
Ch 1, sc in the same st. Sk 2, shell in the next st, sk 2, sc in the next st. Repeat from * 3 more times. Turn. (4 shells, 5 sc = 41 sts)
Border Row 3 (Scallop Edging)
Ch 1, sc in the first sc. (Sc in the next dc, ch 2) 8 times, sc in the 9th dc of the shell, sc in the next sc. Repeat from * 3 more times. (41 sc, 32 ch-2 sps)
Fasten off.
Why the Math Works
The scallop repeat uses 6 stitches (sk 2, shell, sk 2, sc), and you need 1 extra sc at the start. 4 × 6 + 1 = 25, which exactly matches the 25 sc on the bottom edge. That’s why the bottom corners are ch-1 spaces and not extra stitches. Extra stitches there would leave the scallops off-center.
Each mesh row is about 0.27 in (0.7 cm) tall. Three sc per mesh row end comes out to roughly 11 sc per inch, which is close enough to 10 sc/in to keep the side edges flat without ruffling. The top edge gets 15 + 2 = 17 sc, and the extra 2 sc round off the shoulders of the dome.
Hanging Loop
Count the 17 top sc of Border Rnd 1 and find the 9th one, the center. Join the thread there. Ch 25, then sl st into the same st. Work 36 sc over the chain loop, then sl st into the base.
Fasten off. The loop should be about 1 in (2.5 cm) tall.
Attach the Medallion
Center the medallion on the front of the mesh, around Row 10, so that it sits about the same distance from both side edges. Using the tail, tack the tip of each of the 12 ch-5 loops to the closest mesh sc. Keep the medallion flat, not puckered.
Final Blocking
- Weave in all ends through the solid sc and dc areas, not the mesh.
- Soak the ornament in cool water, then press it gently in a towel until it’s damp.
- Pin it to the board, starting with the cuff band. It should be 2.7 in (6.9 cm) wide including the outline.
- Stretch the mesh upward until the body measures 5 in (12.7 cm) from the scallop tips to the top of the dome.
- Pin each mesh loop open so the diamonds look even.
- Pin the thumb out to the side, angled slightly upward. The piece should be 3.5 in (8.9 cm) across.
- Pin each scallop into a rounded fan, opening every ch-2 space. The scallop edge should flare to about 2.9 in (7.4 cm).
- Spray with starch or stiffener and let it dry completely before you unpin it.
Final Quality-Control Checklist
- The medallion is 1.75 in (4.4 cm) across and has 6 even petals and 12 loops.
- The body has 25 sts at the cuff, 6 loops on each full-loop row and 15 sts on Row 20.
- The fan on Row 19 sits exactly at the center.
- Border Rnd 1 has 148 sc: bottom 25, right 61, top 17, left 45.
- There are 4 scallops, each with 8 ch-2 sps.
- The loop is centered on the dome.
- The finished size is 2.7 × 5 in (6.9 × 12.7 cm), and 3.5 in (8.9 cm) across the thumb.
Troubleshooting
- The mesh leans to one side: Make sure every half-loop row starts with ch 5 and ends with ch 2 and a dc.
- The sides ruffle: Drop to 2 sc on every other mesh row end.
- The sides cup inward: Your chains are too tight. Loosen your ch-5s, or use a larger hook for the mesh only.
- The scallops are off-center: Recount the bottom edge. It has to be exactly 25 sc.
- The medallion buckles: Retack it with looser stitches and block it flat first.
- The thumb droops: Use more stiffener on the thumb, and pin it angled upward while it dries.
Care
Hand wash in cool water with mild soap, press out the water in a towel, and reshape it flat. Re-starch the ornament if it softens after storage.
Final Notes
The measurement chain goes like this:
- The medallion is 1.75 in (4.4 cm) across.
- The cuff is 25 sts and 2.5 in (6.4 cm) wide.
- The mesh is 3 in (7.6 cm) tall.
- The body is 4.4 in (11.2 cm) tall before the border.
- The border round has 148 sc.
- The 4 scallops fit exactly into the 25 bottom stitches.
- The finished ornament is 5 in (12.7 cm) tall and 2.7 in (6.9 cm) wide, 3.5 in (8.9 cm) across the thumb.
If every checkpoint matches, the finished mitten will hang flat and even on your tree.
Happy crocheting!