

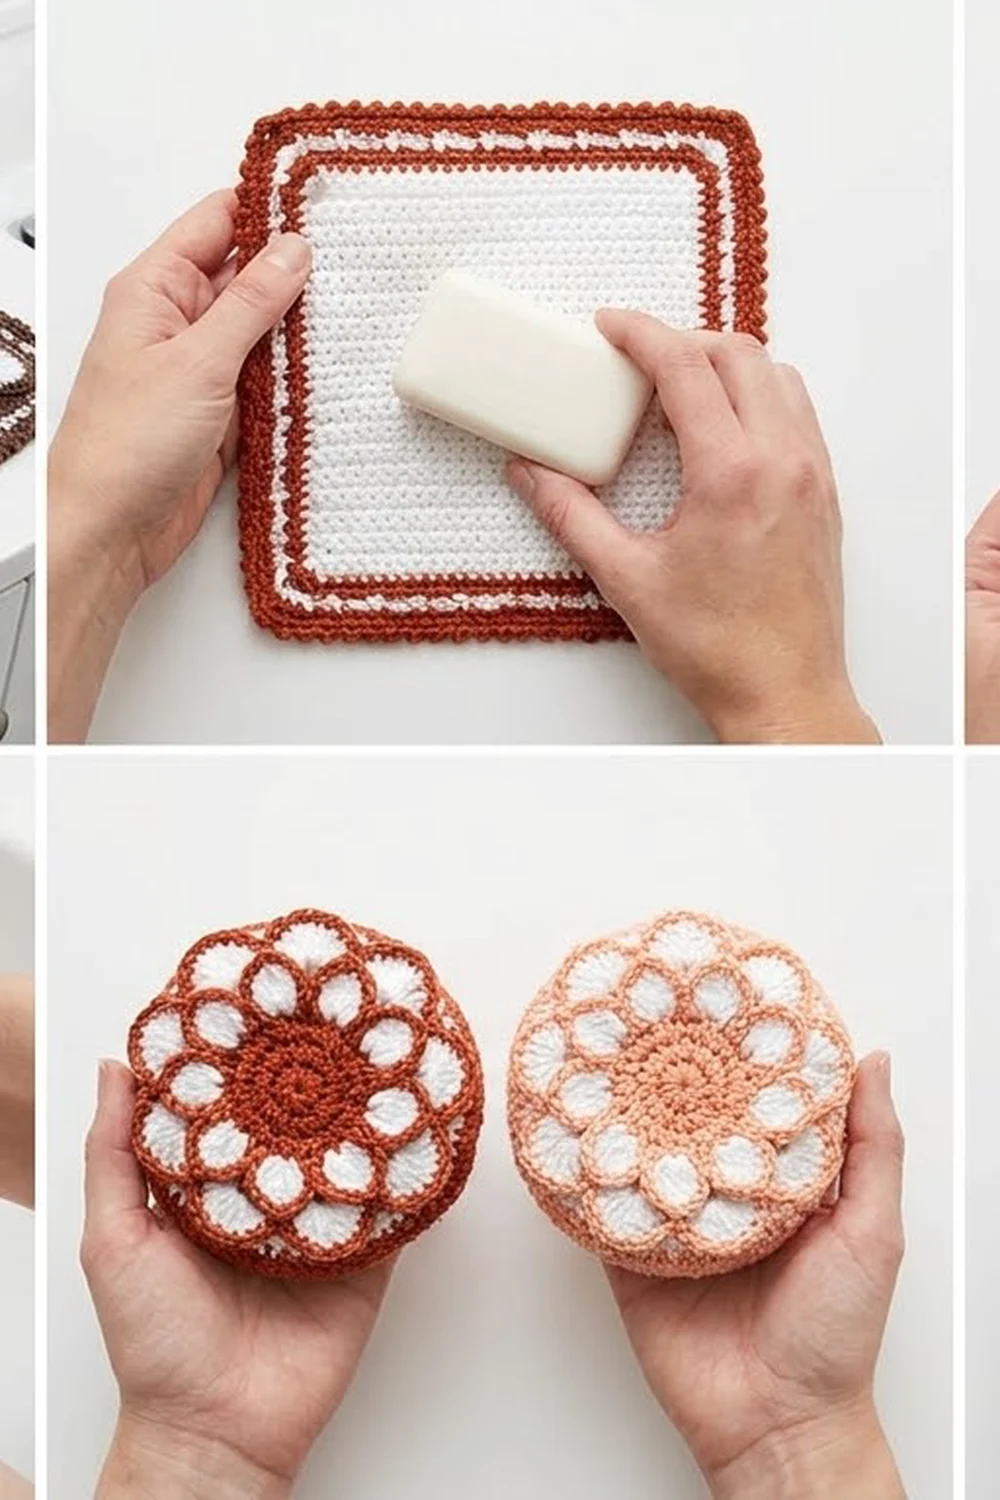
The Petal Bloom Soap Saver is a single flat square of crochet. The front is covered in rows of raised, fan-shaped petals, and each petal is outlined in a contrast color. The back is plain, firm single crochet.
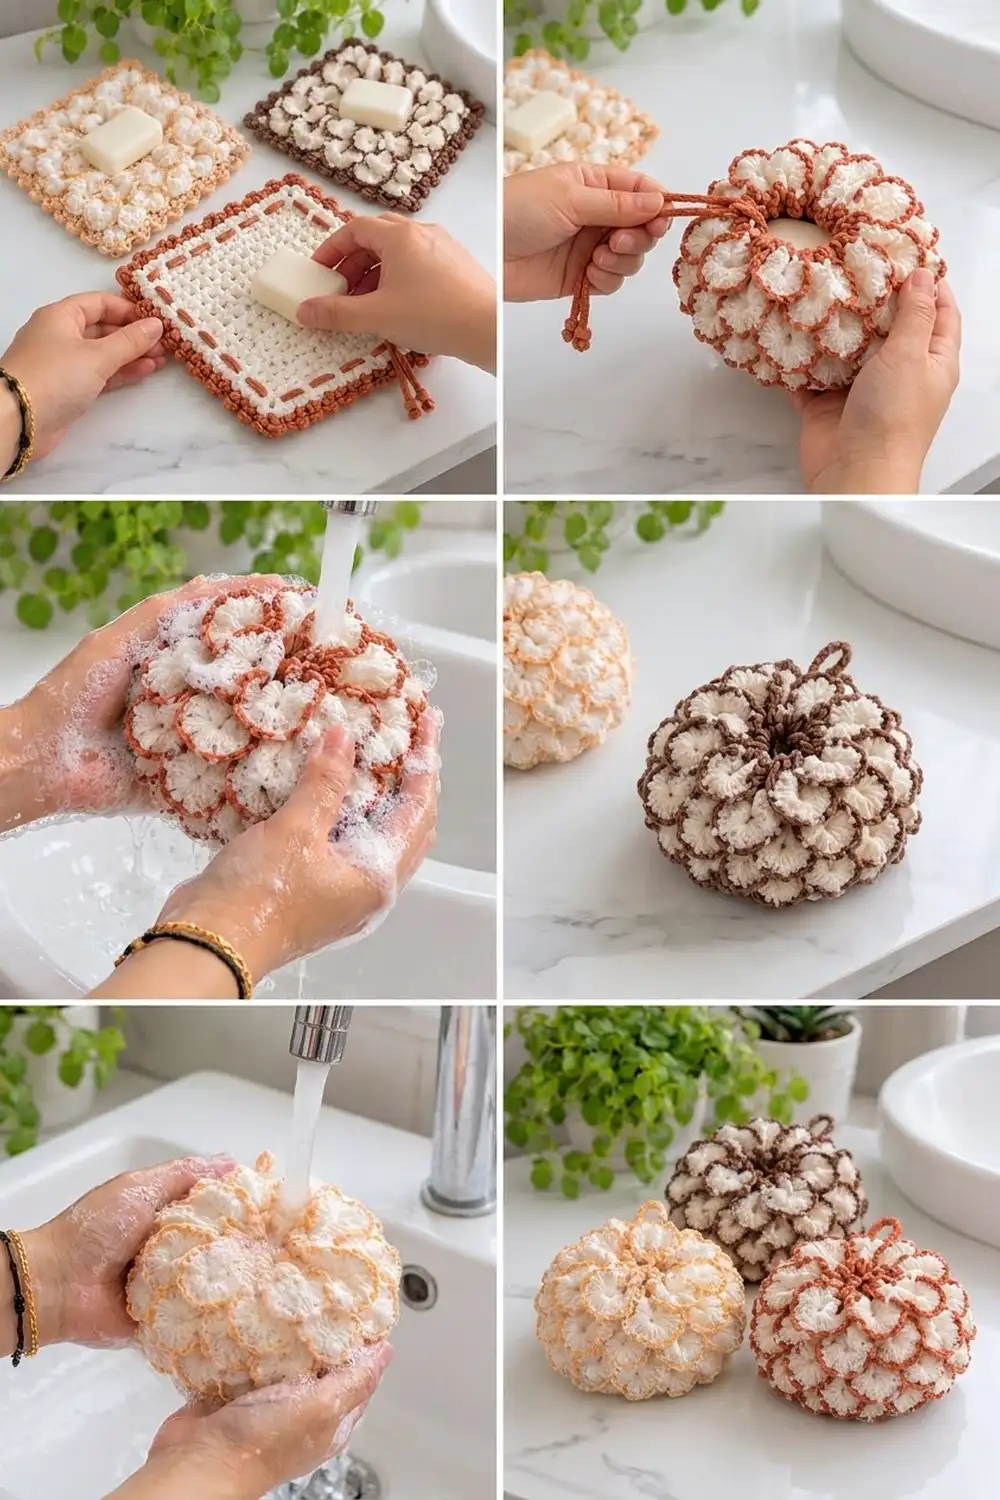
A cord runs through an eyelet round near the edge. When you pull it, the square closes around a bar of soap and becomes a round, fluffy scrubbing pouch. When you open it again, it lies flat as a soap mat.
The sample uses creamy white for the base and petals, with rust for the petal outlines, the border, and the drawstring. Peach or chocolate brown also work well as the contrast color. The style is soft and textured, with a neat, bumpy corded edge. This pattern uses US crochet terms.
Lying flat, the finished square measures 8.7 in x 8.7 in (22.1 cm x 22.1 cm). Pulled closed around a standard bar of soap, it makes a pouch about 4 in (10.2 cm) across.
Construction is simple:
- Work a white single crochet square in rows.
- Every fifth row, work a row of petals into the front loops only, then outline the petals in rust.
- Add a 4-round rust border that includes an eyelet round.
- Make a chain-cord drawstring and weave it through the eyelets.
Finished Size and Construction
- Finished size: 8.7 in x 8.7 in (22.1 cm x 22.1 cm), laid flat
- Skill level: Intermediate
- Terminology: US crochet terms
- Yarn weight: DK / light (#3) cotton
- Hook: 4.0 mm (US G-6)
- Number of pieces: 1 square plus 1 drawstring cord
- Layout: single piece, no joining
- Piece size before border: 6.9 in x 6.9 in (17.5 cm x 17.5 cm), which is 31 sts x 31 rows
- Border depth: 0.9 in (2.3 cm) on each side
- Petal rows: 6, staggered, 41 sts each
Materials
Use 100% cotton or a cotton blend that holds up to soap and hot water. Do not use acrylic. It doesn’t absorb water and won’t hold the petal shape after washing.
Mercerized cotton gives crisp, shiny petals. Soft, unmercerized cotton gives a fluffier, more absorbent scrub. The amounts below assume a DK cotton of about 115 m per 50 g.
- Color A (white / cream): 35 g, about 80 m
- Color B (rust): 25 g, about 58 m. Peach or chocolate brown use the same amount.
- 4.0 mm (US G-6) crochet hook
- Tapestry needle
- Scissors
- 2 removable stitch markers
- Tape measure or ruler
- Blocking pins and a foam mat or folded towel
Both quantities include a margin of about 15% for your gauge swatch and for weaving in ends.
Abbreviations (US Terms)
- ch – chain
- sl st – slip stitch
- sc – single crochet
- dc – double crochet
- rev sc – reverse single crochet (crab stitch)
- FLO – front loop only
- st(s) – stitch(es)
- sp(s) – space(s)
- RS / WS – right side / wrong side
- [ ] x N – repeat the bracketed steps N times
Special stitch: Petal. Work 7 dc into the front loop of a single stitch. Because the dc all come from one loop, they fan out and stand up from the fabric like a scallop.
Reverse sc. Work from left to right. Insert the hook into the next stitch to the right, yarn over, and pull up a loop. Yarn over and draw through both loops on the hook.
Gauge and Checkpoints
Gauge: 18 sc and 18 rows = 4 in (10.2 cm) in plain sc rows with Color A.
This item is one piece, but test your gauge before you start. Chain 21 and work 20 rows of sc, then measure the center 4 in (10.2 cm). The square is built from this number, so gauge controls both the finished size and how much the petals overlap.
Checkpoints. Measure the flat base, not the petals:
- After Row 11: 2.4 in (6.1 cm) tall
- After Row 21: 4.7 in (11.9 cm) tall
- After Row 31: 6.9 in x 6.9 in (17.5 cm x 17.5 cm)
- After Border Rnd 1: 7.3 in (18.5 cm) per side
- After Border Rnd 2: 8.2 in (20.8 cm) per side
- After Border Rnd 3: 8.7 in (22.1 cm) per side
If your piece is too big, switch to a 3.75 mm (F-5) hook. If it’s too small, switch to a 4.5 mm (US 7) hook. Don’t change any stitch counts. If only your row gauge is off, a slightly rectangular square still gathers well, but the petals will sit a little closer together or farther apart.
Main Pattern: The Square
With Color A, ch 32.
Row 1 (RS): Sc in 2nd ch from hook and in each ch across. (31 sc)
Row 2 (WS, carrier row): Ch 1, turn, sc in each st across. (31 sc)
Petal Row A (5 full petals)
Turn so the RS faces you. Work only into the front loops of the carrier row you just made. This makes the petals stand up from the RS and leaves the back loops free for the next base row.
Petal Row A: Sl st in FLO of first st, [skip 2 sts, 7 dc in FLO of next st, skip 2 sts, sl st in FLO of next st] x 5.
Count: 5 petals, made of 35 dc + 6 sl st = 41 sts. This row uses all 31 sts of the carrier row: 1 + (5 x 6) = 31.
Slip the Color A loop onto a removable marker. Do not cut the yarn.
Rust outline A: With the RS facing, join Color B with a sl st in the first sl st at the right-hand edge. [Sc in each of next 7 dc, sl st in next sl st] x 5. Fasten off, leaving a 4 in (10.2 cm) tail.
Count: 35 sc + 6 sl st = 41 sts.
The rust sc follow the curved top of each fan, so every petal gets its own outline.
Continue the Base
Put the Color A loop back on your hook. Fold the petals toward you so they’re out of the way. Gently pull the working loop down behind the last petal.
Row 3 (WS): Ch 1, turn, sc in the unused back loop of each st of Row 2. (31 sc)
Rows 4–6: Ch 1, turn, sc in each st across. (31 sc each row)
Row 7 (WS, carrier row): Ch 1, turn, sc in each st across. (31 sc)
Petal Row B (4 full petals + 2 half petals, staggered)
Turn so the RS faces you. Work in the front loops of Row 7.
Petal Row B: Ch 3 (counts as dc), 3 dc in FLO of first st, skip 2 sts, sl st in FLO of next st, [skip 2 sts, 7 dc in FLO of next st, skip 2 sts, sl st in FLO of next st] x 4, skip 2 sts, 4 dc in FLO of last st.
Count: 4 full petals and 2 half petals, made of 36 dc + 5 sl st = 41 sts.
Stitch check: 4 sts at the start (1 + 2 + 1), 24 sts in the repeats (4 x 6), and 3 sts at the end (2 + 1). 4 + 24 + 3 = 31.
Each full petal in this row sits above a sl st from Row A. That offset gives the staggered, scale-like layout.
Place the Color A loop on a marker.
Rust outline B: With the RS facing, join Color B in the top of the ch-3. Sc in same st and in each of next 3 dc, sl st in next sl st, [sc in each of next 7 dc, sl st in next sl st] x 4, sc in each of last 4 dc. Fasten off.
Count: 36 sc + 5 sl st = 41 sts.
Row 8 (WS): With Color A, ch 1, turn, sc in the unused back loop of each st of Row 7. (31 sc)
Rows 9–11: Ch 1, turn, sc in each st across. (31 sc each row)
Checkpoint: the base is 2.4 in (6.1 cm) tall.
Repeat the Sequence
Row 12 (WS, carrier): Ch 1, turn, sc across. (31 sc) Then work Petal Row A and Rust outline A.
Row 13: Sc in the unused back loops of Row 12. Rows 14–16: Sc across. (31 sc each row)
Row 17 (WS, carrier): Sc across. Then work Petal Row B and Rust outline B.
Row 18: Sc in the unused back loops of Row 17. Rows 19–21: Sc across. (31 sc each row)
Checkpoint: the base is 4.7 in (11.9 cm) tall.
Row 22 (WS, carrier): Sc across. Then work Petal Row A and Rust outline A.
Row 23: Sc in the unused back loops of Row 22. Rows 24–26: Sc across. (31 sc each row)
Row 27 (WS, carrier): Sc across. Then work Petal Row B and Rust outline B.
Row 28: Sc in the unused back loops of Row 27. Rows 29–31: Sc across. (31 sc each row)
Fasten off Color A.
The square now has 6 petal rows and measures 6.9 in x 6.9 in (17.5 cm x 17.5 cm). Each petal row leans upward and covers about 4 base rows above it, so very little plain fabric shows on the RS.
Before you start the border, weave all the rust outline ends into the WS. Run each tail behind its own petal row so it doesn’t show between the petals.
Border
Border gauge: The border keeps the same 18 sc = 4 in (10.2 cm). Each sc round adds about 0.2 in (0.5 cm) per side. The dc eyelet round adds about 0.45 in (1.1 cm) per side.
Each edge of the square has 31 positions, with a corner at each end:
- Top: 31 sts
- Bottom: 31 foundation chains
- Each side: 31 row ends
Rnd 1 (RS): Join Color B in any corner. Work 3 sc in each corner position. Between corners, work 29 sc along each side, 1 sc in each st or row end. Join with sl st to first sc.
Total: 4 x 29 = 116 side sc + 4 x 3 = 12 corner sc = 128 sc.
Counting from one corner center to the next, each side has 31 sc (1 + 29 + 1). That matches the 31 sts of the square.
Rnd 2 (eyelet round): Sl st to the next corner center sc. Ch 5 (counts as dc + ch 2), dc in same st. *[Ch 1, skip 1 st, dc in next st] x 15, ch 1, skip 1 st, (dc, ch 2, dc) in corner center sc; repeat from * around. On the last side, end with ch 1, skip 1 st. Join with sl st to 3rd ch of beginning ch-5.
Per side, the 31 sts between corner centers become 15 dc and 16 ch-1 sps (31 = 15 + 16).
Totals:
– 60 side dc + 8 corner dc = 68 dc
– 64 ch-1 sps
– 4 ch-2 corner sps
Rnd 3: Ch 1. Work 3 sc in each ch-2 corner sp. Along each side, sc in each dc and in each ch-1 sp. Join.
Per side between corner groups: 1 corner dc + 16 ch-1 sps + 15 dc + 1 corner dc = 33 sc.
Total: 4 x 33 = 132 side sc + 4 x 3 = 12 corner sc = 144 sc.
Rnd 4: Ch 1, rev sc in each st around. Join and fasten off. (144 rev sc)
Why the math works. At Rnd 3, the edge is about 8.4 in (21.3 cm) long, measured along the middle of the round. At 4.5 sts per inch, that length needs about 38 sts. Counting from one corner center to the next, Rnd 3 has 37 sts (1 + 1 + 33 + 1 + 1). That’s close enough to lie flat without cupping or rippling. The 3-sc corners add the 2 extra sts per side that each new round needs. The eyelet round is a 1-to-1 conversion, with no stitches added or lost along the sides.
Drawstring
Hold Color B double and ch 170. Sl st in the back bump of each ch, then fasten off. The cord should measure about 42 in (106.7 cm).
Start with the RS facing, at the middle of the bottom edge, between the 8th and 9th ch-1 sps. Weave the cord over and under through every ch-1 sp of Rnd 2 and through each corner ch-2 sp. Bring both ends out on the RS, leaving about 6 in (15.2 cm) of cord free on each end.
On the WS, the cord shows as a row of neat rust dashes just inside the border.
Tie a tight overhand knot about 0.5 in (1.3 cm) from each cord end. Tie a second knot right next to it so the end looks beaded. Trim any excess cord.
To use: Lay the square WS up and set a bar of soap in the center. Pull both cord ends to gather the edges into a ball. The petals end up on the outside. Tie a bow, or knot the ends together to make a hanging loop.
Final Blocking
- Weave in all remaining ends on the WS.
- Soak the square in lukewarm water for 10 minutes. Press the water out gently. Do not wring it.
- Roll it in a dry towel to remove more water.
- Lay it WS down on the mat. Pin one corner first, then the opposite corner, and pin out to 8.7 in x 8.7 in (22.1 cm x 22.1 cm).
- Straighten the border so each side is a straight line, with pins about every 2 in (5.1 cm).
- Lift each petal with your fingertip so it stands up and leans upward. Line up the rust outlines in neat rows.
- Let it dry completely, then remove the pins. Do this before you weave in the drawstring if you prefer.
Final Quality-Control Checklist
- Every base row has 31 sc.
- There are 6 petal rows, alternating A, B, A, B, A, B.
- Every petal row and every rust outline has 41 sts.
- The petals stand up on the RS, and the back is smooth and has no holes.
- Border Rnd 1 has 128 sc, Rnd 3 has 144 sc, and Rnd 4 has 144 rev sc.
- All 64 ch-1 eyelets and 4 corner spaces have the cord woven through them.
- The square measures 8.7 in (22.1 cm) on all four sides.
- Both cord ends are double-knotted and won’t slip.
Troubleshooting
Petals lie flat instead of standing up. You worked into both loops. Use only the front loop of the carrier row.
Holes or gaps behind the petals. You skipped some back loops in the row after a petal row. Each of those 31 loops needs a sc.
The square pulls in at the petal rows. Your rust outline is too tight. Use a hook 0.5 mm larger for the outlines only.
The petal rows don’t stagger. Check that every Petal Row B starts with a half petal.
The border ripples. Check that Rnd 3 has 33 sc per side, with only 1 sc in each ch-1 sp.
The border cups. Check that each corner of Rnd 1 and Rnd 3 has 3 sc.
The pouch won’t close fully. The cord is too thick for the eyelets. Remake it with a single strand of Color B and 170 ch.
Care
Rinse the soap saver after each use and hang it by the cord to dry. Machine wash warm in a laundry bag, then lay flat or tumble dry low.
Final Notes
The finished size depends on this chain of measurements:
- A gauge of 18 sc = 4 in (10.2 cm)
- A 31-st x 31-row base of 6.9 in (17.5 cm)
- 6 staggered petal rows of 41 sts each
- A 4-round border (128 sc, an eyelet round of 68 dc and 64 ch-1 sps, 144 sc, and 144 rev sc) that adds 0.9 in (2.3 cm) per side
- A finished 8.7 in (22.1 cm) square, pulled closed by a 42 in (106.7 cm) cord
Check your gauge, count each petal row, and the bloom will gather evenly every time.
Happy crocheting!