

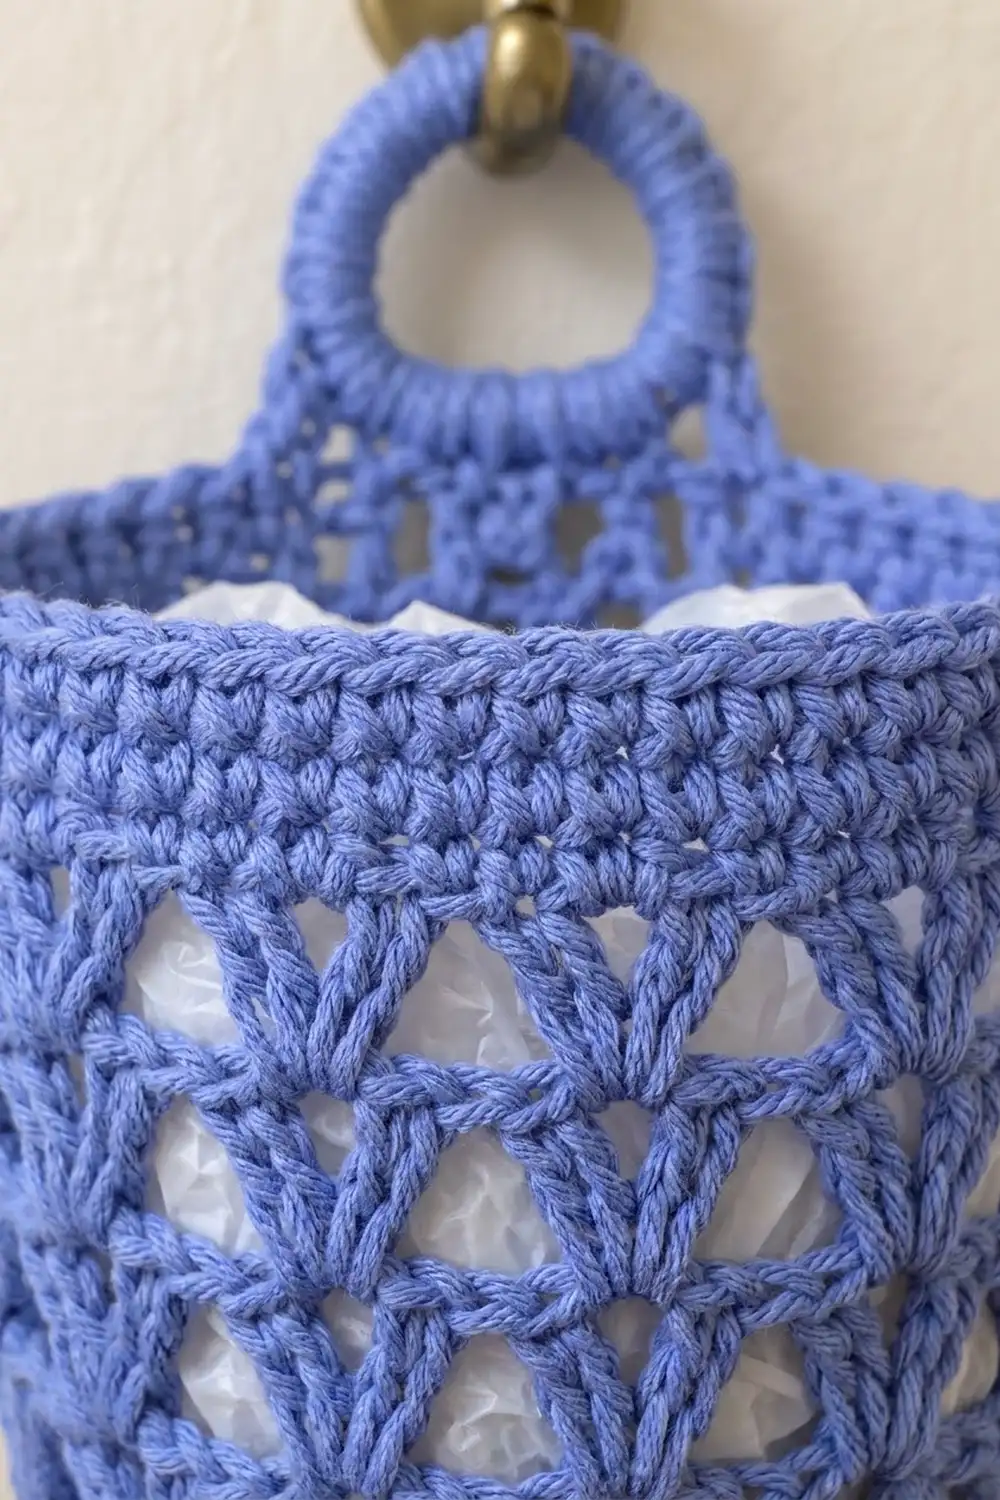
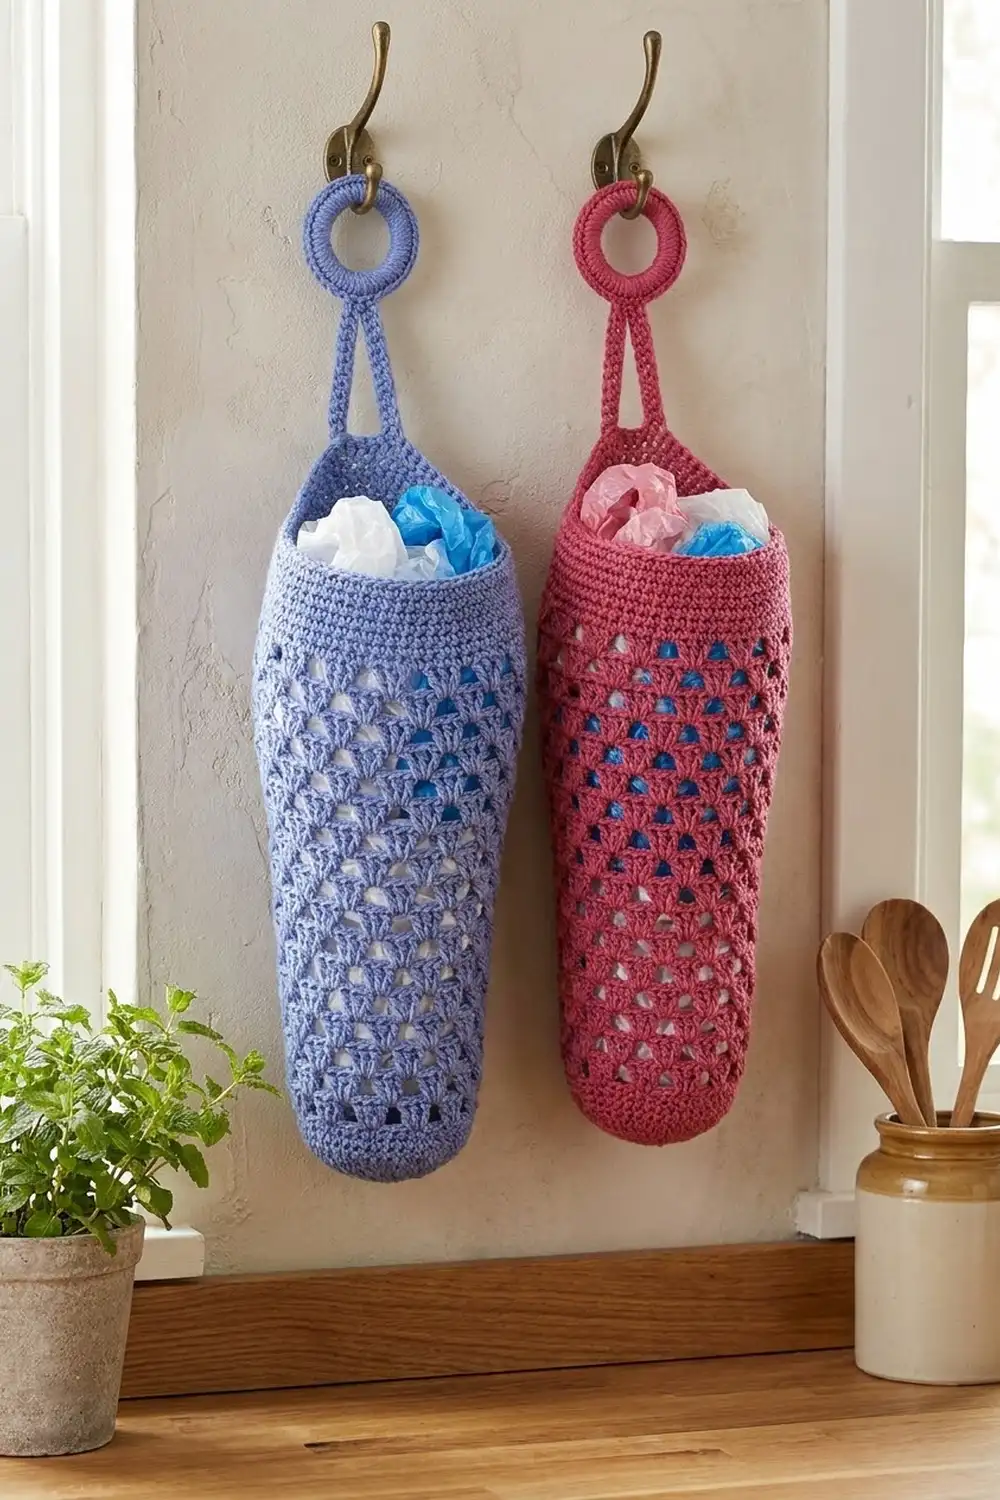
This holder is an upside-down cone with an airy V-stitch lattice. You stuff used grocery bags in at the wide top and pull them out one at a time from the narrow opening at the bottom. Because the lattice is open, you can see at a glance when the holder needs refilling.
The sample is periwinkle blue, and a second one in raspberry pink shows how well the design works in bold colors. Solid sc bands at the top rim and bottom opening keep both edges firm. A crochet-covered ring at the back lets the holder hang on a hook or knob.
The pattern uses US crochet terms. The finished holder is about 8 in (20.3 cm) wide across the flattened rim, 3 in (7.6 cm) wide at the flattened bottom opening, and 11 in (27.9 cm) tall, plus the hanger.
You work the whole holder in one piece, from the bottom up. Start with a narrow sc band, then work 15 rounds of V-stitches with gradual increases to form the cone. Finish with a wider sc rim band, then work a short strap that wraps around a covered ring.
Finished Size and Construction
- Finished size: 8 in (20.3 cm) wide at the top (flattened) × 11 in (27.9 cm) tall
- Bottom opening: 3 in (7.6 cm) wide flattened, 6 in (15.2 cm) around
- Top rim: 16 in (40.6 cm) around
- Skill level: Advanced beginner
- Terminology: US
- Yarn weight: Worsted (#4), cotton or cotton blend
- Hook: 5.0 mm (H-8)
- Number of pieces: 1 (the cone body with an integrated strap; the ring is enclosed in the strap)
- Layout: Worked in joined rounds from the bottom opening up
- Size before the rim band: 8 in (20.3 cm) wide × 10 in (25.4 cm) tall
- Rim band depth: 1 in (2.5 cm), 4 rounds of sc
Materials
Yarn: Use a smooth worsted-weight cotton or cotton blend. Cotton holds the cone shape better than soft acrylic and stands up to the crinkly plastic. Avoid fuzzy yarns, because the V-stitch lattice looks best with clear stitch definition.
- Periwinkle blue (main sample): 120 g, about 200 m (219 yd)
- Raspberry pink (optional second holder): 120 g, about 200 m (219 yd)
These quantities include a margin of about 20 percent for your gauge swatch and small differences in tension.
Tools:
- 5.0 mm (H-8) crochet hook
- One metal or plastic ring, 2 in (5.1 cm) outer diameter
- 4 stitch markers
- Tapestry needle
- Scissors
- Measuring tape
- Spray bottle and pins for blocking
Abbreviations (US Terms)
- ch: chain
- sl st: slip stitch
- sc: single crochet
- dc: double crochet
- sp: space
- sk: skip
- st(s): stitch(es)
- rep: repeat
- Rnd: round
Special stitches
- V-st (V-stitch): (dc, ch 1, dc) in the stitch or space indicated.
- Repeat: one V-st followed by ch 1, which is 4 stitches in total (dc, ch, dc, ch). Each repeat measures 1 in (2.5 cm) around.
- Inc-rep (increase repeat): V-st in the ch-1 sp of the next V below, ch 1, then V-st in the separator ch-1 sp right after that V, ch 1. This turns 1 repeat into 2.
Gauge and Checkpoints
Gauge:
- Single crochet: 16 sc and 16 sc rounds = 4 in (10.2 cm)
- V-stitch: 4 repeats = 4 in (10.2 cm) across, and 5 V-st rounds = 3 in (7.6 cm) tall, so each V-st round is 0.6 in (1.5 cm)
Test first. Work the bottom band and the first 5 V-st rounds, then measure before you go on. Gauge controls the finished size directly: every repeat adds 1 in (2.5 cm) of circumference.
Checkpoints (measure lightly flattened):
| Stage | Height | Flat width |
|---|---|---|
| After the bottom band | 1 in (2.5 cm) | 3 in (7.6 cm) |
| After V-Rnd 5 | 4 in (10.2 cm) | 4.5 in (11.4 cm) |
| After V-Rnd 10 | 7 in (17.8 cm) | 6 in (15.2 cm) |
| After V-Rnd 15 | 10 in (25.4 cm) | 8 in (20.3 cm) |
| Finished | 11 in (27.9 cm) | 8 in (20.3 cm) |
If your work is too big, go down a hook size, to 4.5 mm (7). If it’s too small, go up to 5.5 mm (I-9). Don’t change the stitch counts, because the increase sequence is built for 1 in (2.5 cm) per repeat.
Pattern
Bottom Band
- Ch 24 and join with a sl st to the first ch to form a ring. Make sure the chain is not twisted.
- Rnd 1: Ch 1, sc in each ch around, then join with a sl st to the first sc. (24 sc)
- Rnds 2–4: Ch 1, sc in each sc around, then join. (24 sc)
Checkpoint: The band measures 3 in (7.6 cm) wide flattened, 6 in (15.2 cm) around, and 1 in (2.5 cm) tall. This band is the bottom opening.
Cone Body (V-Stitch Lattice)
V-Rnd 1 (set-up):
- Ch 4 (counts as the first dc + ch 1), then dc in the same st. This is the first V.
- Ch 1, sk 3 sc.
- V-st in the next sc, ch 1, sk 3 sc. Rep from * 4 more times.
- Join with a sl st to the 3rd ch of the beginning ch-4.
Count: 6 repeats, which is 6 × 4 = 24 sts, matching the 24 sc below.
Plain round (no increase):
- Sl st into the ch-1 sp of the first V.
- Ch 4 (counts as dc + ch 1), then dc in the same sp, ch 1.
- V-st in the ch-1 sp of the next V, ch 1. Rep from * around.
- Join to the 3rd ch of the beginning ch-4.
Each new V sits directly in the center of the V below, so the columns stack into the lattice. The ch-1 separators leave the open gaps.
Increase round: Work the same way as a plain round, but replace one regular repeat with an inc-rep. Place each new increase about one-third of the way around from the previous one so the increases spiral and the cone stays even. Put a marker on each new V so you can track where the increases fall.
Each round’s count is that round’s own total number of repeats:
| Rnd | Type | Repeats | Sts |
|---|---|---|---|
| V-Rnd 2 | increase | 7 | 28 |
| V-Rnd 3 | increase | 8 | 32 |
| V-Rnd 4 | plain | 8 | 32 |
| V-Rnd 5 | increase | 9 | 36 |
| V-Rnd 6 | increase | 10 | 40 |
| V-Rnd 7 | plain | 10 | 40 |
| V-Rnd 8 | increase | 11 | 44 |
| V-Rnd 9 | increase | 12 | 48 |
| V-Rnd 10 | plain | 12 | 48 |
| V-Rnd 11 | increase | 13 | 52 |
| V-Rnd 12 | increase | 14 | 56 |
| V-Rnd 13 | plain | 14 | 56 |
| V-Rnd 14 | increase | 15 | 60 |
| V-Rnd 15 | increase | 16 | 64 |
That is 10 increase rounds, each adding 1 repeat, so the count grows from 6 to 16 repeats. The steady two-increases, one-plain rhythm gives the straight, even taper you see in the photo.
Checkpoint after V-Rnd 15: The cone measures 16 in (40.6 cm) around, 8 in (20.3 cm) wide flattened, and 10 in (25.4 cm) tall from the bottom edge.
Border (Top Rim Band)
Border gauge: 16 sc = 4 in (10.2 cm). The rim band uses the same sc gauge as the bottom band.
Rnd T1 (conversion round):
- Ch 1. For each repeat, sc in the first dc of the V, sc in the V’s ch-1 sp, sc in the second dc, and sc in the separator ch-1 sp.
- Join with a sl st to the first sc.
Count: 16 repeats × 4 sc = 64 sc, which is 32 sc per side when you flatten the cone. You work 1 sc into each existing stitch or space and add 0 extra stitches.
Rnds T2–T4: Ch 1, sc in each sc around, then join. (64 sc; 32 per side) Fasten off after Rnd T4 and weave in the end.
Why the math works: V-Rnd 15 has 64 stitches, made up of 32 dc and 32 ch-1 spaces. Working one sc into each gives exactly 64 sc. At 16 sc per 4 in (10.2 cm), 64 sc measures 16 in (40.6 cm) around, the same as the V-stitch round below. The rim lies flat with no flare and no pulling in.
Checkpoint: The holder is now 11 in (27.9 cm) tall and 8 in (20.3 cm) wide flattened.
Covered Ring
- Make a slip knot on the hook.
- Working over the 2 in (5.1 cm) ring, work 40 sc around it, pushing the stitches together so no ring shows.
- Join with a sl st to the first sc, then fasten off and weave in the ends.
Hanging Strap
- Flatten the cone with the beginning-of-round join at one side.
- Find the center 6 sc of the back side, which are sts 14–19 of that side’s 32 sc. Mark them.
- Row 1: Join the yarn in the first marked sc of Rnd T4. Ch 1, then sc in each of the 6 marked sts. (6 sc)
- Rows 2–8: Ch 1, turn, sc in each sc across. (6 sc)
The strap is now 2 in (5.1 cm) long.
Attach the ring:
- Pass the strap through the covered ring from front to back.
- Fold the strap down against the inside of the rim.
- Whipstitch Row 8 to the inside of Rnd T2, catching only the back loops so the stitches don’t show on the outside.
This leaves a short double-layer neck about 0.75 in (1.9 cm) tall, with the ring standing above the rim.
Final Blocking
- Weave in all the ends along the sc bands, where they hide best.
- Lightly spray the whole holder with water until it is damp, not soaked.
- Stuff the cone firmly with plastic bags or a rolled towel so it holds its round shape.
- Pat the V-stitch columns so they run straight up from the bottom to the rim.
- Shape the rim into a smooth circle 16 in (40.6 cm) around. The cone should measure 8 in (20.3 cm) when flattened.
- Pin the strap flat so the ring sits upright.
- Let it dry completely, then remove the stuffing.
Final Quality-Control Checklist
- The bottom opening measures 3 in (7.6 cm) flattened, firm but stretchy enough to pull a bag through.
- V-Rnd 15 has 16 repeats, and Rnd T1 has 64 sc.
- The V columns stack straight, and any twist from the increases is minimal.
- The rim measures 8 in (20.3 cm) flattened and lies flat with no ruffling.
- The total height is 11 in (27.9 cm).
- The ring is fully covered and the strap is centered on the back.
- All the ends are woven in securely.
Troubleshooting
- The cone flares or ruffles: Your increases are bunched together. Spread them about one-third of the way around from the previous increase, or go down a hook size.
- The bottom opening is too tight: Make the foundation chain loosely, or work it with a hook one size larger.
- The rim waves: Check for 64 sc in Rnd T1. If the count is right, your sc is looser than gauge, so redo the band one hook size smaller.
- The V columns lean: Work into the center ch-1 sp of each V, not into the separator spaces, except on an inc-rep.
- The hanger sags: Add 1–2 rows to the strap and refold it with a tighter wrap around the ring, or sew it through both layers.
Care
Hand wash in cool water, reshape the holder while it’s damp, and dry it flat or stuffed. Cotton holders can go in a laundry bag on the gentle cycle if needed.
Final Notes
The whole design runs on one measurement chain:
- 4 sts per repeat, and each repeat is 1 in (2.5 cm).
- The cone starts at 24 sts, or 6 in (15.2 cm) around.
- It grows to 64 sts, or 16 in (40.6 cm) around.
- The rim band converts those 64 sts into 64 sc, 32 per side and 8 in (20.3 cm) flattened.
- The finished height is 11 in (27.9 cm).
If you check your gauge at the first checkpoint, everything else follows. Make one in each kitchen color and you’ll never hunt for a spare bag again.
Happy crocheting!