

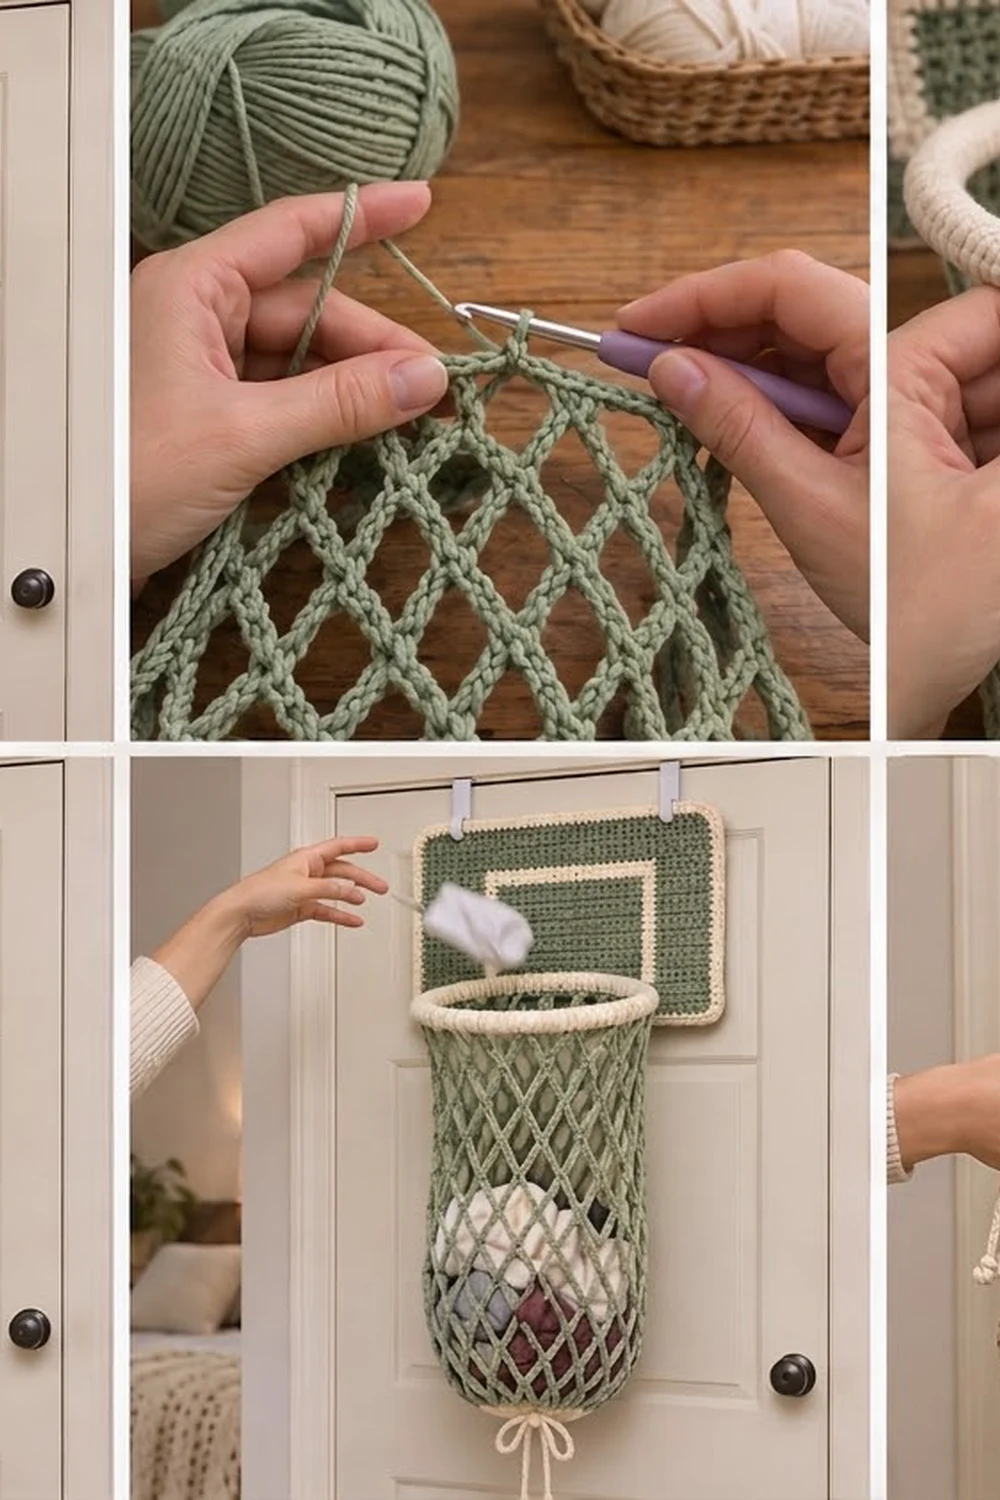
Turn laundry day into a game with this over-the-door basketball hoop hamper. A sage-green backboard with a cream border and target square holds a cream-wrapped rim, and a long diamond-mesh net hangs below to catch socks, tees and towels.
The colors are calm on purpose: soft sage and warm cream, so it fits a bedroom or nursery instead of looking like sports gear. The bottom of the net closes with a cream drawstring cuff and a scalloped ruffle. When the net is full, untie the bow and the laundry drops straight into your basket.
This pattern uses US crochet terms. The finished backboard measures 18 x 12 in (45.7 x 30.5 cm). The rim is 10 in (25.4 cm) across, and the net hangs about 24 in (61.0 cm) from the top of the rim to the scalloped edge.
Construction is simple. You crochet the backboard flat in rows, surface-stitch the target square and add a cream border. Next you cover a metal ring with single crochet and work the net in a continuous spiral straight off the ring, so there’s no seam. You finish with the cuff, a drawstring and a few sewn joins.
Finished Size and Construction
- Finished backboard: 18 x 12 in (45.7 x 30.5 cm)
- Backboard before border: 16 x 10 in (40.6 x 25.4 cm)
- Border depth: 1 in (2.5 cm) per side, 4 rounds
- Rim: 10 in (25.4 cm) diameter, 31.4 in (79.8 cm) around
- Net length: 22 in (55.9 cm) plus a 1.5 in (3.8 cm) cuff
- Skill level: Intermediate
- Terminology: US
- Yarn weight: Worsted (#4) cotton
- Hook: 5.0 mm (H-8)
- Number of pieces: 4 parts (backboard, covered rim with net, drawstring, 2 support straps)
- Layout: Rim sewn to the lower center of the backboard; the net hangs from the rim
Materials
Use a smooth worsted-weight cotton or cotton blend. Cotton holds its shape, takes the weight of laundry and shows the mesh clearly. Avoid acrylic for the net, because it stretches a lot under load.
- Sage green: 250 g, about 475 m (backboard and net)
- Cream: 150 g, about 285 m (border, target square, rim cover, cuff, drawstring, straps)
These amounts assume about 190 m per 100 g and include a margin of roughly 20%.
Tools:
– 5.0 mm (H-8) crochet hook
– 10 in (25.4 cm) metal macramé ring
– 7-count plastic canvas, cut to 15.5 x 9.5 in (39.4 x 24.1 cm)
– 2 metal over-door hooks
– Tapestry needle, scissors, stitch markers
– Rust-proof pins and a blocking mat
Abbreviations (US Terms)
- ch – chain
- sc – single crochet
- dc – double crochet
- sl st – slip stitch
- sp – space
- st(s) – stitch(es)
- rep – repeat
Surface slip stitch: Hold the yarn behind the work and insert the hook from front to back between stitches. Pull up a loop, then pull it through the loop on the hook. This makes a chain-like line on the right side.
Gauge and Checkpoints
Gauge: 16 sc and 16 rows = 4 in (10.2 cm). That is 4 sts and 4 rows per inch.
Net gauge: In ch-6 mesh, 4 rounds = 3 in (7.6 cm), measured hanging with light weight.
Make a 5 in (12.7 cm) square swatch before you start. If you have more than 16 sts in 4 in, go up a hook size. If you have fewer, go down a hook size.
Checkpoints:
– Backboard Row 20: 5 in (12.7 cm) tall, 16 in (40.6 cm) wide
– Backboard Row 40: 10 in (25.4 cm) tall
– After the border: 18 x 12 in (45.7 x 30.5 cm)
– Net Round 24: about 18 in (45.7 cm) below the rim
– Net Round 32: about 22 in (55.9 cm) below the rim
If the backboard is too wide, rework it with a smaller hook. Don’t remove stitches, because the border counts depend on 64 sts. If it’s too short, add rows in pairs and keep the row count even.

Backboard
Work with sage.
Row 1: Ch 65. Sc in the 2nd ch from the hook and in each ch across. (64 sc)
Rows 2–40: Ch 1, turn. Sc in each st across. (64 sc)
Fasten off. The panel measures 16 x 10 in (40.6 x 25.4 cm).
Target Square
Lay the panel right side up with Row 1 at the bottom. Hold 2 strands of cream together and use the surface slip stitch.
The rectangle covers stitches 19 to 46 (28 sts wide) and Rows 4 to 23 (20 rows tall). That leaves 18 sts on each side, since 18 + 28 + 18 = 64. The square measures 7 x 5 in (17.8 x 12.7 cm).
- Start at the lower-left corner: stitch 19, Row 4.
- Work up between stitches 18 and 19 to Row 23.
- Work across the top of Row 23 to stitch 46.
- Work down between stitches 46 and 47 to Row 4.
- Work across Row 4 back to the start.
- Join to the first loop and fasten off on the back.
Keep each slip stitch the same length as the stitch underneath so the panel stays flat.
Border
Work with a single strand of cream. In this border, corner ch-2 spaces are not counted in the per-side numbers.
Border gauge: Each round adds 0.25 in (0.6 cm) on every side, and 4 rounds make 1 in (2.5 cm).
Round 1: Join at the top-right corner.
– Top edge: sc in each of the 64 sts.
– Left edge: 1 sc in each row end, 40 sc.
– Bottom edge: 1 sc in each foundation ch, 64 sc.
– Right edge: 40 sc in the row ends.
– Work ch 2 at each corner.
– Join with a sl st to the first sc.
Round 1 count: 64 / 40 / 64 / 40. (208 sc + 4 corner ch-2 sps)
Round 2: Ch 1. Sc in each sc, and work (sc, ch 2, sc) in each corner sp. Join.
Round 2 count: 66 / 42 / 66 / 42. (216 sc + 4 corner ch-2 sps)
Round 3: Rep Round 2.
Round 3 count: 68 / 44 / 68 / 44. (224 sc + 4 corner ch-2 sps)
Round 4 (trim round): Ch 1. Sc in each sc, and work 3 sc in each corner sp. Join and fasten off.
Round 4 count: 224 sc worked 1-per-stitch + 12 corner sc. (236 sc)
Why the math works:
– The panel’s perimeter is 2 × (16 + 10) = 52 in. At 4 sts per inch that is 208 sts, which is exactly Round 1.
– Each new round is 0.25 in further out on every side. Its perimeter grows by about 8 × 0.25 in = 2 in, which is 8 sts. Rounds 2 and 3 add exactly 8 sts each.
– Round 4 adds 12 sts instead of 8. The 4 extra sts let the corners curve into the soft, rounded shape.
– Final size: 16 + 1 + 1 = 18 in (45.7 cm) wide and 10 + 1 + 1 = 12 in (30.5 cm) tall.
Rim Cover and Net
Rim Cover
Hold 2 strands of cream together.
Round 1: Attach the yarn to the ring with a sl st. Work 126 sc around the ring and push them together as you go so no metal shows. Join with a sl st to the first sc. (126 sc)
The count is 126 sc ÷ 31.4 in, or about 4 sc per inch. If metal shows through, add sts in multiples of 3 and keep the total divisible by 3.
Rotate the stitches so their tops face down, along the lower outer edge of the ring. Fasten off.
Net
Work with a single strand of sage. The net is worked in a continuous spiral without joining. Place a marker in the first loop of each round and move it up as you go.
Round 1: Join to any rim sc. Ch 6, skip 2 sc, sc in next sc. Rep from * around. (42 ch-6 loops)
The count is 126 sc ÷ 3 sts per repeat = 42 loops.
Rounds 2–24: Ch 6, sc in the next ch-6 loop. Rep around. (42 ch-6 loops per round)
Checkpoint: hang the rim and add light weight. The net measures about 18 in (45.7 cm).
Rounds 25–28: Ch 5, sc in the next loop. Rep around. (42 ch-5 loops per round)
Rounds 29–32: Ch 4, sc in the next loop. Rep around. (42 ch-4 loops per round)
The shorter loops taper the net. Each of Rounds 25–32 adds about 0.5 in (1.3 cm), so they add 4 in (10.2 cm) and the net totals 22 in (55.9 cm). Sl st into the next loop to even out the spiral, then fasten off.
Cuff
Work with a single strand of cream.
Round 1 (conversion round): Join in any ch-4 loop. Work 2 sc in each loop and join. (84 sc)
Round 2 (eyelets):
– Ch 4. This counts as the first dc + ch 1.
– Skip the next sc.
– Dc in the next sc, ch 1, skip the next sc. Rep around.
– Join to the 3rd ch of the starting ch-4.
Round 2 count: 42 dc + 42 ch-1 sps. (84 sts)
Round 3: Ch 1. Sc in each dc and in each ch-1 sp. Join. (84 sc)
Round 4 (scallops):
– Ch 1, sc in the first sc, skip 1 sc, 5 dc in the next sc, skip 1 sc.
– Sc in the next sc, skip 1 sc, 5 dc in the next sc, skip 1 sc. Rep from * 19 more times.
– Join to the first sc.
Round 4 count: 21 scallops: 21 sc + 105 dc. (126 sts)
The count works because 84 ÷ 4 = 21 repeats. Fasten off. The cuff is about 1.5 in (3.8 cm) deep.
Make All Pieces
Sage:
– 1 backboard, 64 sts × 40 rows
– 1 net, 32 rounds
Cream:
– Target square
– Backboard border
– Rim cover
– Cuff
– 1 drawstring
– 2 support straps
Drawstring: Ch 130. Sl st in the back bump of each ch across. Tie 2 overhand knots near each end, about 1 in (2.5 cm) apart. The cord measures about 36 in (91.4 cm).
Support straps (make 2): Ch 21. Sc in the 2nd ch and in each ch across. (20 sc) Each strap is about 5 in (12.7 cm) long.
Layout (front view):
+-----------------------------------+
|        BACKBOARD 18 x 12 in       |
|          +-------------+          |
|          |  TARGET SQ  |          |
|          |   7 x 5 in  |          |
|      ====( RIM 10 in )====        |
+-----------| NET 22 in |-----------+
            |  diamond  |
            |   mesh    |
             \  cuff   /
              ~ bow ~
Joining
Drawstring: Starting at the center front, weave the cord in and out through the Round 2 eyelets. Pull it closed and tie a bow.
Plastic canvas: Center the canvas on the back of the backboard. Whipstitch it to the back loops of border Round 1 with sage.
Rim to backboard:
1. Center the back arc of the rim against border Round 4 on the bottom edge.
2. With cream, whipstitch 16 rim sc to 16 border sc. Work 1 rim stitch to 1 border stitch, so both edges are 4 in (10.2 cm) long.
3. Pull each stitch snug but not tight. Tight stitches make the board edge pucker.
Support straps:
1. Sew one end of each strap to the rim, 3 in (7.6 cm) to either side of the seam.
2. Sew the other end to the back of the backboard, 4 in (10.2 cm) above the bottom edge.
3. The straps hold the rim level and stay hidden behind the net.
Size check: Hold the hamper up by the top border. The rim should sit level, and the backboard should still measure 18 x 12 in (45.7 x 30.5 cm).
Final Blocking
- Mist the backboard evenly with water.
- Pin it face up to 18 x 12 in (45.7 x 30.5 cm). Shape the corners into even curves.
- Line up the target square with the stitch columns.
- Hang the net and rim on a door. Slip a damp towel inside the net to open up the diamonds.
- Pull the scallops out gently with your fingers.
- Let everything dry completely, about 24 hours.
- Remove the towel and tighten the drawstring.
Final Quality-Control Checklist
- [ ] The backboard is 64 sts wide and 40 rows tall before the border
- [ ] The border’s Round 4 totals 236 sc with rounded corners
- [ ] The target square is 28 sts × 20 rows and centered
- [ ] No metal shows through the rim cover (126 sc)
- [ ] Every net round has 42 loops
- [ ] The cuff has 21 even scallops
- [ ] The rim seam is 4 in (10.2 cm) wide and centered
- [ ] The rim sits level when the hamper is hung
- [ ] All yarn tails are woven in at least 2 in (5.1 cm)
Troubleshooting
The backboard edges ripple. Border Round 1 has too many sts. Recount 64 / 40 per side.
The backboard corners cup. The corners are too tight. Work the corner chains loosely.
The net spirals off to one side. That’s normal for spiral mesh. Block it straight with a towel inside.
The net is too short. Add ch-6 rounds before Round 25. Each one adds about 0.75 in (1.9 cm).
The rim tilts forward. Shorten the support straps by 2 sc each.
The cuff flares. Work Round 1 with a smaller hook.
The target square looks wavy. Your surface stitches are too tight. Pull out that line and redo it more loosely.
Care
Spot-clean the backboard. If you need to wash the net, cut the rim seam stitches first, hand-wash and air-dry it flat, then sew it back on.
Final Notes
Each measurement builds on the one before. At 4 sts per inch, the panel is 16 x 10 in (40.6 x 25.4 cm), or 64 sts × 40 rows. The border adds 1 in (2.5 cm) per side, for 18 x 12 in (45.7 x 30.5 cm). The 126 rim stitches become 42 net loops, and 42 loops become 84 cuff sts and 21 scallops. If your gauge matches at every checkpoint, the hamper will hang neatly and hold a full load.
Happy crocheting!