

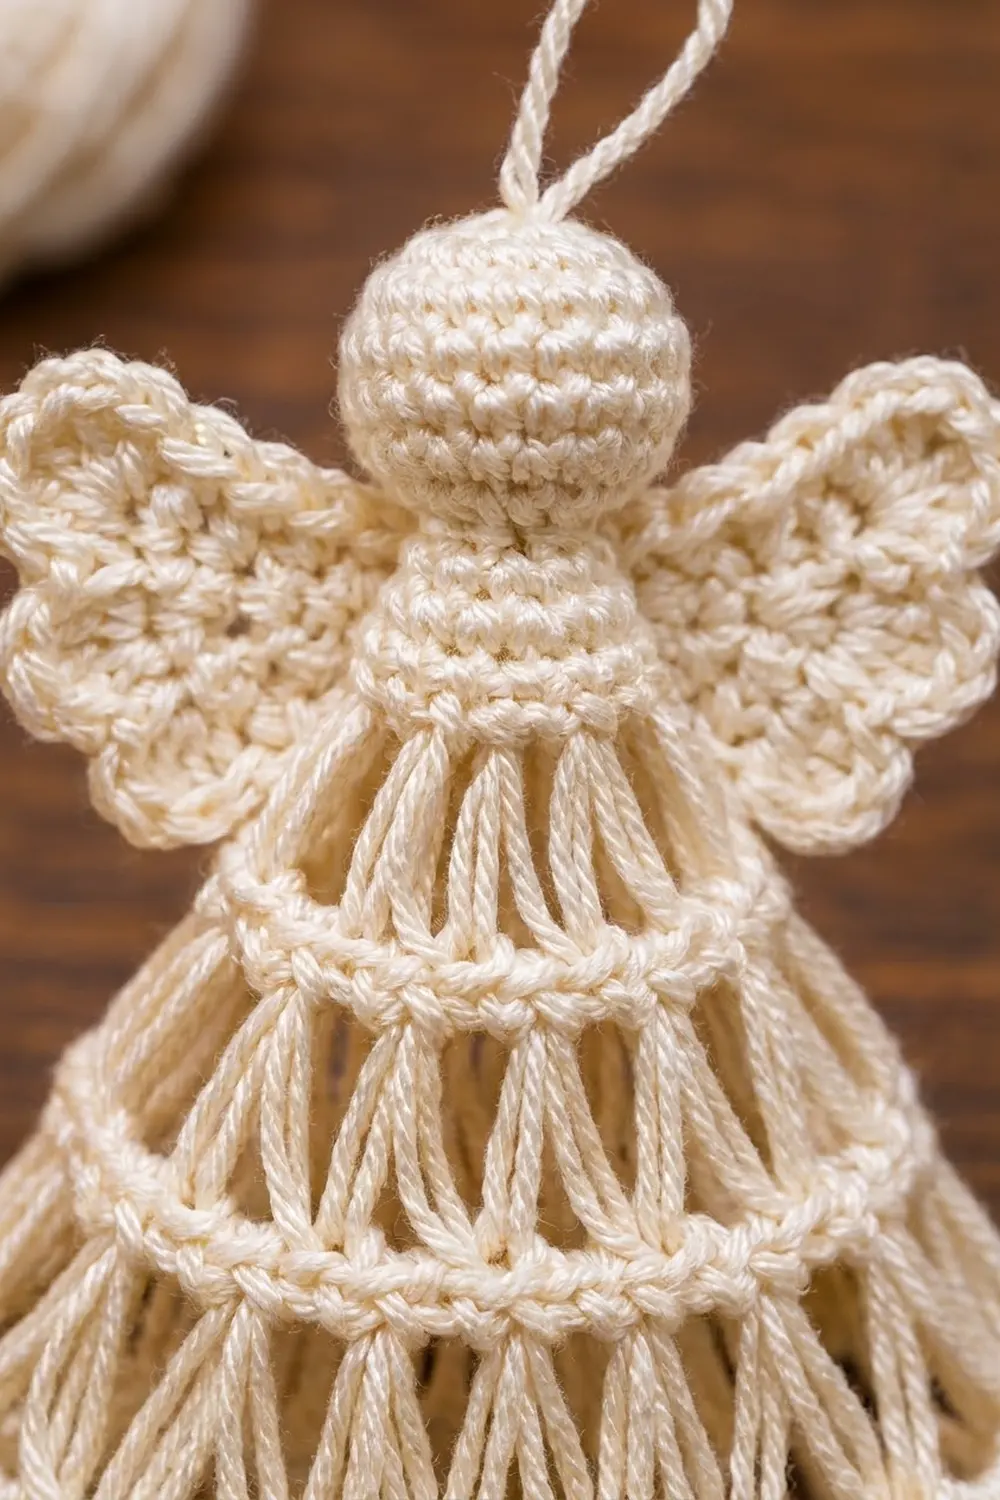
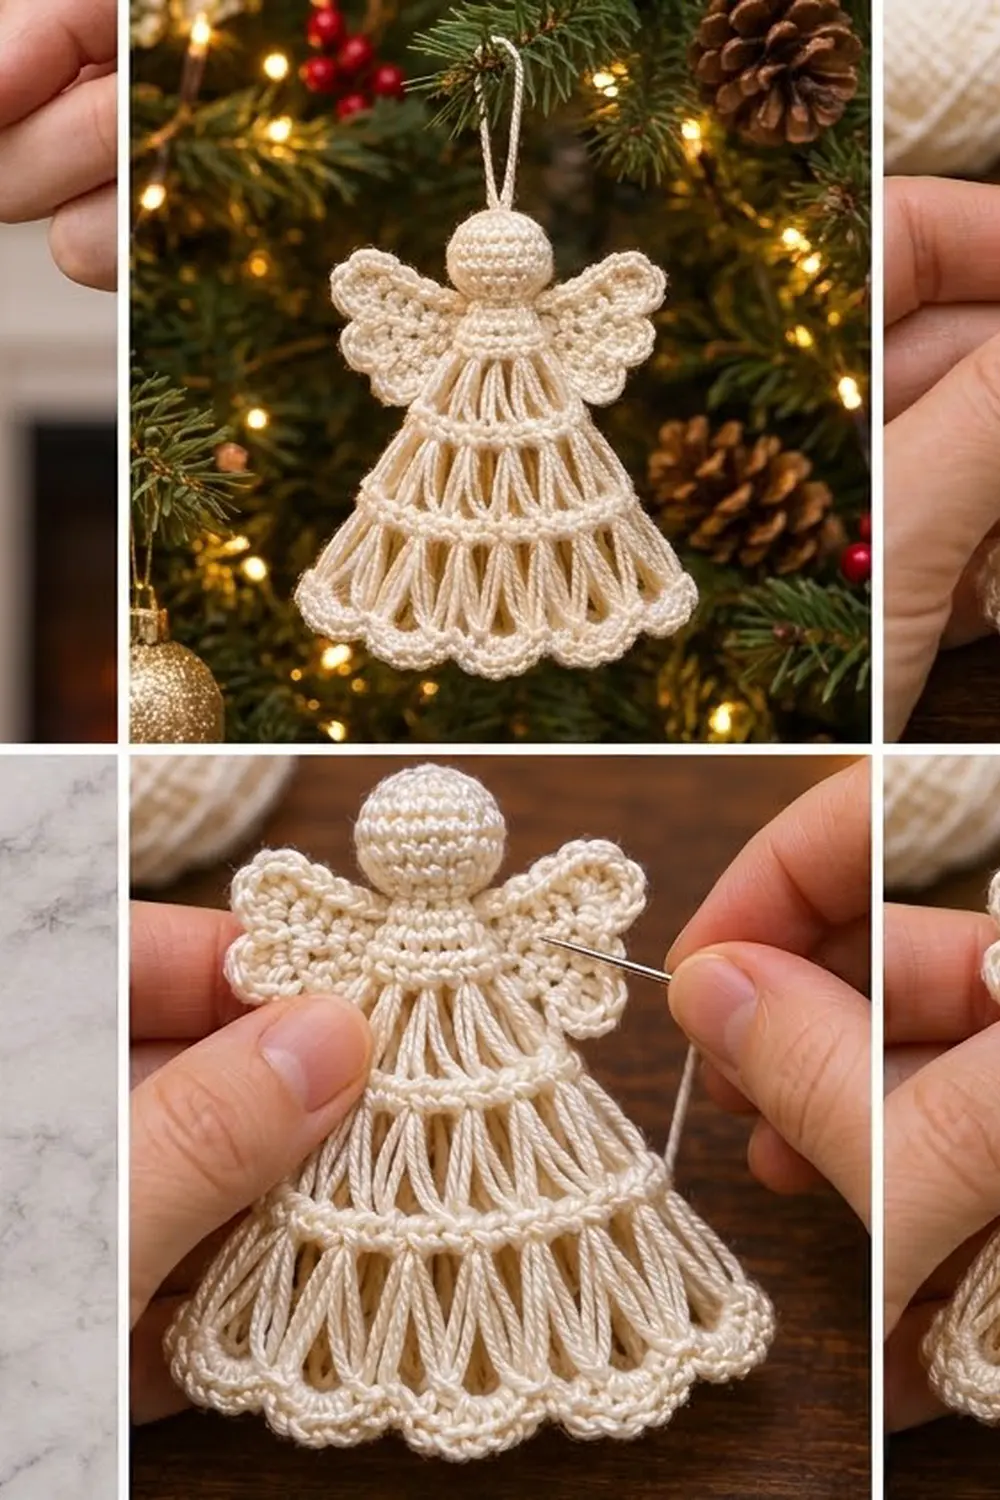
The Ivory Tier Angel is a small heirloom-style tree ornament. The head is round and smooth, the bodice is short and solid, and the skirt flares out in three tiers of long broomstick-lace loops. Ridged single crochet bands separate the tiers, and a row of soft shell scallops finishes the hem. Two fan wings sit behind the shoulders.
The whole angel is one ivory mercerized cotton. With a single color, the light catches the loops and scallops, so the ornament looks delicate and vintage among warm tree lights. It also suits neutral, Scandinavian or all-white trees.
This pattern uses US crochet terms. The finished angel is 4.5 in (11.4 cm) tall without the hanging loop and about 3 in (7.6 cm) across the wings. The hem measures about 3.4 in (8.6 cm) across when flattened.
Construction is simple. You crochet the body flat, starting at the neck and working down, with broomstick-lace tiers that widen as they go. Then you seam it into a cone and add a scallop border around the hem. You make a stuffed ball head and two fan wings separately and sew everything together.
Finished Size and Construction
- Finished size: 4.5 in (11.4 cm) tall; wingspan 3 in (7.6 cm); hem 3.4 in (8.6 cm) flat
- Skill level: Intermediate (basic broomstick lace)
- Terminology: US crochet terms
- Yarn weight: Fingering / Super Fine (#1) mercerized cotton
- Hook: 2.25 mm (US B-1)
- Number of pieces: 4 parts (head, body, 2 wings) assembled into 1 ornament
- Layout: Single ornament; no motif joining
- Body piece before seaming: 6.75 in (17.1 cm) wide at the hem edge, 3.5 in (8.9 cm) long
- Size before border: body 3.5 in (8.9 cm) long
- Border depth: 0.25 in (0.6 cm)
Materials
Yarn: Use a smooth, mercerized (pearl) cotton in fingering weight, such as size 3 crochet thread. Mercerized cotton holds the shape of the broomstick loops and blocks crisply. Avoid fuzzy or very stretchy fibers, because the loops will blur and sag.
- Ivory: 12 g, about 41 m
The quantity includes a margin for your gauge swatch, sewing tails and the hanging loop.
Tools:
- 2.25 mm (US B-1) crochet hook
- 10 mm (US 15) knitting needle or broomstick-lace pin, for the loops
- Small pinch of polyester fiberfill
- Tapestry needle
- Scissors
- Stitch marker
- Blocking mat and rustproof pins
- Spray bottle, plus light spray starch (optional)
Abbreviations (US Terms)
- ch – chain
- sl st – slip stitch
- sc – single crochet
- dc – double crochet
- inc – 2 sc in the same stitch
- dec – sc2tog (single crochet 2 together)
- st(s) – stitch(es)
- rep – repeat
- MR – magic ring
Special stitches
Loop Row (broomstick loops): Do not chain. Pull the loop on your hook long and slip it onto the knitting needle; this counts as the first loop. Then insert the hook in the next st, yarn over, pull up a loop and slip it onto the needle. Rep from * across. Keep all the loops the same height.
Work-Off Group: Insert the hook through 4 loops together and slip them off the needle. Yarn over and pull through all 4. Then work the stated number of sc through the center of the group. Always start working off from the end where your working yarn hangs.
Shell: 5 dc in the same stitch.
Gauge and Checkpoints
Gauge: 16 sc and 16 rows = 2 in (5.1 cm) in sc worked flat, with a 2.25 mm hook. That equals 8 sc per 1 in (2.5 cm).
Test one piece first. The bodice (Rows 1–4) doubles as your gauge swatch. Make it and measure it before you start the loops.
Checkpoints:
- Bodice (after Row 4): 16 sts = 2 in (5.1 cm) wide, 0.5 in (1.3 cm) tall
- After Tier 1 (Row 7): 24 sts = 3 in (7.6 cm) wide
- After Tier 2 (Row 10): 36 sts = 4.5 in (11.4 cm) wide
- After Tier 3 (Row 13): 54 sts = 6.75 in (17.1 cm) wide; body 3.5 in (8.9 cm) long
- Each tier adds 1 in (2.5 cm) of length: 0.75 in (1.9 cm) of loops plus 0.25 in (0.6 cm) of sc band
- Head: 18 sts around = 2.25 in (5.7 cm) circumference, about 0.75 in (1.9 cm) across
If your bodice is wider than 2 in (5.1 cm), go down to a 2.0 mm hook. If it is narrower, go up to a 2.5 mm hook. If your loops measure shorter than 0.75 in (1.9 cm), switch to a 12 mm needle. If they are longer, use an 8 mm needle.
Body
You work the body flat, starting at the neck and working down. Turn only where the pattern says to.
Bodice
Ch 17.
Row 1: Sc in 2nd ch from hook and in each ch across. (16 sc)
Rows 2–4: Ch 1, turn, sc in each st across. (16 sc)
Checkpoint: 2 in (5.1 cm) wide, 0.5 in (1.3 cm) tall.
Tier 1
Row 5 (Loop Row): Turn. Work a Loop Row across. (16 loops on the needle)
Row 6 (Work-Off): For the first group, insert the hook through the first 4 loops, slip them off, yarn over, pull through, ch 1, then work 6 sc in the center of the group. For each remaining group: insert the hook through the next 4 loops, slip them off, yarn over, pull through, yarn over, pull through 2 loops (counts as the first sc), then work 5 more sc in the same center. Rep from * 2 more times. (4 groups × 6 sc = 24 sc)
Row 7 (Band): Ch 1, turn, sc in each st across. (24 sc)
Checkpoint: 3 in (7.6 cm) wide.
Tier 2
Row 8 (Loop Row): Turn. Work a Loop Row across. (24 loops)
Row 9 (Work-Off): Work off in groups of 4 loops with 6 sc in each group, as in Row 6. (6 groups × 6 sc = 36 sc)
Row 10 (Band): Ch 1, turn, sc in each st across. (36 sc)
Checkpoint: 4.5 in (11.4 cm) wide.
Tier 3
Row 11 (Loop Row): Turn. Work a Loop Row across. (36 loops)
Row 12 (Work-Off): Work off in groups of 4 loops with 6 sc in each group. (9 groups × 6 sc = 54 sc)
Row 13 (Band): Ch 1, turn, sc in each st across. (54 sc) Do not fasten off.
Checkpoint: 6.75 in (17.1 cm) wide, 3.5 in (8.9 cm) long.
Why the skirt flares: Every group takes 4 loops in and puts 6 sc out. That is a 1.5× increase per tier: 16 → 24 → 36 → 54. Because all the increases sit in the work-off rows, the band rows stay straight, and each tier forms a clean, even ridge.
Seam: Fold the body with the right side out so the row ends meet. Sl st through both row-end edges from Row 13 up to Row 1, keeping the loop tiers lined up. Fasten off and leave a 6 in (15.2 cm) tail.
The body is now a cone, and the seam is the center back. Weave a separate strand through the foundation chain at the neck and pull it gently until the neck measures about 1.5 in (3.8 cm) around. Knot the strand, but do not trim it yet.
Head
Work in continuous rounds and mark the first st of each round.
Rnd 1: 6 sc in MR. (6)
Rnd 2: Inc in each st around. (12)
Rnd 3: Sc in next st, inc; rep from * around. (18)
Rnds 4–6: Sc in each st around. (18)
Checkpoint: about 0.75 in (1.9 cm) across.
Rnd 7: Sc in next st, dec; rep from * around. (12) Stuff the head firmly so it is round.
Rnd 8: Dec 6 times. (6)
Fasten off, leaving a 10 in (25.4 cm) tail. Weave it through the front loops of the last round and pull it closed.
Wings (Make 2)
Ch 4.
Row 1: 6 dc in 4th ch from hook. (7 dc; the skipped ch counts as 1 dc)
Row 2: Ch 3 (counts as dc), turn. Dc in the same st, then 2 dc in each remaining st. (14 dc)
Row 3: Ch 3 (counts as dc), turn. 2 dc in next st, dc in next st, 2 dc in next st; rep from * 5 more times. (21 dc)
Row 4 (scallop edge): Ch 1, turn. Sc in first st, skip 1 st, Shell in next st, skip 1 st, sc in next st; rep from * 4 more times. (5 shells, 6 sc; the last sc goes in the top of the turning ch)
Fasten off, leaving an 8 in (20.3 cm) tail.
Checkpoint: each wing is a half-circle fan about 1.75 in (4.4 cm) across the straight edge and 1 in (2.5 cm) deep.
Assembly
- Head: Use the head’s tail to sew Rnd 1 of the head into the gathered neck so the head sits upright. Use the neck strand to tack the head on from the inside of the body as well. Trim this strand.
- Hanging loop: Ch 30 (about 3 in, 7.6 cm). Thread both ends through the top center of the head with a tapestry needle and knot them inside. You get a 1.5 in (3.8 cm) loop.
- Wings: Place each wing on the back of the bodice with its straight edge vertical and the starting point of the fan close to the seam. The scalloped edge should face outward. Sew the straight edge to the bodice rows with small stitches so the wings rise slightly above the shoulders. From the front, check that each wing sticks out about 1 in (2.5 cm) past the bodice. That gives a wingspan of 3 in (7.6 cm).
Border: Scalloped Hem
Border gauge: One scallop uses 6 sts, which is 0.75 in (1.9 cm) of the hem edge.
Starting count: The hem is 54 sts around. The seam is at center back, so there are 27 sts across the front half and 27 sts across the back half. There are no extra seam stitches, because the seam is a sl st through the row ends and the 54 Row 13 sts stay intact.
Rnd 1: With the right side facing, join the yarn in the first Row 13 st next to the seam. Ch 1 and sc in the same st. Skip 2 sts, Shell in next st, skip 2 sts, sc in next st. Rep from * 7 more times. Then skip 2 sts, work a Shell in the next st, skip 2 sts, and sl st to the first sc. (9 shells, 9 sc)
Per side: The front 27 sts hold 4.5 scallops and the back 27 sts hold 4.5 scallops. Shells sit on sts 4, 10, 16, 22 and 28. Since st 28 is directly opposite the seam, a full shell sits at center front and a sc point sits at the center-back seam.
Why the math works: 54 ÷ 6 = 9 repeats with nothing left over. The shells line up evenly with the 9 loop groups of Tier 3, one scallop below each cluster.
Fasten off and weave in the ends. The border adds 0.25 in (0.6 cm), so the finished body is 3.75 in (9.5 cm) long. Add the 0.75 in (1.9 cm) head and the angel is 4.5 in (11.4 cm) tall.
Final Blocking
- Mist the whole ornament evenly with water, or with light spray starch if you want a crisp finish.
- Stuff the skirt loosely with plastic wrap or a small paper cone so it stands in a smooth flare. The hem should measure about 3.4 in (8.6 cm) across when flattened.
- Use your fingers to straighten each broomstick cluster so the loops hang vertically and evenly.
- Pin each wing flat on the mat and open each of its 5 shells into a rounded scallop.
- Pin the 9 hem shells so they curve outward evenly.
- Let the angel dry completely, 6–12 hours, then remove the filling and pins.
Final Quality-Control Checklist
- [ ] Height is 4.5 in (11.4 cm) without the loop
- [ ] Wingspan is about 3 in (7.6 cm)
- [ ] Three loop tiers have 16, 24 and 36 loops
- [ ] Band rows count 24, 36 and 54 sc
- [ ] The hem has 9 even shells, with one centered at the front
- [ ] Each wing has 5 shells
- [ ] The seam is at center back and the loop tiers line up across it
- [ ] The head is firm, round and upright
- [ ] The hanging loop is centered and secure
- [ ] All ends are woven in and hidden inside the cone
Troubleshooting
Loops are uneven in height. Pull each loop snug around the needle before you lift the next one. Do not let loops slide toward the tip.
A group came out with 5 or 7 sc. Count each group out loud and rip back to the group that is off. If the counts are wrong, the skirt will twist.
The skirt flares too little or too much. Check the band-row counts first. If they are correct, the band rows may be tight compared with the loops, so use a hook 0.25 mm bigger for the bands only.
The seam looks bulky. Seam through the outer half of each row-end stitch only.
The head is lumpy. Add stuffing in small pieces and roll the ball between your palms before you close it.
The wings droop. Starch them, or add a second line of tacking stitches higher on the bodice.
The hem cups inward. Block it again with a wider cone inside, and check that you skipped exactly 2 sts on each side of every shell.
Care
Spot clean or hand wash gently in cool water, press out the water in a towel, and re-block the angel to dry. Store it in tissue paper so the loops and scallops are not crushed.
Final Notes
The measurements build on each other in a fixed chain. Gauge is 8 sc per 1 in (2.5 cm). A 16-st bodice is 2 in (5.1 cm) wide. Each tier multiplies the stitch count by 1.5, giving 24, then 36, then 54 sts, and the hem edge is 6.75 in (17.1 cm). Three 1 in (2.5 cm) tiers plus the bodice make a 3.5 in (8.9 cm) body. The 0.25 in (0.6 cm) scallop border brings it to 3.75 in (9.5 cm), and the 0.75 in (1.9 cm) head finishes the angel at 4.5 in (11.4 cm). If you check each step, the angel will come out the right size and shape.
Happy crocheting!