

The Frosted Lattice Snowman is a light, lacy ornament. A snowman silhouette is filled with an open net of cream chain loops, which gives it a delicate, snowflake-like texture that catches the tree lights behind it.
The palette is quiet and wintry: cream for the lattice, an inner edging round and the hat band, with slate blue-gray for the outline and the top hat. The firm gray outline holds the open net in shape, so the ornament looks crisp whether it hangs on a branch or decorates a gift.
This pattern uses US crochet terms. The finished ornament measures about 3 1/8 in (7.9 cm) wide and 4 7/8 in (12.4 cm) tall, plus a 1 in (2.5 cm) hanging loop.
How it’s built: First you work the lattice from the bottom up in net-stitch rows, shaping the body, neck and head with simple increases and decreases. Then you edge the mesh with a cream single crochet round. Next you make the hat separately in single crochet rows and sew it to the top of the head. One gray border round goes around the whole outline, and you finish by adding the hanging loop.
Finished Size and Construction
- Finished size: 3 1/8 in (7.9 cm) wide x 4 7/8 in (12.4 cm) tall, not including the loop
- With loop: about 5 7/8 in (14.9 cm) tall
- Skill level: Easy-intermediate
- Terminology: US
- Yarn weight: Size 3 cotton crochet thread (light fingering)
- Hook: 2.25 mm (B-1)
- Number of pieces: 1 ornament, made from the lattice body plus a sewn-on hat
- Layout: Single standalone piece
- Mesh size (widest point): 2 5/8 in (6.7 cm)
- Size before border: 2 7/8 in (7.3 cm) wide x 4 5/8 in (11.7 cm) tall
- Border depth: 1/8 in (0.3 cm), one round of single crochet
Materials
Yarn: Use a smooth, mercerized cotton thread in size 3. Mercerized cotton shows the chain loops clearly and holds its shape well after blocking. Avoid fuzzy or very stretchy fibers, because the lattice will lose its definition.
- Color A – Cream: 6 g, about 16 m (17.5 yd)
- Color B – Slate blue-gray: 4 g, about 11 m (12 yd)
These quantities include a safety margin of about 20%.
Tools:
– 2.25 mm (B-1) crochet hook
– Tapestry needle
– Scissors
– Stitch marker
– Blocking mat and rustproof pins
– Spray bottle with water, or light spray starch
Abbreviations (US Terms)
- ch – chain
- sc – single crochet
- sl st – slip stitch
- sp – space
- st(s) – stitch(es)
- rep – repeat
- inc – increase
Special stitch – Net loop: Ch 5, then sc in the next ch-5 sp. Each net loop counts as 1 loop.
Net row rules:
– Standard row (same count): Turn, ch 5, sc in the first ch-5 sp, ch 5, sc in the next ch-5 sp; rep from * across. This gives the same number of loops as the previous row.
– Increase row (+2): Turn, ch 5, sc in the last sc made (edge loop). Work a standard row across. Then ch 5 and sc again in the same sp as the last sc (edge loop). The row has 2 more loops than the previous row.
– Decrease row (−2): Turn, sl st in each of the first 3 ch of the first ch-5 sp. Ch 5, sc in the next ch-5 sp; rep from * across, but do not work into the last ch-5 sp. The row has 2 fewer loops than the previous row.
Gauge and Checkpoints
Gauge matters on a small ornament, so make the whole lattice first and check it before adding the hat.
- Mesh gauge: 8 net loops = 3 in (7.6 cm) wide, and 11 net rows = 3 1/2 in (8.9 cm) tall, lightly stretched.
- Single crochet gauge: 8 sc and 9 rows = 1 in (2.5 cm).
Checkpoints:
1. After Row 3 (7 loops): The mesh measures about 2 5/8 in (6.7 cm) across.
2. After Row 11: The lattice measures about 3 1/2 in (8.9 cm) tall.
3. After the cream edging: The widest point measures about 2 7/8 in (7.3 cm).
4. Hat: The brim measures 1 7/8 in (4.8 cm) and the crown 1 1/8 in (2.9 cm) wide.
5. After the border: The ornament measures 3 1/8 in x 4 7/8 in (7.9 cm x 12.4 cm).
If your piece is too big, go down to a 2.0 mm hook, or tighten the ch-5 loops. If it’s too small, go up to a 2.5 mm hook. Don’t change the number of chains in a loop, because the edging counts depend on it.
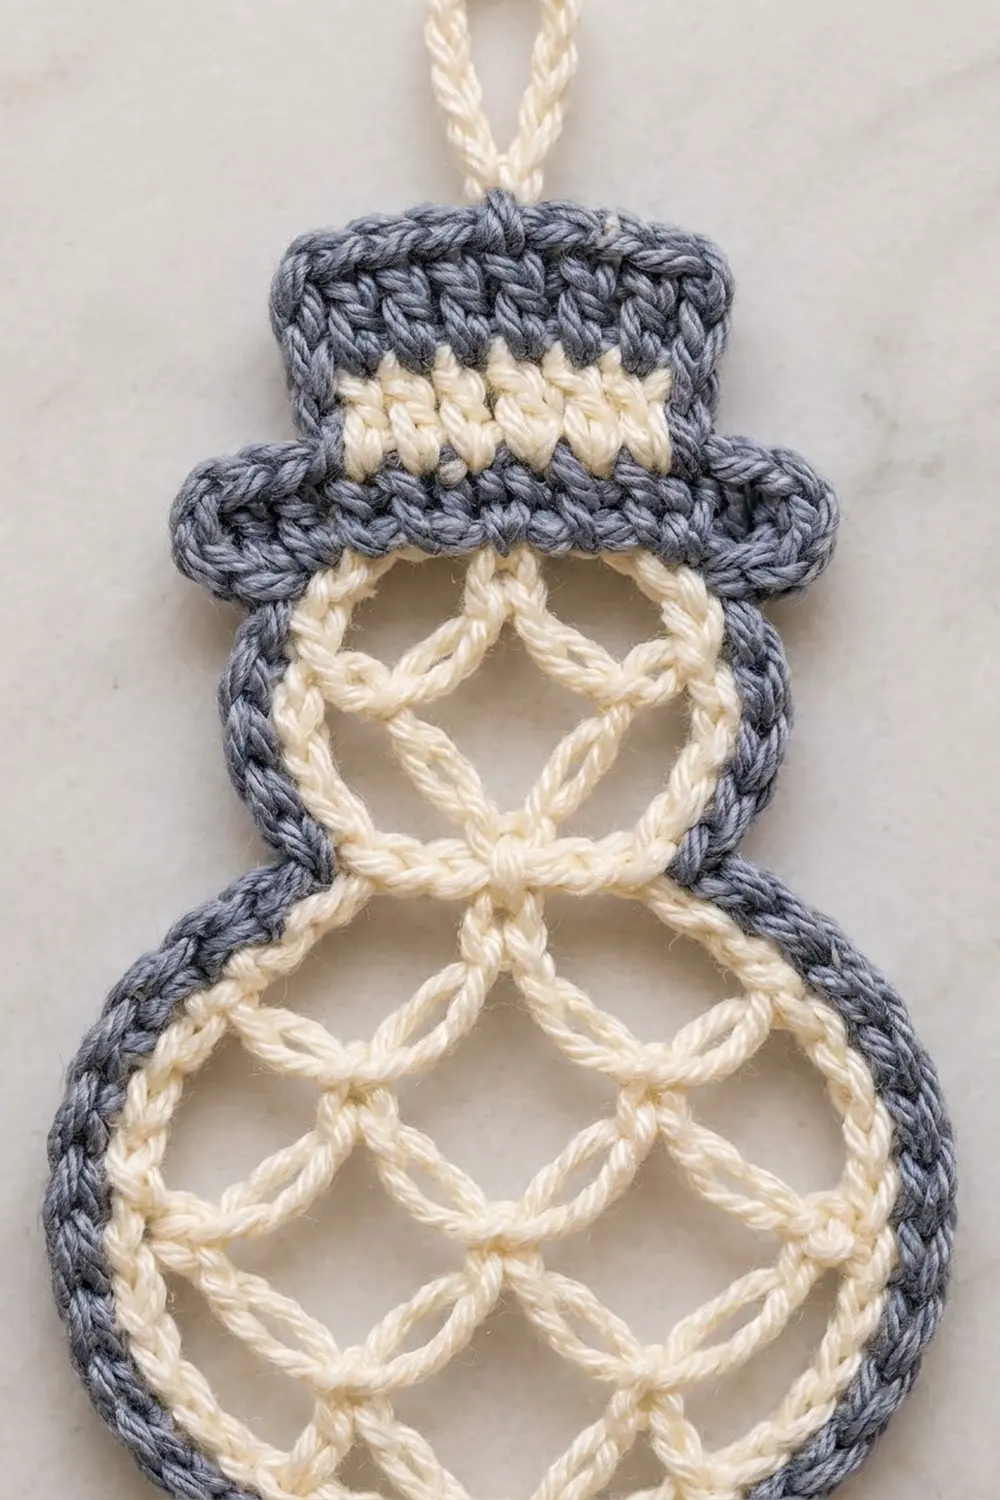
Lattice Body and Head (Color A – Cream)
Work the rows back and forth. Each row ends with a sc.
Foundation: Ch 14.
Row 1: Sc in the 2nd ch from the hook. Ch 5, skip 3 ch, sc in the next ch; rep from * 2 more times. (3 loops, 4 sc)*
The bottom edge uses 13 foundation chains.
Row 2 (increase row): (5 loops)
Row 3 (increase row): (7 loops)
Checkpoint: the mesh measures about 2 5/8 in (6.7 cm) wide.
Rows 4–6 (standard rows): (7 loops in each row)
These rows form the widest part of the body.
Row 7 (decrease row): (5 loops)
Row 8 (decrease row): (3 loops)
Row 8 is the neck.
Row 9 (increase row): (5 loops)
The head begins here.
Row 10 (standard row): (5 loops)
Row 11 (decrease row): (3 loops)
Row 11 is the top of the head. Don’t fasten off.
The lattice now has 11 rows. That gives exactly 11 row-end spaces along each side, which matters for the edging count.
Cream Edging Round (Color A)
Work around the outside of the mesh to make one continuous round.
- Top of head: Work 3 sc in each of the 3 ch-5 sps of Row 11. (9 sc)
- First side: Work 3 sc in each of the 11 row-end spaces. (33 sc)
- Bottom: Work 1 sc in each of the 13 foundation chains. (13 sc)
- Second side: Work 3 sc in each of the 11 row-end spaces. (33 sc)
Sl st to the first sc to join. Round total: 9 + 33 + 13 + 33 = 88 sc. Fasten off and weave in the ends.
Mark the 9 sc across the top of the head. The hat will be sewn there.
Top Hat (Color B with a Color A Band)
Work the hat in sc rows from the brim up.
Foundation (B): Ch 16.
Row 1 (B): Sc in the 2nd ch from the hook and in each ch across. (15 sc)
Row 2 (B): Ch 1, turn, sc in each st across. (15 sc)
Row 3 (B): Turn, sl st in each of the first 3 sc, ch 1, sc in each of the next 9 sc. Leave the last 3 sc unworked. (9 sc)
Change to A on the last yarn-over of this row.
Rows 4–5 (A): Ch 1, turn, sc in each st across. (9 sc in each row)
This is the hat band. Change to B on the last yarn-over of Row 5.
Rows 6–9 (B): Ch 1, turn, sc in each st across. (9 sc in each row)
Fasten off and leave a 12 in (30.5 cm) tail of B.
Hat checkpoint: 9 rows = 1 in (2.5 cm) tall. The brim is 1 7/8 in (4.8 cm) wide and the crown is 1 1/8 in (2.9 cm) wide.
Attach the hat: Center the brim’s foundation edge over the head. The middle 9 foundation chains (chains 4–12) line up one-for-one with the 9 marked cream sc. Whipstitch them together with B, and keep the seam flat. The outer 3 chains on each side of the brim stay free and form the brim overhang.
Border (Color B)
Border gauge: 8 sc = 1 in (2.5 cm), worked firmly but without cupping.
Join B in the first foundation-side sc at one bottom corner. Work 1 sc in each st or row end, with these exceptions:
- Bottom: Work 2 sc in the first st, 1 sc in each of the next 11 sts, and 2 sc in the last st. (15 sc, from 13 sts + 2 inc)
- Side up to the neck: Work 1 sc in each of the 33 sts, with 2 sc in the 17th st (the widest point of the body). (34 sc, from 33 sts + 1 inc)
- Hat, first side:
- Underside of the brim: 1 sc in each of the 3 free foundation chains, with 2 more sc in the outer chain. (5)
- 1 sc in each of the 2 brim row ends. (2)
- 1 sc in each of the 3 unworked sc on top of the brim. (3)
- 1 sc in each of the 7 crown row ends. (7)
- Subtotal: 17 sc
- Hat top: Work 3 sc in the first st, 1 sc in each of the next 7 sts, and 3 sc in the last st. (13 sc)
- Hat, second side: Mirror the first side: 7 + 3 + 2 + 5. (17 sc)
- Side down from the neck: Work as for the first side. (34 sc, from 33 sts + 1 inc)
Sl st to the first sc to join.
Border total: 15 + 34 + 17 + 13 + 17 + 34 = 130 sc. This is the 83 sc around the lattice plus the 47 sc around the hat.
Why the math works:
– The border skips the 9 cream sc under the hat, so 88 − 9 = 79 sts of edging are worked. Adding 4 increases gives 83.
– An outer round on a curve is slightly longer than the round inside it. The 4 increases sit at the bottom corners and the widest points, where the curve is sharpest.
– The hat stitches follow the stitch-per-row-end rule, and its two outer corners get 3 sc each so they stay square.
– On each 34-st side, 34 sc at 8 sc/in = 4 1/4 in (10.8 cm). That matches the curved side length of the body and head, so the edge lies flat.
Hanging loop (A): Join A in the 7th (center) sc of the 13 hat-top border sts. Ch 16, then sl st back into the same st. Fasten off and weave in the end. The 2 in (5.1 cm) chain folds into a 1 in (2.5 cm) loop.
Final Blocking
- Weave in all the ends along the solid sc rounds, never through the lattice.
- Wet the ornament with the spray bottle until it’s damp but not dripping.
- Lay it face up on the blocking mat.
- Pin the bottom at the center and the two widest points of the body to 2 7/8 in (7.3 cm) across inside the border.
- Pin the hat brim straight and square, and check that it’s 1 7/8 in (4.8 cm) wide.
- Gently open each ch-5 loop with your fingertip so the diamonds look even.
- For a stiffer ornament, mist it with light spray starch.
- Let it dry completely, at least 6 hours, before you unpin it.
Final Quality-Control Checklist
- The lattice has 11 rows with loop counts of 3, 5, 7, 7, 7, 7, 5, 3, 5, 5, 3.
- The cream edging has 88 sc.
- The hat has 9 rows, with 2 cream band rows.
- The brim seam joins exactly 9 chains to 9 sc.
- The border has 130 sc and lies flat with no ruffling.
- The size is 3 1/8 in x 4 7/8 in (7.9 cm x 12.4 cm).
- The loop is centered on the hat top and is about 1 in (2.5 cm) long.
- No ends show through the open mesh.
Troubleshooting
- The lattice slants to one side: Make sure every standard row starts with ch 5 and ends with a sc in the last ch-5 sp.
- The edging ruffles: Your chains are loose. Use 2 sc in a few row-end spaces instead of 3, then add the stitches back at the bottom so the total stays at 88.
- The border cups: Your sc tension is too tight. Go up a hook size for the border only.
- The hat tilts: Re-sew the brim, and line up chain 4 and chain 12 with the end stitches of the 9 marked sc.
- The diamonds look uneven: Re-wet the piece and open the loops while you pin it.
Care
Hand wash in cool water with mild soap, then press out the water in a towel and re-block it flat. Store it flat or hanging, away from damp.
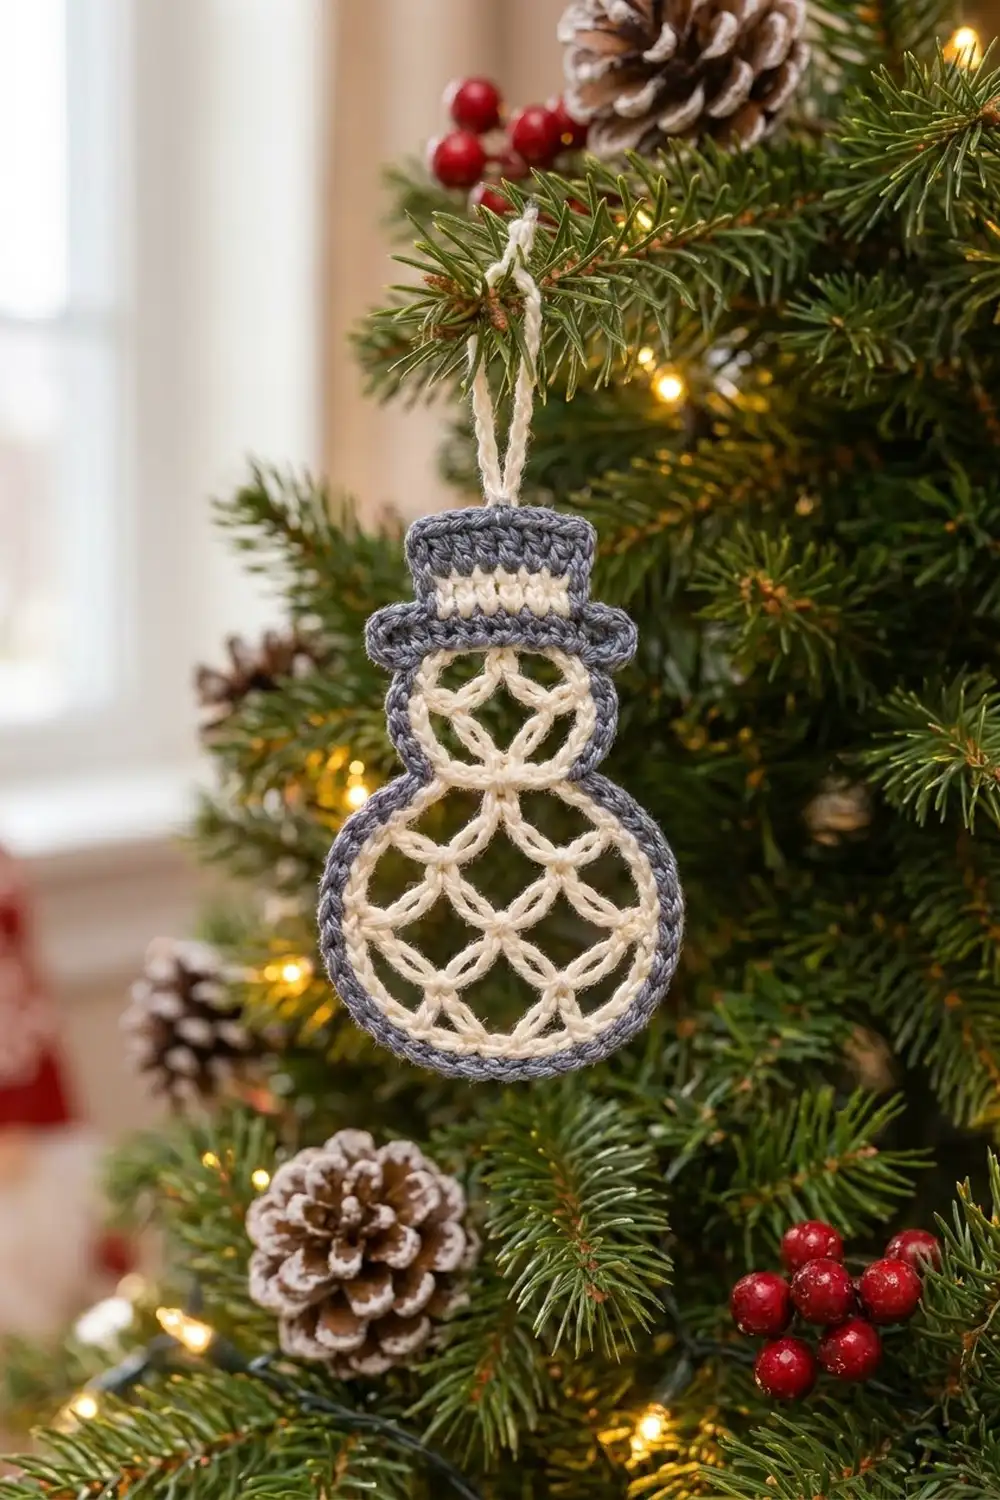
Final Notes
The measurement chain:
1. 7 loops make a mesh 2 5/8 in (6.7 cm) wide, and 11 rows make it 3 1/2 in (8.9 cm) tall.
2. The cream edging brings it to 2 7/8 in (7.3 cm) wide.
3. The 1 in (2.5 cm) hat brings the height before the border to 4 5/8 in (11.7 cm).
4. The 1/8 in (0.3 cm) gray border finishes it at 3 1/8 in x 4 7/8 in (7.9 cm x 12.4 cm).
If you check your size at each stage, your snowman will come out crisp, lacy and ready for the tree.
Happy crocheting!