

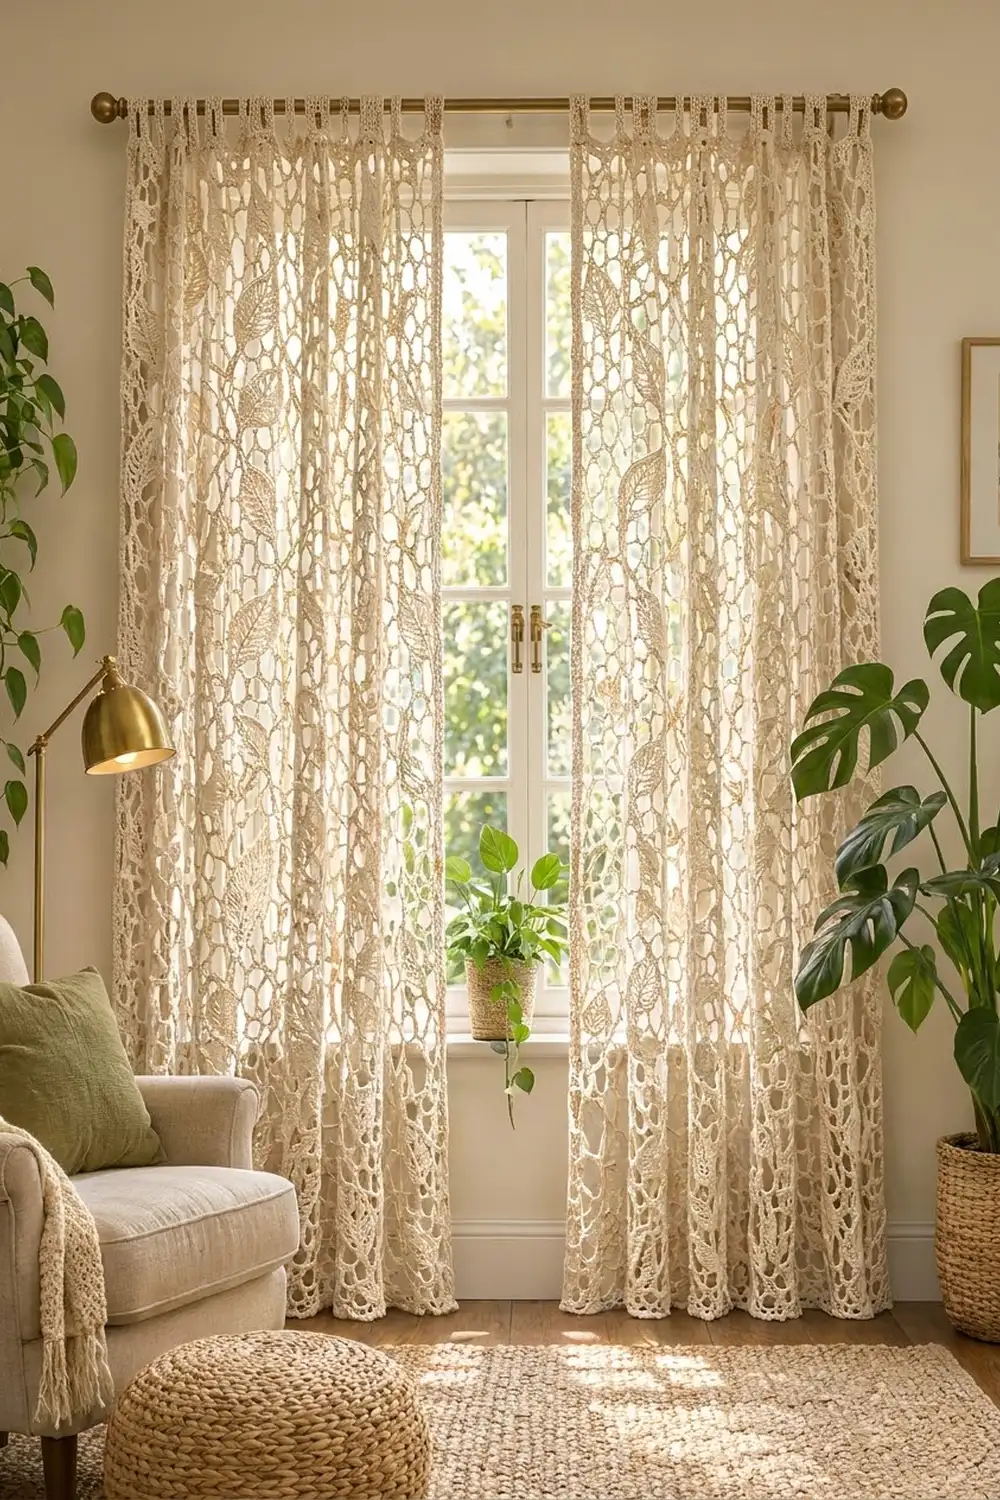
These airy curtain panels filter sunlight through a network of open mesh, with a solid, ridged leaf set into every block. In natural cream cotton, the leaves look like they are drifting down the window in soft columns. The mood is warm, vintage, and calm.
The pattern makes a pair of separate panels. Each panel has 50 square leaf motifs joined as you go, an edging of single crochet, a scalloped hem, and crocheted tab tops that slide straight onto a curtain rod. All instructions use US crochet terms.
Each finished panel measures 40.8 in (103.6 cm) wide and 81.6 in (207.3 cm) long, or 83.6 in (212.3 cm) including the tabs.
Construction is simple and repetitive. You work a ridged leaf back and forth in the back loops, then grow chain-loop mesh around it in rounds until it becomes a square. Each new motif joins to its neighbors during its last round. A three-part border finishes each panel.
Finished Size and Construction
- Finished panel size: 40.8 x 81.6 in (103.6 x 207.3 cm); 83.6 in (212.3 cm) to the top of the tabs
- Skill level: Intermediate
- Terminology: US
- Yarn weight: Sport (#2), cotton
- Hook: 4.0 mm (G-6)
- Number of pieces: 100 motifs (50 per panel), forming 2 separate panels
- Layout per panel: 5 motifs wide x 10 motifs tall
- Motif size (blocked): 8 x 8 in (20.3 x 20.3 cm)
- Panel size before border: 40 x 80 in (101.6 x 203.2 cm)
- Border depth: sides and top 0.4 in (1.0 cm); bottom 1.2 in (3.0 cm) including the scallops; tabs extend 2 in (5.1 cm) above the top edge
Materials
Choose a smooth, mercerized or matte cotton in sport weight. Cotton keeps the mesh crisp, blocks well, and won’t stretch much under its own weight the way acrylic can. Avoid fuzzy blends, because they blur the leaf ridges.
Yarn (one color):
– Natural/ecru cream: 1,200 g (about 3,720 m) for the pair, or 600 g (about 1,860 m) per panel
Quantities assume roughly 3.1 m per gram and include a margin of about 15 percent for swatching and gauge differences.
Tools:
– 4.0 mm (G-6) crochet hook
– Tapestry needle
– Locking stitch markers
– Rustproof pins and blocking mats (or a clean carpet covered with a sheet)
– Measuring tape
– Spray bottle
Abbreviations (US Terms)
- ch – chain
- sc – single crochet
- dc – double crochet
- sl st – slip stitch
- BLO – back loop only
- sp(s) – space(s)
- st(s) – stitch(es)
- rep – repeat
- RS / WS – right side / wrong side
Special technique – Join Loop (JL): Ch 2, sl st into the matching ch-5 loop of the neighboring motif, ch 2. This replaces one ch-5 loop and keeps the loop the same length.
Gauge and Checkpoints
Border gauge: 20 sc = 4 in (10.2 cm), worked into the mesh loops.
Make one complete motif before anything else, then block it and measure it. That motif is your gauge swatch.
Checkpoints for a single motif:
– After the leaf (Row 5): about 4 x 2.25 in (10.2 x 5.7 cm)
– After Round 1: about 5 x 3.5 in (12.7 x 8.9 cm), oval
– After Round 3: about 6 in (15.2 cm) square when lightly stretched
– After Round 5, unblocked: about 7.75 in (19.7 cm) square
– After blocking: 8 in (20.3 cm) square, ±0.25 in (0.6 cm)
If your motif is too big: go down to a 3.75 mm hook, or work ch 4 in place of ch 5 in Rounds 2 to 5.
If your motif is too small: go up to a 4.5 mm hook. Don’t add extra chains, because that makes the mesh sag.
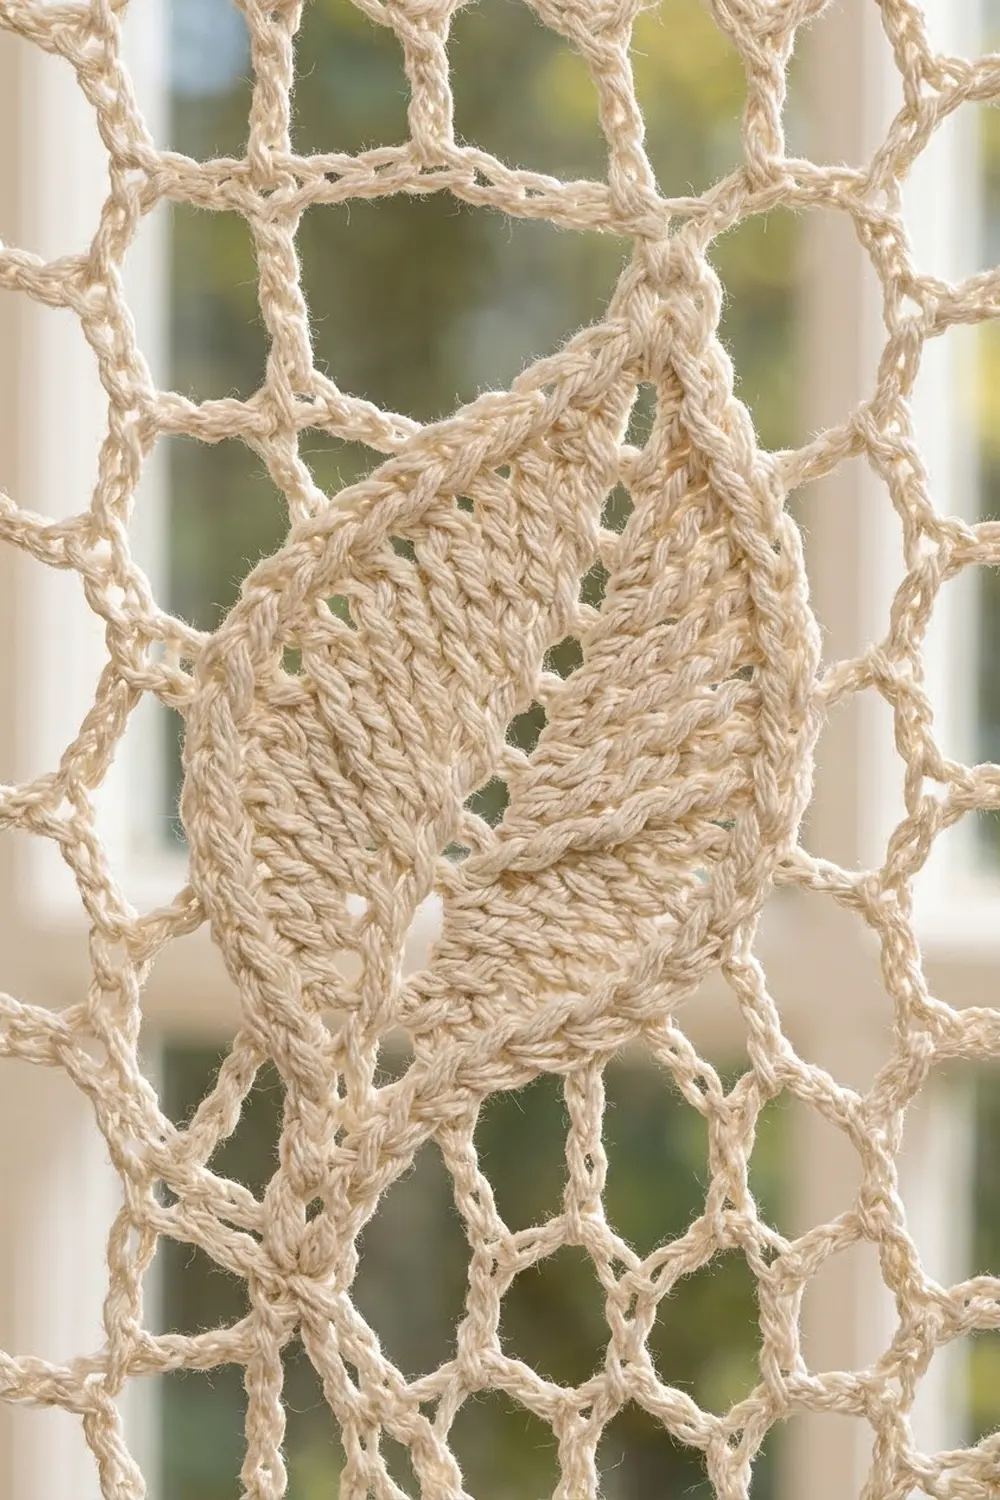
Leaf Motif
The Leaf
Ch 17.
Row 1 (RS): Sc in 2nd ch from hook and in next 14 ch (15 sc), 3 sc in last ch (tip). Rotate and work along the opposite side of the foundation: sc in next 15 ch. (33 sc)
Row 2: Ch 1, turn. Working in BLO throughout: sc in each st up to the center st of the tip, 3 sc in center st, then sc in each remaining st, leaving the last 4 sts unworked. (31 sc: 16 before the tip, 3 at the tip, 12 after)
Row 3: Ch 1, turn. Work as Row 2. (29 sc: 13 + 3 + 13)
Row 4: Ch 1, turn. Work as Row 2. (27 sc: 14 + 3 + 10)
Row 5: Ch 1, turn. Work as Row 2. (25 sc: 11 + 3 + 11)
Each row loses 2 sts overall: 2 are added at the tip and 4 are left unworked at the base. That gives the leaf its tapered, stepped base. Working in the back loops builds the raised diagonal vein ridges, and every row wraps around the tip, so the ridges show on both halves.
Do not fasten off.
Mesh Rounds
Round 1: Ch 1. Work around the whole leaf, spacing the sts evenly: sc at the stem base (sc 1), (ch 5, sc) 5 times along the first long edge (sc 2 to 6), ch 5, sc in the center tip st (sc 7), (ch 5, sc) 5 times along the second long edge (sc 8 to 12), ch 5. Join with sl st to the first sc. (12 sc, 12 ch-5 loops)
The loops are numbered 1 to 12. Loop 1 is the one that follows the stem sc.
Round 2: Sl st into the first 3 ch of loop 1. Ch 1. (Sc, ch 5, sc, ch 5) in the corner loop, (sc, ch 5) in each of the next 2 loops. Rep from * 4 times; the corner loops are loops 1, 4, 7, and 10. Join. (16 loops: 4 corner loops and 3 side loops per side)
The leaf now lies on the diagonal, with the stem in one corner and the tip in the opposite corner.
Round 3: Sl st into the first 3 ch of the next corner ch-5 sp. Ch 1. (Sc, ch 5, sc, ch 5) in the corner sp, (sc, ch 5) in each of the next 3 sps. Rep from * 4 times. Join. (20 loops: 4 corner loops and 4 side loops per side)
Round 4: Work as Round 3, with (sc, ch 5) in each of the next 4 sps on each side. (24 loops: 4 corner loops and 5 side loops per side)
Round 5 (join round): Work as Round 3, with (sc, ch 5) in each of the next 5 sps on each side. (28 loops: 4 corner loops and 6 side loops per side)
Fasten off and weave in the ends.
Per-side definition: Each motif side has 8 loops, counting its 2 corner loops: 1 corner + 6 side + 1 corner. Every side of every motif uses this count.
Make All Pieces
You need 100 motifs in natural cream: 50 per panel, 10 rows of 5. Make the first motif in full as described above. Every later motif is joined to its neighbors in Round 5.
To match the staggered columns in the photo, alternate the direction of the leaf tip by column. R means the tip points to the upper right, and L means it points to the upper left.
Row 1:   R  L  R  L  R
Row 2:   R  L  R  L  R
Row 3:   R  L  R  L  R
  ...    (repeat through)
Row 10:  R  L  R  L  R
Make the second panel the same way. The two panels are never joined to each other.
Joining
Method: Join as you go in Round 5.
Work Round 5 as normal until you reach the first side that touches a finished motif. Along that side, replace every ch-5 with a JL that connects to the matching loop on the neighbor:
- Corner loop: JL into the neighbor’s corner loop
- 6 side loops: JL into each of the neighbor’s 6 side loops, in order
- Next corner loop: JL into the neighbor’s corner loop
That makes 8 joins per shared side, with each loop joined to its matching loop. No stitches are added or skipped at the seam, so the mesh carries on without a break. At a point where 4 motifs meet, sl st into the existing corner join instead of into a loop.
Tension: Keep the ch-2 halves of each JL the same size as your normal chains. If you pull them tight, the seams pucker; if they’re loose, the leaves droop.
Size checkpoint: When the first row of 5 motifs is joined, lay it flat and pin it out. It should measure 40 in (101.6 cm) wide. Check again after Row 5: 40 x 40 in (101.6 x 101.6 cm).
Border
Border gauge: 5 sc per ch-5 loop, which gives 20 sc = 4 in (10.2 cm).
Starting counts: The panel is 5 motifs wide, so each short edge has 5 x 8 = 40 loops. It is 10 motifs tall, so each long edge has 10 x 8 = 80 loops. The 4 outer corner loops of the panel each belong to two edges.
Round 1 (RS): Join the yarn in the outer corner loop at the bottom right. Work (3 sc, ch 2, 3 sc) in each of the 4 panel corner loops. Work 5 sc in every other loop, including the corner loops at the seams between motifs. Join with sl st.
- Short edges: (38 loops x 5) + (2 corners x 3) = 196 sc
- Long edges: (78 loops x 5) + (2 corners x 3) = 396 sc
- Total: 196 + 196 + 396 + 396 = 1,184 sc and 4 ch-2 corner sps
Round 2: Ch 1. Sc in each sc, and work (sc, ch 2, sc) in each corner sp. Join.
- Short edges: 196 worked one per stitch + 2 corner sc = 198 sc
- Long edges: 396 + 2 = 398 sc
- Total: 1,192 sc
Bottom scallops (worked as a row): With the RS facing, join the yarn in the first sc of the bottom edge. Sc in next st, skip 2 sts, 7 dc in next st, skip 2 sts. Rep from * 33 times, then sl st in the corner ch-2 sp. Fasten off.
This gives 33 scallops of about 1.2 in (3.0 cm) each. Each repeat uses 6 sts, and 33 x 6 = 198, which uses the whole bottom edge exactly.
Tabs (top edge, 9 tabs): Count the 198 sts of the top edge. The tabs go on sts 1–6, 25–30, 49–54, 73–78, 97–102, 121–126, 145–150, 169–174, and 193–198. Each tab is 6 sts wide, and the 8 gaps between tabs are 18 sts each: 9 x 6 + 8 x 18 = 198.
For each tab, join the yarn in the first of its 6 sts. Ch 1, then sc in each of the 6 sts.
Rows 2–22: Ch 1, turn, sc in each of the 6 sts. Each tab measures 1.2 x 4 in (3.0 x 10.2 cm).
Fasten off with a long tail. Fold the tab to the WS and whipstitch the last row to the back of Round 2, forming a loop 2 in (5.1 cm) deep. This fits rods up to 1.25 in (3.2 cm) in diameter.
Why the math works: At 1 in (2.5 cm) per loop, 8 loops fill one 8 in motif side, and 5 sc per loop gives the 5 sc per inch gauge. The 196 or 198 sts on a short edge therefore lie flat across 40 in (101.6 cm), so the border neither ruffles nor pulls the mesh in.
Final Blocking
- Soak the panel in cool water with a little wool wash for 15 minutes.
- Press out the water gently. Roll the panel in towels; don’t wring it.
- Lay it flat and pin the body to 40 x 80 in (101.6 x 203.2 cm).
- Pin every motif junction so the seams form a straight grid.
- Pin out each scallop point along the hem.
- Open each leaf with your fingers so it lies flat and the ridges stand up.
- Let it dry completely, which takes 24 to 48 hours, then unpin.
You can also hang the damp panel on the rod and pull the hem straight. Gravity will finish the blocking.
Final Quality-Control Checklist
- [ ] 50 motifs per panel, 5 x 10, with the leaf tips alternating R/L by column
- [ ] Every motif’s Round 5 has 28 loops, or 8 per side counting the corners
- [ ] No missed joins along any shared side
- [ ] Border Round 1: 196 / 396 sc per edge
- [ ] Border Round 2: 198 / 398 sc per edge
- [ ] 33 even scallops
- [ ] 9 tabs, evenly spaced and stitched down securely
- [ ] Blocked size 40.8 x 81.6 in (103.6 x 207.3 cm)
- [ ] All ends woven in along solid stitches, not through the mesh
Troubleshooting
Leaf curls into a cone: You probably worked into both loops in Rows 2 to 5. Use the back loops only, and block firmly.
Motif is not square: Check that the corners in Round 2 fall in loops 1, 4, 7, and 10. If a corner is off by one loop, one side will end up longer.
Seams pucker: Your JL chains are too tight. Loosen them, or chain one size up for the joins only.
Border ruffles: You may be working more than 5 sc into some loops. Recount against 196 and 396.
Border cups in: Your sc are too tight. Go up 0.5 mm for the border.
Scallops don’t end evenly: Round 2 is miscounted. The bottom edge must have exactly 198 sts.
Panel grows longer while hanging: Cotton relaxes a little. Re-block, or shorten each tab by 2 rows.
Care
Hand wash in cool water, or machine wash on a gentle cycle in a mesh laundry bag. Reshape and dry the panels flat or on the rod; don’t tumble dry.
Final Notes
The measurement chain is simple. One leaf of 4 x 2.25 in (10.2 x 5.7 cm) grows into a motif of 8 in (20.3 cm) with 8 loops per side. Five motifs make 40 in (101.6 cm) and ten make 80 in (203.2 cm). At 5 sc per loop, the border holds that size exactly, so each panel finishes at 40.8 x 81.6 in (103.6 x 207.3 cm). Check each checkpoint as you reach it, and both panels will match.
Happy crocheting!