

The Sunlit Meadow Curtain is a lacy tab-top panel built from classic granny squares. Each square has a warm mustard-gold center circled by eight sage-green cluster petals, set inside open cream rounds that let daylight through.
The palette is deliberately soft: cream, sage and gold. Hung against a bright window, the cream rounds glow and the flowers read as a repeating grid of small blooms. A scalloped hem and simple folded tabs finish the cottage look.
This pattern uses US crochet terms. One finished panel measures about 28.5 in (72.4 cm) wide by 73.25 in (186.1 cm) long without the tabs. The tabs add about 2.75 in (7.0 cm), for a total hanging length of about 76 in (193.0 cm). The photo shows a matching pair, so make two panels.
Construction is simple. You make 65 squares per panel, join them flat into a grid 5 squares wide by 13 squares tall, work a two-round border with scallops on the bottom edge, and then add six tabs along the top.
Finished Size and Construction
- Finished panel size: 28.5 in x 73.25 in (72.4 cm x 186.1 cm), plus tabs of about 2.75 in (7.0 cm)
- Skill level: Easy–Intermediate
- Terminology: US terms
- Yarn weight: Worsted (Category 4) cotton or cotton blend
- Hook: 5.0 mm (H-8)
- Number of pieces: 65 squares per panel (130 for a pair), plus 6 tabs per panel
- Layout: 5 squares wide x 13 squares tall
- Square size: 5.5 in x 5.5 in (14.0 cm x 14.0 cm), 23 stitches per side
- Size before border: 27.5 in x 71.5 in (69.9 cm x 181.6 cm)
- Border depth: 0.5 in (1.3 cm) on the sides and top; 1.25 in (3.2 cm) on the bottom, including the scallops
Materials
Choose a smooth, mercerized or matte worsted-weight cotton, about 170 m per 100 g. Cotton drapes well, holds its shape on a rod and is easy to wash. Avoid fuzzy yarns, because they blur the lace.
Amounts for ONE panel (double these for a pair):
- Mustard gold: 110 g (about 187 m)
- Sage green: 150 g (about 255 m)
- Cream: 520 g (about 884 m)
These amounts include a margin of roughly 10% for gauge swatching and the border.
Tools:
- 5.0 mm (H-8) crochet hook
- Tapestry needle
- Stitch markers
- Rustproof pins and a blocking surface
- Measuring tape
- A curtain rod up to 1.5 in (3.8 cm) in diameter
Abbreviations (US Terms)
- ch – chain
- sl st – slip stitch
- sc – single crochet
- dc – double crochet
- sp(s) – space(s)
- st(s) – stitch(es)
- sk – skip
- RS / WS – right side / wrong side
Special stitches:
- 3-dc cluster (cl): *Yarn over, insert hook in the stitch, pull up a loop, yarn over, pull through 2 loops; repeat from * 2 more times in the same stitch (4 loops on hook). Yarn over and pull through all 4 loops.
- Beginning cluster (beg cl): Ch 2, then work a 2-dc cluster in the same stitch (the same method as above, but repeated only twice).
Gauge and Checkpoints
Make one complete square before anything else, and measure it after a light steam or wet block.
Square checkpoints:
- After Round 1: 1.75 in (4.4 cm) across
- After Round 2: 3 in (7.6 cm) across
- After Round 3: 3.75 in (9.5 cm) square
- After Round 4: 4.5 in (11.4 cm) square
- After Round 5: 5.25 in (13.3 cm) square
- After Round 6: 5.5 in (14.0 cm) square
Border gauge: 23 sc = 5.5 in (14.0 cm), or about 4.2 sc per inch (2.5 cm).
If your square is too big (over 5.75 in / 14.6 cm), go down to a 4.5 mm hook. If it is too small (under 5.25 in / 13.3 cm), go up to a 5.5 mm hook.
An error of only 1/4 in (0.6 cm) per square adds up to 3.25 in (8.3 cm) over the 13 squares of the panel length. That is why it pays to check now.
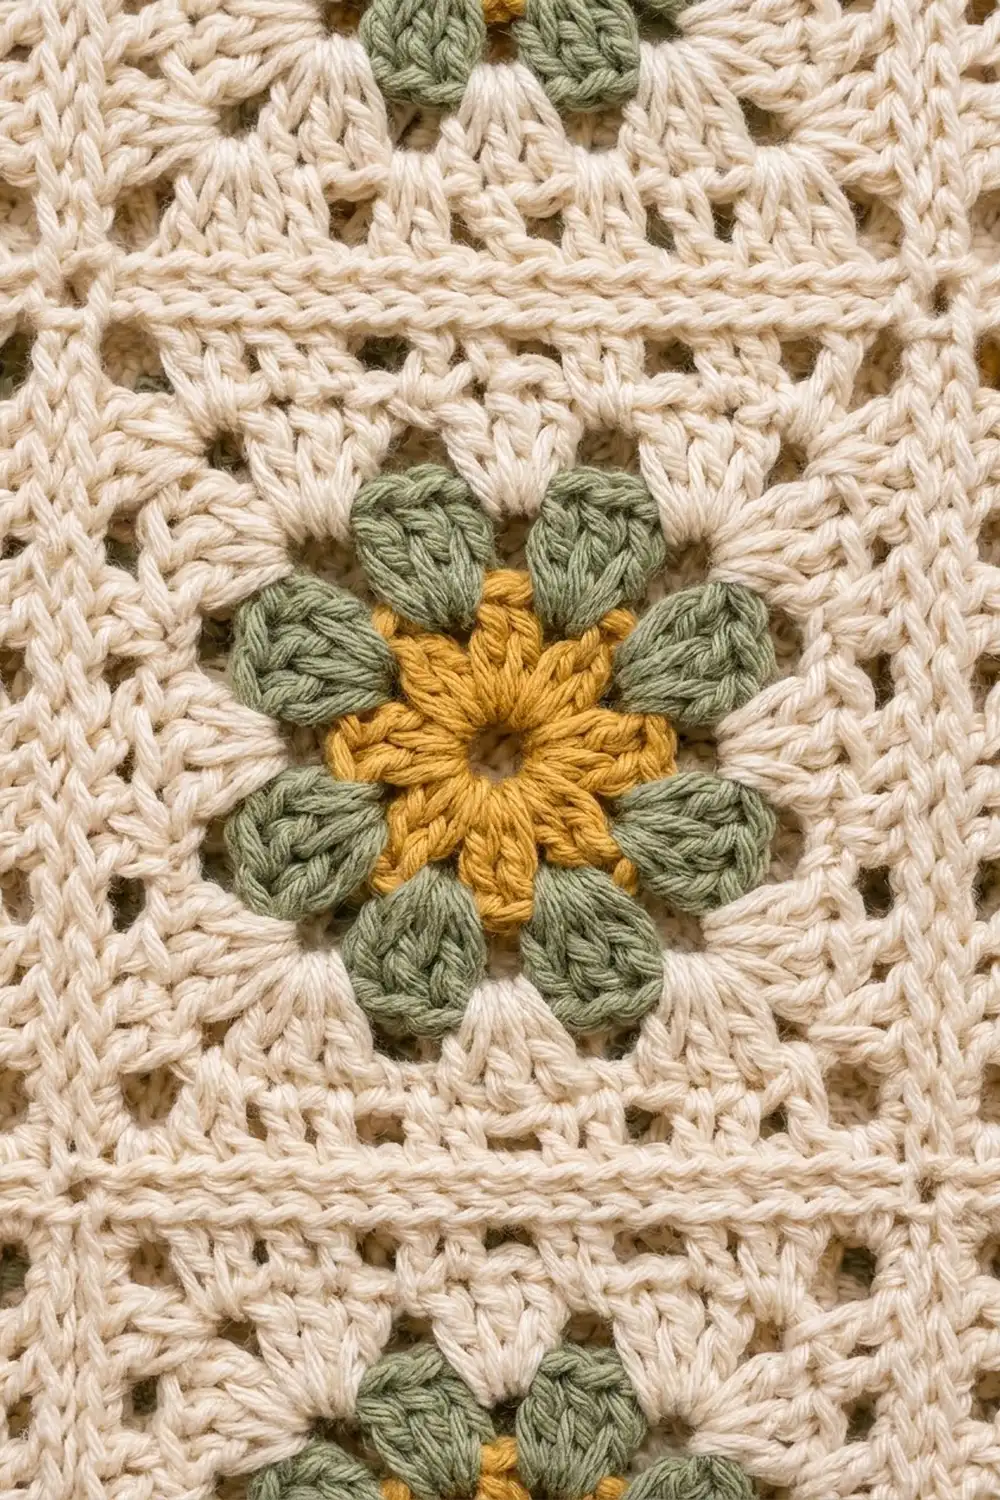
The Square (Make 65 per Panel)
Round 1 (gold)
Make a magic ring. Ch 3 (counts as dc), then work 15 dc into the ring. Join with a sl st to the top of the beginning ch-3. (16 dc)
Pull the ring closed and fasten off.
Round 2 (sage green, petals)
Join green in any dc.
Beg cl in the same st, ch 3, sk next dc. Cl in next dc, ch 3, sk next dc; repeat from * 6 more times. Join with a sl st to the top of the beg cl. (8 clusters, 8 ch-3 sps)*
Fasten off. Each cluster sits above every other gold dc, which gives eight evenly spaced petals.
Round 3 (cream, squaring round)
This is a conversion round: it turns the 8-petal circle into a square. Join cream in any ch-3 sp.
- Ch 3 (counts as dc), then work (2 dc, ch 2, 3 dc) in the same sp. This is the first corner.
- Ch 1, 3 dc in the next ch-3 sp, ch 1.
- *(3 dc, ch 2, 3 dc) in the next ch-3 sp, ch 1, 3 dc in the next ch-3 sp, ch 1; repeat from * 2 more times.
- Join with a sl st to the top of the beginning ch-3.
Count: 4 corners x 6 dc + 4 side groups x 3 dc = 36 dc, plus 4 ch-2 corner sps and 8 ch-1 sps. Each side has 9 dc and 2 ch-1 sps between its corner ch-2 sps.
Round 4 (cream)
Sl st in the next 2 dc and into the ch-2 corner sp.
- Ch 3, then work (2 dc, ch 2, 3 dc) in the same sp.
- *Ch 1, 3 dc in each of the next 2 ch-1 sps, with ch 1 between them, then ch 1.
- Work (3 dc, ch 2, 3 dc) in the next corner sp. Repeat from * 2 more times.
- Ch 1, 3 dc in each of the next 2 ch-1 sps with ch 1 between, ch 1, and join.
Count: 12 dc per side (4 groups of 3), 3 ch-1 sps per side. Total: 48 dc.
Round 5 (cream)
Sl st into the corner sp as before. Work the same way as Round 4: a corner group in each ch-2 sp, and 3 dc in every ch-1 sp along the sides, with ch 1 between all groups.
Count: 15 dc per side (5 groups), 4 ch-1 sps per side. Total: 60 dc.
Round 6 (cream, sc edge)
Ch 1. Work 1 sc in each dc and 1 sc in each ch-1 sp around. In each ch-2 corner sp, work 3 sc. Join to the first sc.
Count per side: 15 sc (in the dc) + 4 sc (in the ch-1 sps) = 19 sc. Add the 2 outer sc from the corner groups and the 2 corner (middle) sc, and each side has 23 sts including both corners.
Total: 4 x 23 − 4 shared corners = 88 sc.
Fasten off and weave in the ends. Mark the middle sc of each corner group as the corner st.
Make All Pieces
For one panel, make 65 squares: 5 across x 13 down. Every square uses all three colors in the same sequence: gold (Round 1), sage (Round 2) and cream (Rounds 3–6). For a pair, make 130 squares.
Layout grid for one panel (each S is one square):
S S S S S    row 1 (top)
S S S S S
S S S S S
S S S S S
S S S S S
S S S S S
S S S S S
S S S S S
S S S S S
S S S S S
S S S S S
S S S S S
S S S S S    row 13 (bottom)
Block all the squares to 5.5 in (14.0 cm) before joining. Joined squares that are already the same size give straight seams and a panel that hangs straight.
Joining
Method: A flat slip stitch join through the back loops, worked with RS facing up. This makes a thin, flat seam that keeps the grid lines crisp and adds no stitches.
Stitch-to-stitch logic: Each side has 23 sts, corner to corner. Place two squares side by side with RS up and their edges touching.
- Join cream with a sl st through the back loop of the corner st on the right-hand square.
- Sl st through the back loop of the matching corner st on the left-hand square.
- Continue alternating, 1 sl st into each square, working st 2 to st 2, st 3 to st 3, and so on to the corner st 23 on both squares.
Every seam matches 23 sts to 23 sts, with nothing added or skipped.
Order:
- Join the squares into 13 horizontal rows of 5 squares each.
- Join the rows to each other along their long edges, still working stitch to stitch: 5 x 23 = 115 sts to 115 sts.
- Where four corners meet, work through all four corner sts neatly so that no hole forms.
Tension: Keep the sl sts as loose as the sc edge. If the seam puckers, switch to a hook one size larger for joining only.
Size checkpoint: The joined panel should measure 27.5 in x 71.5 in (69.9 cm x 181.6 cm). Two joined squares should measure 11 in (27.9 cm).
Border
Border gauge: About 4.2 sc per inch (2.5 cm). Each sc round adds about 0.25 in (0.6 cm).
Starting counts. Count both corner sts of every square along each edge, and add nothing at the seams:
- Top and bottom edges: 5 squares x 23 = 115 sts each
- Left and right edges: 13 squares x 23 = 299 sts each
Border Round 1 (cream)
With RS facing, join cream in any st along a side edge. Ch 1.
Work 1 sc in each st around the panel. Work 3 sc in each of the 4 outer corner sts. Join to the first sc.
Counts per side (including both corner-center sc):
- Top and bottom: 115 + 2 = 117 sts
- Left and right: 299 + 2 = 301 sts
Total: 2 x 117 + 2 x 301 − 4 = 832 sc. As a check, 824 starting sts + 8 corner increases = 832.
Border Round 2 (cream, scallops on the bottom only)
Ch 1. Work along each edge as follows.
- Sides and top: 1 sc in each st along both long sides (299 sc each between the corners). Work 3 sc in each of the 2 top corner sts, with 115 sc across the top between them.
- Bottom edge: Sc in the bottom corner st (st 1 of 117). *Sk 1 st, 5 dc in the next st, sk 1 st, sc in the next st; repeat from * 29 times. The final sc lands exactly in the opposite bottom corner st (st 117).
Join and fasten off.
Why the math works: Each scallop uses 4 sts. The bottom edge has 117 sts, which is 1 starting sc + (29 x 4), so the scallops begin and end exactly on the corners. Bottom count: 29 scallops = 145 dc + 30 sc.
Top Tabs (make 6)
The top edge of Round 2 now has 121 sts: 3 corner sc + 115 sc + 3 corner sc. Number them from left to right with RS facing.
Each tab is 6 sts wide, with 17 sts between tabs:
6 tabs x 6 sts + 5 gaps x 17 sts = 36 + 85 = 121 sts.
Tabs start on sts 1, 24, 47, 70, 93 and 116. That 23-st spacing matches the width of one square, so the tabs line up with the grid below.
For each tab:
- Row 1: Join cream in the starting st, ch 1, sc in the same st and the next 5 sts. Turn. (6 sc)
- Rows 2–26: Ch 1, sc in each st across. Turn. (6 sc)
- The tab should measure about 6 in (15.2 cm) long. Fasten off, leaving a 12 in (30.5 cm) tail.
- Fold the tab to the WS and whipstitch its last row to the base of Border Round 1. This forms a loop about 2.75 in (7.0 cm) tall.
Final Blocking
- Weave in all remaining ends along the seams, not through the open lace.
- Soak the panel in cool water for 15 minutes, then press out the water. Do not wring it.
- Roll the panel in towels to remove as much moisture as possible.
- Lay it flat on a large clean surface, such as blocking mats, a bed or a sheet on the floor.
- Pin it to 28.5 in x 73.25 in (72.4 cm x 186.1 cm). Start by pinning the four corners, then pin the seam lines straight.
- Pin each bottom scallop into a smooth curve.
- Lay the tabs flat, but do not stretch them.
- Leave the panel to dry completely, usually 24–48 hours.
Final Quality-Control Checklist
- [ ] All 65 squares measure 5.5 in (14.0 cm), with 23 sts per side
- [ ] Each flower has 8 sage petals around a 16-dc gold center
- [ ] Seams are flat and matched stitch to stitch, with no gaps at the four-corner meeting points
- [ ] Border Round 1 has 832 sc
- [ ] The bottom edge has 29 scallops ending exactly on the corners
- [ ] Six tabs start on sts 1, 24, 47, 70, 93 and 116, and all are the same length
- [ ] The panel is 28.5 in x 73.25 in (72.4 cm x 186.1 cm) after blocking
- [ ] If making a pair, both panels match in size
Troubleshooting
Squares are cupping: Round 2 chains are too tight. Use ch 3 loosely, or try ch 4 between petals.
Squares are ruffling: The dc groups are too loose. Go down a hook size for Rounds 3–5.
Petals lean to one side: Make sure you skip exactly 1 dc between clusters in Round 2.
Seam puckers: The join is too tight. Use a larger hook for joining.
Scallops don’t end on the corner: Recount Border Round 1 along the bottom. It must be exactly 117 sts.
Panel hangs crooked: Re-block it and pin the seam lines straight. Check that all squares were blocked to the same size.
Tabs stretch on the rod: Work the tabs with a hook one size smaller.
Care
Hand wash or machine wash in cool water on a gentle cycle inside a large mesh bag. Lay flat to dry and reshape the scallops while damp.

Final Notes
The whole curtain depends on one measurement chain. Each square is 5.5 in (14.0 cm) with 23 sts per side. Five squares across gives 27.5 in (69.9 cm) and 115 sts. Thirteen squares down gives 71.5 in (181.6 cm) and 299 sts. The two border rounds bring the panel to 28.5 in x 73.25 in (72.4 cm x 186.1 cm). The 117-st bottom edge holds exactly 29 scallops, and the 121-st top edge holds 6 evenly spaced tabs. Get the first square right and everything after it falls into place.
Happy crocheting!