

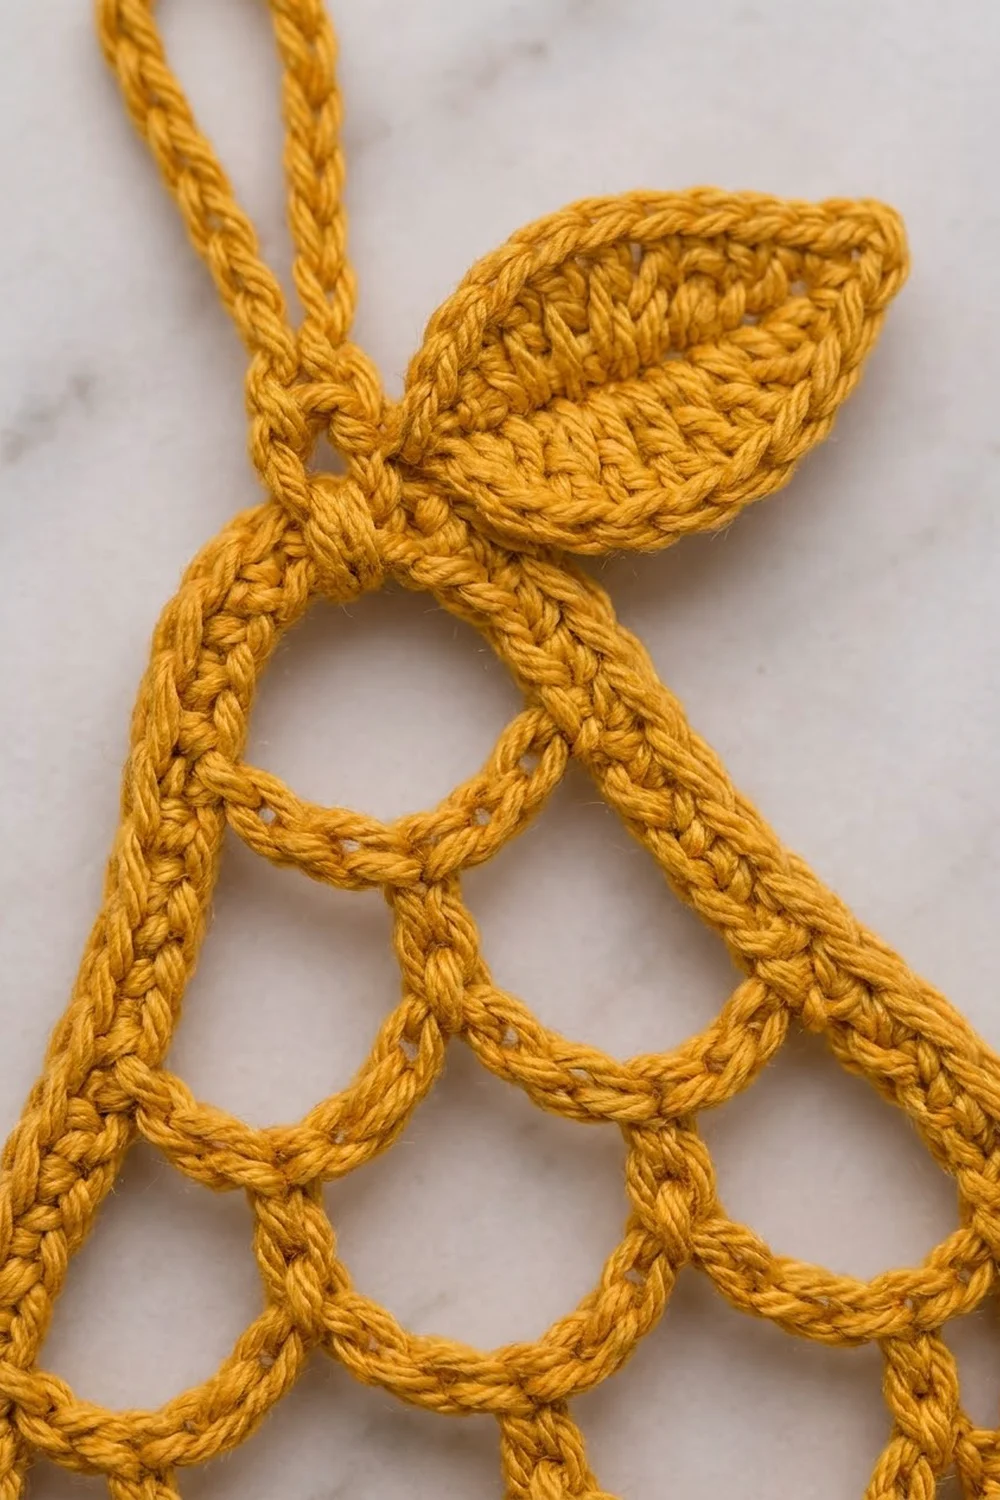
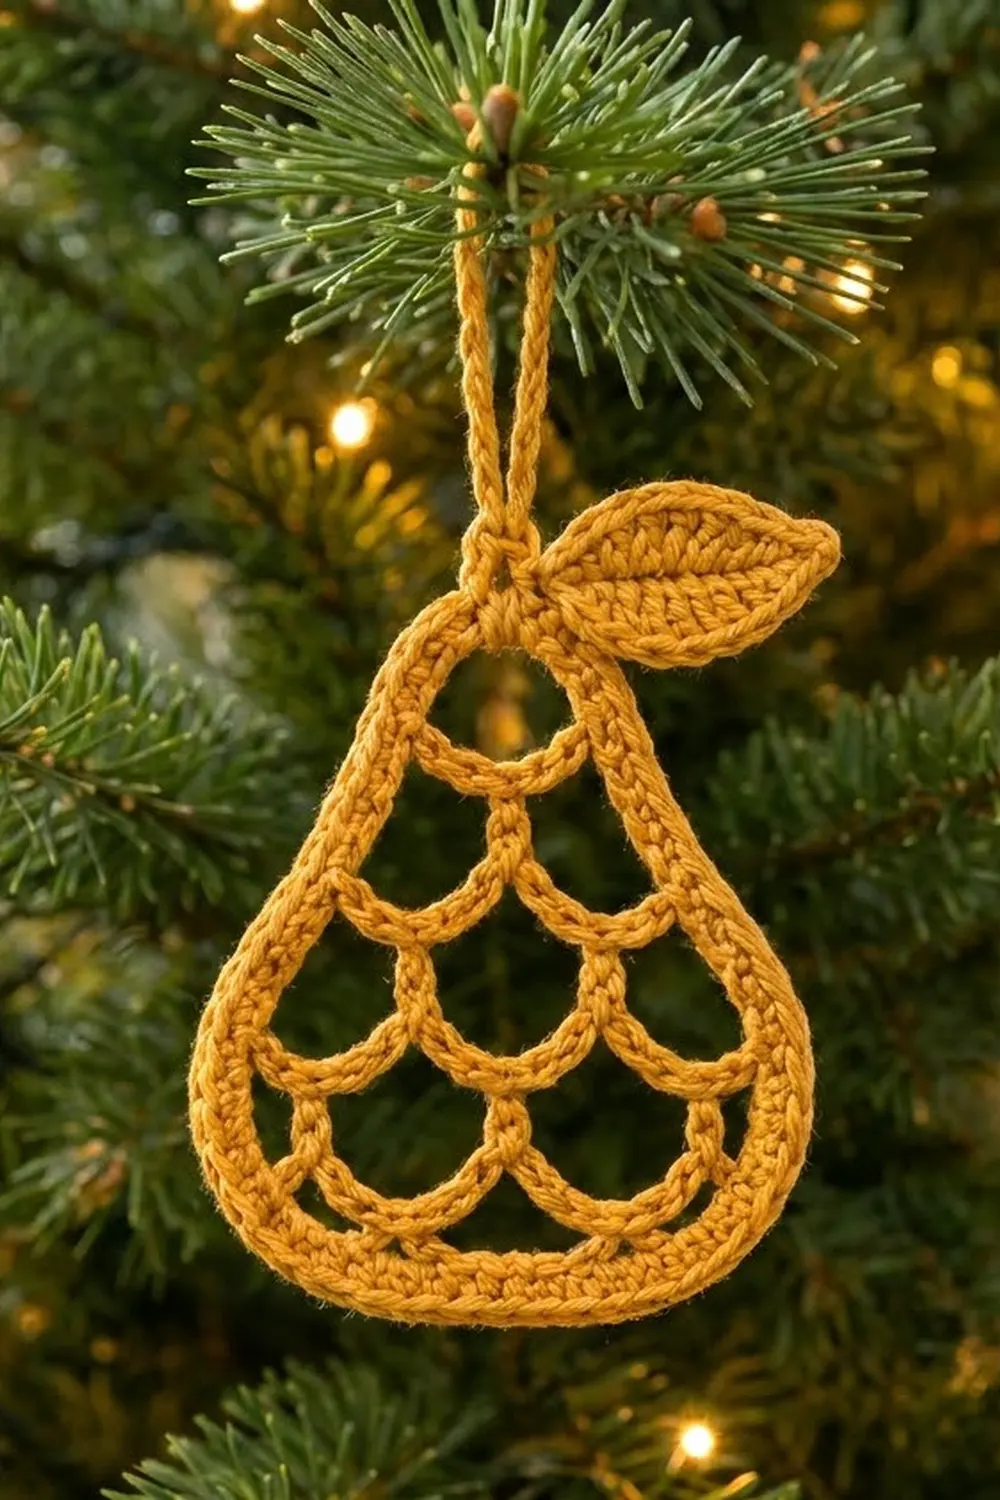
This little pear is a lacy ornament with a solid outline. Inside the frame, chain arches hang in rows like scales: one arch at the top, then two, three and four. A chain hanging loop sits at the top, and a small solid leaf is tucked beside it.
The sample uses one color only, a warm mustard gold that glows against green branches and white lights. It looks light and airy, like a filigree ornament, and it works up fast enough to make several for gift tags or tree trims.
This pattern uses US crochet terms. The finished pear body measures 2.75 in (7.0 cm) wide and 3.25 in (8.3 cm) tall. With the hanging loop, the whole ornament is about 4.5 in (11.4 cm) tall.
You work the body from the top down. Start with a small ring at the neck, then work 4 rows of fishnet mesh that each add one arch. A fifth row closes the bottom with short chains. Two rounds of single crochet then outline the whole piece and give it the pear curve. Last, you add the hanging loop and sew on a leaf that you make separately.
Finished Size and Construction
- Finished body size: 2.75 in (7.0 cm) wide x 3.25 in (8.3 cm) tall
- Height with hanging loop: about 4.5 in (11.4 cm)
- Skill level: Easy to intermediate
- Terminology: US crochet terms
- Yarn weight: Sport weight (#2) mercerized cotton
- Hook: 2.75 mm (C-2)
- Number of pieces: 1 pear body plus 1 small leaf appliqué, sewn together into one ornament
- Layout: A single pear that hangs from a loop at the top center
- Leaf size: about 1.25 in (3.2 cm) long x 0.75 in (1.9 cm) wide
- Size before border (after Row 5): 2.25 in (5.7 cm) wide x 2.75 in (7.0 cm) tall
- Border depth: 2 rounds of sc, about 0.25 in (0.6 cm) on each side
Materials
Yarn: Use a smooth, mercerized sport weight cotton. Cotton keeps the open arches crisp and blocks well. Fuzzy or very stretchy yarns blur the lattice and let the arches sag.
- Mustard gold: 10 g, about 32 m (35 yd)
This makes the body, border, loop and leaf for one ornament. The amount includes a margin of about 25% for tails, testing and any ripping back.
Tools:
- 2.75 mm (C-2) crochet hook
- Tapestry needle
- Scissors
- Blocking mat or folded towel
- Rust-proof pins
- Spray bottle, plus spray starch or fabric stiffener (optional)
Abbreviations (US Terms)
- ch – chain
- sl st – slip stitch
- sc – single crochet
- hdc – half double crochet
- dc – double crochet
- tr – treble crochet
- sp(s) – space(s)
- st(s) – stitch(es)
- RS / WS – right side / wrong side
Special stitch – Arch: An arch is a ch-5 that hangs between two anchor stitches. On the next row, work the anchor sc into the space under the arch, not into its chains.
Beginning ch-4: In Rows 1–4, the ch 4 at the start of the row counts as the first tr.
Gauge and Checkpoints
Gauge: 6 sc = 1 in (2.5 cm), or 24 sc = 4 in (10.2 cm), worked in rows with the 2.75 mm hook.
Lace is hard to judge from a flat swatch, so make the ornament itself as your test piece. Work Rows 1–5 and compare your piece with the checkpoints below before you start the border.
Checkpoints (laid flat and gently straightened, not stretched):
- After Row 1: about 0.75 in (1.9 cm) wide x 0.75 in (1.9 cm) tall
- After Row 2: about 1.25 in (3.2 cm) wide x 1.25 in (3.2 cm) tall
- After Row 3: about 1.75 in (4.4 cm) wide x 1.75 in (4.4 cm) tall
- After Row 4: about 2.25 in (5.7 cm) wide x 2.25 in (5.7 cm) tall
- After Row 5: 2.25 in (5.7 cm) wide x 2.75 in (7.0 cm) tall at the center
- After border Round 2: 2.75 in (7.0 cm) wide x 3.25 in (8.3 cm) tall
Too big: Change to a 2.5 mm hook, or pull each chain a little snugger.
Too small: Change to a 3.0 mm hook. Don’t add chains to the arches, because that would change every border count.
A difference of 0.125 in (0.3 cm) is normal for lace. If you’re off by 0.5 in (1.3 cm) or more, change hooks.
Pear Body
Work the body in turned rows. Each mesh row has a tr at each edge and one more arch than the row before.
Ring: Ch 4, sl st in the first ch to form a ring.
Row 1 (RS): Ch 4 (counts as tr), ch 5, tr in ring. Turn.
(2 tr, 1 arch)
Row 2 (WS): Ch 4 (counts as tr), ch 5, sc in the ch-5 sp, ch 5, tr in the 4th ch of the turning ch. Turn.
(2 tr, 1 sc, 2 arches)
Row 3 (RS): Ch 4 (counts as tr), [ch 5, sc in the next ch-5 sp] 2 times, ch 5, tr in the 4th ch of the turning ch. Turn.
(2 tr, 2 sc, 3 arches)
Row 4 (WS): Ch 4 (counts as tr), [ch 5, sc in the next ch-5 sp] 3 times, ch 5, tr in the 4th ch of the turning ch. Turn.
(2 tr, 3 sc, 4 arches)
The arch count grows by one each row because a row with N arches gets N anchor sc on the next row. Those anchors, plus the 2 tr edges, leave N + 1 gaps to fill with new arches.
Row 5 (RS, closing row): Ch 1, sc in the first tr, ch 2, sc in the next ch-5 sp, [ch 3, sc in the next ch-5 sp] 3 times, ch 2, sc in the 4th ch of the turning ch. Don’t turn and don’t fasten off.
(6 sc, 2 ch-2 sps, 3 ch-3 sps)
The short chains of Row 5 run straight across the bottom of the four Row 4 arches. This closes the lowest tier of openings and gives the border a flat base. The end spaces are ch-2 because each one spans only half an arch.
Measure now. The piece should be 2.25 in (5.7 cm) wide and 2.75 in (7.0 cm) tall.
Border
Two rounds of sc turn the mesh triangle into a pear. The neck stays slim, the shoulders round out, and the bottom becomes a firm, slightly thicker curve.
Border gauge: 6 sc = 1 in (2.5 cm). Work both rounds with the RS facing.
The outline has six sections: corner A, the first side, the top, the second side, corner B and the bottom.
Round 1 (RS): Ch 1, 3 sc in the same st as the last sc of Row 5 (corner A). (3 sc)
Up the first side: 4 sc around the Row 4 tr, 3 sc around the Row 3 tr, 3 sc around the Row 2 tr, 2 sc around the Row 1 tr. (12 sc)
Top: 5 sc in the open part of the ring. (5 sc)
Down the second side: 2 sc around the Row 1 tr, 3 sc around the Row 2 tr, 3 sc around the Row 3 tr, 4 sc around the Row 4 tr. (12 sc)
Corner B: 3 sc in the first sc of Row 5. (3 sc)
Bottom: 2 sc in the ch-2 sp, skip the next sc, [3 sc in the next ch-3 sp, skip the next sc] 3 times, 2 sc in the last ch-2 sp. (13 sc)
Sl st in the first sc to join.
Round 1 total: 3 + 12 + 5 + 12 + 3 + 13 = 48 sc
Why Round 1 works: At gauge, each tr row edge is about 0.5 in (1.3 cm) tall, which fits 3 sc. Using 2 sc at the neck pulls it in, and 4 sc at the widest row lets the shoulders flare. Each side still adds up to 12 sc, or 2 in (5.1 cm), which matches the length of the mesh edge. Along the bottom, 13 sc is about 2.17 in (5.5 cm), close to the 2.25 in (5.7 cm) Row 5 width, so the base lies flat. Skipping the anchor sc keeps the bottom count from growing.
Round 2 (RS): Ch 1, sc in the first sc, 2 sc in the next sc (center of corner A), sc in each sc to the center sc of corner B, 2 sc in that center sc, sc in each remaining sc. Sl st in the first sc to join.
Round 2 total: 48 sts worked 1 per stitch + 2 extra corner sts = 50 sc
By section: corner A 4, first side 12, top 5, second side 12, corner B 4, bottom 13, for 4 + 12 + 5 + 12 + 4 + 13 = 50 sc.
Why Round 2 works: The only extra stitches go at the two bottom corners, where the outline curves most sharply. Everywhere else, 1 sc per stitch keeps the border flat. The two rounds add 0.25 in (0.6 cm) on every side. That brings the width from 2.25 in (5.7 cm) to 2.75 in (7.0 cm) and the height from 2.75 in (7.0 cm) to 3.25 in (8.3 cm).
Hanging Loop
Don’t fasten off. Sl st along Round 2 to the center top st, which is the 3rd of the 5 top sts.
Loop: Ch 15, sl st in the same center top st, then sl st in the next st to lock the loop. Fasten off.
The loop measures about 1.25 in (3.2 cm) from the top of the pear to its fold. For a fuller, corded loop like the sample, work 1 sc in each ch of the loop before you fasten off.
Leaf
Make the leaf as a separate appliqué, working around both sides of a short chain.
Ch 8.
Rnd 1: Sc in the 2nd ch from hook, hdc in the next ch, dc in each of the next 3 ch, hdc in the next ch, (sc, ch 2, sc) in the last ch for the tip. Rotate and work in the free loops on the other side of the chain: hdc in the next ch, dc in each of the next 3 ch, hdc in the next ch, sc in the last ch (the same ch as the first sc). Sl st in the first sc to join.
(14 sts plus a ch-2 tip)
The dc make the widest part of the leaf, and the sc taper it to a point at each end.
Optional vein: With the RS facing, work surface sl sts from the base to the tip along the center line.
Fasten off, leaving a 6 in (15.2 cm) tail. The leaf measures about 1.25 in (3.2 cm) long x 0.75 in (1.9 cm) wide.
Attach the leaf: Place the base of the leaf on the border just to the right of the hanging loop, with the tip angled up and out at about 45 degrees. Sew 3–4 small stitches through the leaf base and Round 2. Add one tack stitch halfway up the leaf so it can’t flip. Weave in the tail on the WS.
Final Blocking
- Spray the ornament until it is evenly damp but not dripping.
- Lay it RS up on a blocking mat.
- Pin the top center and the bottom center so the body is 3.25 in (8.3 cm) tall.
- Pin the widest point on each side so it is 2.75 in (7.0 cm) wide.
- Ease each arch into a smooth, even curve. Pin the center of any arch that sags into a point.
- Shape the neck so it is narrower than the shoulders.
- Flatten the leaf and pin its tip.
- For a crisp finish, use spray starch or diluted fabric stiffener.
- Let it dry completely, usually 6–12 hours, before you unpin it.
Final Quality-Control Checklist
- The body measures 2.75 in (7.0 cm) x 3.25 in (8.3 cm).
- From top to bottom, the arches go 1, 2, 3, 4, and the bottom openings are even.
- Round 1 has 48 sc and Round 2 has 50 sc.
- Each side has 12 sc, and the neck is slimmer than the shoulders.
- The bottom lies flat, with no ruffling or cupping.
- The loop is centered and about 1.25 in (3.2 cm) long.
- The leaf is sewn on securely to the right of the loop.
- All ends are woven in on the WS.
Troubleshooting
Arches are uneven: Keep your chain tension steady, and pin the arches into even curves when you block.
Bottom ruffles: Make sure you skipped the anchor sc in Round 1. If you did, use a smaller hook for the border.
Bottom cups: Your Row 5 chains are too tight. Rework that row more loosely.
Pear looks like a triangle: Check that your side counts are 2-3-3-4, with 2 at the neck, and shape the neck firmly when you block.
Sides don’t match: Count each side to 12 sc before you join Round 1.
Leaf curls: Wet-block the leaf flat and add the tack stitch.
Care
Hand wash in cool water with mild soap, roll the ornament in a towel to remove water, and reshape it to dry flat. If you stiffened it before, stiffen it again after washing.
Final Notes
Here is how the measurements build: at a gauge of 6 sc = 1 in (2.5 cm), the mesh reaches 2.25 in (5.7 cm) wide after Row 4. Row 5 closes it at 2.75 in (7.0 cm) tall. Border Round 1 has 48 sc and Round 2 has 50 sc, which brings the finished pear to 2.75 in (7.0 cm) x 3.25 in (8.3 cm). If every checkpoint matches, the border lies flat and the pear shape comes out right.
Happy crocheting!