

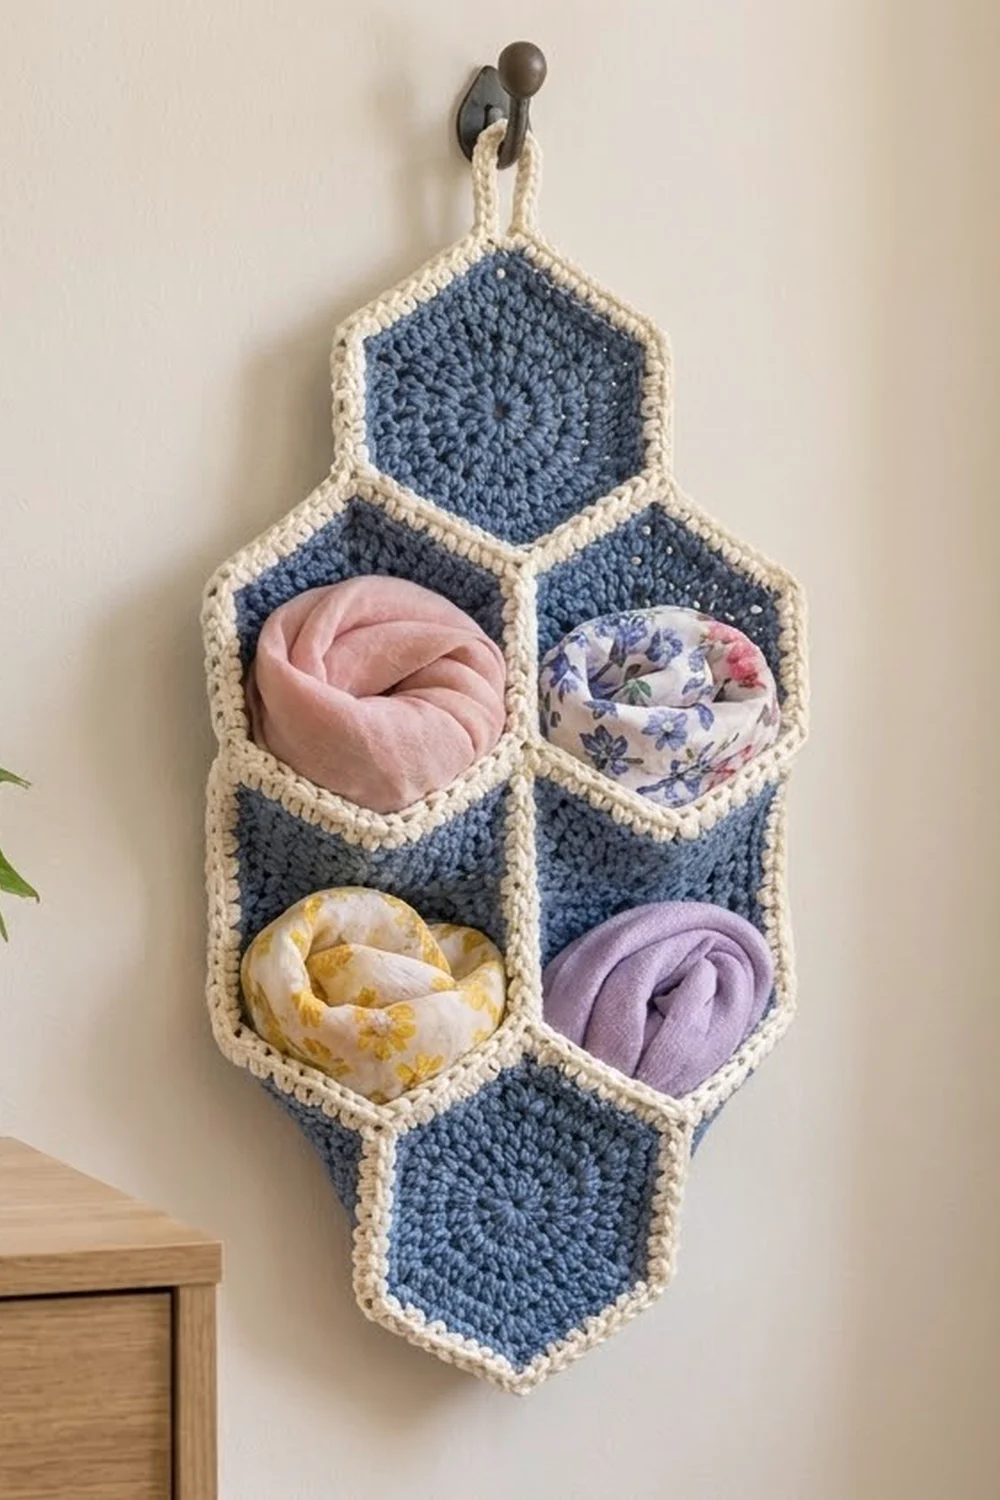
This organizer is a column of six denim-blue hexagons outlined in cream, with one hexagon at the top, two pairs in the middle, and one at the bottom. It hangs from a single loop. The four middle hexagons are pockets with open tops, and they hold rolled scarves, bandanas or hair accessories.
The colors are simple: a soft denim blue for the hexagons and warm cream for every edge, seam, border and the loop. Dense double crochet gives the hexagons a firm, slightly textured surface. The cream outlines give the piece a clean honeycomb look.
The pattern uses US crochet terms. The finished organizer measures about 11.5 in (29.2 cm) wide by 20.5 in (52.1 cm) tall, plus a 3 in (7.6 cm) hanging loop.
How it’s made: you crochet ten identical hexagons. Four of them become pocket fronts and are whipstitched to four back hexagons. The six back hexagons are then whipstitched together, a one-round cream border goes around the outline, and the loop is worked straight onto the top point.
Finished Size and Construction
- Finished size: 11.5 in x 20.5 in (29.2 cm x 52.1 cm), loop not included
- Skill level: Easy-intermediate
- Terminology: US
- Yarn weight: Worsted (#4)
- Hook: 5 mm (H-8)
- Number of pieces: 10 hexagons (6 back + 4 pocket fronts)
- Layout: pointy-top hexagons, 1-2-2-1 vertical
- Piece size: 5.5 in (14.0 cm) flat side to flat side, 6.4 in (16.3 cm) point to point, sides about 3.2 in (8.1 cm)
- Size before border: 11 in x 20 in (27.9 cm x 50.8 cm)
- Border depth: 0.25 in (0.6 cm)
Materials
Use a worsted cotton or cotton blend. Cotton keeps its shape when the pockets are loaded, and it won’t stretch on the hook. Avoid very fuzzy or loosely plied yarn, because it hides the cream outlines.
- Color A, denim blue: 150 g, about 300 m
- Color B, cream: 80 g, about 160 m
Tools:
– 5 mm (H-8) crochet hook
– Tapestry needle
– Stitch markers
– Locking clips or pins
– Measuring tape
– Blocking mat and rustproof pins
– Spray bottle
All quantities include a safety margin of about 20%.
Abbreviations (US Terms)
- ch – chain
- sl st – slip stitch
- sc – single crochet
- dc – double crochet
- sc2tog – single crochet 2 together
- sp – space
- st(s) – stitch(es)
- RS – right side
Special stitch – corner (dc, ch 1, dc): work 1 dc, ch 1 and 1 dc into the same ch-1 space. Each corner adds 1 dc to each of the two sides it touches.
Gauge and Checkpoints
Gauge is 14 dc and 8 rows = 4 in (10.2 cm) in Color A.
Make one full hexagon before anything else and measure flat side to flat side:
- After Round 1: 1 in (2.5 cm)
- After Round 3: 3 in (7.6 cm)
- After Round 5: 5 in (12.7 cm)
- After Round 6: 5.5 in (14.0 cm)
Too big? Go down 0.5 mm in hook size. Too small? Go up 0.5 mm.
If the hexagon ruffles, your stitches are too loose for the hook. If it cups, they’re too tight. Every hexagon must match within 0.25 in (0.6 cm), because the seams pair stitch to stitch.
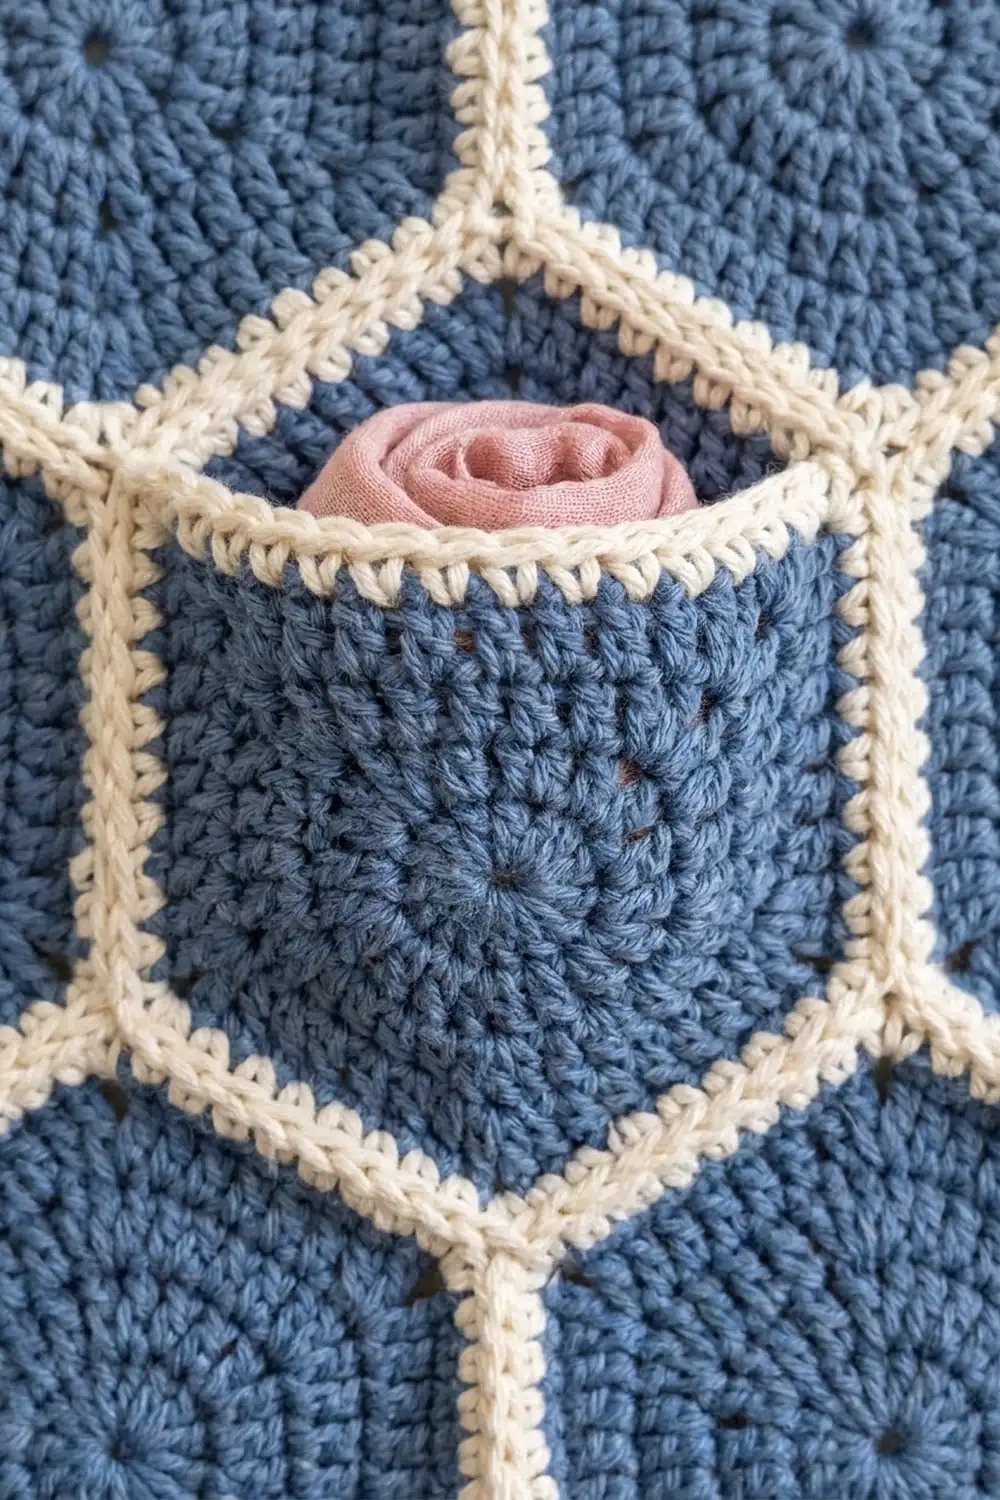
Hexagon (make 10)
Round 1 (Color A): Make a magic ring. Ch 3 (counts as dc), dc in ring, ch 1, [2 dc in ring, ch 1] 5 times. Sl st to the top of the ch-3.
12 dc, 6 ch-1 sp; 2 dc per side.
Round 2: Sl st in next dc and into the ch-1 sp. Ch 3 (counts as dc), dc in each dc to the next ch-1 sp, [(dc, ch 1, dc) in sp, dc in each dc to next sp] 4 times, (dc, ch 1, dc) in the last sp, dc in each dc to the starting sp, dc in starting sp, ch 1. Sl st to the top of the ch-3.
24 dc; 4 dc per side.
Rounds 3–5: Repeat Round 2. Each round has 12 more dc than the round before.
– Round 3: 36 dc; 6 dc per side
– Round 4: 48 dc; 8 dc per side
– Round 5: 60 dc; 10 dc per side
Fasten off Color A. Check: 5 in (12.7 cm) flat to flat.
Round 6 (Color B, trim round): Join cream in any ch-1 sp. Ch 1, (sc, ch 1, sc) in the same sp, sc in each dc to the next sp, [(sc, ch 1, sc) in sp, sc in each dc to next sp] 5 times. Sl st to the first sc and fasten off.
Count: 60 (1 sc in each existing dc) + 12 (2 corner sc in each of the 6 corners) = 72 sc and 6 ch-1 corner sp.
Each side now has 12 sc, and that count includes the side’s 2 corner sc.
Check: 5.5 in (14.0 cm) flat to flat. Weave in ends on the wrong side.
Make All Pieces
Make 10 hexagons, each with Rounds 1–5 in Color A and Round 6 in Color B. Label them like this:
       [ A ]
    [ B ][ C ]
    [ D ][ E ]
       [ F ]
- A to F are the back hexagons.
- P1 to P4 are the pocket fronts, which go on top of B, C, D and E.
Blue rounds total 10 x 60 dc. Cream trim totals 10 x 72 sc.
Joining
Method: Use Color B and a tapestry needle. Whipstitch through the outer loops only, with the RS facing up. Every stitch pairs 1 to 1: corner ch-1 sp to ch-1 sp, and sc to sc. One full side is 14 points (ch-1 sp, 12 sc, ch-1 sp).
Keep the tension snug enough to close the gap but not tight enough to pucker. The seam should lie as flat as the fabric around it.
Step 1 – Pockets: Place P1 on B with both RS facing out and the corners matched. Whipstitch together along the left vertical side, the lower-left side, the lower-right side and the right vertical side. That’s 4 sides, 48 sc plus 5 corner sps. Leave the two upper slanted sides open; they form the V-shaped pocket opening. Repeat with P2 on C, P3 on D and P4 on E.
From here on, join through the back hexagon only, unless a step says otherwise.
Step 2 – Pairs: Join B’s right vertical side to C’s left vertical side (14 points). Do the same for D and E.
Step 3 – Pocket section: Join B’s lower V to D’s upper point, which points up like a Λ. Match the pieces this way:
– B’s lower-right corner sp to D’s upper-right corner sp
– 12 sc to 12 sc
– B’s bottom sp to D’s top sp
– 12 sc to 12 sc
– B’s lower-left sp to D’s upper-left sp
That’s 27 points on each piece. Repeat for C and E.
This seam pulls both points flat into one straight horizontal line. That gives the pocket section straight outer sides, as in the photo, and the bit of extra fabric becomes pocket ease.
Step 4 – Top: Join A’s lower-left side to B’s upper-right side, and A’s lower-right side to C’s upper-left side. Each is 14 points. A’s bottom point meets the top of the B–C seam.
Step 5 – Bottom: Join F’s upper-right side to E’s lower-left side, and F’s upper-left side to D’s lower-right side.
Checkpoint: The piece should measure 11 in (27.9 cm) wide and about 20 in (50.8 cm) tall.
Border
Border gauge: 1 round of sc adds 0.25 in (0.6 cm) on every edge.
The outline has 16 exposed hexagon sides:
– A: 4 sides (upper-left, upper-right and both verticals)
– B and C: 2 sides each
– D and E: 2 sides each
– F: 4 sides
That gives 16 x 12 = 192 sc before any corner adjustments.
The outline also has 16 corner points, and they come in three types:
– Convex points: 10. A’s top, upper-left and upper-right corners; B’s upper-left and C’s upper-right corners; D’s lower-left and E’s lower-right corners; F’s lower-left, bottom and lower-right corners.
– Concave notches: 4. These are where A meets B and C, and where F meets D and E.
– Straight joins: 2. These are on the outer sides, where B meets D and C meets E.
Border round (Color B): With the RS facing, join in A’s top ch-1 sp. Ch 1. Work around the outline as follows:
– Along each side: sc in each sc.
– At convex points: (sc, ch 1, sc) in the ch-1 sp, adding 2 sc.
– At straight joins: 1 sc through both corner sps together, adding 1 sc.
– At concave notches: sc2tog over the last corner sc of one side and the first corner sc of the next, skipping the ch-1 sps (minus 1 sc).
Work through both layers along the stitched pocket edges. On B’s upper-left side and C’s upper-right side, work through the back hexagon only, so the pocket opening stays free. Sl st to the first sc.
Count: 192 + (10 x 2) + (2 x 1) − (4 x 1) = 210 sc and 10 ch-1 corner sps.
Why the math works: each side keeps exactly its own 12 sc, and the corner sc are already counted inside those 12. Increases go only where the edge turns outward and decreases only where it turns inward. That keeps the border flat.
Hanging loop: Without fastening off, sl st into A’s top ch-1 sp. Ch 24, then sl st in the same sp. Work 36 sc over the chain loop and sl st into the border. Fasten off.
The loop stands about 3 in (7.6 cm) tall. Weave the tail back through the loop base twice so it’s secure.
Final size: 11.5 in x 20.5 in (29.2 cm x 52.1 cm).
Final Blocking
- Weave in all ends along the cream seams, where they’re hidden.
- Lay the organizer face up on the blocking mat.
- Pin the outer points first, measuring 11.5 in (29.2 cm) across the pocket section.
- Pin the length to 20.5 in (52.1 cm) from the top point to the bottom point.
- Straighten each seam and each pocket opening with pins.
- Mist evenly until damp, without soaking it.
- Slide a rolled towel into each pocket to shape the ease.
- Leave it to dry completely, at least 12 hours, before unpinning.
Final Quality-Control Checklist
- All 10 hexagons measure 5.5 in (14.0 cm) flat to flat.
- Each hexagon has 60 dc in Round 5 and 72 sc in Round 6.
- Every pocket is open across its two upper sides only.
- All seams pair 1 to 1, with no skipped stitches.
- The B–D and C–E seams are straight and horizontal.
- The border has 210 sc and 10 corner ch-1 sps.
- The outer sides of the pocket section are straight.
- The loop is firmly anchored at A’s top point.
- The organizer hangs straight, without twisting.
Troubleshooting
Hexagon cups: Loosen your tension or go up one hook size. Check that every corner has (dc, ch 1, dc).
Hexagon ruffles: Go down one hook size, and check that you haven’t added extra dc along the sides.
Seams don’t line up: Count 12 sc per side and pair the corner sps first, then clip the middles.
Pocket too tight: Block it over a rolled towel. Cotton relaxes a little once it’s damp.
Border waves: Recheck the concave notches, because a missing sc2tog adds fullness.
Border pulls in: Check that each convex point has (sc, ch 1, sc).
Organizer leans to one side: Re-block it, pinning both side edges to the same length.
Care
Hand wash in cool water with mild soap, press out the water in a towel, and dry flat in shape. Don’t hang it to dry, because the wet weight will stretch the loop.
Final Notes
Everything comes back to the measurement chain. A hexagon of 60 dc measures 5 in (12.7 cm), and the cream trim brings it to 5.5 in (14.0 cm) with 12 sc per side. Six joined back hexagons measure 11 in x 20 in (27.9 cm x 50.8 cm). A 210-sc border takes the finished organizer to 11.5 in x 20.5 in (29.2 cm x 52.1 cm), plus a 3 in (7.6 cm) loop.
Check each stage, and the final piece will hang flat with four useful pockets.
Happy crocheting!