

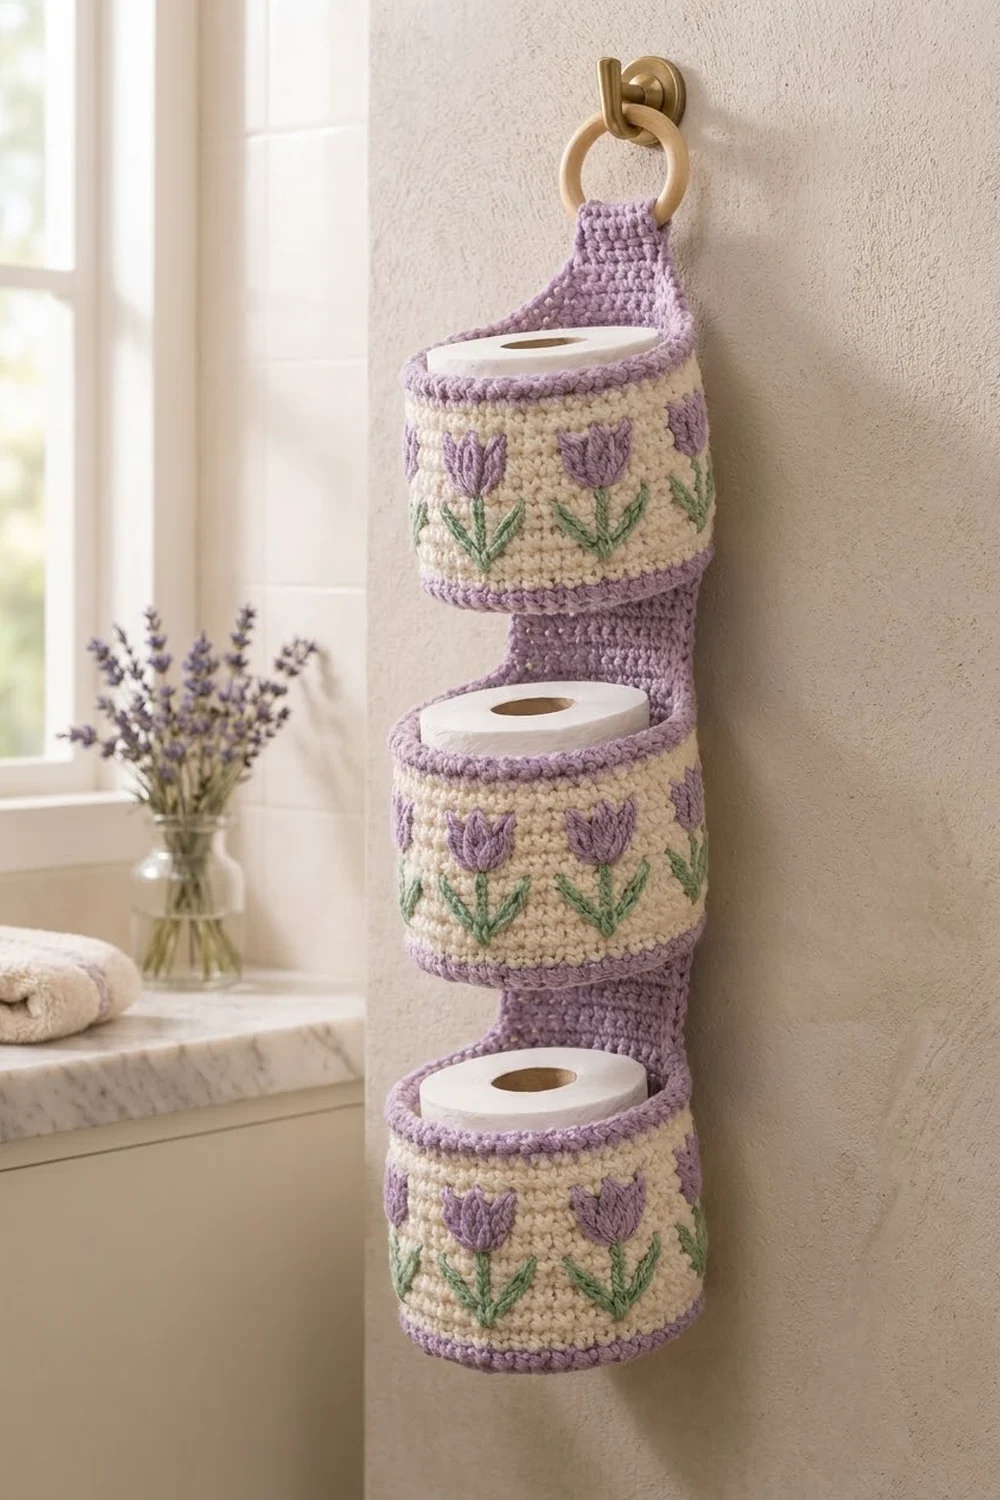
This hanging toilet paper holder keeps three spare rolls in a neat column on the bathroom wall. Each roll sits in its own round pocket. The pockets are sewn to one lavender back strip, and the strip loops over a wooden ring.
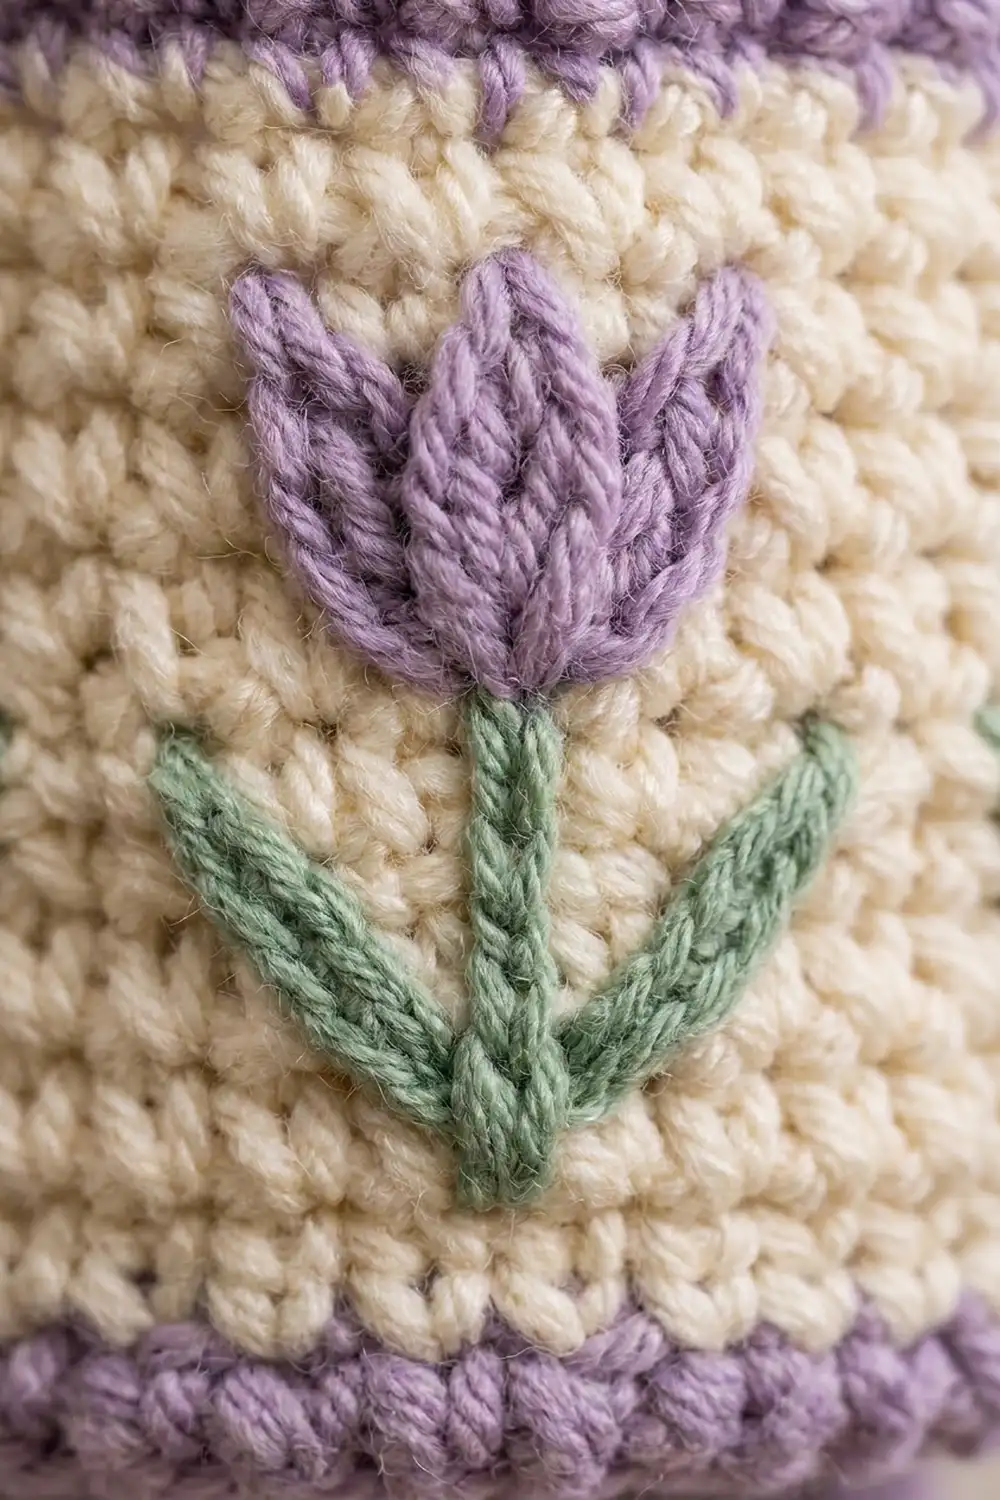
Each pocket has a soft cream body with lavender bands at the base and rim. Four tulips are embroidered across the front of each pocket, with lavender heads and sage green stems and leaves. The style is fresh and cottage-like, and it suits a light, spring-toned bathroom.
The pattern uses US crochet terms. Each pocket measures about 4¾ in (12.1 cm) across and 3½ in (8.9 cm) tall, so it fits a standard roll about 4½ in (11.4 cm) wide. The back strip is 3 in (7.6 cm) wide. The finished holder hangs about 16½ in (41.9 cm) from the bottom of the strip to the fold of the tab.
The construction is simple. You crochet three identical pockets in joined rounds of single crochet, starting each one with a flat base. Then you crochet one flat strip with a narrow tab, embroider the tulips, sew the pockets to the strip and fold the tab over the ring.
Finished Size and Construction
- Finished size: about 3 in (7.6 cm) wide at the strip, 4¾ in (12.1 cm) deep at the pockets, 16½ in (41.9 cm) tall to the tab fold
- Skill level: Easy to intermediate
- Terminology: US crochet terms
- Yarn weight: Worsted (#4), cotton or cotton blend
- Hook: 4.5 mm (US 7)
- Number of pieces: 4 (3 pockets + 1 back strip)
- Layout: 1 column of 3 pockets, stacked vertically
- Pocket size: 4¾ in (12.1 cm) across, 3½ in (8.9 cm) tall
- Pocket height before rim: just under 3 in (7.6 cm)
- Rim (border) depth: about ⅝ in (1.6 cm)
Materials
Choose a smooth worsted-weight cotton or cotton blend. Cotton holds its shape in a damp room and makes the embroidered tulips look crisp. Avoid fuzzy or brushed yarn, because it blurs the small tulip details. Pick a lavender that clearly contrasts with the cream so the rims stand out.
- Lavender (A): 190 g, about 360 m (bases, lower bands, rims, back strip, tulip heads)
- Cream (B): 130 g, about 245 m (pocket bodies)
- Sage green (C): 10 g, about 20 m (stems and leaves)
These amounts assume a yarn of about 190 m per 100 g. They already include a margin of roughly 15% for gauge swatches and sewing.
Tools:
- 4.5 mm (US 7) crochet hook
- Wooden ring, 2½ in (6.4 cm) across
- Tapestry needle
- 5 locking stitch markers
- Scissors and measuring tape
- Rust-proof pins and a blocking mat
- One toilet roll, to test the fit
Abbreviations (US Terms)
- ch: chain
- sl st: slip stitch
- sc: single crochet
- inc: 2 sc in the same stitch
- sc2tog: single crochet 2 together
- BLO: back loop only
- MR: magic ring
- st(s): stitch(es)
- rnd(s): round(s)
Special stitch: reverse single crochet (rev sc). Work from left to right (if you crochet right-handed). Insert the hook into the next stitch to the right, yarn over and pull up a loop. Yarn over again and pull through both loops. This makes the rope-like rim.
Gauge and Checkpoints
Gauge: 16 sc and 18 rows (or rounds) = 4 in (10.2 cm) in sc.
Make one full pocket before anything else. It works as your real gauge swatch, and it shows you whether a roll will fit.
- After Rnd 10 (base): 60 sts, about 4¾ in (12.1 cm) across.
- After Rnd 12: the walls stand up straight, and the circumference is still about 15 in (38.1 cm).
- After Rnd 23: the wall is just under 3 in (7.6 cm) tall from the base ridge.
- After Rnd 26: the wall is about 3½ in (8.9 cm) tall.
If the pocket is too small, a roll will not drop in. Go up one hook size (5 mm / US 8).
If the pocket is too big, the roll will rattle and the walls may slump. Go down one hook size (4 mm / US 6).
Don’t add or remove stitches to fix gauge. The tulip spacing and the back panel both depend on exactly 60 stitches.
Pocket (make 3)
Work in joined rounds. Join each round with a sl st to the first sc, then ch 1. The ch 1 doesn’t count as a stitch. Keep the joins at the back, because Sts 55–60 and 1–6 will be sewn to the strip.
Base
With A:
Rnd 1: 6 sc in MR. (6 sts)
Rnd 2: Inc in each st around. (12 sts)
Rnd 3: Sc 1, inc; repeat 6 times. (18 sts)
Rnd 4: Sc 2, inc; repeat 6 times. (24 sts)
Rnd 5: Sc 3, inc; repeat 6 times. (30 sts)
Rnd 6: Sc 4, inc; repeat 6 times. (36 sts)
Rnd 7: Sc 5, inc; repeat 6 times. (42 sts)
Rnd 8: Sc 6, inc; repeat 6 times. (48 sts)
Rnd 9: Sc 7, inc; repeat 6 times. (54 sts)
Rnd 10: Sc 8, inc; repeat 6 times. (60 sts)
The base should lie flat. If it ruffles, your tension is too loose. If it cups, your tension is too tight.
Walls
Rnd 11: With A, sc in BLO of each st around. (60 sts) This leaves a ridge where the wall turns up.
Rnd 12: With A, sc in each st around. (60 sts) Change to B on the last yarn over of the join.
Rnds 13–23: With B, sc in each st around. (60 sts in each rnd, 11 rnds) Change to A on the last yarn over of Rnd 23.
The walls have no increases, so the pocket rises as a straight cylinder. Fasten off B. Work the rim in the Border section below, then come back here to embroider.
Tulip Embroidery
Count stitches from the join, with the first stitch after the join as St 1. Place markers in Sts 12, 24, 36 and 48 of Rnd 13. These mark the centers of the four tulips. They sit 12 stitches apart across the front, clear of the back panel (Sts 55–60 and 1–6).
For each tulip:
- Stem (C): Work chain stitch embroidery straight up the marked column from Rnd 14 to Rnd 18 (5 rnds).
- Leaves (C): Make one lazy-daisy loop on each side. Start at the stem on Rnd 15 and end 2 sts out on Rnd 17. Add a straight stitch inside each loop to fill it.
- Head (A): Make three lazy-daisy petals from the top of the stem. The center petal runs straight up from Rnd 19 to Rnd 22. The side petals start at the same point and end on Rnd 21, 1 st to the left and 1 st to the right. Fill each petal with one straight stitch so it looks padded.
Leave Rnd 13 and Rnd 23 clear as a cream margin above and below the tulips. Weave in ends on the inside without pulling, so the cream fabric stays flat.
Back Strip (make 1)
With A, ch 13.
Row 1: Sc in 2nd ch from hook and in each ch across, turn. (12 sts)
Rows 2–68: Ch 1, sc in each st across, turn. (12 sts in each row)
At 18 rows per 4 in (10.2 cm), Row 68 makes the strip about 15 in (38.1 cm) long.
Tab
Row 69: Ch 1, sc2tog, sc 8, sc2tog, turn. (10 sts)
Row 70: Ch 1, sc2tog, sc 6, sc2tog, turn. (8 sts)
Rows 71–84: Ch 1, sc in each st across, turn. (8 sts in each row, 14 rows)
Fasten off, leaving a 12 in (30.5 cm) tail. The tab is 2 in (5.1 cm) wide and about 3 in (7.6 cm) long.
Make All Pieces
- Pockets: make 3. Use A for the base, the first 2 wall rounds, the rim and the tulip heads. Use B for Rnds 13–23 and C for the stems and leaves.
- Back strip: make 1, all in A.
Layout (strip rows, from the bottom up):
Rows 69–84  | TAB (folded over ring)
Rows 63–68  | strip only (about 1¼ in / 3.2 cm)
Rows 47–62  | POCKET 1 (top)
Rows 40–46  | gap (about 1½ in / 3.8 cm)
Rows 24–39  | POCKET 2 (middle)
Rows 17–23  | gap (about 1½ in / 3.8 cm)
Rows 1–16   | POCKET 3 (bottom)
Check the math: 3 pockets × 16 rows + 2 gaps × 7 rows + 6 rows = 68 rows.
Joining
Sew each pocket to the strip with whipstitch in A. The back panel of each pocket is 12 stitches wide (Sts 55–60 and 1–6) and 16 rounds tall (Rnds 11–26). The strip is 12 stitches wide, and each pocket zone on it is 16 rows tall. So you sew 1 stitch to 1 stitch across, and 1 round to 1 row up each side.
- Lay the strip flat, wrong side up. Pin Pocket 3 so its base ridge (Rnd 11) lines up with Row 1 and its rim (Rnd 26) lines up with Row 16.
- Bottom edge: Whipstitch the 12 front loops left by the BLO round (Rnd 11) to the 12 sts of Row 1.
- Sides: Whipstitch the edge of St 55 to the row ends on one side, 1 round to 1 row, for 16 stitches. Repeat along St 6 on the other side.
- Top edge: Whipstitch the 12 sts of Rnd 25, just below the rim, to the 12 sts of Row 15.
- Repeat for Pocket 2 (Rows 24–39) and Pocket 1 (Rows 47–62).
Tension: Sew snugly, but no tighter than the fabric itself. Tight seams pucker the strip and tip the pockets forward.
Size checkpoint: The strip should still measure 3 in (7.6 cm) wide and about 15 in (38.1 cm) long. Each gap should be about 1½ in (3.8 cm).
Attach the ring: Wrap the tab over the wooden ring to the back of the strip. Whipstitch the 8 sts of Row 84 to the 8 sts of Row 70. The fold sits about 1½ in (3.8 cm) above Row 68.
Border (Pocket Rims)
The border is the lavender rim on each pocket. It uses the same gauge, 16 sc = 4 in (10.2 cm), so the rim matches the wall exactly. The back strip has no border because its straight sc edges are already neat.
Continue on the pocket right after Rnd 23, with A.
Rnd 24: Sc in each st around. (60 sts)
Rnd 25: Sc in each st around. (60 sts)
Rnd 26: Ch 1, rev sc in each st around, sl st to the first st. (60 sts)
Fasten off and weave in the ends.
Why the math works: A cylinder has no corners, so there are no per-side counts. The rim keeps exactly 60 stitches, the same as the wall, so the circumference stays at 15 in (38.1 cm). Reverse sc in every stitch lies flat on a 60-stitch round. Skipping stitches would pull the rim in, and adding stitches would make it flare.
The three rim rounds add about ⅝ in (1.6 cm). They take the wall from just under 3 in (7.6 cm) to about 3½ in (8.9 cm).
Final Blocking
- Lightly mist the whole holder with water.
- Slide a toilet roll into each pocket to hold its round shape.
- Lay the holder on its back on a blocking mat.
- Pin the strip straight at 3 in (7.6 cm) wide and 15 in (38.1 cm) long, not counting the tab.
- Measure each gap and check that it is 1½ in (3.8 cm).
- Let it dry completely, then remove the pins and rolls.
Don’t iron the embroidery, because heat flattens the padded tulip petals.
Final Quality-Control Checklist
- Each base has 60 sts and lies flat at 4¾ in (12.1 cm).
- Each wall has 60 sts in every round and stands straight.
- The cream band covers Rnds 13–23 on all three pockets.
- Four tulips sit at Sts 12, 24, 36 and 48 on each pocket.
- The strip has 68 rows of 12 sts, plus the 16-row tab.
- The pocket seams run 12 sts across and 16 rows up each side.
- All three pockets hang level and centered on the strip.
- The tab is sewn 8 sts to 8 sts around the ring.
- A roll drops in easily without stretching the walls.
Troubleshooting
The walls flare out. You may have added stitches at the joins. Count every round. Each one must have 60 sts.
The walls lean in. Your tension is too tight. Go up half a hook size for the walls.
The join line drifts sideways. Joined rounds shift slightly as you go. Move the join 1 st back every few rounds to keep it at the back.
The tulips look flat or uneven. Embroider with a full strand of yarn, and keep the lazy-daisy loops loose enough to puff up.
The pockets tip forward. The top seam is too loose. Reinforce it with a second pass of whipstitch through Rnd 25.
The strip stretches under three rolls. Use cotton rather than acrylic, and keep your gauge firm.
Care
Hand wash in cool water with mild soap. Lay the holder flat to dry, shaping each pocket around a roll, and keep it out of the dryer so the cotton doesn’t shrink.
Final Notes
Here is how the measurements build on each other:
- The 60-stitch base sets each pocket at 4¾ in (12.1 cm) across.
- Straight 60-stitch walls and a 3-round rim bring each pocket to 3½ in (8.9 cm) tall.
- Each pocket is 16 rounds tall and is sewn to 16 rows of the 12-stitch strip.
- Each 7-row gap adds about 1½ in (3.8 cm).
- Together that makes a 68-row strip of about 15 in (38.1 cm), with a tab around a 2½ in (6.4 cm) ring.
Make one pocket first and check the fit with a real roll. Once that pocket is right, the other two and the strip will match it.
Happy crocheting!