

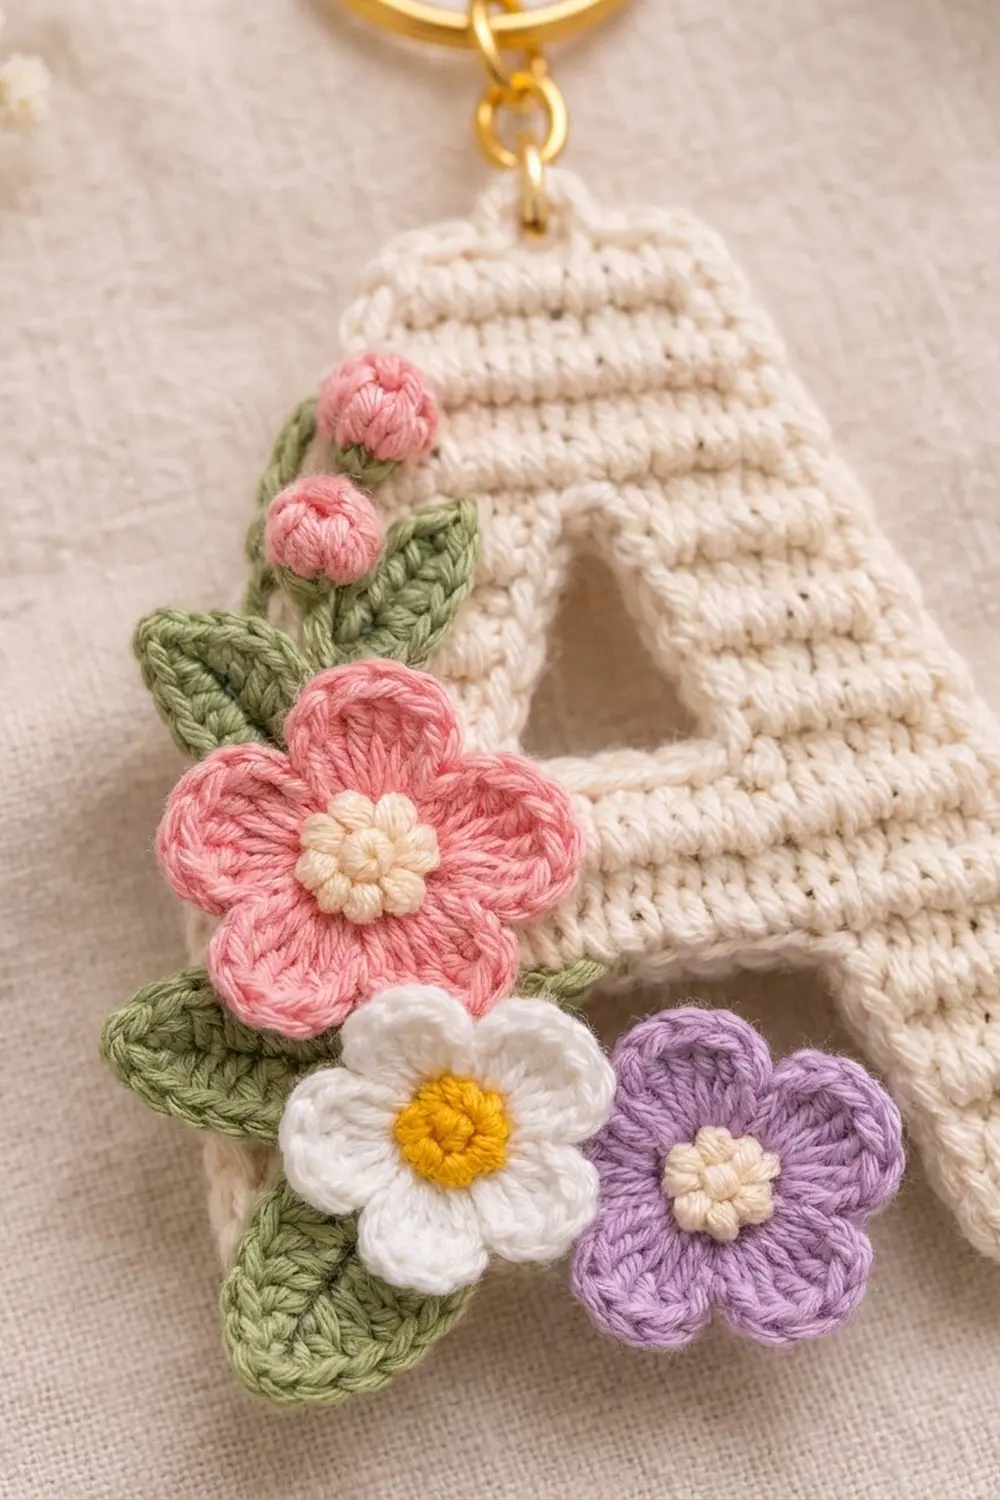
This letter A keychain is a flat, solid initial worked in neat rows of single crochet. A small spray of flowers runs down its left leg. The cream letter has a ribbed texture, a flat top and a clean single crochet edge. It has two openings: a gap between the legs and a small triangle above the crossbar.
The appliqués use five soft colors:
– one large pink flower with a cream center
– one white flower with a yellow center
– one lilac flower with a cream center
– two tiny pink buds
– four sage green leaves
A gold jump ring, a short chain and a split ring turn the letter into a bag charm or key fob.
This pattern uses US crochet terms. The finished letter is 3.4 in (8.6 cm) wide at the base and 3.6 in (9.1 cm) tall, not counting the hardware. The flowers stick out slightly past the left edge.
Construction is simple. You crochet the two lower legs separately and join them with a chained crossbar. Then you split again to leave the triangle opening and join into a flat top. One round of single crochet goes around the outside as a border. Finally, you make the small flowers and leaves and sew them onto the front in layers.
Finished Size and Construction
- Finished size: 3.4 in (8.6 cm) wide x 3.6 in (9.1 cm) tall
- Skill level: Advanced beginner
- Terminology: US crochet terms
- Yarn weight: DK / light worsted (#3) cotton
- Hook: 3.5 mm (E-4)
- Number of pieces: 1 letter body plus 9 small appliqués (3 flowers, 2 buds, 4 leaves)
- Layout: Single letter; no body pieces to join
- Body size before border: 3 in (7.6 cm) wide x 3.2 in (8.1 cm) tall
- Border depth: 1 round of sc, about 0.2 in (0.5 cm) on each side
Materials
Use a smooth mercerized or combed cotton in DK weight. Cotton holds the letter’s shape, keeps the row ridges crisp and stands up to life on a bag. A typical yarn has about 115 m per 50 g (2.3 m per gram).
- Cream (body and two flower centers): 8 g, about 18 m
- Pink (large flower and buds): 3 g, about 7 m
- White (white flower): 2 g, about 5 m
- Lilac (lilac flower): 2 g, about 5 m
- Sage green (leaves and bud details): 3 g, about 7 m
- Yellow (white flower center): 1 g, about 2 m
All amounts include extra yarn as a safety margin.
Tools:
– 3.5 mm (E-4) crochet hook
– Tapestry needle
– Sharp sewing needle and matching thread (optional, for invisible appliqué stitching)
– 8 mm gold jump ring, 1 in (2.5 cm) of small gold chain and a 25 mm gold split ring
– Two pairs of flat-nose pliers
– Stitch markers, scissors, a blocking mat and rust-proof pins
Abbreviations (US Terms)
- ch: chain
- sl st: slip stitch
- sc: single crochet
- hdc: half double crochet
- dc: double crochet
- sc2tog: single crochet 2 together
- MR: magic ring
- st(s): stitch(es)
- sp: space
- RS: right side
Special stitch: dc3tog cluster. Yarn over, insert the hook into the ring, pull up a loop, yarn over, pull through 2 loops. Repeat from * to * 2 more times (4 loops on hook). Yarn over and pull through all 4 loops.
Gauge and Checkpoints
Gauge: 5 sc and 5 rows = 1 in (2.5 cm), worked in rows of sc.
Your stitch gauge and row gauge should be the same. That way, working 1 sc into each row end in the border lies flat. Before starting the letter, crochet a swatch 10 sts wide and 10 rows tall. It should measure 2 in (5.1 cm) square.
Checkpoints:
– After Row 2: each leg is 1 in (2.5 cm) wide and 0.4 in (1.0 cm) tall.
– After Row 8: the crossbar is 2.2 in (5.6 cm) wide and the piece is 1.6 in (4.1 cm) tall.
– After Row 16: the base is 3 in (7.6 cm) wide, the top is 1.4 in (3.6 cm) wide and the piece is 3.2 in (8.1 cm) tall.
– After the border: the letter is 3.4 in (8.6 cm) x 3.6 in (9.1 cm).
Too big? Use a 3.25 mm or 3.0 mm hook. Too small? Use a 3.75 mm hook. Check your gauge again after Row 2, because the leg width sets every later measurement.
Letter Body
Work in rows. The ch 1 at the start of each row does not count as a stitch. Single crochet looks the same on both sides, so you can choose either side as the RS.
Lower Legs (make 2)
On each leg, the outer edge is the end with the starting tail. The inner edge is the other end.
Row 1: With cream, ch 6. Sc in the 2nd ch from the hook and in each remaining ch. (5 sts)
Row 2: Ch 1, turn, sc in each st. (5 sts)
Row 3: Ch 1, turn. 2 sc in the first st (inner edge), sc in the next 2 sts, sc2tog over the last 2 sts (outer edge). (5 sts)
This row shifts the leg one stitch toward the center without changing its width. This starts the slant on the outside edge.
Rows 4–5: Ch 1, turn, sc in each st. (5 sts)
On the first leg, fasten off after Row 5. On the second leg, do not fasten off. Your yarn is now at its outer edge.
Crossbar
Lay the two legs side by side with both starting tails on the outside.
Row 6: Ch 1, turn. On the second leg: sc2tog, sc in the next 3 sts. Ch 3. On the first leg, starting at its inner edge: sc in the next 3 sts, sc2tog. (11 sts: 4 sc + 3 ch + 4 sc)
The ch-3 closes the top of the lower gap. The gap is 1 in (2.5 cm) wide at the base and narrows to 0.6 in (1.5 cm) under the crossbar.
Row 7: Ch 1, turn, sc in each sc and each ch. (11 sts)
Row 8: Ch 1, turn, sc in each st. (11 sts) Check that the piece is 2.2 in (5.6 cm) wide.
Upper Sides and Triangle Opening
First upper side:
Row 9: Ch 1, turn. Sc2tog, sc in the next 2 sts. Leave the rest of the row unworked. (3 sts)
Row 10: Ch 1, turn. 2 sc in the first st (inner edge), sc in the next 2 sts. (4 sts)
Row 11: Ch 1, turn, sc in each st. (4 sts) Fasten off.
Second upper side:
Row 9: On Row 8, skip the 3 sts next to the first upper side. Join cream with an sc in the next st (inner edge). Sc in the next st, then sc2tog over the last 2 sts. (3 sts)
Row 10: Ch 1, turn. Sc in the next 2 sts, 2 sc in the last st (inner edge). (4 sts)
Row 11: Ch 1, turn, sc in each st. (4 sts) Do not fasten off. Your yarn is at the outer edge.
The 3 skipped stitches form the bottom of the triangle. The increases on the inner edges narrow the opening to 1 stitch at the top.
Top
Row 12: Ch 1, turn. On the second upper side: sc2tog, sc in the next 2 sts. Ch 1. On the first upper side, starting at its inner edge: sc in the next 2 sts, sc2tog. (7 sts: 3 sc + 1 ch + 3 sc)
Rows 13–16: Ch 1, turn, sc in each st and in the ch. (7 sts)
Do not fasten off. Check that the letter is 3 in (7.6 cm) wide at the base and 3.2 in (8.1 cm) tall.
Width by row (counting the gap between the legs as stitches):
| Rows | Width |
|---|---|
| 1–2 | 15 sts |
| 3–5 | 13 sts |
| 6–8 | 11 sts |
| 9–11 | 9 sts |
| 12–16 | 7 sts |
Appliqués
Leave an 8 in (20.3 cm) tail on every piece for sewing.
Large Pink Flower (make 1)
Rnd 1: With cream, MR, 10 sc in the ring, sl st to the first sc. Fasten off. (10 sts)
Rnd 2: Join pink with a sl st in any st. Ch 3, skip the next st, sl st in the next st. Repeat from * 5 times in total. The last sl st lands in the stitch where you joined. (5 ch-3 sps)
Rnd 3: In the next ch-3 sp, work (sc, hdc, 3 dc, hdc, sc), then sl st in the next sl st. Repeat from * 5 times in total. (5 petals, 7 sts each)
The flower is about 1.25 in (3.2 cm) across.
White Flower (make 1)
Rnd 1: With yellow, MR, 5 sc in the ring, sl st to the first sc. Fasten off. (5 sts)
Rnd 2: Join white in any st. In that st, work (sl st, ch 2, 2 dc, ch 2, sl st), then move to the next st. Repeat from * 5 times in total. (5 petals)
The flower is about 0.9 in (2.3 cm) across.
Lilac Flower (make 1)
Rnd 1: With cream, MR, 5 sc in the ring, sl st to the first sc. Fasten off. (5 sts)
Rnd 2: Join lilac in any st. In that st, work (sl st, ch 1, 3 hdc, ch 1, sl st), then move to the next st. Repeat from * 5 times in total. (5 petals)
The flower is about 0.8 in (2.0 cm) across.
Buds (make 2)
With pink, MR, ch 2, then work a dc3tog cluster into the ring. Pull the ring tight and fasten off. With green, sew 2 short straight stitches over the base of each bud to make the green cup at its base.
Each bud is about 0.3 in (0.8 cm) across.
Leaves (make 4)
With green, ch 6. Starting in the 2nd ch from the hook, work sc, hdc, dc, hdc, sc (5 sts). Ch 1. Working along the other side of the chain, work sc, hdc, dc, hdc, sc. Sl st to the first sc. (10 sts)
Each leaf is about 1 in (2.5 cm) long. The foundation chain forms a center vein.
Border
Border gauge: Work 1 sc in each row end, 1 sc in each stitch and 3 sc in each corner stitch. Because the gauge is 5 sts and 5 rows per inch, 1 sc per row end lies flat without ruffling or cupping.
Rnd 1: Ch 1, do not turn. Work around the outside of the letter in this order:
1. First outer side: 1 sc in each row end, from Row 16 down to Row 1. (16 sc)
2. First leg bottom (foundation ch): 3 sc in the first st, sc in the next 3, 3 sc in the last st. (9 sc)
3. First leg inner edge: 1 sc in each row end, from Row 1 up to Row 5. (5 sc)
4. Crossbar underside: sc in each unused loop of the ch-3. (3 sc)
5. Second leg inner edge: 1 sc in each row end, from Row 5 down to Row 1. (5 sc)
6. Second leg bottom: 3 sc in the first st, sc in the next 3, 3 sc in the last st. (9 sc)
7. Second outer side: 1 sc in each row end, from Row 1 up to Row 16. (16 sc)
8. Top (Row 16): 3 sc in the first st, sc in the next 5, 3 sc in the last st. (11 sc)
Sl st to the first sc. The total is 16 + 9 + 5 + 3 + 5 + 9 + 16 + 11 = 74 sc. Fasten off.
Why the math works:
– Each outer side has 16 rows, so it gets 16 sc.
– Each leg bottom has 5 stitches, and its two corners add 2 sc each: 5 + 4 = 9.
– The top has 7 stitches plus 4 corner sc: 7 + 4 = 11.
– The border adds 0.2 in (0.5 cm) on every side. The width grows from 3 in to 3.4 in (7.6 cm to 8.6 cm). The height grows from 3.2 in to 3.6 in (8.1 cm to 9.1 cm).
Triangle outline: With cream, work loose sl sts on the RS surface around the triangle opening:
– 3 sl sts along the skipped Row 8 sts
– 3 up one side’s row ends
– 1 in the ch-1
– 3 down the other side’s row ends
That is 10 sl sts in total. This tidies the edge of the opening without making it smaller.
Final Blocking
- Weave in all the tails on the letter. Leave the appliqué tails for sewing.
- Mist the letter lightly with water or spray starch.
- Pin it to 3.4 in (8.6 cm) wide at the base and 3.6 in (9.1 cm) tall.
- Pin the top straight across at 1.8 in (4.6 cm) wide. Check that both outer sides slant evenly.
- Use the blunt end of a needle to shape both openings neatly.
- Pin the flowers flat and shape the petals with your fingers.
- Let everything dry completely before sewing.
Appliqué Placement and Hardware
Sew the pieces on in this order, from the bottom layer up:
1. Leaves: Place two leaves at the upper left, beside the triangle opening. Place one behind the left edge of where the pink flower will go, and one at the lower left near the base.
2. Buds: Place both buds at the top of the spray. Embroider short green backstitch stems from the buds down to the leaves.
3. Pink flower: Center it on the left leg at crossbar height so that about 0.4 in (1.0 cm) sticks out past the outer edge.
4. White flower: Place it just below the pink flower, slightly overlapping the pink flower’s lower petal.
5. Lilac flower: Tuck it under the right edge of the white flower, near the bottom of the left leg.
Using the tails, whipstitch around each flower’s center and at each petal tip. Hide the stitches under the petals.
To add the hardware, open the jump ring with two pairs of pliers. Pass it through the top center of the letter, between Rows 15 and 16. Add the chain and split ring, then close the jump ring.
Final Quality-Control Checklist
- The letter measures 3.4 in (8.6 cm) x 3.6 in (9.1 cm).
- The border has 74 sc and lies flat.
- Each leg bottom has 9 border sc.
- The triangle opening is open and outlined.
- The layers go leaves, buds, pink, white, lilac, and no petals lift.
- No stitches show through on the back.
- The jump ring is fully closed with no gap.
Troubleshooting
- Legs lean unevenly: Check Row 3. The increase should be on the inner edge and the decrease on the outer edge.
- Crossbar puckers: The ch-3 is too tight. Redo it more loosely.
- Border ruffles: You get more rows per inch than stitches. Skip 1 row end on each outer side.
- Border cups: Add 1 sc near the middle of each outer side.
- Triangle closes up: The outline sl sts are too tight. Redo them loosely.
- Petals curl: Steam-block them and pin them flat until dry.
Care
Remove the metal hardware first so it doesn’t tarnish. Hand wash in cool water, press out the water in a towel and dry flat.

Final Notes
Here is the measurement chain from start to finish:
– A gauge of 5 sc and 5 rows per inch gives a body 3 in (7.6 cm) wide and 3.2 in (8.1 cm) tall.
– The 74-sc border adds 0.2 in (0.5 cm) on every side.
– The finished letter is 3.4 in (8.6 cm) x 3.6 in (9.1 cm).
Check your size at Row 2, Row 8 and Row 16, and the flowers will fit exactly where they should.
Happy crocheting!