

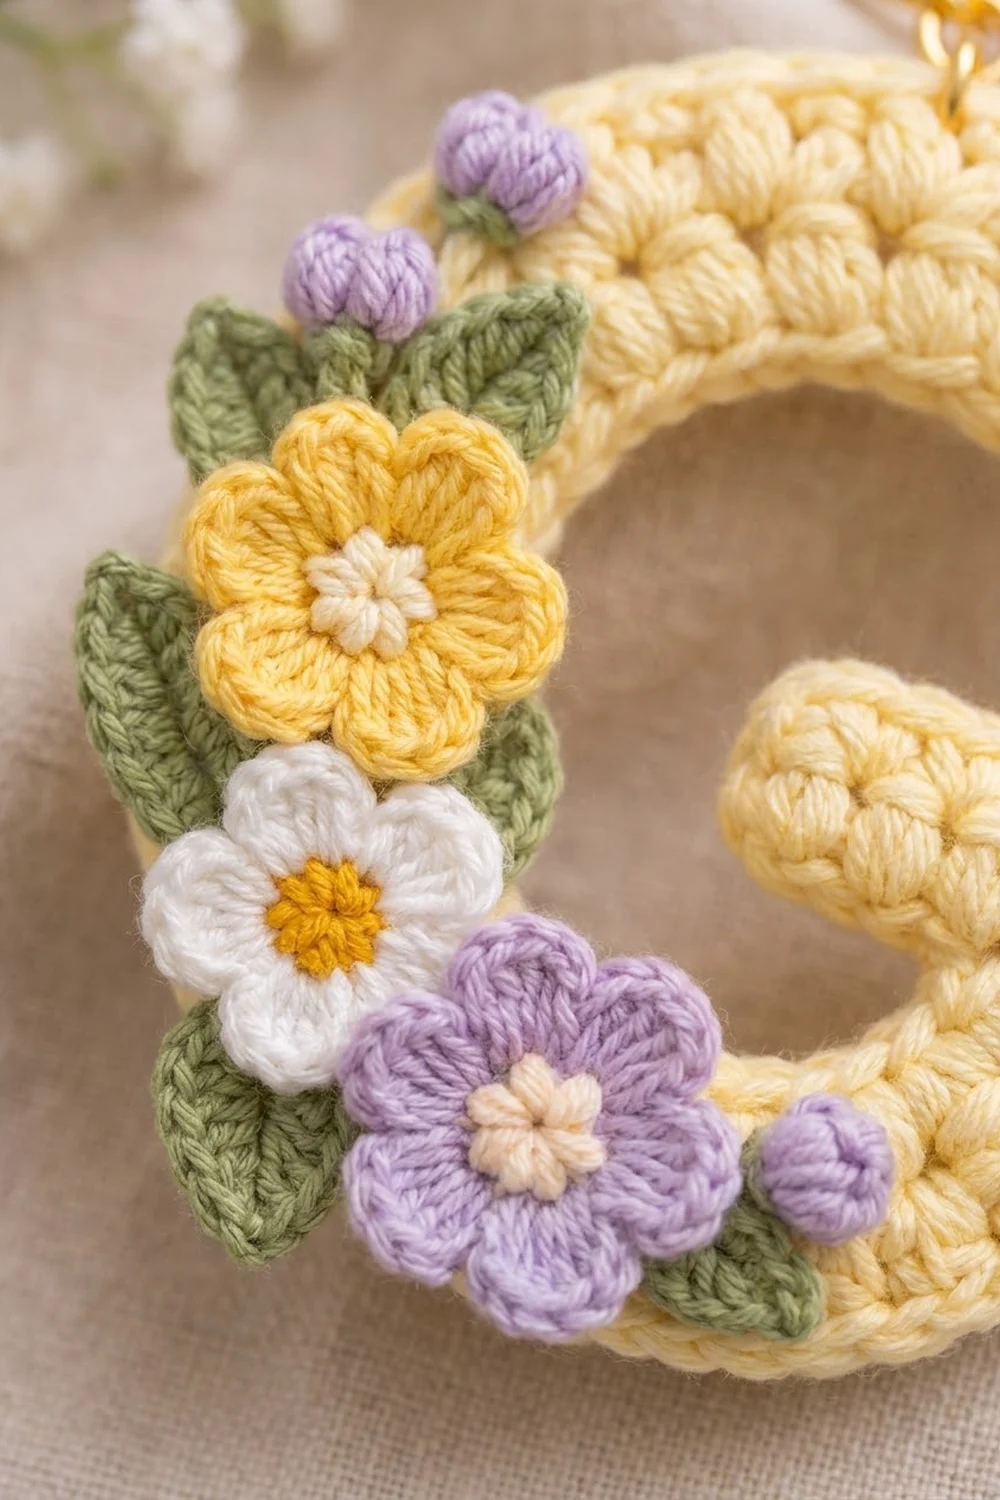
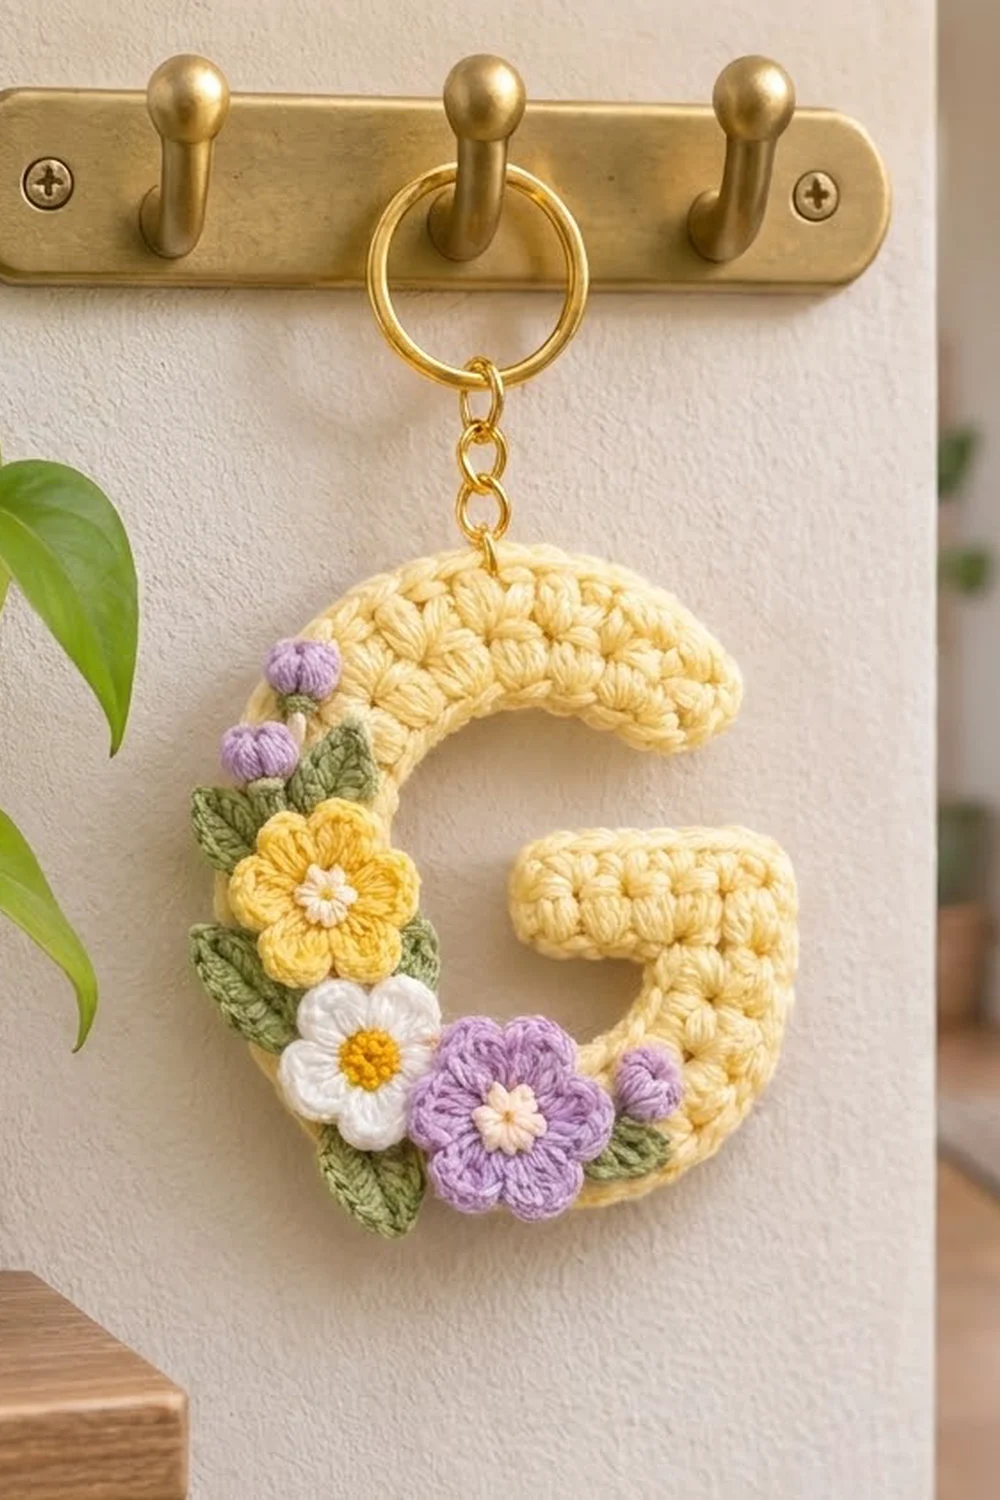
This little letter G keychain is soft, plump and finished with a small spring bouquet. The body is pale butter yellow, with raised puff stitches that run along the curve of the letter. A cluster of yellow, white and lilac flowers with sage-green leaves wraps around the lower-left curve.
The pattern uses US crochet terms. The finished letter measures 3.5 in (8.9 cm) tall and 3.25 in (8.3 cm) wide, not counting the keyring hardware.
You make the letter in one piece, working in rounds around a single foundation chain that traces the path of the G. Increases on the outer edge make the strip curl into shape as you go. After that, you crochet three small flowers, two buds and five leaves, sew them on, and add a gold keyring.
It’s a quick project for using up scraps, and you can personalize it in one evening.
Finished Size and Construction
- Finished size: 3.5 in (8.9 cm) tall × 3.25 in (8.3 cm) wide
- Skill level: Easy–Intermediate
- Terminology: US crochet terms
- Yarn weight: DK (light worsted, #3)
- Hook: 3.5 mm (US E-4)
- Number of pieces: 1 letter body, plus 10 small appliqués (3 flowers, 2 buds, 5 leaves)
- Layout: One single letter; the appliqués are clustered on the lower-left outer curve
- Piece size before edging: 3.25 in (8.3 cm) tall × 3 in (7.6 cm) wide, with a 1 in (2.5 cm) wide stroke
- Edging depth: 0.125 in (0.3 cm) on every edge, which brings the stroke to 1.25 in (3.2 cm)
Materials
Choose a smooth DK cotton or cotton blend. Cotton shows the puff texture clearly and holds its shape on a keychain that gets handled a lot.
- Color A, pale butter yellow (body): 12 g, about 29 m
- Color B, sunny yellow (flower and white-flower center): 3 g, about 7 m
- Color C, white (flower): 2 g, about 5 m
- Color D, lilac (flower and buds): 4 g, about 10 m
- Color E, sage green (leaves): 3 g, about 7 m
- Color F, pale pink (flower centers): 1 g, about 2 m
The quantities include a margin of about 20% for swatching and sewing tails.
Tools:
– 3.5 mm (US E-4) hook
– Tapestry needle
– 4 stitch markers
– Gold split keyring, 1 in (2.5 cm)
– Gold chain, 0.75 in (1.9 cm) long, with 2 jump rings
– 2 pairs of flat-nose pliers
– Pins, a blocking mat and a spray bottle
Abbreviations (US Terms)
- ch: chain
- sl st: slip stitch
- sc: single crochet
- sc2tog: single crochet 2 together
- hdc: half double crochet
- dc: double crochet
- sk: skip
- sp: space
- st(s): stitch(es)
- MR: magic ring
Special stitch: Puff stitch (puff). (Yarn over, insert hook in the stitch, yarn over and pull up a loop to 0.25 in [0.6 cm] height) 3 times. Yarn over and pull through all 7 loops on the hook.
Special stitch: Bobble bud. Make a MR, ch 2, and work 5 dc in the ring. Pull the ring closed. Remove the hook, insert it into the top of the first dc, pick up the dropped loop and pull it through.
Gauge and Checkpoints
Gauge: 10 sc = 2 in (5.1 cm) with Color A and a 3.5 mm hook.
Since this is a single piece, Round 1 works as your test. Work it, then check before going further.
- After Round 1: The strip is about 0.45 in (1.1 cm) wide and already curves into a loose C. The straight crossbar section measures about 0.8 in (2.0 cm).
- After Round 2: The letter measures 3.25 in (8.3 cm) × 3 in (7.6 cm), and the stroke is 1 in (2.5 cm) wide.
- After Round 3: The letter measures 3.5 in (8.9 cm) × 3.25 in (8.3 cm), and the stroke is 1.25 in (3.2 cm) wide.
If your piece is too big, go down 0.25 mm in hook size. If it’s too small, go up 0.25 mm. Because the curve comes from the stitch counts and not from blocking, a big change in gauge changes the size of the letter but not its shape.
Letter G Body
Use Color A. The side you work first becomes the outer edge of the G. Round 1 starts at the top tip of the letter and ends at the tip of the crossbar.
Foundation: Ch 33.
The 32 workable chains are used as follows:
– 2nd ch from hook: the top tip
– next 22 ch: the curve
– next 4 ch: the short upright on the right
– next 4 ch: the crossbar
– last ch: the crossbar tip
Round 1 (outer edge first):
1. Sc in 2nd ch from hook and place a marker in it (1 st).
2. [Sc in next ch, 2 sc in next ch] 11 times (33 sts).
3. Sc in next 3 ch, 3 sc in next ch to make the outer corner, then sc in next 4 ch (10 sts).
4. Work 3 sc in the last ch (crossbar tip).
5. Rotate and work along the opposite side of the foundation chain: sc in next 3 ch, sc2tog over next 2 ch (inner corner), sc in next 25 ch (29 sts).
6. Work 2 sc in the same ch as the first sc, then join with a sl st to the first sc.
Round 1 total: 78 sc. That is 1 + 33 + 10 on the outer edge, 3 at the crossbar tip, 29 on the inner edge, and 2 to finish the top tip.
The 11 increases are all on the outer side, so the strip bends into the curve of the G.
Round 2 (puff round):
1. Ch 2 (does not count as a stitch). Puff in the same st as the join, ch 1, sk next st.
2. [Puff in next st, ch 1, sk next st] 38 times.
3. Join with a sl st to the top of the first puff.
Round 2 total: 39 puffs and 39 ch-1 sps (78 sts).
Each puff followed by its ch-1 space counts as one “pair.” Place markers to divide the 39 pairs into four sections:
– Top tip: pairs 38, 39 and 1 (3 pairs)
– Outer edge: pairs 2–21 (20 pairs)
– Crossbar tip: pairs 22–24 (3 pairs)
– Inner edge: pairs 25–37 (13 pairs)
Check: 3 + 20 + 3 + 13 = 39.
Round 3 (sc edging): See the Border section below.
Border
The border is the single round of sc edging. It turns the puff texture into a clean, rounded edge that sits about 0.125 in (0.3 cm) beyond the puffs.
Border gauge: 5 sc = 1 in (2.5 cm) on straight sections. On the outer curve, the stitches spread slightly, so the edge lies flat without ruffling.
Round 3: This round works 1 sc into each of the 78 existing stitches (each puff and each ch-1 sp). Then it adds 12 extra stitches and removes 8 by decreasing.
- Top tip, first part: Ch 1, sc in the same puff, 2 sc in next ch-1 sp (3 sc).
- Outer edge:
- Sc in next puff, sc in next sp (pair 2).
- [Sc in next puff, 2 sc in next sp, sc in next puff, sc in next sp] 6 times (pairs 3–14).
- [Sc in next puff, sc in next sp] 7 times (pairs 15–21).
- Outer edge total: 2 + 30 + 14 = 46 sc. That is 40 one-to-one stitches plus 6 increases, all on the curve.
- Crossbar tip: [Sc in next puff, 2 sc in next sp] 3 times. 9 sc (6 + 3).
- Inner edge:
- [Sc in next puff, sc in next sp] 5 times along the underside of the crossbar and the inner corner (10 sc).
- [Sc2tog over next puff and next sp] 8 times around the inner curve (8 sc).
- Inner edge total: 18 sc (26 − 8).
- Top tip, second part: [Sc in next puff, 2 sc in next sp] 2 times (6 sc), then join with a sl st to the first sc.
Round 3 total: 90 sc. That is 78 + 6 (outer edge) + 6 (tips) − 8 (inner curve) = 76 + 14 = 90. Fasten off and weave in the ends.
Why the math works:
– Outer edge: 46 sc at about 5.5 sc per inch covers about 8.4 in (21.3 cm). That matches the outer edge of a G with a 3.5 in (8.9 cm) height.
– Inner edge: This edge is much shorter, about 3.4 in (8.6 cm). Its 18 sc at 5 per inch give 3.6 in (9.1 cm), which is close enough for the puffs to ease in.
– Tips: Each tip goes around a half-circle, so it needs 3 extra stitches to round off without cupping.
Flowers, Buds and Leaves
Large flower (make 2: one in Color B, one in Color D):
– Round 1: With Color F, make a MR. Work 5 sc in the ring and join (5 sts). Fasten off.
– Round 2: Join the petal color in any st. Ch 1, 2 sc in each st around, then join (10 sts).
– Round 3: [Sl st in next st, (hdc, 2 dc, hdc) in next st] 5 times, then join. This gives 5 petals.
– The flower measures about 1.25 in (3.2 cm) across.
Small flower (make 1):
– Round 1: With Color B, make a MR. Work 5 sc in the ring and join (5 sts). Fasten off.
– Round 2: Join Color C. Ch 1, 2 sc in each st around, then join (10 sts).
– Round 3: [Sl st in next st, (hdc, dc, hdc) in next st] 5 times, then join. This gives 5 petals.
– The flower measures about 1 in (2.5 cm) across.
Bud (make 2): With Color D, make one bobble bud. Leave a 6 in (15.2 cm) tail for sewing. Each bud is about 0.4 in (1.0 cm).
Leaf (make 5):
1. With Color E, ch 7.
2. Sl st in 2nd ch from hook, sc in next ch, hdc in next ch, dc in next ch, hdc in next ch, sc in next ch.
3. Ch 1. Working along the other side of the chain: sc in next ch, hdc in next ch, dc in next ch, hdc in next ch, sc in next ch, sl st in the tip.
Each leaf is about 1 in (2.5 cm) long, with a pointed tip.
Assembly and Hardware
Picture the G as a clock face, with 12 o’clock at the top. Pin everything in place before sewing.
- Pin one leaf pointing up-left at 10 o’clock and a second leaf at 9 o’clock. Pin a bud at the top of the first leaf.
- Pin the yellow flower at 9 o’clock so it overlaps the outer edge by 0.25 in (0.6 cm). Tuck a third leaf behind its left side.
- Pin the white flower at 7 o’clock, just below the yellow flower. Put a fourth leaf under its lower left.
- Pin the lilac flower at 6 o’clock, touching the white flower on its right.
- Pin the second bud at 5 o’clock, with the fifth leaf beneath it.
- Sew each piece on with matching yarn, using small stitches through the back loops of the edging and the base of the petals. Keep the petal tips free so they stay dimensional.
- Hardware: Open a jump ring with the pliers and push it through 2 sc of the edging at the highest point of the top curve. Hook on the chain and close the ring. Then use the second jump ring to join the chain to the keyring.
Final Blocking
- Draw or print a G outline 3.5 in (8.9 cm) tall and 3.25 in (8.3 cm) wide. Place it under the blocking mat or on top of it.
- Lay the letter face up and pin it at the two tips, the outer corner, and three points on the outer curve.
- Check the stroke width with a ruler. It should be 1.25 in (3.2 cm) all the way around.
- Mist lightly with water. Don’t press or iron, because that flattens the puffs.
- Let it dry completely, usually 2–3 hours.
- Unpin it, then attach the appliqués and hardware if you haven’t already.
Final Quality-Control Checklist
- The letter is 3.5 in (8.9 cm) tall and 3.25 in (8.3 cm) wide.
- The stroke is 1.25 in (3.2 cm) wide all around.
- Round 3 has 90 sc and lies flat on both the outer and inner edges.
- Both tips are smoothly rounded.
- The crossbar points inward and the outer corner is crisp.
- All 5 petals on each flower are even.
- The flowers overlap the outer edge by about 0.25 in (0.6 cm).
- All jump rings are fully closed with no gaps.
- All yarn ends are woven in on the back.
Troubleshooting
- The outer edge ruffles: Rework Round 3 and replace two of the “2 sc in next sp” repeats with a single sc in each sp.
- The inner curve buckles: Make sure you worked all 8 sc2tog. Tight puffs on the inner side can also cause this, so loosen your tension there.
- The G opens out too wide: Check the 11 increases in Round 1. Missing increases make the curve too shallow.
- The puffs look flat: Pull every loop up to 0.25 in (0.6 cm) before closing the puff.
- A flower cups: Block it flat with a little mist before sewing it on.
- The keyring pulls the edging out of shape: Move the jump ring so it goes through 2 sc instead of 1.
Care
Hand wash in cool water with mild soap, press out the water in a towel, and dry flat. Protect the gold hardware from moisture.
Final Notes
Each stage builds on the one before:
– The 10 sc = 2 in (5.1 cm) gauge gives a Round 1 strip of 78 sc.
– That becomes 39 puffs, making a 3.25 in (8.3 cm) × 3 in (7.6 cm) letter.
– The 90 sc edging brings it to the finished 3.5 in (8.9 cm) × 3.25 in (8.3 cm).
– The 1.25 in (3.2 cm) flowers then fill the lower-left curve.
Check your measurements at each step, and your keychain will match the one shown. Happy crocheting!