

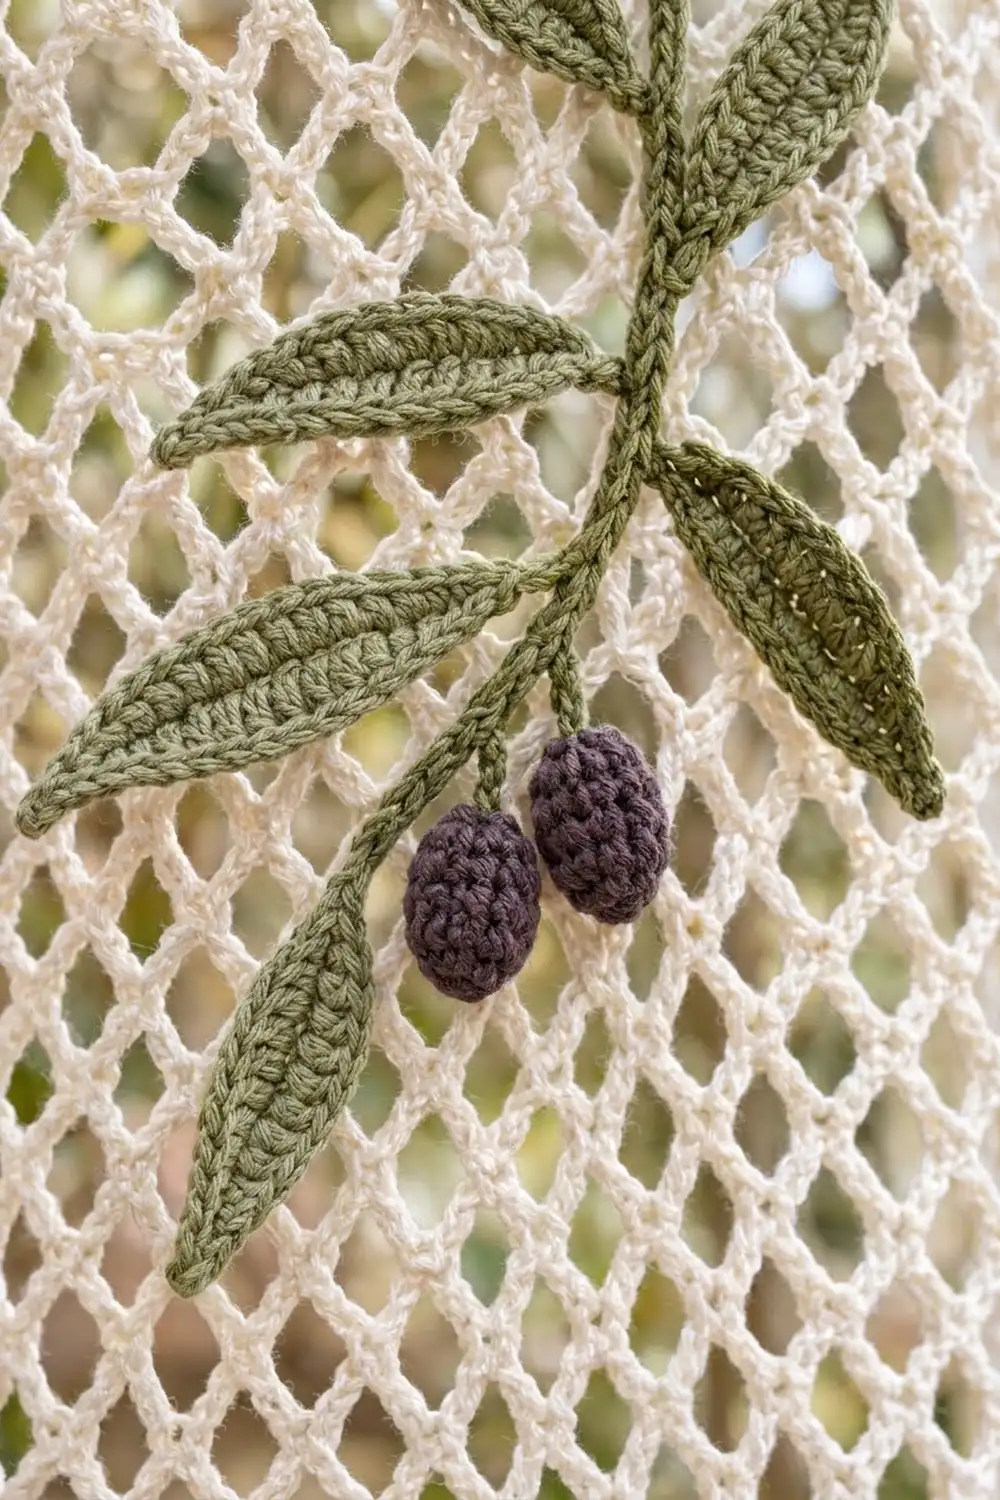
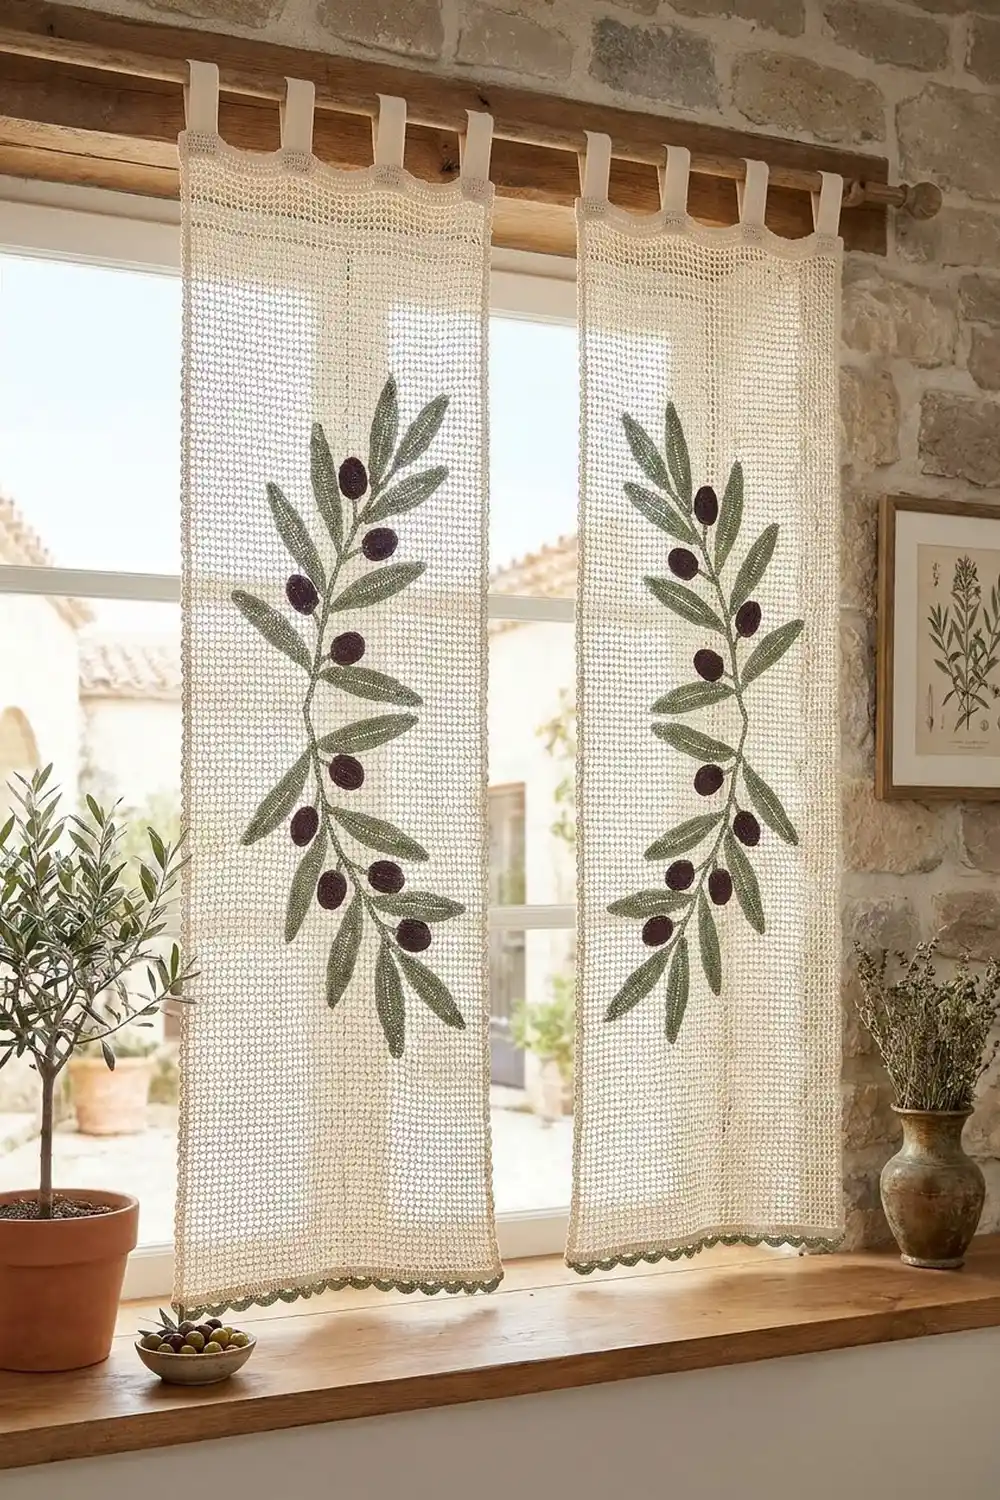
These curtain panels bring a Mediterranean garden indoors. Each one is an open cream diamond mesh with a single olive branch winding up its length. The branch carries pointed sage-green leaves and small pairs of deep plum olives. A narrow green shell edging finishes the hem.
The palette is cream, sage and plum, and the look is airy, rustic and tidy. Light passes through the lattice, so the branch reads as a soft silhouette. The pattern uses US crochet terms.
Each panel measures 25 in (63.5 cm) wide by 77 in (195.6 cm) long, plus 3 in (7.6 cm) tab loops. You make two separate panels with mirrored vines. They hang side by side and are never joined.
You work the mesh bottom-up in rows, from a single-crochet base row to a solid single-crochet band. The tabs are worked off that band. Then you add the green shell edging to the bottom, block the panel, and sew on a crocheted stem cord, leaves and olives.
Finished Size and Construction
- Finished size (one panel): 25 in × 77 in (63.5 × 195.6 cm), plus 3 in (7.6 cm) tab loops
- Skill level: Intermediate
- Terminology: US
- Yarn weight: DK (#3) cotton
- Hooks: 4.0 mm (mesh), 3.5 mm (appliqués)
- Number of pieces: 2 separate panels. Each panel has 1 mesh body (tabs and edging worked on), plus 1 stem cord, 24 leaves, 16 olives and 16 olive stalks sewn on.
- Layout: panels hang side by side, not joined, with mirrored vines
- Size before border: 25 in × 76.25 in (63.5 × 193.7 cm)
- Border depth: 0.75 in (1.9 cm), bottom edge only
Materials
Choose a smooth DK cotton of about 230 m per 100 g. Cotton holds the mesh shape, blocks crisply and doesn’t stretch much while hanging. Avoid fuzzy yarns, because they blur the lattice.
Amounts for both panels:
- Cream (mesh, band, tabs): 800 g / 1,840 m
- Sage green (stem, leaves, stalks, edging): 250 g / 575 m
- Dark plum (olives): 100 g / 230 m
The quantities include a margin of about 15% for swatching and gauge differences.
Tools:
– 4.0 mm and 3.5 mm hooks
– Tapestry needle and a sharp sewing needle
– Locking stitch markers
– Rust-proof pins and blocking mats
– Spray bottle
– A little fiberfill
– Measuring tape
– A curtain rod up to 1.5 in (3.8 cm) in diameter
Abbreviations (US Terms)
- ch – chain
- sl st – slip stitch
- sc – single crochet
- hdc – half double crochet
- dc – double crochet
- tr – treble crochet
- sc2tog – single crochet 2 together
- blo – back loop only
- sk – skip
- st(s) – stitch(es)
- RS / WS – right side / wrong side
Shell: 5 dc in the same stitch.
Back-bump cord: Make a chain, then sl st into the back bump of each chain. This makes a firm, round stem that doesn’t curl.
Gauge and Checkpoints
Mesh gauge (4.0 mm hook, blocked): 4 ch-5 loops = 5 in (12.7 cm) wide. 9 mesh rows = 5 in (12.7 cm) tall.
Sc gauge: 4 sc and 4 rows = 1 in (2.5 cm).
Test one piece first. Ch 27 and work Row 1 (26 sc). Then work 18 mesh rows as written, which gives 5 loops across. Block the swatch. It should measure 6.25 in (15.9 cm) wide and 10 in (25.4 cm) tall.
- Too big: go down 0.5 mm.
- Too small: go up 0.5 mm.
Get the width right before you start. You can adjust the height later by adding or removing pairs of mesh rows.
Body checkpoints (lightly stretched flat):
- After Row 2: 25 in (63.5 cm) wide
- After Row 46: mesh 25 in (63.5 cm) tall
- After Row 91: mesh 50 in (127.0 cm) tall
- After Row 136: mesh 75 in (190.5 cm) tall
- After Row 140: body 76.25 in (193.7 cm) long
Panel Body (Make 2)
Use the 4.0 mm hook and cream yarn.
Foundation: Ch 102.
Row 1 (RS): Sc in the 2nd ch from the hook and in each ch across. Turn. (101 sc)
Row 2 (mesh set-up, full row): Ch 1, sc in the first sc. Ch 5, sk 4 sc, sc in the next sc. Repeat from * across. Turn. (20 ch-5 loops, 21 sc)*
Row 3 (offset row): Ch 5 (counts as dc + ch 2). Sc in the first ch-5 loop. Ch 5, sc in the next loop. Repeat from * across. Ch 2, dc in the last sc. Turn. (20 sc; 19 full loops + 2 half loops)*
Row 4 (full row): Ch 1, sc in the dc. Ch 5, sc in the next loop. Repeat from * across, working the last sc in the 3rd ch of the turning ch. Turn. (20 ch-5 loops, 21 sc)*
Rows 5–136: Repeat Rows 3–4 another 66 times, ending on a full row. That makes 135 mesh rows (Rows 2–136). Each offset row centers its sc in the loops below, and this forms the diamond lattice.
Row 137 (conversion row): Ch 1, sc in the first sc. 4 sc in the next loop, sc in the next sc. Repeat from * across. Turn. (21 sc worked 1-per-sc + 80 sc added in loops = 101 sc)*
Rows 138–140: Ch 1, sc in each sc across. Turn. (101 sc) Fasten off.
Tabs
Seven tabs sit on Row 140. Each tab is 7 sts wide, with 2 edge sts at each end and 8 sts between tabs: 2 + 7 + (8 + 7) × 6 + 2 = 101.
Tab:
– With WS facing, join cream in the 3rd st. Ch 1, sc in the same st and in the next 6 sts. (7 sc)
– Rows 2–24: Ch 1, turn, sc in each st. (7 sc)
The tab is 6 in (15.2 cm) long and 1.75 in (4.4 cm) wide. Fasten off, leaving a 12 in (30.5 cm) tail.
Repeat for all 7 tabs, starting them at sts 3, 18, 33, 48, 63, 78 and 93. Fold each tab to the WS and whipstitch its last row to the back of Row 137. This forms a 3 in (7.6 cm) loop.
Appliqués
Use the 3.5 mm hook so the appliqués are firm.
Stem Cord (sage)
Ch 288, then sl st in the back bump of the 2nd ch from the hook and in each ch across. (287 sl st)
The cord is 72 in (182.9 cm) long. Leave a long tail.
Large Leaf (sage)
Ch 13.
Rnd 1:
– Side 1: Sc in the 2nd ch from the hook, hdc in the next 2 ch, dc in the next 5 ch, hdc in the next 2 ch, sc in the next ch.
– Tip: (sc, ch 2, sc) in the last ch.
– Side 2: Working along the other side of the chain, sc in the next ch, hdc in the next 2, dc in the next 5, hdc in the next 2, sc in the last ch.
– Base point: Ch 2, sl st in the first sc.
(24 sts + 2 ch-2 points)
Rnd 2 (trim round): Ch 1. Sc blo in each st around, working (sc, ch 2, sc) in each ch-2 point. Join. (24 sc worked 1-per-st + 4 sc added at points = 28 sc, plus 2 ch-2 points)
The large leaf measures 3.5 in × 1.25 in (8.9 × 3.2 cm). Both ends are pointed, the foundation chain shows as a center vein, and the blo round raises the outline.
Small Leaf (sage)
Ch 10.
Rnd 1:
– Side 1: Sc in the 2nd ch from the hook, hdc in the next ch, dc in the next 4 ch, hdc in the next ch, sc in the next ch.
– Tip: (sc, ch 2, sc) in the last ch.
– Side 2: Mirror side 1 along the other side of the chain.
– Base point: Ch 2, sl st in the first sc.
(18 sts + 2 ch-2 points)
Rnd 2: Work as for the large leaf. (18 + 4 = 22 sc, plus 2 ch-2 points)
The small leaf measures 2.75 in × 1 in (7.0 × 2.5 cm).
Olive (plum)
Rnd 1: 6 sc in a magic ring. (6)
Rnd 2: 2 sc in each st. (12)
Flip the little cup so its inside faces you. From now on, every tr bump pops outward.
Rnd 3: Sc in the next st, tr in the next st. Repeat from * around. (12)*
Rnd 4: Sc in each st. (12)
Rnd 5: Tr in the next st, sc in the next st. Repeat from * around. (12)*
Rnd 6: Sc2tog around. (6)
Stuff firmly, close the opening and leave a tail. The olive is 0.75 in × 1 in (1.9 × 2.5 cm), knobbly and oval.
Olive Stalk (sage)
Ch 7, then sl st in the back bump of the 2nd ch from the hook and in each ch across. (6 sl st)
The stalk is 1.5 in (3.8 cm) long. Sew an olive to one end. Then sew two stalks together at their free ends to form a hanging pair.
Make All Pieces
Per panel:
– 1 body
– 1 stem cord
– 14 large leaves
– 10 small leaves
– 16 olives
– 16 stalks (8 pairs)
For both panels:
– Cream: 2 bodies
– Sage: 2 cords, 28 large leaves, 20 small leaves, 32 stalks
– Plum: 32 olives
Vine layout, Panel A: The columns are loops 1–7, 8–13 and 14–20. Panel B is the mirror image. The letters mark zones, not exact counts.
Rows 120–136 |  .  | tip | L L |  small leaves only
Rows 95–119  | L o |  L  |  .  |  1 olive pair
Rows 70–94   |  .  | L L | L o |  1 olive pair
Rows 45–69   | L o | L L |  .  |  2 olive pairs
Rows 20–44   |  .  | L L | L o |  2 olive pairs
Rows 4–19    | L o | base|  .  |  2 olive pairs
(L = leaf, o = olive pair)
Space the leaves about 3 in (7.6 cm) apart along the cord, alternating sides and angled upward. Use large leaves in the lower two-thirds and small leaves near the tip.
Joining: Attaching the Appliqués
Sew the appliqués on after blocking, so the mesh is at its true size.
- Lay the panel RS up. Following the layout, pin the cord in a gentle S-curve from Row 4 to Row 136.
- With the cord tail, tack the cord to a mesh strand about every 0.75 in (1.9 cm). Wherever possible, anchor into an sc of the mesh rather than a bare chain.
- Pin each leaf with its base touching the cord. Sew along the center vein, then tack the tip and both widest points.
- Sew each stalk pair at its fork, tucked under a leaf. Tack each olive once at its back.
Tension: Keep your stitches snug but never tight. If the diamonds beside the cord pucker or narrow, resew with longer stitches.
Checkpoint: The panel should still lie flat at 25 in (63.5 cm) wide across the widest part of the vine.
Border
Border gauge: 4 sc = 1 in (2.5 cm). One shell repeat = 4 sts = 1 in (2.5 cm).
The border runs along the bottom edge only. The sides stay as plain mesh, because a sc edge along 135 rows tends to pull the panel in.
Border Row 1: With RS facing and the 4.0 mm hook, join sage in the first remaining foundation loop at the right corner. Ch 1, then sc in the same loop and in each remaining loop across. Turn. (101 sc, 1 per Row 1 st)
Border Row 2: Ch 1, sc in the first sc. Sk 1, shell in the next sc, sk 1, sc in the next sc. Repeat from * across. Fasten off. (25 shells, 26 sc)*
Why the math works: Each repeat uses 4 sts, so 1 + 4 × 25 = 101, and both ends finish on an sc. At 1 in (2.5 cm) per repeat, 25 shells equal the 25 in (63.5 cm) width, so the hem neither flares nor gathers.
The final length is 76.25 + 0.75 = 77 in (195.6 cm).
Final Blocking
- Weave in all body ends.
- Soak the panel in cool water with mild detergent for 15 minutes.
- Press out the water without wringing, then roll the panel in towels.
- Pin it flat to 25 in × 77 in (63.5 × 195.6 cm). Place pins every 4 in (10.2 cm) along each edge.
- Run a long ruler down the center and nudge the diamonds square.
- Pin out each shell point.
- Let it dry completely, which takes 24–48 hours.
- Mist the leaves, pat them flat and pinch the tips sharp before sewing them on.
Final Quality-Control Checklist
- Full mesh rows have 20 loops; offset rows have 19 full + 2 half loops
- Rows 137–140 have 101 sc each
- There are 7 evenly spaced tabs, each 7 sts wide, with 3 in (7.6 cm) loops
- There are 25 shells along the hem
- The panel blocks to 25 in × 77 in (63.5 × 195.6 cm)
- The vines on Panel A and Panel B mirror each other
- Leaves are pointed at both ends
- Olives are firm, with no stuffing showing
- No ends show on either face
Troubleshooting
- Panel narrows: You’re skipping the last loop or the turning ch. Count the loops every 10 rows.
- Panel widens: An extra sc crept in at a row end. Recheck where you place the last sc of Row 4 (in the turning ch).
- Diamonds look like stripes: Work each offset sc into the loop, not around the sc below.
- Wavy hem: Border Row 1 must be exactly 101 sc.
- Leaves curl: Go up 0.5 mm, or steam-block them under a damp towel.
- Olive bumps face inward: Turn the olive inside out before stuffing.
- Tabs twist: Whipstitch through both loops, keeping each tab square to the band.
Care
Hand wash in cool water, reshape the mesh while it’s damp, and dry flat. Never hang the panels wet, because the weight of the water stretches the length.
Final Notes
The measurement chain is simple. Since 4 loops = 5 in (12.7 cm), 20 loops = 25 in (63.5 cm). That width converts to 101 sc, which divides cleanly into 7 tabs and 25 shells.
Vertically, 135 mesh rows at 9 rows per 5 in (12.7 cm) give 75 in (190.5 cm). Add the 0.25 in (0.6 cm) base row, the 1 in (2.5 cm) top band and the 0.75 in (1.9 cm) hem for a total of 77 in (195.6 cm). Check each link as you go, and your olive branch will grow on an even, open lattice.
Happy crocheting!