

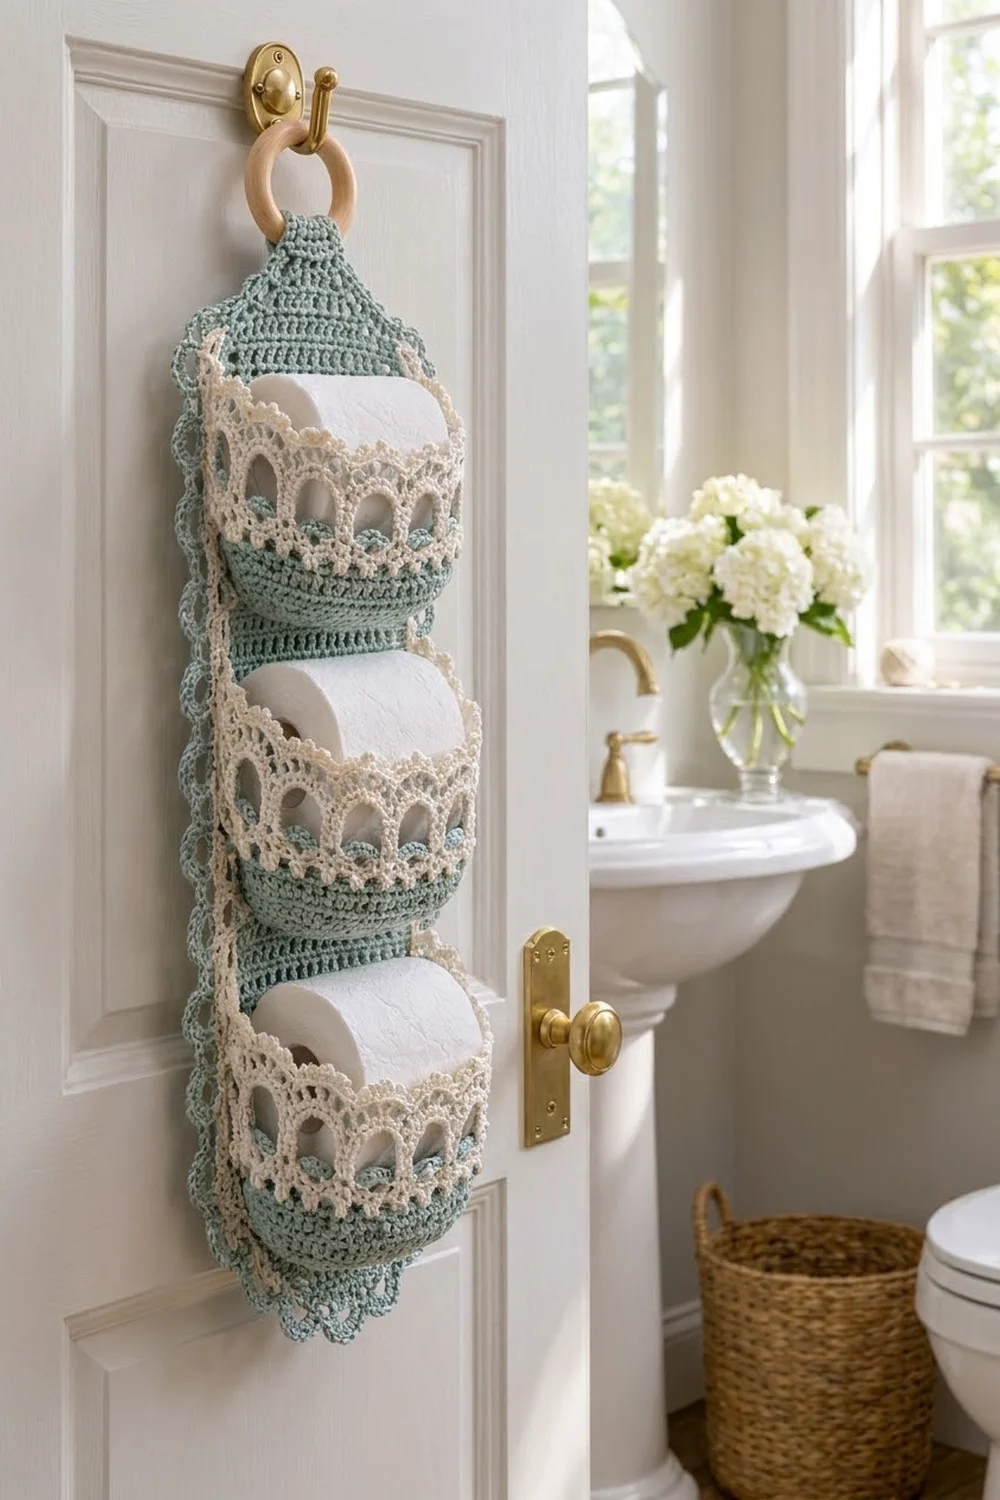
This hanging toilet paper holder gives a bathroom door or wall a soft, cottage feel. A long sage panel hangs from a wooden ring and carries three oval pockets. Each pocket holds one standard roll on its side.
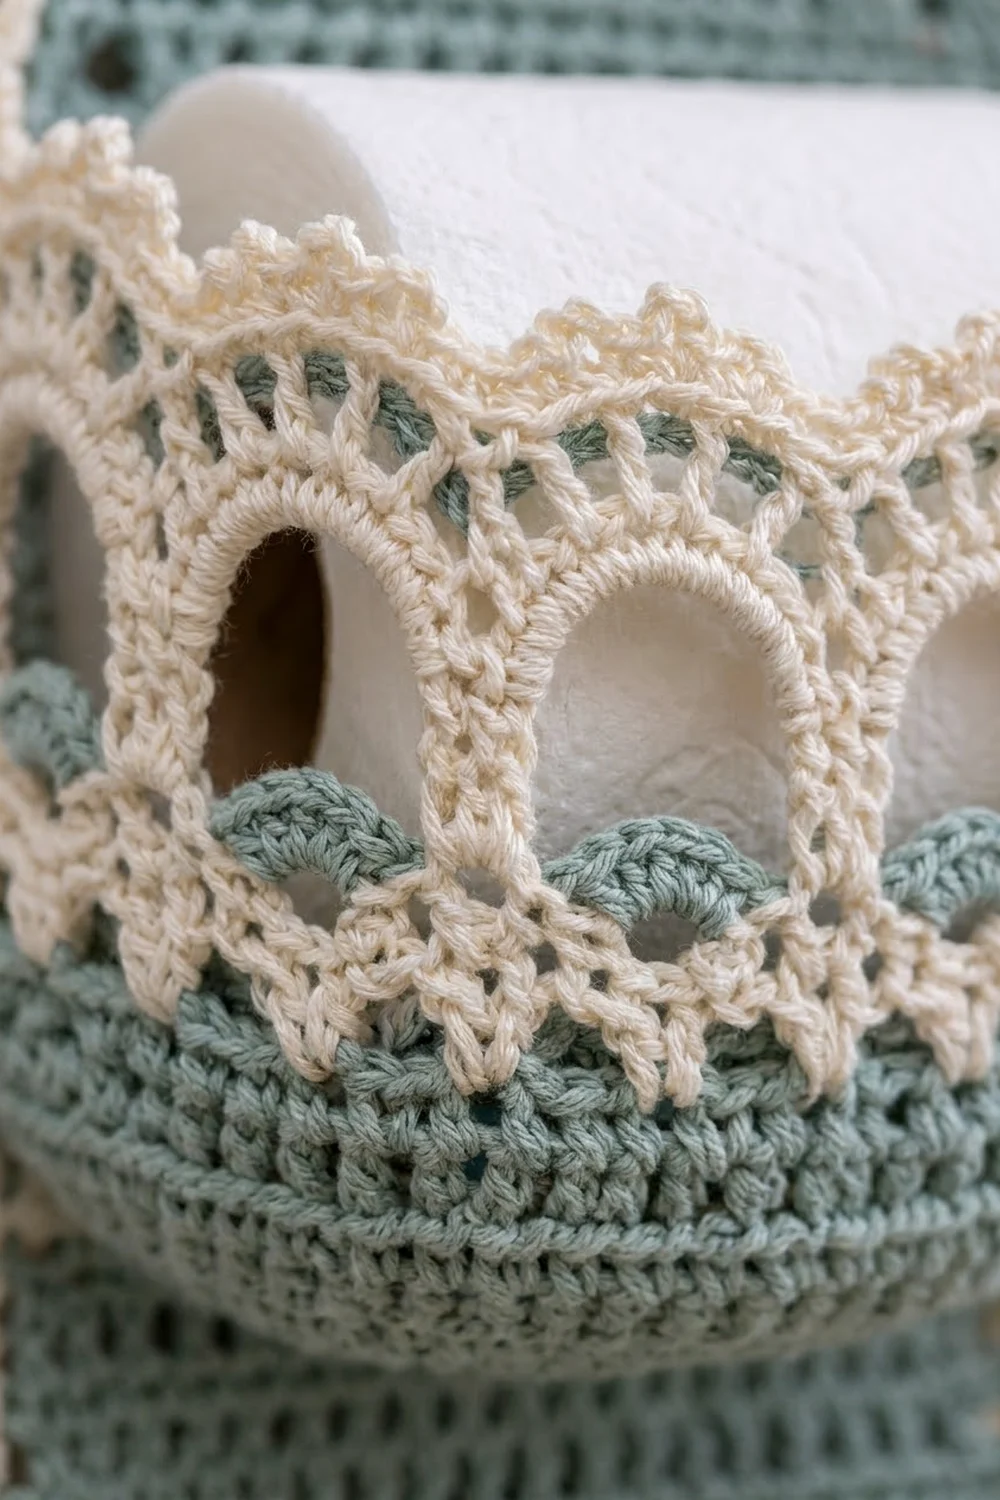
The palette is two colors: seaglass sage for the panel and pocket bases, and creamy ivory for the lace arches and picot rims. The arched windows let a little sage show through, so the pockets look light without being flimsy.
The pattern uses US crochet terms. The finished panel measures 7.5 in (19.1 cm) wide by 25.5 in (64.8 cm) long, not counting the ring. Each pocket is 5.5 in (14.0 cm) wide and 3.75 in (9.5 cm) tall.
Construction is simple. You work the panel flat in double crochet rows, tapered at both ends, and add a hanging tab at the top. You work each pocket in joined rounds from an oval base. Then you sew the pockets to the panel and finish the panel with a two-round scalloped border.
Finished Size and Construction
- Finished panel size: 7.5 in x 25.5 in (19.1 cm x 64.8 cm)
- Skill level: Intermediate
- Terminology: US terms
- Yarn weight: Worsted (#4) cotton
- Hook: 5.0 mm (H-8)
- Number of pieces: 4 (1 back panel and 3 pockets), plus 1 wooden ring
- Layout: 3 pockets stacked vertically down the panel
- Pocket size: 5.5 in (14.0 cm) wide, 3 in (7.6 cm) deep, 3.75 in (9.5 cm) tall
- Panel size before border: 6 in x 24 in (15.2 cm x 61.0 cm)
- Border depth: 0.75 in (1.9 cm) on every edge
Materials
Use a smooth, mercerized or soft worsted cotton. Cotton holds its shape, stands up to bathroom humidity and washes well. Acrylic works too, but the pockets will be softer.
- Sage (Color A): 220 g, about 330 m
- Cream (Color B): 60 g, about 90 m
- 5.0 mm (H-8) crochet hook
- 1 wooden ring, 2.5 in (6.4 cm) outer diameter
- Tapestry needle
- 8–10 locking stitch markers
- Scissors
- Rust-proof pins and a blocking mat
All quantities include a margin of about 15 percent for your gauge swatch and for differences in tension.
Abbreviations (US Terms)
- ch – chain
- sl st – slip stitch
- sc – single crochet
- hdc – half double crochet
- dc – double crochet
- tr – treble crochet
- dc2tog – double crochet 2 together
- BLO / FLO – back loop only / front loop only
- sk – skip
- st(s) – stitch(es)
- sp – space
- RS / WS – right side / wrong side
Special stitch – Picot: ch 3, then sl st in the 3rd ch from the hook.
Special stitch – Shell: 5 dc in the same stitch.
Gauge and Checkpoints
Gauge: 16 dc and 8 rows = 4 in (10.2 cm) with a 5.0 mm hook. Each dc is 0.25 in (0.6 cm) wide and each row is 0.5 in (1.3 cm) tall.
Test one piece first. Make one pocket before you start the panel. It is small, uses both colors, and shows right away whether your tension matches.
Checkpoints:
- Pocket base after Round 3: 5.5 in x 3 in (14.0 cm x 7.6 cm)
- Pocket wall after Round 10: 3.25 in (8.3 cm) tall
- Panel after Row 10: 6 in (15.2 cm) wide and 5 in (12.7 cm) tall
- Panel after Row 38: 19 in (48.3 cm) tall
- Panel after Row 48: 24 in (61.0 cm) tall
If your piece is too big, go down a hook size (4.5 mm). If it is too small, go up to 5.5 mm. Do not change the stitch counts. All the joining and border math depends on them.
Back Panel
Use Color A. In every row, the ch 2 does not count as a stitch.
Row 1 (RS): Ch 8, dc in the 3rd ch from hook and in each of the next 5 ch. Turn. (6 dc)
Rows 2–10 (increase rows): Ch 2, 2 dc in the first st, dc in each st to the last st, 2 dc in the last st. Turn. Each row has 2 more stitches than the row before.
– Row 2: 8 dc
– Row 4: 12 dc
– Row 6: 16 dc
– Row 8: 20 dc
– Row 10: 24 dc
Checkpoint: the panel is 6 in (15.2 cm) wide.
Rows 11–38 (straight): Ch 2, dc in each st across. Turn. (24 dc in each row, 28 rows total)
Rows 39–47 (decrease rows): Ch 2, dc2tog over the first 2 sts, dc in each st to the last 2 sts, dc2tog. Turn. Each row has 2 fewer stitches than the row before.
– Row 39: 22 dc
– Row 43: 14 dc
– Row 47: 6 dc
Row 48: Ch 2, dc in each st across. Turn. (6 dc)
Checkpoint: the panel is 24 in (61.0 cm) long and 6 in (15.2 cm) wide across the straight section. The top and bottom tapers are each 5 in (12.7 cm) tall.
Hanging Tab
Row 49: Ch 2, dc in the FLO of each st across. Turn. (6 dc) The back loops of Row 48 stay free for the border.
Rows 50–54: Ch 2, dc in each st across. Turn. (6 dc in each row)
The tab is 3 in (7.6 cm) long. Fasten off and leave a 12 in (30.5 cm) tail.
Pass the tab through the wooden ring from front to back. Fold it down against the WS and whipstitch the top of Row 54 to the WS of Row 46, centered. Check that the ring turns freely in the fold.
Pockets (Make 3)
Work in joined rounds with the RS facing; do not turn. The ch 2 does not count as a stitch. Join every round with a sl st to the first stitch.
Base (Color A)
Round 1: Ch 12. Dc in the 3rd ch from hook and in each of the next 8 ch, then 6 dc in the last ch. Rotate the work and, along the other side of the foundation chain, dc in each of the next 8 ch, then 5 dc in the first ch (the one that already holds the first dc). Join. (28 dc: 8 on each straight side, 6 around each end)
Round 2: Ch 2. Dc in each of the 8 side sts and 2 dc in each of the 6 end sts, on both sides. Join. (40 dc: 8 on each side, 12 around each end)
Round 3: Ch 2. Dc in each of the 8 side sts. At each end, work (dc in next st, 2 dc in next st) 6 times. Join. (52 dc: 8 on each side, 18 around each end)
Checkpoint: the base is 5.5 in x 3 in (14.0 cm x 7.6 cm). A slight cup is fine and helps the wall turn up.
Walls (Color A)
Round 4: Ch 2, dc in the BLO of each st around. Join. (52 dc) This ridge turns the wall up and becomes your sewing line later.
Rounds 5–6: Ch 2, dc in each st around. Join. (52 dc in each round) Fasten off Color A.
Lace Band (Color B)
Round 7: Join Color B in any st. Ch 1, sc in each st around. Join. (52 sc)
Round 8 (arch posts): Ch 4 (counts as the first tr). *Ch 3, sk 3 sts, tr in next st; repeat from * 11 more times, then ch 3, sk 3. Join to the top of the beginning ch-4. (13 tr and 13 ch-3 spaces)
This round uses 13 repeats of 4 stitches, which accounts for all 52 stitches of Round 7. Each skipped group of 3 becomes an open window.
Round 9 (arch tops, conversion round): Ch 1. *Sc in the next tr, then (sc, 2 hdc, sc) in the next ch-3 sp; repeat from * around. Join.
– Count: 13 sc (1 in each tr) + 52 sts (4 in each ch-3 space) = 65 sts.
The 2 hdc in each space dome upward, which gives the windows their rounded tops and makes the rim flare slightly.
Round 10: Ch 2, dc in each st around. Join. (65 dc)
Round 11 (picot rim): Ch 1. *Sc in each of the next 4 sts, then (sc, picot) in the next st; repeat from * 12 more times. Join. (65 sc and 13 picots) Fasten off and weave in the ends.
Checkpoint: the wall is 3.25 in (8.3 cm) tall at the end of Round 10. The whole pocket is 3.75 in (9.5 cm) tall including the picots.
Make All Pieces
Before you join anything, check that you have all of these:
- Back panel: 1, in Color A (border still to come)
- Pockets: 3. Each has Rounds 1–6 in Color A and Rounds 7–11 in Color B.
- Wooden ring: 1, already sewn into the tab
Layout (front view, top to bottom):
        [ ring ]
        [ tab  ]
       /  taper \     Rows 39-48
      | Pocket C |    seam row 30, sits on Rows 30-36
      | Pocket B |    seam row 21, sits on Rows 21-27
      | Pocket A |    seam row 12, sits on Rows 12-18
       \  taper /     Rows 1-10
Joining
Method: Whipstitch with Color A and a tapestry needle. Work with the panel RS up and the pocket’s Round 4 ridge lying against the panel.
Bottom seam: Flatten each pocket so one long side of the oval lies against the panel. That side has 8 straight stitches plus 9 end stitches on each side, for 26 back stitches in all. Mark the center 18 of these on Round 4: the 8 straight stitches plus 5 end stitches on each side. Mark the center 18 dc of the seam row on the panel, which leaves 3 dc free at each edge.
Join stitch to stitch: 1 pocket stitch to 1 panel stitch, 18 to 18. Both stitches are dc at 0.25 in (0.6 cm) wide, so the seam lies flat with no easing.
Side seams: From each end of the bottom seam, whipstitch straight up the pocket wall to the top of Round 10, catching the panel’s row ends next to it. That is 3.25 in (8.3 cm), or about 6.5 panel rows. Then tack the center back of Round 10 to the panel with three small stitches.
Placement: Pocket A goes on Row 12, Pocket B on Row 21 and Pocket C on Row 30. The pockets are spaced 4.5 in (11.4 cm) apart, which leaves a gap of about 0.75 in (1.9 cm) between one pocket’s picots and the next pocket’s base.
Tension: Keep the whipstitches snug but not tight. If the panel puckers behind a seam, the stitches are too tight.
Size checkpoint: After joining, the panel should still measure 6 in x 24 in (15.2 cm x 61.0 cm) and lie flat.
Border
Work with Color A and the RS facing. The border gauge matches the panel: 2 sc in each dc row end and 1 sc in each stitch.
Round 1: Join at the bottom of Row 11 on the right edge, at the start of the right long side. Ch 1 and work sc evenly around as follows:
- Right long side (Rows 11–38): 2 sc in each row end = 56 sc
- Upper-right slant (Rows 39–48): 2 sc in each row end = 20 sc
- Top edge: working in the free back loops of Row 48 behind the tab, 2 sc in the first st, sc in the next 4 sts, 2 sc in the last st = 8 sc
- Upper-left slant (Rows 48–39): 20 sc
- Left long side (Rows 38–11): 56 sc
- Lower-left slant (Rows 10–1): 20 sc
- Bottom edge: working along the foundation chain, 2 sc in the first ch, sc in the next 4 ch, 2 sc in the last ch = 8 sc
- Lower-right slant (Rows 1–10): 20 sc
Join to the first sc. That gives 56 + 20 + 8 + 20 + 56 + 20 + 8 + 20 = 208 sc.
The joins between the slants and the long sides are wide, obtuse angles, so they need no extra stitches. The extra stitch at each end of the top and bottom edges eases the sharper corners there.
Round 2 (scallops): Ch 1, sc in the same st. Sk 1 st, shell in the next st, sk 1 st, sc in the next st; repeat from * around, ending with sk 1 st. Join to the first sc. (52 scallops*)
- Each long side: 56 sts ÷ 4 = 14 scallops
- Each end (slant + top or bottom edge + slant = 20 + 8 + 20 = 48 sts): 48 ÷ 4 = 12 scallops
Fasten off and weave in the ends.
Why the math works: Each scallop uses exactly 4 stitches. Every segment of the border has a stitch count that divides evenly by 4. Because the round starts exactly at the start of a long side, every scallop sits squarely on its segment and no partial repeats fall at the corners. The finished border adds 0.75 in (1.9 cm) to every edge: 6 + 1.5 = 7.5 in (19.1 cm) wide and 24 + 1.5 = 25.5 in (64.8 cm) long.
Final Blocking
- Soak the finished holder in cool water for 10 minutes, then press out the water gently. Don’t wring it.
- Roll it in a towel and press to remove extra moisture.
- Lay the panel face up on a blocking mat and pin it to 7.5 in x 25.5 in (19.1 cm x 64.8 cm). Keep the long sides straight.
- Pin each scallop point so the shells fan out evenly.
- Stuff each pocket with a dry toilet roll wrapped in a plastic bag, so it dries in shape.
- Shape each arch window with your fingertips and lift the picots upright.
- Let it dry completely, usually 24 hours, before you unpin it.
Final Quality-Control Checklist
- The panel measures 7.5 in x 25.5 in (19.1 cm x 64.8 cm).
- There are 14 scallops on each long side and 12 across each end.
- All 3 pockets show 13 arches and 13 picots.
- The pockets are centered, level and 4.5 in (11.4 cm) apart.
- No whipstitches show through to the panel back as loose loops.
- The ring turns freely and the tab seam is secure.
- All ends are woven in at least 2 in (5.1 cm) and trimmed.
Troubleshooting
- Panel edges wave: Your border sc are too dense. Check that you are working 2 sc per row end, not 3.
- Panel edges pull in: The tension is too tight on Round 1. Go up a hook size for the border only.
- The pocket base won’t cup: Work Round 4 firmly in the BLO. That ridge is what turns the wall upward.
- The pocket is too tight for the roll: Your gauge is tight. Remake the pocket with a 5.5 mm hook.
- The arches look square: Make sure there are 2 hdc in each space on Round 9, and shape the arches while blocking.
- The panel sags under the rolls: Add a few tacking stitches between the top back of each pocket and the panel.
Care
Hand wash cool or machine wash on a gentle cycle in a laundry bag. Then reshape it and dry it flat. Remove the wooden ring before washing, or keep it out of the water.
Final Notes
Everything rests on one gauge: 16 dc and 8 rows to 4 in (10.2 cm). That gives a pocket base of 5.5 in x 3 in (14.0 cm x 7.6 cm) and a panel of 6 in x 24 in (15.2 cm x 61.0 cm). The pockets join stitch to stitch, 18 to 18. The 208-stitch border divides into 52 even scallops and brings the panel to 7.5 in x 25.5 in (19.1 cm x 64.8 cm). Check each step against its checkpoint and the finished holder will hang straight and hold all three rolls neatly.
Happy crocheting!