

This hanging holder stores three rolls in a slim column that hangs from a door hook. One long olive green back panel carries three curved pockets. Each pocket front has a cream filet-mesh triangle pointing down, with a small four-petal flower in solid blocks at its center.
Only two colors are used: olive green and soft cream. The look is calm and a little vintage, so it suits a cottage bathroom. A wooden ring at the top gives it a natural touch.
The pattern uses US crochet terms. The finished holder is 6.75 in (17.1 cm) wide and 22.75 in (57.8 cm) tall, plus a loop of about 1 in (2.5 cm) above the panel.
You crochet a dc back panel, three filet pocket fronts in intarsia, and a short tab. Each pocket is sewn on with its bottom corners eased in, which curves the front outward. Two border rounds finish the edge, and then the tab wraps around a wooden ring.
Finished Size and Construction
- Finished size: 6.75 in x 22.75 in (17.1 cm x 57.8 cm), plus a loop of about 1 in (2.5 cm)
- Skill level: Intermediate (filet mesh, intarsia, seaming)
- Terminology: US
- Yarn weight: Worsted (#4)
- Hook: 5.0 mm (H-8)
- Number of pieces: 5 (1 back panel, 3 pocket fronts, 1 tab)
- Layout: 3 pockets stacked in one vertical column
- Pocket front size: 10 in x 5.5 in (25.4 cm x 14.0 cm), measured flat
- Size before border: 6 in x 22 in (15.2 cm x 55.9 cm)
- Border depth: 3/8 in (1.0 cm), 2 rounds
Materials
Choose a cotton or cotton-blend worsted yarn. Cotton gives crisp mesh, holds its shape, and copes well with bathroom humidity. Acrylic also works, but the pockets will be softer.
- Olive green (Color A): 150 g, about 270 m
- Cream (Color B): 50 g, about 90 m
These amounts include a margin of about 15%. The margin covers your gauge swatch and the sewing tails.
Tools:
– 5.0 mm (H-8) crochet hook
– Wooden ring, 3 in (7.6 cm) outer diameter
– Tapestry needle
– Small yarn bobbins
– Stitch markers
– Measuring tape
– Blocking mat, rust-proof pins, and a spray bottle
Abbreviations (US Terms)
- ch – chain
- sc – single crochet
- dc – double crochet
- sp – space
- st(s) – stitch(es)
- RS / WS – right side / wrong side
- rev sc – reverse single crochet (crab stitch)
Special terms:
– Mesh: Each pocket row is 17 meshes wide. One mesh is 2 sts, and each row also starts with an edge dc, so a row has 1 + (17 x 2) = 35 sts.
– Space: ch 1, skip 1 st (or ch-1 sp), dc in next dc.
– Block: dc in next 2 sts. When you reach a ch-1 sp, work that dc into the space.
– Color change: Work the last dc of the old color until 2 loops remain. Yarn over with the new color and pull through.
– Rev sc: Work sc from left to right (if you crochet right-handed), inserting the hook into the next st to the right.
Gauge and Checkpoints
Gauge: 14 dc and 8 dc rows = 4 in (10.2 cm). In sc, 16 sts = 4 in (10.2 cm).
Make one pocket front first. It works as your real gauge swatch, and gauge matters most on the pockets.
Pocket checkpoints:
– After Row 4: 10 in (25.4 cm) wide and 2 in (5.1 cm) tall
– After Row 10: 10 in x 5 in (25.4 cm x 12.7 cm)
– After Row 12: 10 in x 5.5 in (25.4 cm x 14.0 cm)
Panel checkpoints:
– After Row 10: 6 in x 5 in (15.2 cm x 12.7 cm)
– After Row 44: 6 in x 22 in (15.2 cm x 55.9 cm)
If your gauge is off:
– Pieces too big: change to a hook 0.5 mm smaller.
– Pieces too small: change to a hook 0.5 mm larger.
– Width correct but height wrong: change how far you pull up the dc loops. Row height matters because each pocket side must match the panel rows.
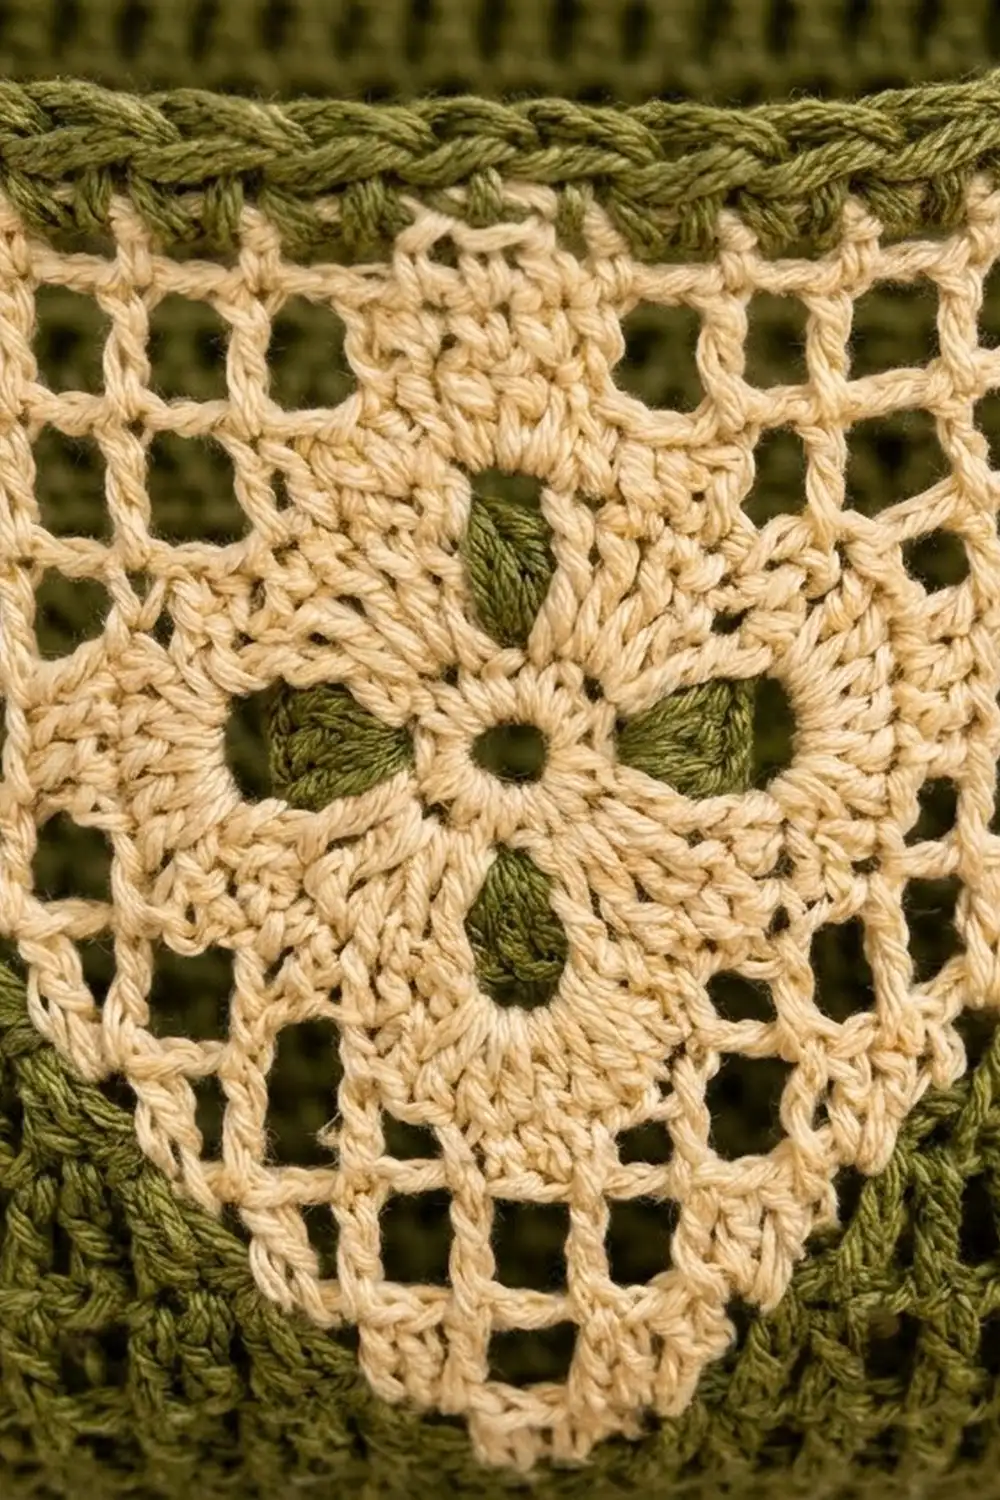
Pocket Front (make 3)
You work each pocket front flat from the bottom up, so the triangle’s point is in Row 1. You need three yarn sources:
– Green A for the left section
– Cream for the center
– Green B for the right section
Never carry a yarn behind the work. Each color stays in its own section. The chart is symmetric, so RS and WS rows read the same way. The edge sts and all green meshes are always worked as blocks.
Foundation: With Green A, ch 37.
Row 1 (RS):
1. With Green A, dc in the 4th ch from the hook and in each of the next 15 ch. The skipped 3 ch count as the first dc, so this section has 17 sts. Change to cream on the last dc.
2. With cream, ch 1, skip 1 ch, dc in the next ch (1 space). Change to Green B.
3. With Green B, dc in each of the last 16 ch. Turn.
(35 sts: 8 green meshes, 1 cream mesh, 8 green meshes)
Rows 2–8: Ch 3 (counts as dc). For each row, work green blocks, then cream meshes, then green blocks, as shown below. Work the last dc of each row in the top of the turning ch. Each row has 35 sts. Turn.
| Row | Green blocks (left) | Cream meshes | Green blocks (right) |
|---|---|---|---|
| 2 | 7 | 3 | 7 |
| 3 | 6 | 5 | 6 |
| 4 | 5 | 7 | 5 |
| 5 | 4 | 9 | 4 |
| 6 | 3 | 11 | 3 |
| 7 | 2 | 13 | 2 |
| 8 | 1 | 15 | 1 |
Rows 9–10: Work as for Row 8: 1 green block, 15 cream meshes, 1 green block. (35 sts)
Flower: Number the meshes 1–17 across the row. Mesh 9 is the center. Work these cream meshes as blocks:
– Rows 4–5: mesh 9
– Row 6: meshes 7, 8, 10, and 11. Leave mesh 9 as a space to make the open eye.
– Rows 7–8: mesh 9
Work every other cream mesh as a space. The result is four 2-mesh petals around one open center.
At the end of Row 10, fasten off the cream and Green B. Continue with Green A.
Row 11 (RS): Ch 1, sc in each dc and each ch-1 sp across. Turn. (35 sc)
Row 12: Ch 1, sc in each st across. (35 sc) Fasten off and leave a 24 in (61.0 cm) tail.
These two sc rows make the firm rim at the pocket opening. Together they measure about 0.5 in (1.3 cm), the height of one dc row.
Back Panel (make 1)
Foundation: With Green A, ch 23.
Row 1: Dc in the 4th ch from the hook and in each ch across. The skipped 3 ch count as a dc. Turn. (21 sts)
Rows 2–44: Ch 3 (counts as dc), dc in each st across. Turn. (21 sts)
Fasten off. The panel measures 6 in x 22 in (15.2 cm x 55.9 cm).
Place markers on both side edges at these points:
– Between Rows 14 and 15, at 7 in (17.8 cm)
– Between Rows 28 and 29, at 14 in (35.6 cm)
Hanging Tab (make 1)
Foundation: With Green A, ch 9.
Row 1: Dc in the 4th ch from the hook and in each ch across. Turn. (7 sts)
Rows 2–8: Ch 3, dc in each st across. Turn. (7 sts)
Fasten off and leave a 12 in (30.5 cm) tail. The tab measures 2 in x 4 in (5.1 cm x 10.2 cm).
Make All Pieces
- Green A: the back panel, the tab, and the green sections and rims of all 3 pockets
- Cream: the mesh triangles of all 3 pockets
Layout (front view, top to bottom):
         [ TAB + RING ]
[ Panel rows 40–44: open, 2.5 in ]
[ Pocket 3 : panel rows 29–39   ]
[ Pocket 2 : panel rows 15–25   ]
[ Pocket 1 : panel rows 1–11    ]
There is 1.5 in (3.8 cm) of bare panel between pockets. You won’t see much of it once the rolls are in, because each curved pocket stands forward.
Joining
Block the pockets and the panel flat before you join anything (see Final Blocking). Sew with a whipstitch, RS facing out. Keep your tension firm but relaxed, so the seams don’t pucker the panel.
Pocket bottoms: Each pocket bottom has 35 sts and the panel has 21. You ease in the corners, which curves the front:
– Pocket sts 1–14 go to panel sts 1–7, with 2 pocket sts per panel st.
– Pocket sts 15–21 go to panel sts 8–14, one to one.
– Pocket sts 22–35 go to panel sts 15–21, with 2 pocket sts per panel st.
Check the totals: 14 + 7 + 14 = 35 pocket sts, and 7 + 7 + 7 = 21 panel sts.
Where each pocket bottom goes:
– Pocket 1: Sew its foundation chain to the panel’s foundation chain.
– Pocket 2: Sew it along the line between Rows 14 and 15, working through the base of each Row 15 st.
– Pocket 3: Sew it along the line between Rows 28 and 29 in the same way.
Pocket sides: Sew the pocket’s 10 dc row ends to 10 panel row ends, one to one. Then sew the 2 sc rim rows to the next panel row. Pocket 1 uses panel rows 1–11, Pocket 2 uses rows 15–25, and Pocket 3 uses rows 29–39.
Size checkpoint:
– The panel still measures 6 in x 22 in (15.2 cm x 55.9 cm).
– The top of Pocket 3 sits at 19.5 in (49.5 cm).
– Each pocket stands out about 1.5 in (3.8 cm) at its center.
You attach the tab after the border.
Border
Border gauge: 16 sc = 4 in (10.2 cm), which is 4 sc per inch (2.5 cm). Each dc row is 0.5 in (1.3 cm) tall, so 2 sc per row end matches this gauge. Where a pocket side lies on the panel edge, work through both layers.
Round 1 (RS): Join Green A at the bottom right corner and work around the panel:
– Bottom edge: 3 sc in st 1 (corner), sc in sts 2–20 (19 sc), 3 sc in st 21 (corner)
– Left side: 2 sc in each of the 44 row ends (88 sc)
– Top edge: 3 sc in st 1, sc in sts 2–20 (19 sc), 3 sc in st 21
– Right side: 2 sc in each of the 44 row ends (88 sc)
Sl st to the first sc. (226 sc: 4 corners x 3 = 12, plus 19 + 19 + 88 + 88 = 214)
Round 2: Ch 1, rev sc in each st around, with no increases. The corner groups from Round 1 already ease the turn. Sl st to join. (226 rev sc) Fasten off.
Why the math works:
– One sc in each dc top keeps the width at 6 in (15.2 cm).
– Two sc per row end, at 4 sc per inch, keeps the length at 22 in (55.9 cm). Neither edge ruffles or pulls in.
– The two rounds add 3/8 in (1.0 cm) on each side. The finished size is 6.75 in x 22.75 in (17.1 cm x 57.8 cm).
Attach the tab:
1. Slip the tab through the wooden ring and fold it in half.
2. Put the top of the panel between the two tab ends, one end on the front and one on the back.
3. Center the tab over panel sts 8–14. Overlap 1 in (2.5 cm), or 2 tab rows, on each side.
4. Sew through all layers, hiding your stitches in the dc posts.
The loop rises about 1 in (2.5 cm) above the border.
Final Blocking
- Weave in all ends inside seams or behind green blocks, never through the cream mesh.
- Pin the holder flat, RS up, to 6.75 in x 22.75 in (17.1 cm x 57.8 cm).
- Pin along each triangle so its edges run straight and the mesh holes are square.
- Spray evenly with water until the holder is damp but not soaked.
- Fold a hand towel to roll size, about 4.5 in (11.4 cm) across, and push it into each pocket so the curve sets.
- Let the holder dry completely, about 24 hours.
- Unpin, remove the towels, and hang the holder to check it.
Final Quality-Control Checklist
- Each pocket row has 35 sts, and each panel row has 21 sts.
- Each triangle point is centered, and the top of each triangle is 15 cream meshes across.
- Each flower shows four petals and an open center.
- No yarn shows behind the mesh.
- The corners of each pocket bottom are eased in evenly on both sides.
- The pocket tops sit at 5.5 in, 12.5 in, and 19.5 in (14.0 cm, 31.8 cm, and 49.5 cm).
- The border lies flat and has 226 sts.
- The tab is centered and firmly sewn, and the ring turns freely.
Troubleshooting
The mesh holes are tall instead of square.
Pull your dc loops up less, or use a hook 0.5 mm smaller for the pockets.
There are gaps at the color changes.
Twist the two yarns once on the WS at each change, and always change color on the last yarn-over.
The triangle edges look jagged.
Start each cream section with ch 1 and end it with a dc.
The pocket is too shallow.
The corners need to be eased at 2 pocket sts per panel st. A bottom seam sewn one to one makes a flat pocket.
The border ruffles.
Recount the sides. Each side should have exactly 88 sc.
The holder tilts when it hangs.
Re-sew the tab so it is centered over panel sts 8–14.
Care
Remove the rolls and hand wash the holder in cool water with mild soap. Press out the water in a towel and dry it flat, with the pockets shaped over towels.

Final Notes
The measurement chain builds in four steps:
– Each pocket is 35 sts by 12 rows, or 10 in x 5.5 in (25.4 cm x 14.0 cm).
– The panel is 21 sts by 44 rows, or 6 in x 22 in (15.2 cm x 55.9 cm).
– Each pocket bottom eases 35 sts onto 21, and each pocket side matches 11 panel rows.
– The border adds 3/8 in (1.0 cm) per side, for a finished size of 6.75 in x 22.75 in (17.1 cm x 57.8 cm).
Check your gauge on the first pocket, and every piece after it will fit into place.
Happy crocheting!