

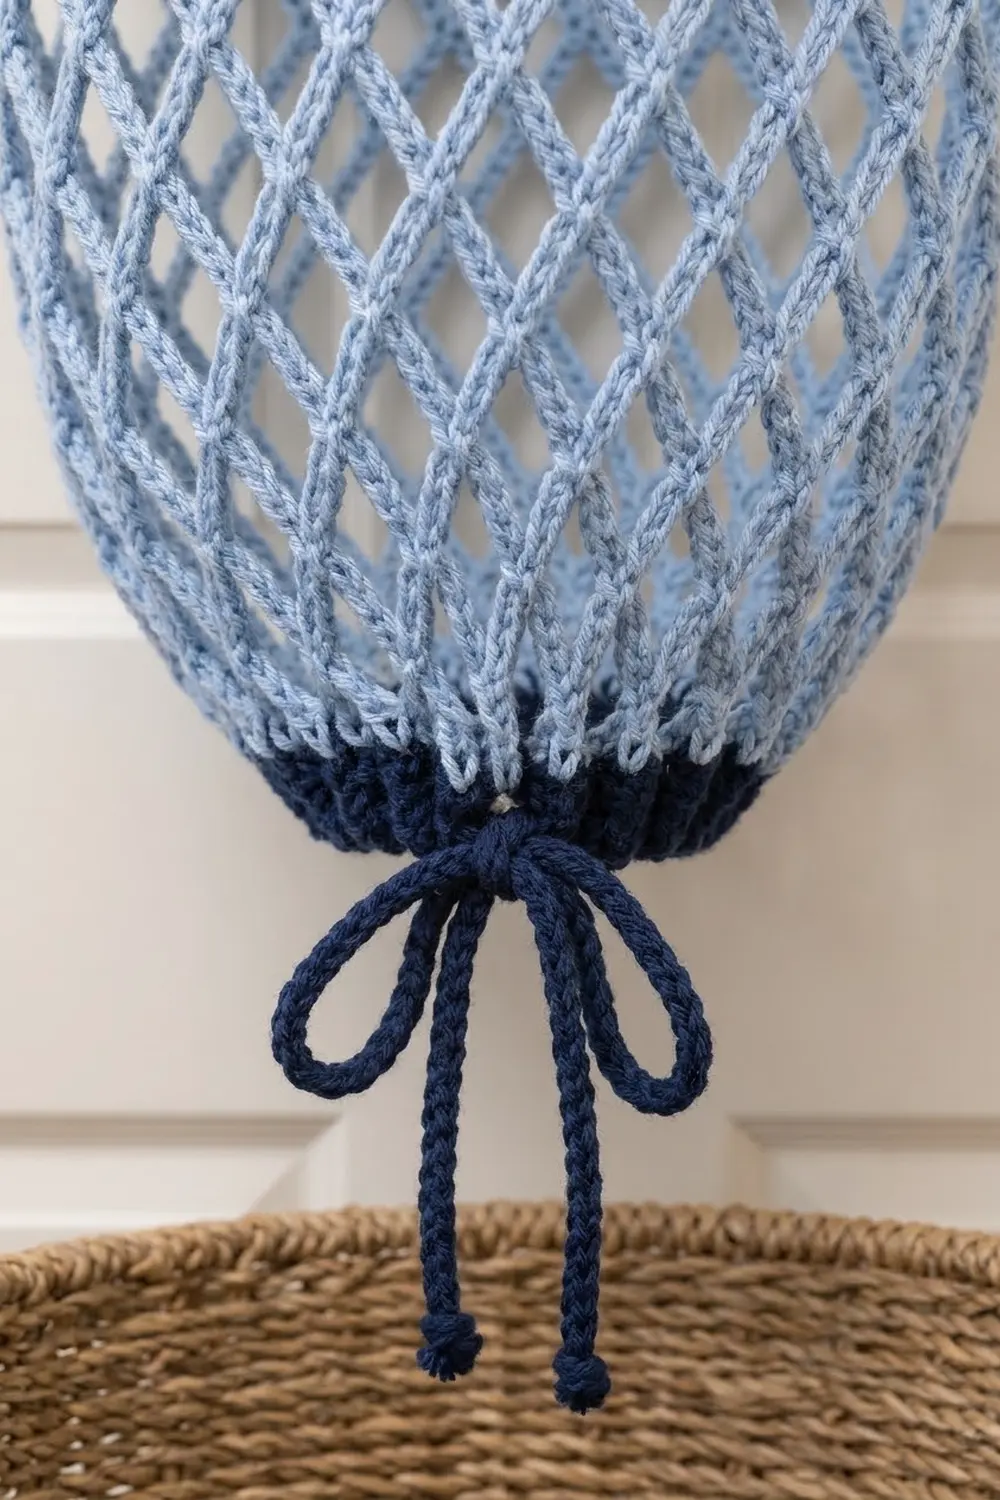
Turn laundry day into a game with this over-the-door basketball hoop hamper. A light blue backboard with a bold navy target square hangs from two door hooks. A padded navy rim sticks out from the board, and a light blue diamond mesh net hangs below it. The net ends in a navy drawstring band that opens to drop the laundry straight into a basket.
The colors are soft and calm. Light blue is used for the backboard and net, and navy for the rim, outline, band, and cord. It suits a bedroom, kids’ room, or dorm, and it still reads as a real hoop from across the room.
The pattern uses US crochet terms. The finished backboard measures 16 x 11 in (40.6 x 27.9 cm), and the rim is built on a 12 in (30.5 cm) ring. Hanging on the door, the whole piece is about 30 in (76.2 cm) from the top of the board to the bottom edging, plus the cord tails.
How it’s built:
– Make two single crochet panels and add a surface slip stitch outline to the front one.
– Join the panels around a stiffener with the border.
– Cover a padded ring with navy single crochet.
– Work the mesh net down from the rim in rounds.
– Finish with a navy band, a drawstring, and two support ties.
Finished Size and Construction
- Finished backboard size: 16 x 11 in (40.6 x 27.9 cm)
- Skill level: Intermediate
- Terminology: US
- Yarn weight: Worsted (#4)
- Hook: 5.0 mm (H-8)
- Number of pieces: 7 (front panel, back panel, 2 hanging tabs, rim-net-band unit, drawstring cord, 2 support ties)
- Layout: backboard on top, rim on the lower part of the board, net hanging below
- Panel size (each): 60 sts x 45 rows = 15 x 10 in (38.1 x 25.4 cm)
- Size before border: 15 x 10 in (38.1 x 25.4 cm)
- Border depth: 2 rounds, about 1/2 in (1.3 cm) per side
- Net: 24 loops around, 20 mesh rounds, about 19 in (48.3 cm) relaxed
Materials
Use a smooth worsted acrylic or a cotton-acrylic blend. Smooth yarn shows the mesh clearly and doesn’t snag on clothes. Avoid 100% cotton, which stretches a lot under wet towels.
- Light blue: 220 g / about 440 m (backboard, tabs, net, shell edging)
- Navy: 80 g / about 160 m (outline, rim, band, cord, ties, seaming)
These amounts assume about 200 m per 100 g and include a margin of roughly 20%.
Tools and notions:
- 5.0 mm (H-8) crochet hook
- 12 in (30.5 cm) metal macramé ring
- About 2 yd (1.8 m) of fleece strip, 1.5 in (3.8 cm) wide, for padding
- Corrugated plastic or foam board cut to 14.5 x 9.5 in (36.8 x 24.1 cm)
- 2 over-the-door hooks
- Tapestry needle, 8 stitch markers, pins, measuring tape
Abbreviations (US Terms)
- ch – chain
- sc – single crochet
- dc – double crochet
- sl st – slip stitch
- st(s) – stitch(es)
- sp – space
- rnd – round
- rep – repeat
- RS – right side
Special stitch – surface slip stitch: Hold the yarn behind the fabric. Insert the hook from front to back through the fabric, pull up a loop, and draw it through the loop on the hook. Each stitch makes one chain-like V on the front.
Gauge and Checkpoints
Gauge: 16 sc and 18 rows = 4 in (10.2 cm). On the mesh, one ch-7 loop spans about 1.6 in (4.1 cm) along the rim, and 4 rounds of ch-7 mesh measure about 4 in (10.2 cm) relaxed.
Make the front panel first and measure it before you make anything else. It works as your gauge swatch.
Checkpoints:
- Row 1: 60 sts = 15 in (38.1 cm)
- After Row 18: 4 in (10.2 cm) tall
- After Row 45: 10 in (25.4 cm) tall
- After the border: 16 x 11 in (40.6 x 27.9 cm)
- Covered rim: about 13 in (33.0 cm) across the outside, with 24 sc between markers
- After Mesh Rnd 12: the net hangs about 12 in (30.5 cm) below the rim
If the panel is too wide, go down to a 4.5 mm hook. If it’s too narrow, go up to a 5.5 mm hook. Don’t change the stitch counts, because the outline and border depend on 60 sts x 45 rows.
Backboard Panels (make 2)
Use light blue.
Row 1 (RS): Ch 61, sc in 2nd ch from hook and in each ch across. (60 sc)
Rows 2–45: Ch 1, turn, sc in each st across. (60 sc)
Fasten off. Make a second identical panel. On the front panel, number the rows from the bottom (Row 1) to the top (Row 45), and number the columns from left (1) to right (60).
Navy Target Outline (front panel only)
The outline is 32 columns wide and 31 rows tall, about 8 x 7 in (20.3 x 17.8 cm).
– Side to side: it is centered, with 14 columns free on each side (14 + 32 + 14 = 60).
– Top to bottom: it covers Rows 11–41, with 10 rows below it and 4 rows above it (10 + 31 + 4 = 45).
- Outer line: With navy, surface sl st once per column along Row 11 from column 15 to column 46 (32 sts). Work once per row up column 46 to Row 41 (31 sts), back along Row 41 to column 15 (32 sts), and down column 15 to Row 11 (31 sts). Sl st into the first stitch to join.
- Inner line: Work a second line just inside the first, on columns 16 and 45 and Rows 12 and 40. That’s 30 sts across and 29 sts up each side.
The double line gives the bold look. Keep your tension loose so the panel stays flat.
Hanging Tabs (make 2)
With light blue, ch 7.
Row 1: Sc in 2nd ch from hook and in each ch across. (6 sc)
Rows 2–12: Ch 1, turn, sc in each st. (6 sc)
Each tab measures 1.5 x 2.7 in (3.8 x 6.9 cm). Leave a 10 in (25.4 cm) tail for sewing.
Rim, Net, and Band (one continuous unit)
Rim
Wrap the fleece strip tightly around the ring until it is about 3/4 in (1.9 cm) thick, then stitch the end down.
Rim Rnd (navy): Join with a sl st around the ring. Ch 1, then work 192 sc over the padded ring, packing the stitches tightly. Place a marker in every 24th sc (8 markers). Sl st to first sc. (192 sc)
Turn the stitches so their tops sit along the lower edge of the rim. Choose one marker as the back point, where the rim will touch the board. Fasten off.
Mesh Net
Join light blue in the sc at the back point. Starting here keeps the round joins hidden against the board.
Rnd 1: Ch 1, sc in same st, *ch 7, skip 7 sc, sc in next sc; rep from * 22 more times, ch 7, skip last 7 sc, sl st in first sc. (24 sc, 24 ch-7 loops)
Check: 24 x (1 sc + 7 skipped) = 192 sts used.
Rnd 2: Sl st in each of the first 4 ch, ch 1, sc in same loop, *ch 7, sc in next ch-7 sp; rep from * 22 more times, ch 7, sl st in first sc. (24 ch-7 loops)
Rnds 3–12: Rep Rnd 2. (24 ch-7 loops in each round)
Rnds 13–16: Work as Rnd 2, but sl st in the first 3 ch and make every loop ch 6. (24 ch-6 loops in each round)
Rnds 17–20: Work as Rnd 2, but sl st in the first 3 ch and make every loop ch 5. (24 ch-5 loops in each round)
The loop count stays the same in every round. The shorter chains are what taper the net into its rounded bottom. Fasten off.
Drawstring Band
Band Rnd 1 (navy, conversion round): Join in any ch-5 sp. Ch 1, 4 sc in each ch-5 sp around, sl st to first sc. (24 loops x 4 sc = 96 sc + 0 extra)
Band Rnd 2: Ch 3 (counts as dc), dc in each st around, sl st to top of ch-3. (96 dc)
Band Rnd 3: Ch 1, sc in each st around, sl st to first sc. (96 sc)
The band measures 24 in (61.0 cm) around, about 7.6 in (19.3 cm) across when open. Fasten off.
Shell Edging (light blue): Join in any sc. Ch 1, sc in same st, *skip 1 st, 5 dc in next st, skip 1 st, sc in next st; rep from * 22 more times, skip 1 st, 5 dc in next st, skip 1 st, sl st in first sc. (24 shells; 24 x 4 sts = 96 sts used)
Cord and Support Ties
Cord (navy): Ch 160. Sl st in the back bump of the 2nd ch from hook and of each ch across. (159 sl st, about 36 in / 91.4 cm)
Support ties (make 2, navy): Ch 34. Sl st in the back bump of the 2nd ch from hook and of each ch across. (33 sl st, about 7.6 in / 19.3 cm) Leave 8 in (20.3 cm) tails at both ends.
Weave the cord over and under every 4 dc of Band Rnd 2 (24 passes). Knot each end, then tie the cord in a bow to close the bottom.
Make All Pieces
- Light blue: 2 backboard panels, 2 hanging tabs, the net, and the shell edging
- Navy: the front outline, rim cover, band, 1 cord, and 2 support ties
Layout (front view):
   [tab]                    [tab]
 +--------------------------------+
 |        +--------------+        |
 |        | navy outline |        |
 |        |              |        |
 |   ====(  navy rim  )=====      |
 +--------------------------------+
          \  diamond mesh  /
           \   24 loops   /
            \____________/
              navy band
             shell edge
              cord bow
Joining
Panels: Place the two panels wrong sides together with the stiffener between them. The front panel faces you, and both Row 1 edges are at the bottom. The panels are the same size (60 x 45), so stitch 1 of the front lines up with stitch 1 of the back on every edge. Border Rnd 1 is worked through both layers at once. It joins the panels and also counts as the first border round.
Tension: Work the joining sc at the same tension as the panels. If they’re too tight, the edges cup around the stiffener. If they’re too loose, the edges gap.
Size checkpoint: After Border Rnd 1, the board should measure about 15.5 x 10.5 in (39.4 x 26.7 cm).
After the border is finished:
- Tabs: Fold each tab in half to make a loop. Sew both ends to the top of the back panel, centered 2.5 in (6.4 cm) in from each side edge, with the loop rising about 1/2 in (1.3 cm) above the board.
- Rim: Line up the back point with the center of the outline’s bottom line, 2.7 in (6.9 cm) above the bottom edge of the board. With navy, whipstitch 6 in (15.2 cm) of the rim’s back arc (about 30 sc) to Rows 10–11 through both panels.
- Ties: Sew one end of each tie to the rim 48 sc to the left and to the right of the back point. Sew the other ends to the outline sides at Row 30 (columns 15 and 46). Adjust until the rim sits level, then secure.
Border
Border gauge: Along the top and bottom, work 1 sc per stitch. Along the sides, work 8 sc for every 9 row-ends, so 45 row-ends become 40 sc. This matches 4 sc per inch to 4.5 rows per inch.
Rnd 1 (joining round, light blue): Join at the top right corner and work through both layers.
– Top: sc in each st across. (60 sc)
– Corner: ch 2.
– Left side: *sc in each of next 8 row-ends, skip 1 row-end; rep from * 4 more times. (40 sc)
– Corner: ch 2.
– Bottom: work in the free loops of the foundation ch. (60 sc)
– Corner: ch 2.
– Right side: work as the left side. Insert the stiffener before you close this side. (40 sc)
– Corner: ch 2, then sl st to first sc.
(200 sc + 4 ch-2 corner sps)
Rnd 2: Ch 1, sc in each sc and work (sc, ch 2, sc) in each corner sp.
– Top and bottom: 60 + 2 = 62 sc each
– Sides: 40 + 2 = 42 sc each
Sl st to first sc. (208 sc + 4 ch-2 sps)
Why the math works:
– The corners are ch-2 spaces, so no corner stitch is counted twice.
– Width: 62 sc ÷ 4 = 15.5 in, and the corner spaces add the last 1/2 in, for 16 in (40.6 cm).
– Height: 42 sc ÷ 4 = 10.5 in, plus the corners, for 11 in (27.9 cm).
Final Blocking
- Before joining, pin each panel to 15 x 10 in (38.1 x 25.4 cm).
- Mist with water, or steam acrylic lightly with the iron held above the fabric. Let dry completely.
- After assembly, hang the hoop on the door.
- Mist the net. Put 2–3 towels inside, close the band, and let it dry overnight so the diamonds open evenly.
- Straighten the shell edging by hand while it’s still damp.
Final Quality-Control Checklist
- The board measures 16 x 11 in (40.6 x 27.9 cm) and lies flat
- The outline is centered with 14 columns clear on each side
- The rim has 192 sc and no padding shows through
- Every net round has 24 loops, and the round joins sit at the back
- The band has 96 sts, and the cord closes it fully
- The rim sits level and the ties are secure
- The tabs hold the board without stretching
- All ends are woven in at least 2 in (5.1 cm)
Troubleshooting
- Board edges ruffle: You probably worked into every row-end. Use 8 sc per 9 rows.
- Board cups: The joining round is too tight. Redo it with looser tension.
- Padding shows through the rim: Wrap the padding thicker instead of adding stitches, because the net needs exactly 192 sc.
- Net twists: Make sure you work into the next loop each time. Recount to 24 loops.
- Net is too long: Leave out one of Rnds 3–12.
- Bottom won’t close: Weave the cord through every 4 dc.
- Rim droops: Shorten the support ties.
Care
Spot clean the backboard. Hand wash the net and band in cool water if needed, and hang to dry.

Final Notes
Each stage sets up the next one:
– 60 sts x 45 rows make a 15 x 10 in (38.1 x 25.4 cm) panel.
– Two border rounds bring the board to 16 x 11 in (40.6 x 27.9 cm).
– The rim’s 192 sc carry 24 mesh loops.
– The net tapers from ch-7 to ch-5 loops.
– 24 loops x 4 sc give the band’s 96 sts.
If each checkpoint matches, everything fits together.
Happy crocheting!