

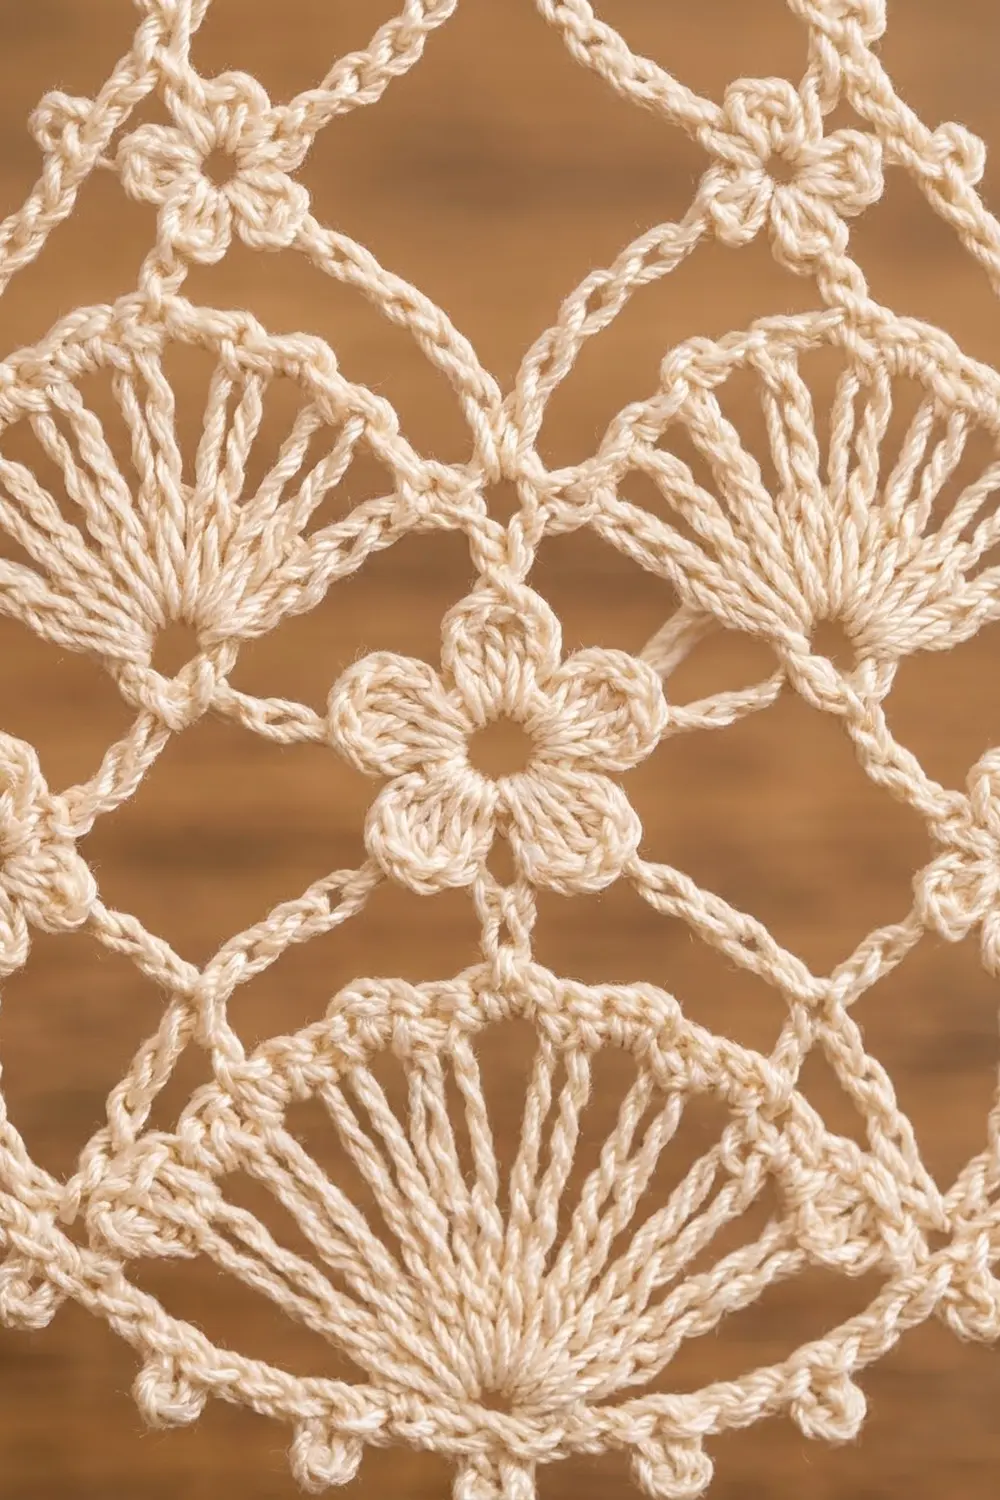
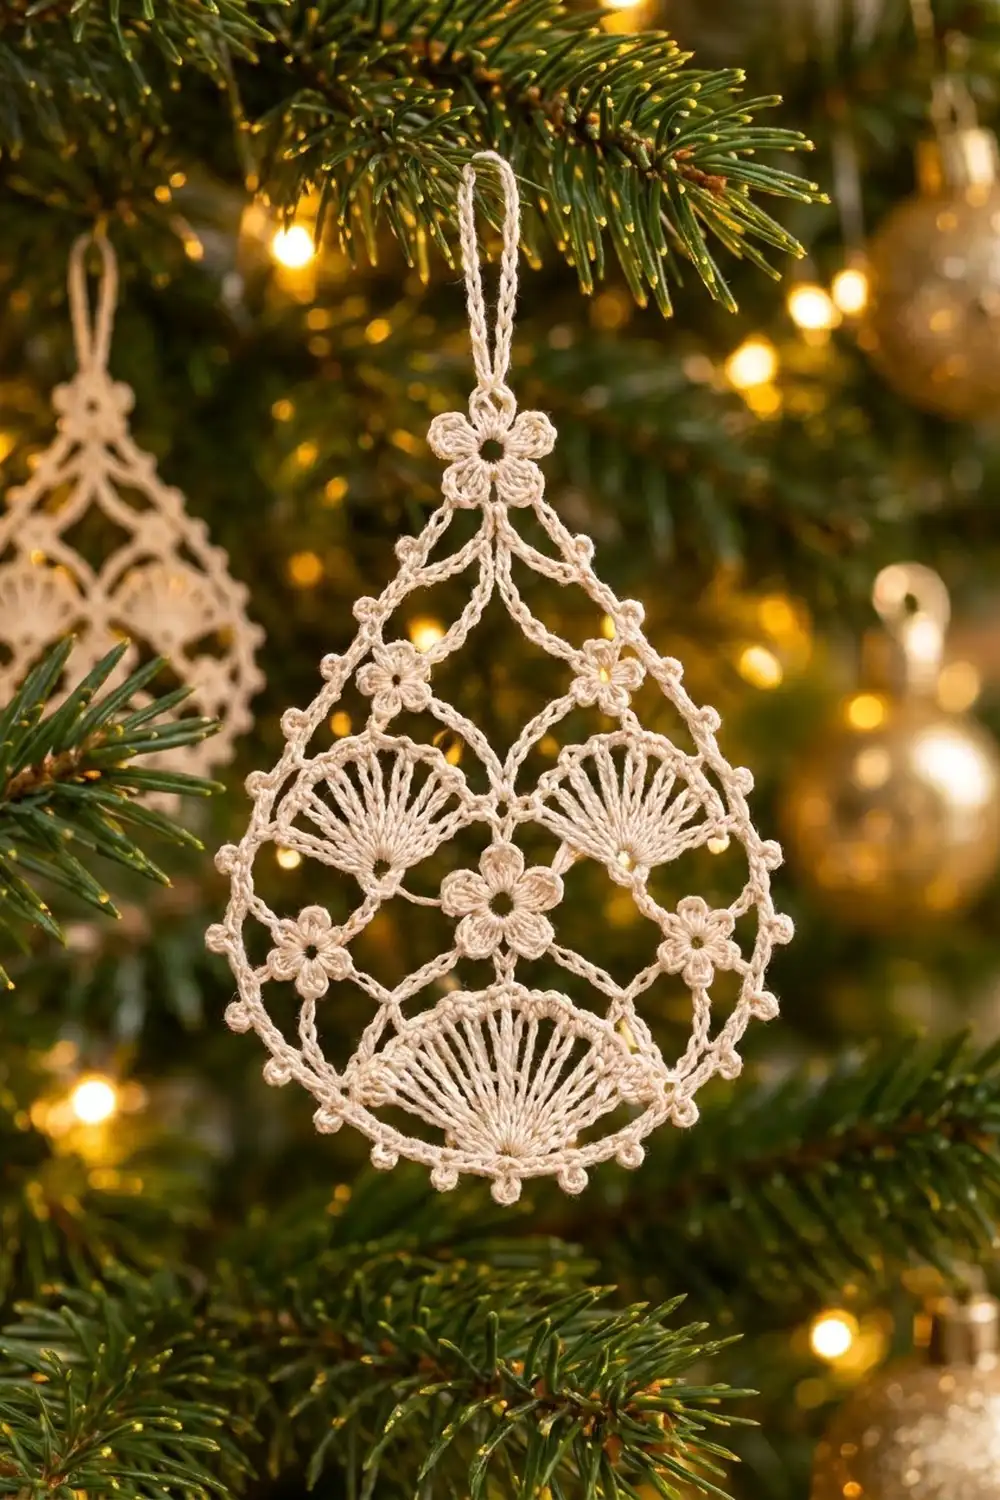
The Frosted Lantern is a lace Christmas ornament worked in fine cream cotton thread. It has an open chain lattice dotted with tiny five-petal flowers, two small fans in the upper half, and one large fan filling the rounded bottom. A chain edging with small picots runs around the whole teardrop.
It uses a single color, so the stitch texture does all the work. Cream or ecru gives a soft vintage look on a green tree. White looks crisp and frosty, and metallic-blend thread gives a little shine. The pattern uses US crochet terms throughout.
The finished ornament measures 2.75 in (7.0 cm) wide and 4 in (10.2 cm) tall. The hanging loop adds about 1 in (2.5 cm), so the total height is 5 in (12.7 cm).
You’ll work the ornament in one piece from the bottom up. First you make the large fan, then you build rows of chain loops upward with the flowers and the two small fans worked in as you go. The rows narrow to the top flower. Next, one edging pass outlines the whole shape with picots, and you finish by adding the hanging loop.
Finished Size and Construction
- Finished size: 2.75 in (7.0 cm) wide × 4 in (10.2 cm) tall, plus a 1 in (2.5 cm) hanging loop
- Skill level: Intermediate (thread crochet, working into chain spaces)
- Terminology: US crochet terms
- Yarn weight: Size 10 crochet thread (Lace, weight 0)
- Hook: 1.75 mm (US steel 6)
- Number of pieces: 1 (single continuous piece)
- Layout: Teardrop, worked bottom-up in 10 rows, then edged
- Piece size before edging: 2.25 in (5.7 cm) wide × 3.5 in (8.9 cm) tall
- Edging depth: about 0.25 in (0.6 cm) on every side
Materials
Thread: Use mercerized cotton size 10 crochet thread. Mercerized cotton keeps a smooth sheen, holds starch well, and shows the flower and fan stitches clearly. Avoid fuzzy or acrylic threads, because the lattice will look blurry and won’t block as crisply.
- Cream / ecru: about 6 g, 20 m (21.9 yd) for one ornament
This amount includes a margin of roughly 30 percent for a gauge swatch, joins, and weaving in ends. One standard ball makes many ornaments.
Tools:
– 1.75 mm (US steel 6) crochet hook
– Fine tapestry needle or small-eye sewing needle
– Small sharp scissors
– Blocking foam board and stainless steel pins
– Spray starch, or a fabric stiffener diluted 1:1 with water
– Tape measure or ruler with inches and cm
Abbreviations (US Terms)
- ch – chain
- sl st – slip stitch
- sc – single crochet
- dc – double crochet
- tr – treble crochet
- dtr – double treble crochet
- sk – skip
- sp(s) – space(s)
- p – picot: ch 3, sl st in 3rd ch from hook
- CPS – chain-picot segment: ch 3, p, ch 3
Special stitches
FN (Flower Node): Ch 6, sl st in 6th ch from hook to form a small ring. [Ch 2, 2 dc in ring, ch 2, sl st in ring] 5 times. Sl st in the base ch of the ring. The finished FN has 5 petals:
– Petals 1 and 5 sit beside the chain it hangs from.
– Petals 2 and 4 are the side petals.
– Petal 3 points straight away from the chain. This is the top petal.
To work “in a petal,” insert the hook between the 2 dc of that petal.
LFN (Large Flower Node): Work it the same way as the FN, but make each petal [ch 2, 3 dc in ring, ch 2, sl st in ring]. To work “in a petal” of an LFN, work into the center dc of that petal.
Both nodes hang off the working chain and add no length to it.
Gauge and Checkpoints
Gauge matters because the lattice chains have to sit taut between the anchor points. Make one test ornament through Row 2 and measure it before you continue.
- Gauge: 11 ch = 1 in (2.5 cm). One FN measures 0.5 in (1.3 cm) across.
- Checkpoint 1 (after Row 2): The bottom fan is 1.75 in (4.4 cm) wide across the arc ends and 0.9 in (2.3 cm) tall.
- Checkpoint 2 (after Row 6): The piece is 2.25 in (5.7 cm) wide, measured between the side flowers.
- Checkpoint 3 (after Row 10): The piece is 3.5 in (8.9 cm) tall, measured from the bottom point to the top of the top flower.
- Checkpoint 4 (after edging): The ornament is 2.75 in (7.0 cm) × 4 in (10.2 cm).
If your piece is too big: Change to a 1.5 mm (US steel 7) hook, or tighten your chains. Loose chain loops make the lattice sag.
If your piece is too small: Change to a 2.0 mm (US steel 4) hook. Check that your dtr stitches are fully extended, because short dtr stitches give a cramped bottom fan.
Pattern
Leave a 6 in (15.2 cm) tail at the start for weaving in.
Bottom Fan
Foundation: Ch 5, sl st in first ch to form a ring.
Row 1 (RS): Ch 5 (counts as first dtr), 14 dtr in ring. Turn. (15 dtr)
The dtr stitches radiate from the ring like the spokes of a half-circle. The ring becomes the bottom point of the ornament.
Row 2: Ch 1, sc in first dtr, [ch 1, sc in next dtr] 14 times. Turn. (15 sc, 14 ch-1 sps)
This row forms the solid arch across the top of the fan. Number the sc from 1 to 15 in your head; sc #8 is the center.
Middle Section
Row 3: Ch 1, sc in sc #1, ch 7, sc in sc #5, ch 7, sc in sc #8, ch 7, sc in sc #11, ch 7, sc in sc #15. Turn. (5 sc, 4 ch-7 loops)
The skips are 3, 2, 2, and 3 sc, so the loops are symmetrical around the center.
Row 4: Sl st in first 4 ch of first loop. Ch 1, sc in same loop. Ch 5, sc in next loop. Ch 3, LFN, ch 3, sc in next loop. Ch 5, sc in last loop. Turn. (4 sc, 2 ch-5 sps, 1 LFN on a ch-3/ch-3 segment)
The LFN is the central flower. Settle it so its top petal points up, directly above sc #8 of Row 2.
Row 5: Ch 1, sc in first sc. Ch 3, FN, ch 3, sl st in same sc. This is the first side flower, and it sits outside the edge. Work 9 tr in next ch-5 sp (first small fan). Ch 2, sc in top petal of LFN, ch 2. Work 9 tr in next ch-5 sp (second small fan). Sc in last sc, ch 3, FN, ch 3, sl st in same sc for the second side flower. Turn. (3 sc, 18 tr in 2 fans of 9, 2 FN, 2 ch-2 sps)
Each 9-tr group fans upward from its ch-5 space, so its base sits next to the central flower.
Row 6: Ch 1, sc in first sc (behind the side-flower loop). Sc in each of next 9 tr. Ch 3, sc in center sc above the LFN, ch 3. Sc in each of next 9 tr, sc in last sc. Turn. (21 sc, 2 ch-3 sps)
Count the sc from 1 to 21: #1 and #21 are the edge sc, #2–#10 and #12–#20 are the fan tops, and #11 is the center. Check measurement Checkpoint 2 now.
Upper Lattice
Row 7: Ch 1, sc in sc #1. Ch 6, sk 4 sc, sc in sc #6. Ch 6, sk 4 sc and the ch-3 sp, sc in sc #11. Ch 6, sk the ch-3 sp and 4 sc, sc in sc #16. Ch 6, sk 4 sc, sc in sc #21. Turn. (5 sc, 4 ch-6 loops)
Each loop lifts from the middle of a fan top or from the center, so the lattice lines start evenly.
Row 8: Sl st in first 3 ch of first loop. Ch 1, sc in same loop. Ch 3, FN, ch 3, sc in next loop. Ch 6, sc in next loop. Ch 3, FN, ch 3, sc in last loop. Turn. (4 sc, 2 FN, 1 ch-6 sp)
These two FN are the upper flowers. Settle each one with its top petal pointing up.
Row 9: Ch 1, sc in first sc. Ch 3, sc in top petal of next FN. Ch 7, sc in ch-6 sp. Ch 7, sc in top petal of next FN. Ch 3, sc in last sc. Turn. (5 sc, 2 ch-3 sps, 2 ch-7 sps)
Row 10: Sl st in first ch-3 sp. Ch 1, sc in same sp. Ch 5, sc in next ch-7 sp. Ch 4, FN, ch 4, sc in next ch-7 sp. Ch 5, sc in last ch-3 sp. (4 sc, 2 ch-5 sps, 1 FN on a ch-4/ch-4 segment)
This FN is the top flower. Settle it at the peak with its top petal (petal 3) pointing straight up. Fasten off, then check measurement Checkpoint 3.
Edging
Edging gauge: One CPS covers about 0.35 in (0.9 cm) of outline when slightly stretched. That spacing keeps the picots evenly spaced without ruffling.
With the RS facing, join thread with a sc in the left side petal (petal 2) of the top flower. The anchor points down the left side are:
- Work 3 CPS, then sc in the outer side petal of the left upper flower (Row 8).
- Work 2 CPS, then sc in the end sc of Row 7.
- Work 2 CPS, then sc in the outer petal (petal 3) of the left side flower (Row 5).
- Work 3 CPS, then sc in the end sc of Row 2 (the left fan corner).
Bottom:
- Work 4 CPS, then sc around the foundation ring between the first and last dtr (the bottom point).
- Work 4 CPS, then sc in the end sc of Row 2 (the right fan corner).
Right side (mirror of the left):
- Work 3 CPS, then sc in the outer petal (petal 3) of the right side flower.
- Work 2 CPS, then sc in the end sc of Row 7.
- Work 2 CPS, then sc in the outer side petal of the right upper flower.
- Work 3 CPS, then sc in the right side petal (petal 4) of the top flower.
Sl st in the first sc and fasten off. (11 anchor sc, 28 CPS, 28 picots)
Why the math works: The 11 anchor points create 10 segments of 3, 2, 2, 3, 4, 4, 3, 2, 2, 3 CPS, which add up to 28.
– Sides: Each side gets 10 CPS × 0.35 in = 3.5 in (8.9 cm). That matches the curved side from the top flower to the fan corner.
– Bottom: The 8 CPS × 0.35 in = 2.8 in (7.1 cm) follow the half-circle under the fan.
Because the counts are mirrored, the picots line up evenly on both sides.
Hanging Loop
Join thread with a sl st in the top petal (petal 3) of the top flower. Ch 22, sl st in the same petal. Work 30 sc into the loop, then sl st in the first sc. Fasten off.
The loop stands about 1 in (2.5 cm) tall. The sc covering makes it strong enough to hang without stretching.
Final Blocking
- Weave in all ends along the chain lattice, splitting the thread, and trim closely.
- Draw the teardrop outline on paper: 2.75 in (7.0 cm) wide × 4 in (10.2 cm) tall, with the widest point about 1.25 in (3.2 cm) above the bottom.
- Tape the template under clear plastic wrap on the foam board.
- Dampen the ornament, lay it RS up on the template, and pin the bottom point and the top flower first.
- Pin each anchor sc of the edging to the outline, then pin out each picot.
- Pin the centers of the flowers so the petals lie flat, and ease each fan into an even semicircle.
- Spray with starch, or brush on the diluted stiffener, until the piece is saturated.
- Leave it to dry completely for at least 8 hours. Unpin it and shape the hanging loop upright.
Final Quality-Control Checklist
- The bottom fan has 15 dtr, with all stitches meeting at the ring.
- Each small fan has 9 tr, and both fans are the same size.
- There are six flowers: 1 large central flower, 2 side flowers, 2 upper flowers, and 1 top flower.
- The lattice chains are taut, without sagging loops.
- The edging has 28 picots, with 10 on each side and 8 across the bottom.
- The ornament is 2.75 in (7.0 cm) × 4 in (10.2 cm), and the 1 in (2.5 cm) loop stands upright.
- The piece is symmetrical when folded along the center line.
Troubleshooting
- Bottom fan cups or ruffles: Your dtr stitches are too loose or too tight. Rework Row 1, keeping each loop pulled to the same height.
- Flowers twist or flip: Turn them to face the RS before working the next row into their top petals. Blocking will set them.
- Lattice sags: Your chains are too loose. Go down a hook size for the chain rows only.
- Edging ruffles: Use 1 fewer CPS in the longest segments (the 4-CPS bottom segments), keeping both sides mirrored.
- Edging pulls inward: Add 1 CPS to each 3-CPS side segment, again mirrored on both sides.
- Loop flops over: Re-starch the loop alone and dry it standing upright, threaded over a pencil.
Care
Hand wash in cool water with mild soap, then reblock and re-starch to restore the crisp shape. Store flat between tissue paper so the picots don’t crush.
Final Notes
The measurement chain is simple. Your gauge of 11 ch = 1 in (2.5 cm) gives a bottom fan 1.75 in (4.4 cm) wide. Rows 3 to 10 build a 2.25 in × 3.5 in (5.7 cm × 8.9 cm) lace body, and the 28-picot edging brings it to 2.75 in × 4 in (7.0 cm × 10.2 cm). The 1 in (2.5 cm) loop finishes the ornament at 5 in (12.7 cm) total. Check each stage before you move on, and the finished teardrop will come out the right size.
Happy crocheting!