

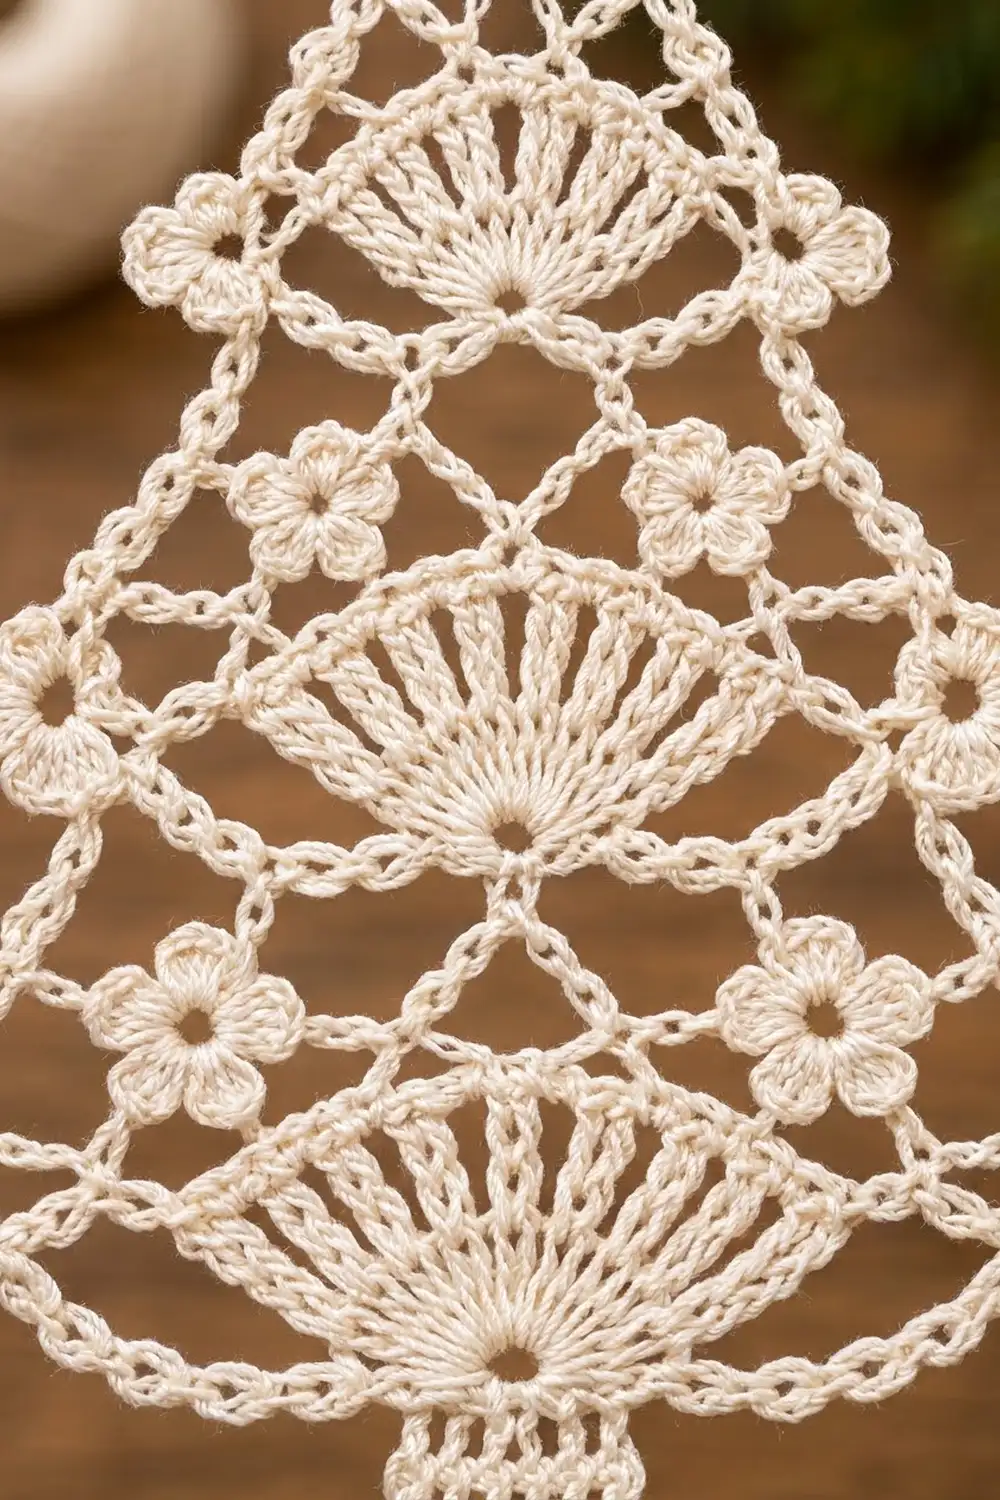
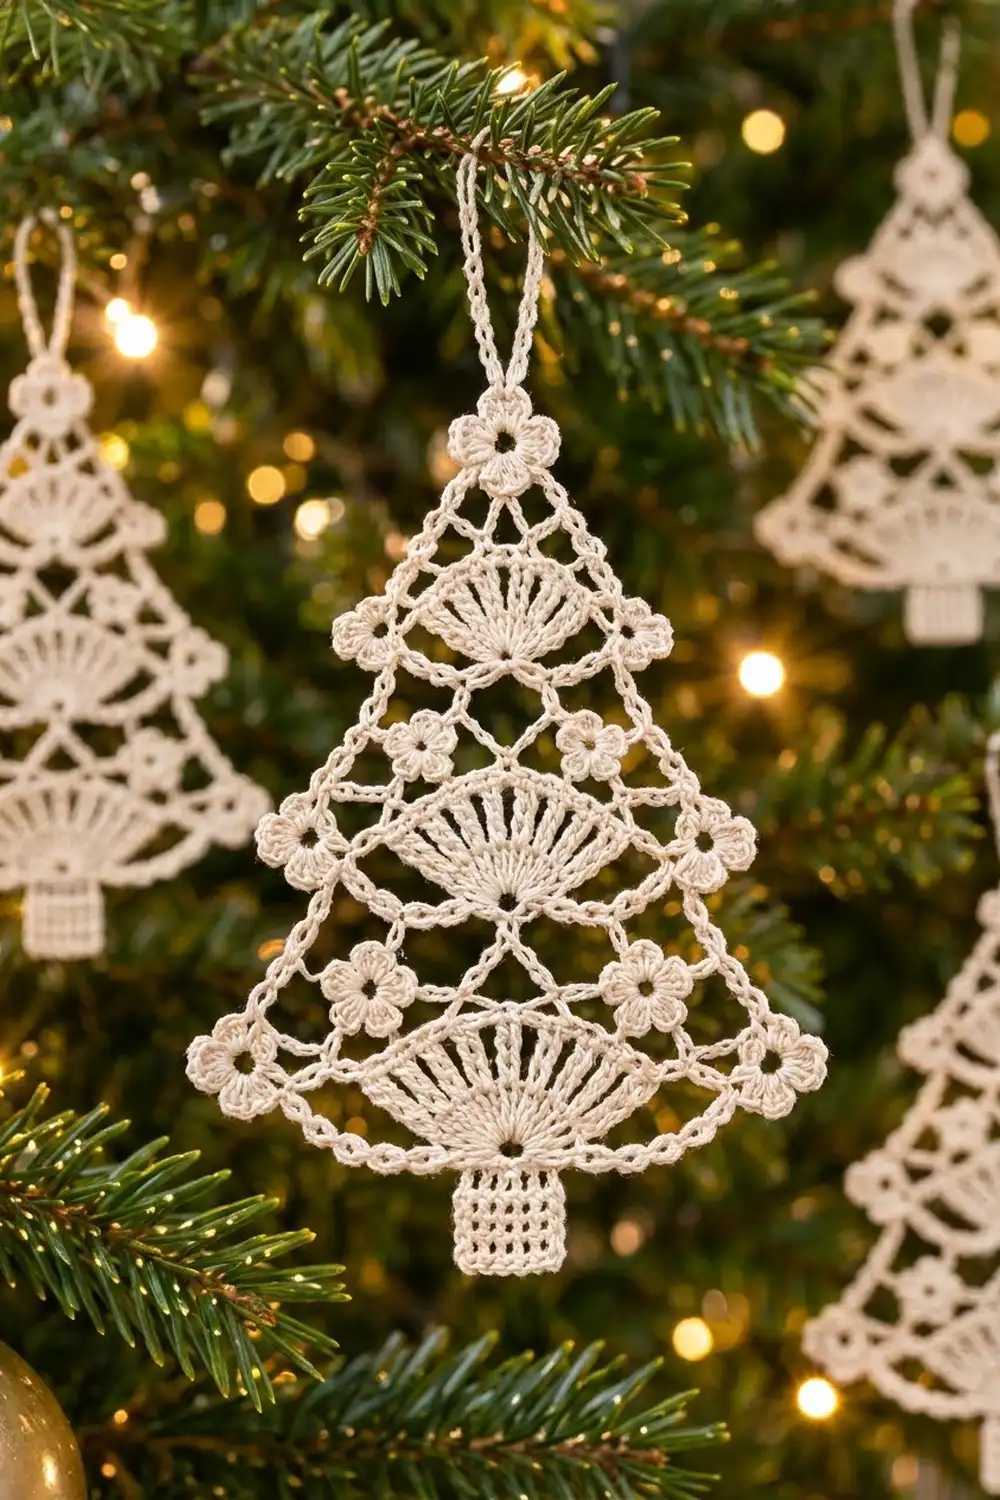
This lace tree ornament is worked in fine ivory cotton thread and looks like heirloom tatting from across the room. Three stacked fans form the tiers of the tree. Tiny five-petal flowers mark the apex and every tier tip, and a neat little trunk anchors the bottom.
The design uses one color only, which keeps the focus on texture: ribbed fans, airy chain mesh, and a picot edging that catches the light on a tree. It suits a classic white Christmas, a rustic natural theme, or a gift tag tied onto a wrapped present.
All instructions use US crochet terms. The blocked ornament measures 3.5 in (8.9 cm) wide and 4.5 in (11.4 cm) tall, plus a 1.25 in (3.2 cm) hanging loop, for a total hanging length of 5.75 in (14.6 cm).
The ornament is made as a single piece. You crochet the trunk and the three-fan “spine” first. Then you add the chain outline with in-line flowers, fill the gaps with chain-loop mesh, work one edging round, and finish with the hanging loop.
Finished Size and Construction
- Finished size: 3.5 in (8.9 cm) wide x 4.5 in (11.4 cm) tall, plus a 1.25 in (3.2 cm) loop
- Skill level: Intermediate
- Terminology: US
- Yarn weight: Size 10 crochet thread (Lace, weight 0)
- Hook: 1.75 mm (US steel 6)
- Number of pieces: 1
- Layout: Single ornament, trunk at bottom, three fans stacked up the center
- Piece size: 3.5 in x 4.5 in (8.9 cm x 11.4 cm) blocked
- Size before border: about 3.25 in x 4.375 in (8.3 cm x 11.1 cm), unblocked
- Border depth: 0.125 in (0.3 cm)
Materials
Choose a mercerized 100% cotton size 10 thread. Mercerized cotton keeps crisp stitch definition, takes starch well, and will not fuzz on the tree. Avoid acrylic thread, which will not hold a blocked shape.
- Ivory / cream: about 4 g, approximately 22 m (one ornament)
These amounts include a margin of roughly 30% for your gauge swatch, joining tails, and weaving in.
Tools:
- 1.75 mm (US steel 6) crochet hook
- Fine tapestry needle or small-eye sewing needle
- Small sharp scissors
- Blocking board or foam mat
- Rustproof pins
- Fabric stiffener or heavy spray starch
- Spray bottle with water
- Ruler or tape measure
Abbreviations (US Terms)
- ch – chain
- sl st – slip stitch
- sc – single crochet
- dc – double crochet
- tr – treble crochet
- st(s) – stitch(es)
- sp – space
- sk – skip
- tch – turning chain
- RS – right side
Special stitches
- 2-dc cluster (2-dc cl): [Yarn over, insert hook in ring, pull up a loop, yarn over, pull through 2 loops] twice, yarn over, pull through all 3 loops on hook.
- Picot: Ch 3, sl st in 3rd ch from hook.
- Flower (worked in-line): Ch 5, sl st in 5th ch from hook to form a ring. *(Ch 2, 2-dc cl, ch 2, sl st) in ring; repeat from * 4 more times. You now have 5 petals around an open center. Your hook is back at the base of the ring, ready to keep chaining. Each Flower measures about 0.5 in (1.3 cm) across.
Gauge and Checkpoints
Exact gauge matters less for an ornament than for clothing, but it decides whether the outline chains lie flat. Make one Flower and one trunk before you commit to the whole piece.
- Chain gauge: 10 ch = 1 in (2.5 cm), slightly relaxed
- Flower: 0.5 in (1.3 cm) across
- Trunk (7 dc x 4 rows): 0.6 in x 0.6 in (1.5 cm x 1.5 cm)
Checkpoints during the work:
- After the trunk: 0.6 in (1.5 cm) square.
- After Fan A: 1.75 in (4.4 cm) across the band, about 0.75 in (1.9 cm) tall.
- After Fan B: 1.375 in (3.5 cm) across the band.
- After Fan C: 1 in (2.5 cm) across the band; the full spine is about 3.25 in (8.3 cm) tall.
- After the outline: about 3.25 in x 4.375 in (8.3 cm x 11.1 cm) unblocked.
- After edging and blocking: 3.5 in x 4.5 in (8.9 cm x 11.4 cm).
If your piece is too big, go down to a 1.5 mm hook or chain more firmly. If it is too small, go up to a 2.0 mm hook. Do not change the chain counts, because the edging math depends on them.
Part 1: Trunk
Row 1: Ch 9, dc in 4th ch from hook and in each remaining ch. (7 dc, beginning ch-3 counts as 1 dc)
Rows 2–4: Ch 3 (counts as dc), turn, sk first st, dc in each st across, working the last dc in the top of the tch. (7 dc)
The vertical dc columns give the trunk its ribbed look. Checkpoint: 0.6 in (1.5 cm) square. Do not fasten off.
Part 2: The Fan Spine
Fan A (bottom fan)
Row 5 (base ring): Turn, sl st in first 4 sts (you are now in the center dc). Ch 4, sl st in the same dc. (1 ch-4 ring)
Row 6: Sl st into the ch-4 ring, ch 4 (counts as tr), work 12 tr in the ring. (13 tr)
The tr fan opens upward from the ring, which stays as a small open hole at the fan’s lower point.
Row 7: Ch 5 (counts as tr + ch 1), turn, (tr in next tr, ch 1) 11 times, tr in top of tch. (13 tr, 12 ch-1 sps)
Row 8 (band): Ch 1, turn, sc in first tr, (2 sc in next ch-1 sp, sc in next tr) 12 times. (37 sc)
Check: 1 + (12 x 3) = 37. Checkpoint: 1.75 in (4.4 cm) across the band.
Fan B (middle fan)
Row 9: Turn, sl st in first 19 sc. (You are now in sc 19, the center of 37.)
Row 10 (stem and ring): Ch 7, sl st in 4th ch from hook. (3-ch stem topped by a 4-ch ring)
Row 11: Ch 4 (counts as tr), 8 tr in the ring. (9 tr)
Row 12: Ch 5 (counts as tr + ch 1), turn, (tr in next tr, ch 1) 7 times, tr in top of tch. (9 tr, 8 ch-1 sps)
Row 13 (band): Ch 1, turn, sc in first tr, (2 sc in next ch-1 sp, sc in next tr) 8 times. (25 sc)
Check: 1 + (8 x 3) = 25. Checkpoint: 1.375 in (3.5 cm) across.
Fan C (top fan)
Row 14: Turn, sl st in first 13 sc. (You are now in sc 13, the center of 25.)
Row 15 (stem and ring): Ch 7, sl st in 4th ch from hook.
Row 16: Ch 3 (counts as dc), 6 dc in the ring. (7 dc)
Row 17: Ch 4 (counts as dc + ch 1), turn, (dc in next dc, ch 1) 5 times, dc in top of tch. (7 dc, 6 ch-1 sps)
Row 18 (band): Ch 1, turn, sc in first dc, (2 sc in next ch-1 sp, sc in next dc) 6 times. (19 sc)
Check: 1 + (6 x 3) = 19. Fasten off. Checkpoint: Fan C is 1 in (2.5 cm) across. The spine measures about 3.25 in (8.3 cm) from the trunk bottom to the top of Fan C.
Part 3: Chain Outline with Flowers
Lay the spine RS up with the trunk at the bottom. “Right” and “left” mean the sides of the piece as it lies in front of you. Each Flower is made in-line and ends at its own base, so the next chain starts from the same point.
Join thread with a sl st in the top right corner dc of Trunk Row 4.
- Ch 15, Flower (bottom right tip).
- Ch 3, sl st in the right end sc of the Fan A band.
- Ch 12, Flower (middle right tip).
- Ch 3, sl st in the right end sc of the Fan B band.
- Ch 9, Flower (top right tip).
- Ch 3, sl st in the right end sc of the Fan C band.
- Ch 9, Flower (apex).
- Ch 9, sl st in the left end sc of the Fan C band.
- Ch 3, Flower (top left tip).
- Ch 9, sl st in the left end sc of the Fan B band.
- Ch 3, Flower (middle left tip).
- Ch 12, sl st in the left end sc of the Fan A band.
- Ch 3, Flower (bottom left tip).
- Ch 15, sl st in the top left corner dc of Trunk Row 4.
Fasten off. You now have 7 Flowers. Each side has outline sections of 15, 12, 9, and 9 ch, plus three ch-3 links. Checkpoint: about 3.25 in x 4.375 in (8.3 cm x 11.1 cm).
Part 4: Chain-Loop Mesh
Mesh over Fan A: Join with sl st in the right end sc of the Fan A band, ch 1, sc in same sc (sc 1).
- Ch 8, sk 5 sc, sc in next sc (sc 7).
- Ch 4, Flower, ch 4, sk 5 sc, sc in next sc (sc 13).
- Ch 8, sk 5 sc, sc in next sc (sc 19, the same sc as the Fan B stem).
- Ch 8, sk 5 sc, sc in next sc (sc 25).
- Ch 4, Flower, ch 4, sk 5 sc, sc in next sc (sc 31).
- Ch 8, sk 5 sc, sc in next sc (sc 37).
Count: 7 sc, 4 ch-8 arcs, 2 Flower arcs. Fasten off. The two Flowers stand up in the open space between Fan A and Fan B.
Mesh over Fan B: Join in the right end sc of the Fan B band, ch 1, sc in same sc. (Ch 8, sk 5 sc, sc in next sc) 4 times. (5 sc, in sc 1, 7, 13, 19, 25; 4 ch-8 arcs) Fasten off.
The ornament now has 9 Flowers in total.
Part 5: Edging (Border)
Border gauge: 1 sc per ch, at the same 10 sts = 1 in (2.5 cm) as the chains themselves. The edging adds 0.125 in (0.3 cm) of depth.
Picot rule for each outline section: Work 1 sc in each ch, with a Picot after every 3rd sc. Leave out the Picot after the last group of 3 in each section. A section of n ch therefore gets n sc and (n ÷ 3) – 1 Picots.
With RS facing, join with sl st in the bottom right corner of the trunk (the free loop of the foundation ch at that corner), ch 1.
- Trunk bottom: sc in each of the 7 foundation ch. (7 sc, corners included; no extra corner sts)
- Trunk right side: 2 sc in the side edge of each of Rows 1–4. (8 sc)
- Right outline:
- 15-ch section: 15 sc, 4 Picots
- Link: sl st in each of the 3 ch (3 sl st)
- 12-ch section: 12 sc, 3 Picots
- Link: 3 sl st
- 9-ch section: 9 sc, 2 Picots
- Link: 3 sl st
- 9-ch section to apex: 9 sc, 2 Picots
- Left outline (mirror, working down): 9 sc + 2 Picots, 3 sl st, 9 sc + 2 Picots, 3 sl st, 12 sc + 3 Picots, 3 sl st, 15 sc + 4 Picots.
- Trunk left side: 2 sc in the side edge of each row. (8 sc)
Sl st in first sc. Fasten off. Leave the Flower petals free; the edging only passes their bases.
Per side: 15 + 12 + 9 + 9 = 45 sc, 4 + 3 + 2 + 2 = 11 Picots, 9 sl st.
Round total: 7 + 8 + 8 = 23 trunk sc, plus 2 x 45 = 90 outline sc, for 113 sc; 22 Picots; 18 sl st.
Why the math works: Every outline chain gets exactly one sc, so the edging is the same length as the chain. It will not ruffle or pull the tiers inward. A Picot every 3 sc, about 0.3 in (0.8 cm) apart, gives the beaded outline. Leaving out the last Picot in each section keeps them from crowding the Flowers.
Part 6: Hanging Loop
Join with sl st at the tip of the apex Flower petal that points straight up. Ch 24, sl st in the same petal. Work 30 sc into the loop, sl st in first sc. Fasten off. Checkpoint: the loop is 1.25 in (3.2 cm) long.
Final Blocking
- Weave in all ends along the sc bands and trunk, where they hide best.
- Soak the ornament in cool water for 5 minutes, then press the water out in a towel.
- Soak it with fabric stiffener or heavy spray starch.
- Lay it RS up on the board. Pin the trunk square at 0.6 in (1.5 cm).
- Pin the bottom tips 3.5 in (8.9 cm) apart, and the apex 4.5 in (11.4 cm) above the trunk bottom.
- Pin each tier tip evenly. The middle tier should be about 2.75 in (7.0 cm) wide and the top tier about 2 in (5.1 cm).
- Open the fan ribs with a pin tip so the spaces are even, and round out each Flower.
- Pin the hanging loop straight up. Let it dry completely, at least 12 hours, before unpinning.
Final Quality-Control Checklist
- Fan bands have 37, 25, and 19 sc.
- Each fan rises from an open ring.
- 9 Flowers: apex, 6 tier tips, 2 in the mesh.
- Both outline sides mirror each other: 15, 12, 9, 9 ch.
- Edging: 113 sc, 22 Picots, 18 sl st.
- Blocked size is 3.5 in x 4.5 in (8.9 cm x 11.4 cm), with a 1.25 in (3.2 cm) loop.
- No tails show, and the piece hangs straight without twisting.
Troubleshooting
- Fan cups or curls: Your tr are too short. Pull up a slightly taller first loop, or go up a hook size for the fan rows only.
- Fan ruffles: The ch-1 sps are too loose. Chain more firmly in Rows 7, 12, and 17.
- Outline pulls the tips inward: Your chains are too tight. Check the 10 ch = 1 in (2.5 cm) gauge.
- Edging ruffles: You added extra sc. Recount: exactly 1 sc per ch.
- Flowers look lopsided: Make sure all 5 petals go into the ring, not into the chain before it.
- Ornament leans: Re-block with the center line pinned straight from trunk to loop.
Care
Hand wash in cool water with a mild soap, then re-starch and re-block flat. Store flat or hanging, away from anything heavy that could crush it.
Final Notes
The measurements build in a simple sequence. A 0.6 in (1.5 cm) trunk supports Fan A at 1.75 in (4.4 cm), Fan B at 1.375 in (3.5 cm), and Fan C at 1 in (2.5 cm). The chain outline and Flowers bring the piece to about 3.25 in x 4.375 in (8.3 cm x 11.1 cm). The 0.125 in (0.3 cm) edging plus blocking finishes it at 3.5 in x 4.5 in (8.9 cm x 11.4 cm), with a 1.25 in (3.2 cm) loop on top. Check each stage as you go, and the finished ornament will come out crisp and even on both sides.
Happy crocheting!