

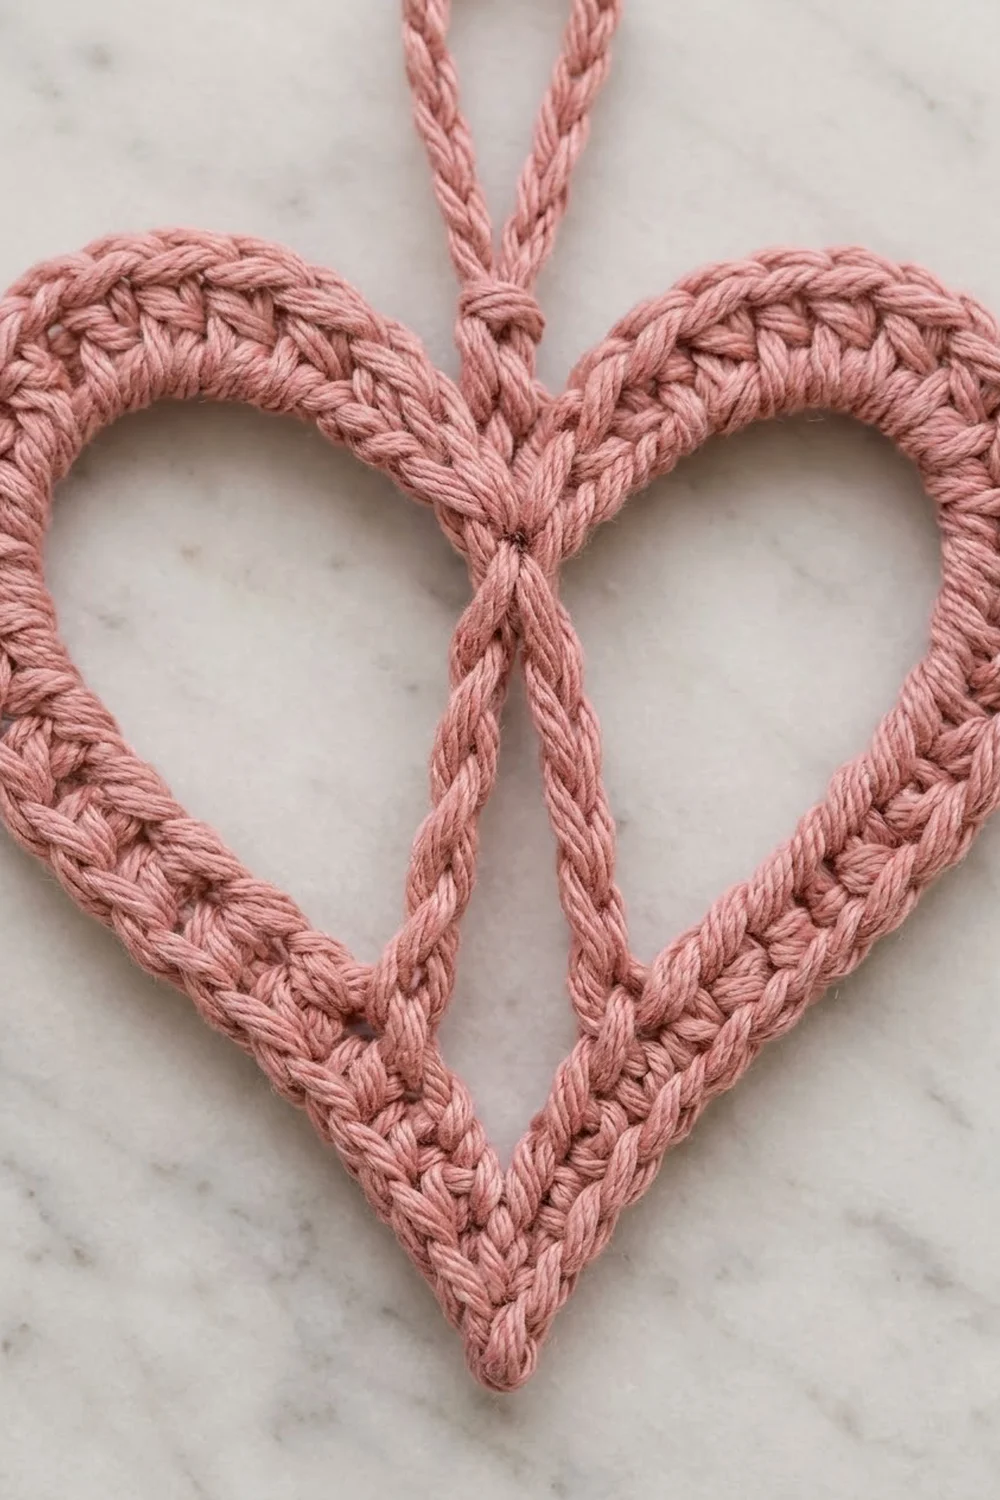
The Rose Lattice Heart is a small, open-outline heart ornament worked in one soft dusty-rose cotton. A firm, textured band traces the heart shape. Two slim chain strands run from the top dip down to the point and cross in a small X just below the dip. A simple chain loop at the top lets it hang from a tree branch, a gift tag, or a window hook.
The look is clean and slightly vintage. The band shows a neat row of V-shaped stitches on each side of a central chain line, so the outline looks like a rounded, braided cord. The center is left open, which keeps the ornament light and lets the background show through.
This pattern uses US crochet terms. The finished heart measures 3.5 in (8.9 cm) wide by 3.5 in (8.9 cm) tall, not counting the loop. With the hanging loop, the total height is about 5 in (12.7 cm).
Construction is simple. You chain a ring and work one round of single crochet into the back bumps to form the inner edge. Then you work a shaped border round into the top loops on the other side of the same chain. Two chain strands and a hanging loop finish the piece. It is one single piece, so there is no joining.
Finished Size and Construction
- Finished size: 3.5 in x 3.5 in (8.9 cm x 8.9 cm), loop excluded
- Total height with loop: about 5 in (12.7 cm)
- Skill level: Easy to Intermediate
- Terminology: US crochet terms
- Yarn weight: Sport weight (#2) cotton
- Hook: 2.75 mm (US C/2)
- Number of pieces: 1
- Layout: Single heart motif, hung from a top loop
- Piece size: 3.5 in x 3.5 in (8.9 cm x 8.9 cm)
- Size before border: about 3.2 in x 3.2 in (8.1 cm x 8.1 cm) when the inner-edge ring is shaped into a heart
- Border depth: one round, adding about 0.15 in (0.4 cm) on each outer edge; the full band is about 0.4 in (1.0 cm) wide
Materials
Choose a smooth, tightly plied cotton or cotton blend. Mercerized cotton gives crisp stitch definition and holds the heart shape well after blocking. Avoid fuzzy or very splitty yarns, because the band is narrow and every stitch shows.
- Yarn: Sport weight (#2) cotton in dusty rose, about 5 g (16 m) per heart
- Hook: 2.75 mm (US C/2)
- Tapestry needle for weaving in ends
- Stitch markers: 2 (one for the top dip, one for the bottom point)
- Scissors
- Blocking mat and rust-proof pins
- Spray bottle with water
- Optional: fabric stiffener or starch spray
The yarn quantity includes a margin of about 30 percent for your gauge test, the tails, and any frogging. If you plan to make several ornaments, multiply the amount by the number of hearts.
Abbreviations (US Terms)
- ch – chain
- sl st – slip stitch
- sc – single crochet
- hdc – half double crochet
- sc3tog – single crochet 3 together
- st(s) – stitch(es)
- Rnd – round
- RS – right side
Special stitch – sc3tog: Insert hook in next st, yarn over, and pull up a loop (2 loops on hook). Repeat in each of the next 2 sts (4 loops on hook). Yarn over and pull through all 4 loops. This counts as 1 st.
Back bump of a chain: Turn the chain over. The small horizontal bar running down the back of each chain is the back bump. Working into it leaves the two top loops free for the border.
Gauge and Checkpoints
Gauge: 6 sc = 1 in (2.5 cm) and 6 ch = 1 in (2.5 cm), using a 2.75 mm hook.
Gauge matters here because the foundation ring sets the whole outline. Make one test heart before you commit to a set.
Checkpoint 1 – foundation ring: Laid flat in a circle with no twists, the 66-chain ring should measure 11 in (27.9 cm) around.
Checkpoint 2 – after Rnd 1: Shaped into a heart, the piece should be about 3.2 in (8.1 cm) wide and tall.
Checkpoint 3 – after Rnd 2 (border): Before blocking, the heart should measure 3.5 in (8.9 cm) wide and tall, give or take about 0.125 in (0.3 cm).
Checkpoint 4 – after the strands: The two center strands should lie flat without pulling the dip down or puckering the point.
If your heart is too big: Go down to a 2.5 mm (US B/1) hook, or tighten your chain tension. Do not remove chains from the ring, because the stitch placement depends on 66.
If your heart is too small: Go up to a 3.0 mm hook. Tight foundation chains are a common cause, so check that your chains are no tighter than your sc.
Pattern
The heart is worked in one direction around the ring. Stitch positions are numbered from the joining chain, which becomes the top dip. Going around the ring, ch 1 is the dip, ch 2–17 are the right lobe, ch 18–33 are the right side, ch 34 is the point, ch 35–50 are the left side, and ch 51–66 are the left lobe.
Foundation Ring
Ch 66. Check that the chain is not twisted, then sl st into the first ch to form a ring. (66 ch)
Place a marker in the first ch (ch 1, top dip) and another in ch 34 (bottom point).
Rnd 1 – Inner Edge
Work this round into the back bump of each chain. These stitches become the inner edge of the heart band.
Ch 1 (does not count as a st). 3 sc in back bump of ch 1 (dip). Sc in back bump of next 16 ch (right lobe). Sc in next 15 ch (right side). Sc3tog over next 3 ch, centered on the marked ch 34 (point). Sc in next 15 ch (left side). Sc in next 16 ch (left lobe). Sl st to first sc to join.
Count: 66 chains worked, with 3 sc in the dip (+2) and sc3tog at the point (−2) = 66 sts.
The 3 sc at the dip give the inner edge room where it bends outward. The sc3tog at the point pulls the inner edge tight, so the point stays sharp. Fasten off and weave in the tail.
Lay the ring flat and gently shape it into a heart, with the dip at the top and the point at the bottom. Compare it with Checkpoint 2.
Center Strands
The two strands are worked into the inner-edge sts. Hold the heart with the RS facing you and the dip at the top. Label the 3 dip sts A, B, and C from right to left.
Strand 1: Join yarn with a sl st in dip st A. Ch 15. Sl st in the sc3tog at the point. Fasten off.
Strand 2: Join yarn with a sl st in dip st C. Ch 3. Lay this chain across Strand 1, then sl st around Strand 1 between its 3rd and 4th ch. This locks the X in place. Ch 12. Sl st in the same sc3tog at the point. Fasten off.
Count: Each strand is 15 ch long (Strand 2 = 3 ch + 12 ch). Because the lengths match, the diamond below the cross stays even on both sides.
Each strand runs from the dip to the point. Below the cross, the strands bow outward into a narrow, elongated diamond. Weave the tails into the inner-edge sts so they don’t show from the front.
Border
The border is Rnd 2. You work it into the free top loops on the other side of the foundation chain. It forms the outer edge of the band and gives the lobes their roundness.
Border gauge: 6 sts = 1 in (2.5 cm) along the straight sides. The hdc sections on the lobes are taller and create the curve.
Rnd 2 – Outer Edge
With RS facing, join yarn with a sl st in the top loops of ch 1 (dip), on the opposite side of the chain from Rnd 1.
Ch 1 (does not count as a st). Sc in ch 1 (dip). (1 st)
Right lobe (ch 2–17): Sc in next 3 ch, hdc in next 3 ch, 2 hdc in each of next 4 ch, hdc in next 3 ch, sc in next 3 ch. (20 sts)
Right side (ch 18–33): Sc in next 16 ch. (16 sts)
Point (ch 34): 3 sc in marked ch. (3 sts)
Left side (ch 35–50): Sc in next 16 ch. (16 sts)
Left lobe (ch 51–66): Sc in next 3 ch, hdc in next 3 ch, 2 hdc in each of next 4 ch, hdc in next 3 ch, sc in next 3 ch. (20 sts)
Sl st to first sc to join. Do not fasten off.
Counts per section: dip 1, right lobe 20, right side 16, point 3, left side 16, left lobe 20.
Count: 66 sts worked 1-per-existing-stitch + 10 extra sts = 76 sts.
Why the Math Works
Each lobe uses 16 chains. Four of those chains get 2 hdc instead of 1, so each lobe gains 4 sts (16 + 4 = 20). Together, the two lobes gain 8. The point gets 3 sc in one ch, which adds 2 more. That makes 8 + 2 = 10 extra sts, for a total of 66 + 10 = 76.
The outer edge is longer than the inner edge, which is what a band needs to curve around a heart. All 10 extra sts sit where the outline turns: around the two lobes and at the point. The straight sides stay at 1 sc per chain, so they don’t ruffle.
The inner edge does the opposite. The dip gains 2 sts and the point loses 2, so Rnd 1 stays at 66. Together, the two rounds hold the heart’s shape even before blocking.
Hanging Loop
After the joining sl st of Rnd 2, your hook is at the dip on the outer edge. Ch 18. Sl st in the same dip st to close the loop. Fasten off.
The 18-ch loop folds in half and hangs about 1.5 in (3.8 cm) above the dip. For a sturdier loop, sl st back along the chain once before fastening off. Weave all remaining ends through the inside of the band’s stitches.
Final Blocking
- Mist the heart well with the spray bottle, or soak it in cool water for a few minutes and press out the extra water in a towel.
- Lay it RS up on the blocking mat.
- Pin the bottom point first.
- Pin the top of each lobe so the full height, from the lobe tops to the point, measures 3.5 in (8.9 cm). Keep both lobes at the same height.
- Pin the outer curve of each lobe so the full width measures 3.5 in (8.9 cm).
- Pin the dip so it sits centered directly above the point.
- Pin the straight sides so they run smoothly from lobe to point without bowing in.
- Pin the cross of the center strands just below the dip. Then pin each strand slightly outward so the two form a narrow diamond.
- Lay the hanging loop straight up from the dip.
- For a firmer ornament, spray lightly with starch or fabric stiffener at this stage.
- Let it dry completely before you remove the pins, which usually takes several hours.
Final Quality-Control Checklist
- Rnd 1 has 66 sts and Rnd 2 has 76 sts.
- The heart measures 3.5 in (8.9 cm) wide and 3.5 in (8.9 cm) tall, loop excluded.
- Both lobes are the same size and height.
- The point is sharp and sits directly below the dip.
- Both edges of the band show a neat row of V stitches, with the chain line in the middle.
- The center strands cross once, about 0.5 in (1.3 cm) below the dip, and are tacked together at the cross.
- Both strands are the same length and lie flat.
- The hanging loop is about 1.5 in (3.8 cm) tall and firmly anchored.
- All ends are woven in and hidden.
Troubleshooting
The ring twisted. Undo the joining sl st. Lay the chain flat with all the back bumps facing the same way, then join again.
The lobes look flat or pointy. Check that you worked 2 hdc in each of the 4 center lobe chains. When blocking, place the pins in a smooth curve.
The sides of the band ruffle. Your border tension may be looser than your foundation chain. Work the side sc a little tighter, or go down a hook size for Rnd 2 only.
The point is rounded. Make sure the sc3tog in Rnd 1 and the 3 sc in Rnd 2 are both centered on ch 34.
The strands pull the dip down. The strand chains are too tight. Rework them more loosely, or add 1 ch to each strand so they stay equal.
The X sits too low. Tack Strand 2 between the 2nd and 3rd ch of Strand 1 instead.
The heart won’t hold its shape. Use cotton rather than acrylic, and add a light coat of stiffener while blocking.
Care
Hand wash in cool water, press out the extra water in a towel, then reshape and dry flat. If you used stiffener, a short soak and fresh blocking will restore the shape.

Final Notes
Each measurement in this heart builds on the one before. A gauge of 6 ch and 6 sc per 1 in (2.5 cm) gives a 66-chain ring of 11 in (27.9 cm). Rnd 1 stays at 66 sts and shapes the inner edge to about 3.2 in (8.1 cm). Rnd 2 adds 10 sts at the lobes and point, for 76 sts, and brings the heart to 3.5 in (8.9 cm) wide and tall. Two 15-chain strands cross in the center, and an 18-chain loop adds about 1.5 in (3.8 cm), for a total height of about 5 in (12.7 cm).
Check each stage against its checkpoint, and your ornament will come out the right size every time.
Happy crocheting!