

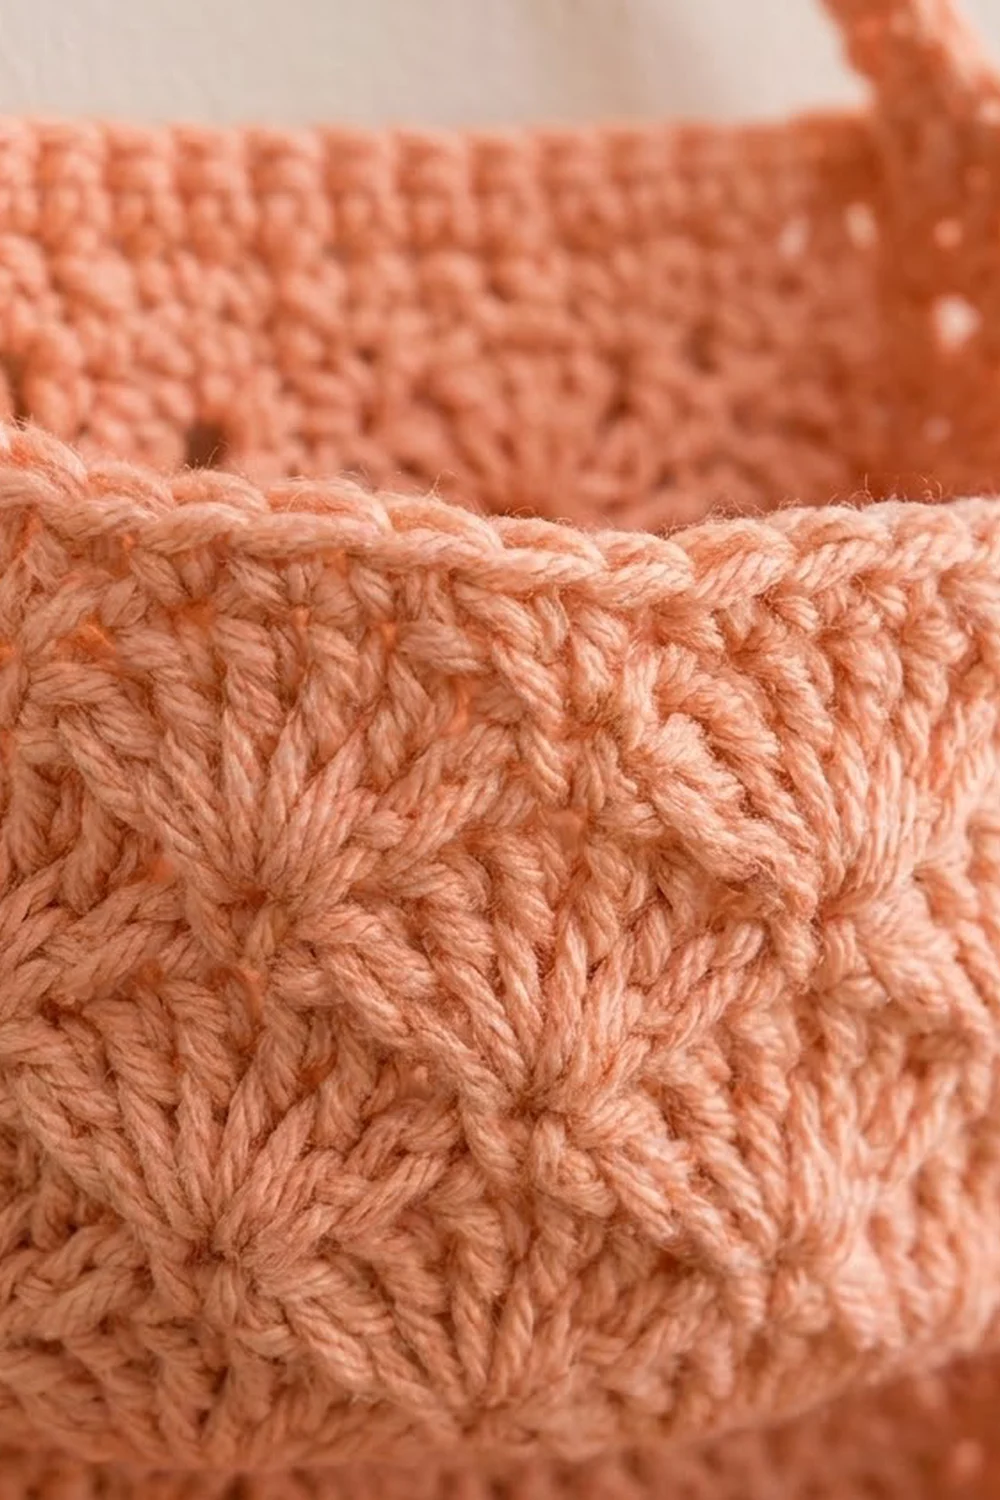
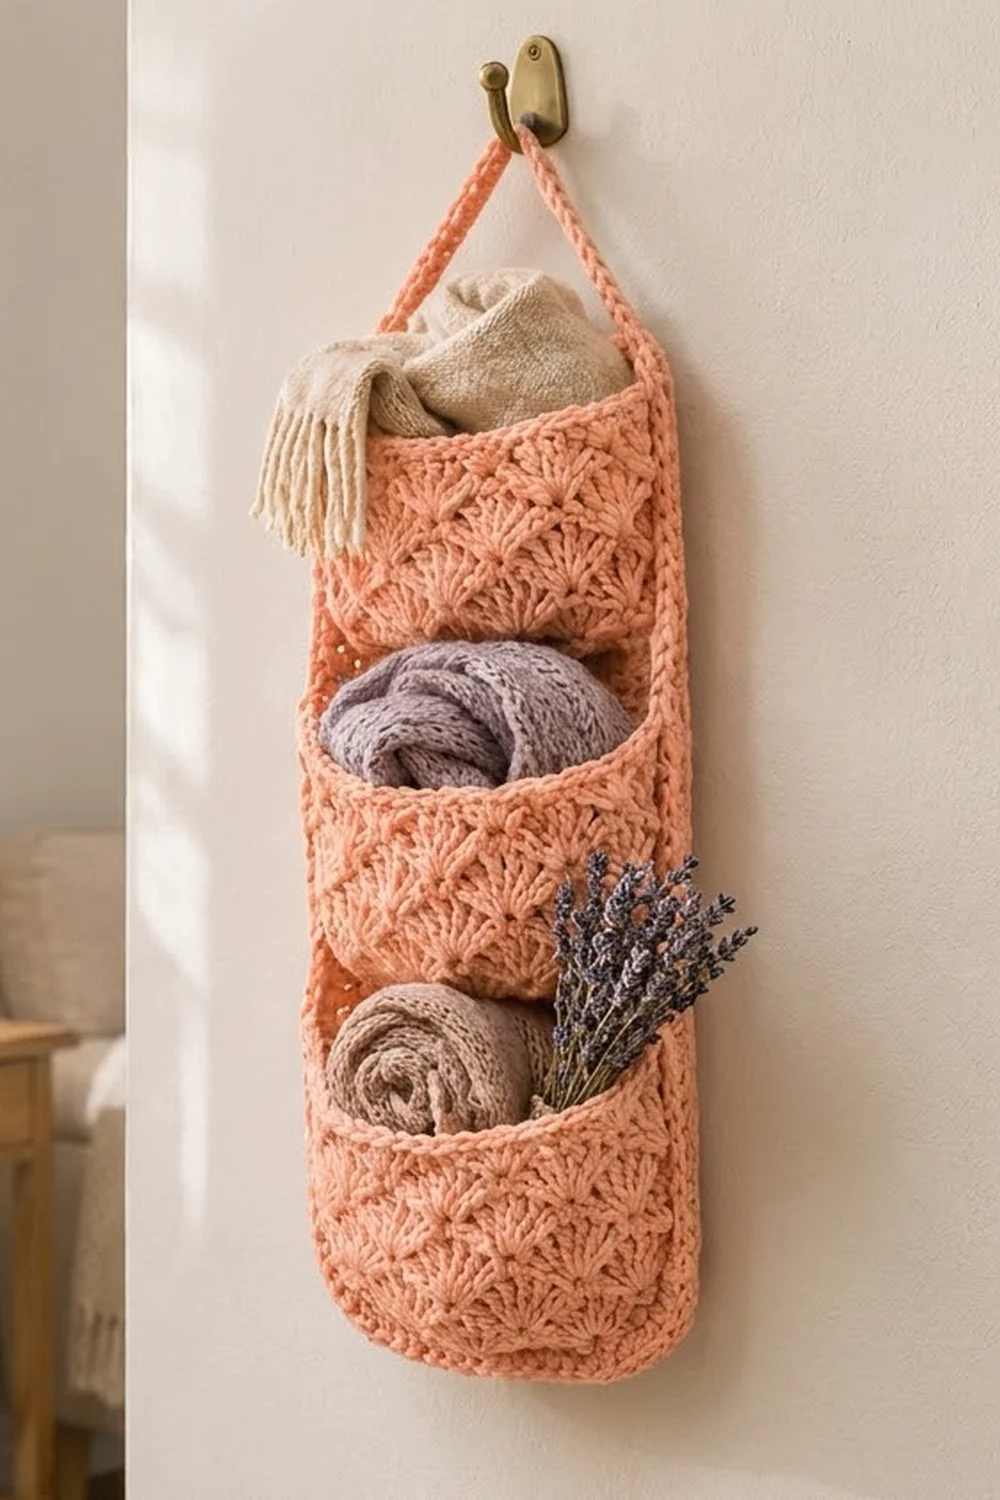
This hanging organizer has three stacked pockets, all worked in a soft peach shell stitch. The fan texture adds detail without making the piece look busy. The pockets are deep enough for scarves, fabric bundles, yarn cakes or small hand towels, and the triangular strap hangs from a single hook.
The whole project uses one solid color. A warm peach or coral works well because it shows off each shell clearly. The style is relaxed and cottage-like, so it suits an entryway, a craft corner or a nursery wall.
The pattern is written in US crochet terms. The finished organizer measures 8.75 in wide × 21.5 in tall (22.2 cm × 54.6 cm). The hanger adds about 6 in (15.2 cm) above the top edge.
Here is how it’s built. You crochet one back panel and three pocket fronts in the same shell pattern, all the same width. Then you sew the pockets to the panel, add a 2-round single crochet border that catches the pocket sides as it goes, and finish with an attached strap.
Finished Size and Construction
- Finished size: 8.75 in × 21.5 in (22.2 cm × 54.6 cm), not counting the hanger
- Height with hanger: about 27.5 in (69.9 cm)
- Skill level: Easy-Intermediate
- Terminology: US
- Yarn weight: Worsted (#4)
- Hook: 5.0 mm (H-8)
- Number of pieces: 1 back panel, 3 pocket fronts, 1 hanger (worked in place)
- Layout: 3 pockets stacked vertically on a single back panel
- Back panel before border: 7.75 in × 20.5 in (19.7 cm × 52.1 cm), 31 sts wide × 42 rows
- Pocket size: 7.75 in × 6 in (19.7 cm × 15.2 cm), 31 sts wide × 14 rows
- Border depth: 0.5 in (1.3 cm) per side, 2 rounds
Materials
Yarn: Use a smooth worsted-weight cotton or cotton blend. Cotton keeps the shells crisp and stops the pockets from sagging once they’re loaded. Avoid fuzzy or very drapey yarns, because the fans lose their definition.
- Peach: about 230 g / 415 m (455 yd)
These amounts include a margin of roughly 15% for your gauge swatch, tension differences and the hanger.
Tools:
– 5.0 mm (H-8) crochet hook
– Tapestry needle
– Stitch markers (at least 4)
– Locking pins or clips for positioning the pockets
– Measuring tape
– Blocking mat and rust-proof pins
– Spray bottle
Abbreviations (US Terms)
- ch – chain
- sl st – slip stitch
- sc – single crochet
- hdc – half double crochet
- dc – double crochet
- st(s) – stitch(es)
- sk – skip
- BLO – back loop only
Special stitch – Shell: 5 dc worked into the same stitch.
Gauge and Checkpoints
Gauge: 12 sts (two shell repeats) = 3 in (7.6 cm) wide, and 4 pattern rows = 2 in (5.1 cm) tall. In practice, one shell repeat of 6 sts measures 1.5 in (3.8 cm), and each pattern row measures 0.5 in (1.3 cm).
Test one piece first. Make one pocket before you start the back panel. It’s small, it uses the same stitch pattern, and it works as your gauge swatch.
Checkpoints:
– Pocket after Row 12: 7.75 in × 5.5 in (19.7 cm × 14.0 cm)
– Pocket after the rim: 7.75 in × 6 in (19.7 cm × 15.2 cm)
– Back panel after Row 22: about 10.75 in (27.3 cm) tall
– Back panel complete: 7.75 in × 20.5 in (19.7 cm × 52.1 cm)
– After the border: 8.75 in × 21.5 in (22.2 cm × 54.6 cm)
If your pocket is too wide, go up a hook size. If it is too narrow, go down a hook size. If only the height is off, check your dc height: pull each dc up to its full height and don’t yank the loops tight. A width difference of 0.25 in (0.6 cm) is fine, since the border and blocking can absorb it.
Stitch Pattern Rows
The panel and the pockets are both 31 sts wide (a multiple of 6 + 1), and both use the rows below.
Foundation: Ch 32.
Row 1 (sc row): Sc in 2nd ch from hook and in each ch across, turn. (31 sts)
Row 2 (first shell row): Ch 1, sc in first st. Sk 2 sts, shell in next st, sk 2 sts, sc in next st. Repeat from * 4 more times (5 shells total), turn. (31 sts: 5 shells + 6 sc)
Row B (offset row): Ch 3 (counts as dc), 2 dc in first sc. Sc in center dc of next shell, shell in next sc. Repeat from * 3 more times. Sc in center dc of last shell, 3 dc in last sc, turn. (31 sts: 3 dc + 4 shells + 5 sc + 3 dc)
Row A (shell row): Ch 1, sc in first dc. Shell in next sc, sc in center dc of next shell. Repeat from * 4 more times; on the final repeat, work the last sc into the top of the turning ch-3. Turn. (31 sts: 5 shells + 6 sc)
Leveling Row (worked on top of a Row B): Ch 1, sc in first 2 sts, hdc in next st, dc in next sc, hdc in next st. Sc in next 3 sts, hdc in next st, dc in next sc, hdc in next st. Repeat from * 3 more times. Sc in last 2 sts. (31 sts)
The leveling row works a taller dc into each low sc point and shorter sc over the shell tops, so the edge ends up flat.
Back Panel (make 1)
Ch 32.
Row 1: Work the sc row. (31 sts)
Row 2: Work the first shell row. (31 sts)
Rows 3–41: Work Row B on odd rows and Row A on even rows, finishing with Row 41 as a Row B. (31 sts in every row)
Checkpoint: After Row 22, the panel should measure about 10.75 in (27.3 cm).
Row 42: Work the Leveling Row. (31 sts)
Do not fasten off. Leave the yarn on a locking marker, because you’ll use it for the border later.
Checkpoint: 7.75 in × 20.5 in (19.7 cm × 52.1 cm). Row 1 and Row 42 together add 0.5 in (1.3 cm), and the 40 pattern rows add 20 in (50.8 cm).
Pocket Front (make 3)
Ch 32.
Row 1: Work the sc row. (31 sts)
Row 2: Work the first shell row. (31 sts)
Rows 3–11: Alternate Row B (odd rows) and Row A (even rows), ending on a Row B. (31 sts)
Row 12: Work the Leveling Row. (31 sts)
Checkpoint: 7.75 in × 5.5 in (19.7 cm × 14.0 cm).
Rows 13–14 (rim): Ch 1, sc in each st across, turn. (31 sts)
Fasten off, leaving a 30 in (76.2 cm) tail for sewing.
Checkpoint: 7.75 in × 6 in (19.7 cm × 15.2 cm). The two rim rows add 0.5 in (1.3 cm) and give the pocket opening a firm edge that won’t flare.
Make All Pieces
- Peach: 1 back panel (31 sts × 42 rows)
- Peach: 3 pocket fronts (31 sts × 14 rows each)
- Peach: 1 hanger, worked after the border
Layout (front view, pocket openings facing up):
          /\        <- hanger, ~6 in / 15.2 cm
         /  \
+------------------+
| open panel top   |  2.75 in / 7.0 cm
+------------------+
| Pocket 3         |  sewn along panel Row 24
+------------------+
| Pocket 2         |  sewn along panel Row 12
+------------------+
| Pocket 1         |  bottom edge = panel Row 1
+------------------+
Joining the Pockets
Method: Whipstitch the bottom edge of Pockets 2 and 3 to the panel, then let the border close all the side seams and the bottom of Pocket 1.
Stitch-to-stitch logic: Each pocket foundation has 31 sts, and every panel row has 31 sts. So each pocket stitch is sewn to exactly one panel stitch, with no easing.
- Lay the panel right side up, with Row 1 at the bottom.
- Pocket 1: Place it on top of the panel so its foundation edge lines up with the panel’s foundation edge and its side edges line up with the panel’s side edges. Clip the pieces together. Don’t sew yet, because the border joins this pocket.
- Pocket 2: Place its foundation edge along the line between panel Rows 12 and 13. That is 5.75 in (14.6 cm) up from the panel bottom. With the tail, whipstitch each of the 31 pocket foundation loops to one strand at the top of the matching Row 12 stitch. The rim of Pocket 1 sits 0.25 in (0.6 cm) over this seam and hides it.
- Pocket 3: In the same way, sew its foundation edge along the line between panel Rows 24 and 25, which is 11.75 in (29.8 cm) from the bottom.
- Clip the side edges of all three pockets flush with the panel sides.
Tension: Sew snugly enough that no gaps open up, but not so tightly that the panel puckers. After each seam, the panel should still lie flat and measure 7.75 in (19.7 cm) wide.
Size checkpoint: The top of Pocket 3 should sit 17.75 in (45.1 cm) above the panel bottom, leaving 2.75 in (7.0 cm) of open panel above it.
Border
Border gauge: 4 sc = 1 in (2.5 cm), which matches the panel width (31 sts over 7.75 in) and height (82 row-end sts over 20.5 in).
On the side edges, work 1 sc into the end of each sc row (Row 1 and Row 42) and 2 sc into the end of each pattern row (Rows 2–41). That gives 1 + (40 × 2) + 1 = 82 sc per long side.
Wherever a pocket covers the panel edge, insert the hook through the pocket edge and the panel edge together. The panel’s row ends set the count. The pocket edges are caught in those same stitches, and no extra stitches are added at the pocket seams.
Round 1: Using the live loop at the end of Row 42, ch 1. Along the top edge, work 3 sc in the first st, sc in the next 29 sts, and 3 sc in the last st (35 sc). Work 82 sc down the left side. Along the bottom, working into the foundation chains through both the panel and Pocket 1, work 3 sc in the first ch, sc in the next 29 ch, and 3 sc in the last ch (35 sc). Work 82 sc up the right side. Join with a sl st to the first sc. (234 sts)
To track the corners, place a marker in the center sc of each 3-sc corner. Counting between those markers, you have 31 sts across the top and bottom and 84 sts along each side: 4 + 31 + 84 + 31 + 84 = 234.
Round 2: Ch 1. Sc in each st around, working 3 sc in each marked corner st and moving each marker up to the new center sc. Join. (242 sts: 4 corners + 33 sts across top and bottom + 86 sts along each side)
Why the math works: Each round adds 2 sts at each of the 4 corners, so 8 per round: 234 + 8 = 242. Counting the corners, the top edge has 35 sts at 4 sc per inch, which equals 8.75 in (22.2 cm). That matches 7.75 in plus 0.5 in of border on each side. The sides have 88 sts over 21.5 in (54.6 cm), so they are just as balanced.
Fasten off and weave in the ends.
Hanger
- With the right side facing, join the yarn with a sl st in the marked top-left corner st.
- Ch 60. Making sure the chain isn’t twisted, sl st in the marked top-right corner st.
- Ch 1, turn. Sc in each of the 60 ch, then sl st in the top-left corner st. (60 sc)
- Ch 1, turn. Sl st in the BLO of each sc across, then sl st in the top-right corner st. (60 sl st)
Fasten off and weave the ends into the border.
The strap is 15 in (38.1 cm) long and about 0.4 in (1.0 cm) wide. It forms a triangle that peaks about 6 in (15.2 cm) above the top edge.
Final Blocking
- Weave in all remaining ends, running them through stitches of the same color.
- Lightly mist the whole piece until it is damp but not soaked.
- Pin it flat, pocket side up, to 8.75 in × 21.5 in (22.2 cm × 54.6 cm).
- Pin the top corners square, and ease the bottom corners into a gentle curve.
- Run your fingers through each pocket so the shells open evenly.
- Pin each pocket rim straight across.
- Let it dry completely before you unpin it. This usually takes 12–24 hours.
Final Quality-Control Checklist
- Every row of the panel and pockets has 31 sts
- Pockets 2 and 3 are sewn along panel Rows 12 and 24
- Each pocket’s side edges are caught evenly in the border
- Border Round 1 = 234 sts and Round 2 = 242 sts
- The finished piece measures 8.75 in × 21.5 in (22.2 cm × 54.6 cm)
- The hanger is untwisted and attached at both top corners
- All ends are woven in securely
Troubleshooting
The shells lean or drift to one side: Check that you are working the sc into the center dc of each shell.
The edges wave or ruffle: You may have worked 3 sc into some pattern row ends. Use exactly 2 per pattern row.
The edges pull in: Your border is too tight. Go up 0.5 mm for the border only.
The pocket rims flare: Work the rim rows with a hook 0.5 mm smaller.
The panel puckers behind a pocket seam: Unpick the seam and resew it with looser whipstitches, one stitch per stitch.
The organizer tilts on the hook: The hanger is attached off-center. Re-anchor each end in its marked corner stitch.
Care
Hand wash in cool water and lay flat to dry. If the organizer stretches from heavy loads, reshape it and pin it to size again.
Final Notes
Everything in this pattern comes from one 31-stitch row. Each shell repeat is 1.5 in (3.8 cm), so the panel is 7.75 in (19.7 cm) wide. At 0.5 in (1.3 cm) per pattern row, the panel is 20.5 in (52.1 cm) tall and each pocket is 6 in (15.2 cm) tall. The 2-round border adds 0.5 in (1.3 cm) on every side, for a finished size of 8.75 in × 21.5 in (22.2 cm × 54.6 cm). If your first pocket matches its checkpoints, the rest of the organizer will come out to the same size.
Happy crocheting!