

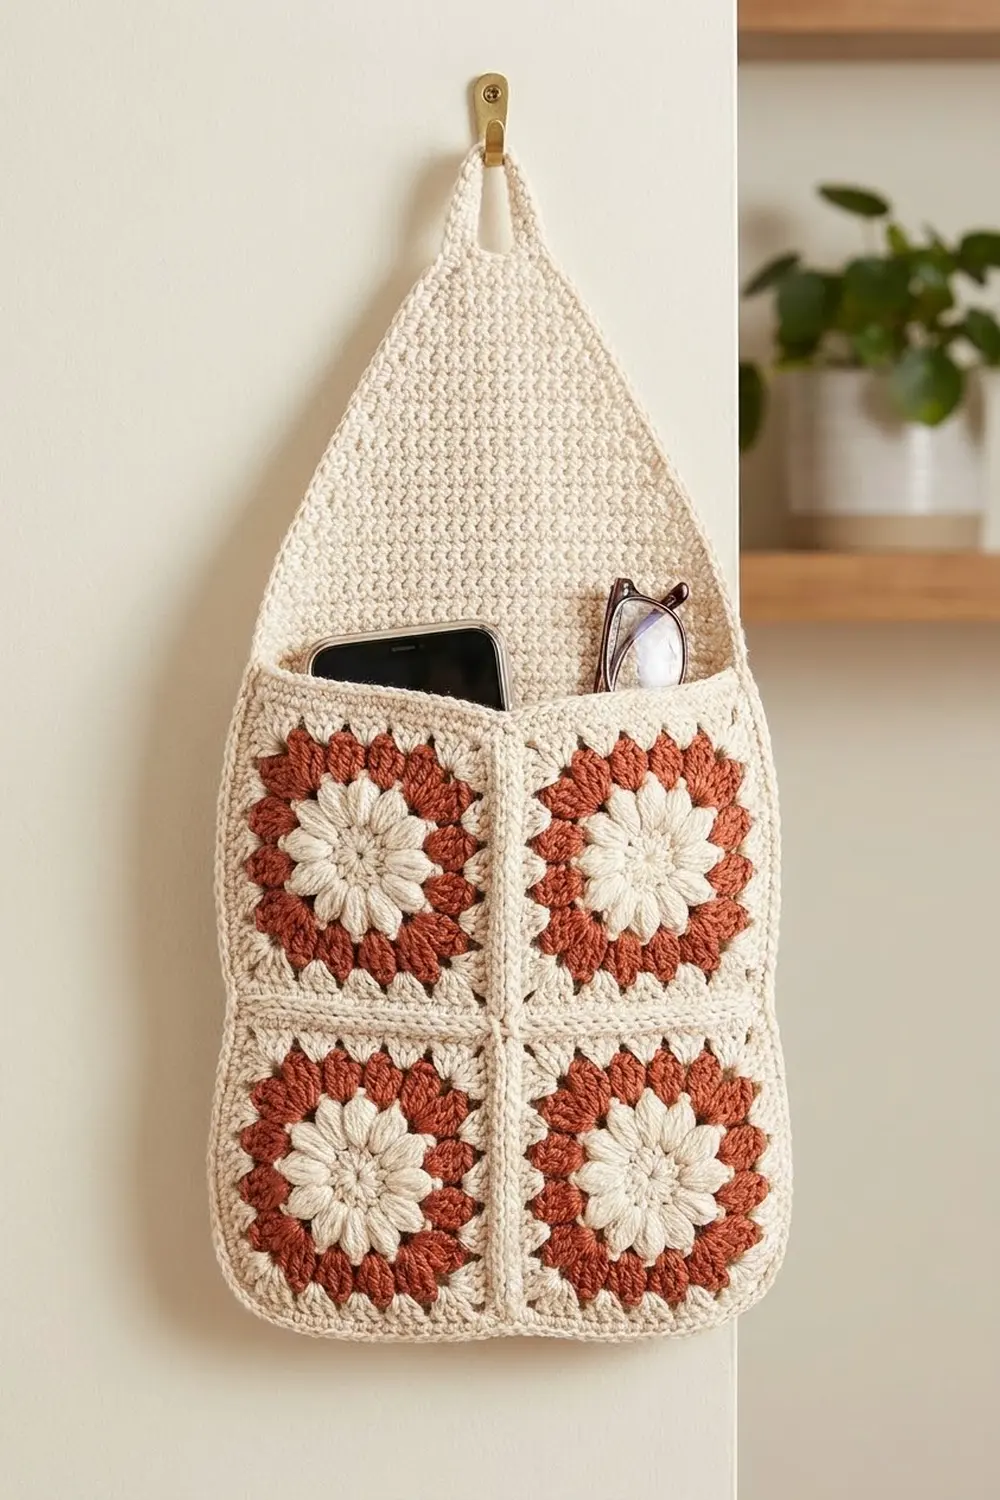
The Terracotta Bloom Wall Pocket is a small hanging organizer for the spots where things pile up, like the entryway, the desk or the bedside. It holds a phone, glasses, keys or a few letters, and it hangs from any hook by a crocheted loop.
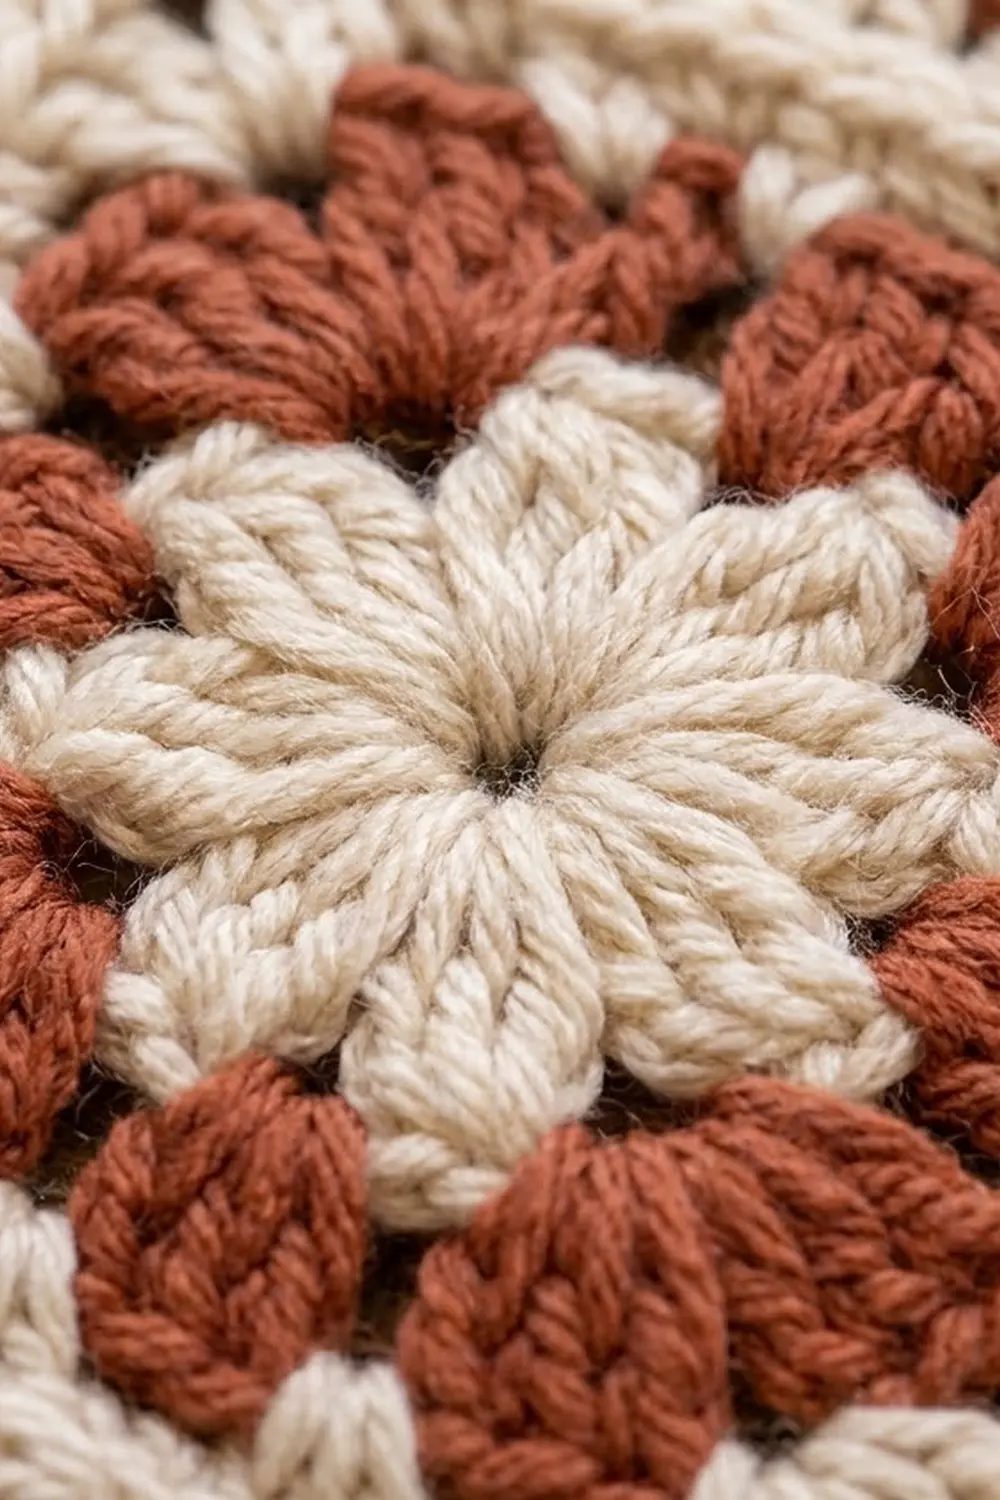
The front is four granny squares in warm rust and soft cream. Each square has a puffy cream flower in the center, rust cluster rounds around it and a crisp cream outline. The back is solid cream single crochet that rises above the pocket and curves to a rounded point.
This pattern uses US crochet terms. The finished pocket measures about 9.5 in (24.1 cm) wide and 17 in (43.2 cm) tall including the hanging loop. The pocket itself is about 9.25 in (23.5 cm) deep.
Here’s the construction. You make four squares, slip-stitch them into a 2 x 2 block and add a two-round border. Then you crochet the back panel in rows, join the front to the back with a single-crochet round, and finish with the hanging loop.
Finished Size and Construction
- Finished size: 9.5 in (24.1 cm) wide x 17 in (43.2 cm) tall, including the loop
- Skill level: Easy-Intermediate
- Terminology: US
- Yarn weight: Worsted (#4)
- Hook: 5 mm (H-8)
- Number of pieces: 5 (4 granny squares + 1 back panel)
- Front layout: 2 squares wide x 2 squares tall
- Square size: 4 in (10.2 cm)
- Front panel before border: 8 in (20.3 cm) square
- Border depth: 0.5 in (1.3 cm) per edge, so the front panel measures 9 in (22.9 cm) square
Materials
Use a smooth worsted-weight cotton or cotton blend. Cotton holds its shape when the pocket is loaded and shows the puff flowers clearly. Acrylic also works, but it makes a softer, slouchier pocket.
- Cream: about 85 g / 170 m (186 yd)
- Rust / terracotta: about 30 g / 60 m (66 yd)
Tools:
– 5 mm (H-8) crochet hook
– Tapestry needle
– Stitch markers (4–6)
– Scissors
– Measuring tape
– Blocking mat and rust-proof pins
These amounts include a margin of about 15% for your gauge swatch and weaving in ends.
Abbreviations (US Terms)
- ch – chain
- sl st – slip stitch
- sc – single crochet
- dc – double crochet
- sc2tog – single crochet 2 together
- sp – space
- st(s) – stitch(es)
- MR – magic ring
- RS / WS – right side / wrong side
- BLO – back loop only
Special stitch: Puff (puff stitch). Yarn over, insert the hook into the ring and pull up a loop to the height of a dc. Do this 3 times in total, so you have 7 loops on the hook. Yarn over and pull through all 7 loops.
Gauge and Checkpoints
Gauge: 15 sc and 15 rows = 4 in (10.2 cm), worked firmly with a 5 mm hook. This firm fabric keeps the pocket from sagging.
Make one complete square before anything else and check it against these measurements:
- After Round 1: about 1.5 in (3.8 cm) across
- After Round 2: about 2.5 in (6.4 cm) across
- After Round 3: about 3.5 in (8.9 cm) across
- After Round 4: 4 in (10.2 cm) square
If your square is too big, drop to a 4.5 mm hook. If it’s too small, go up to a 5.5 mm hook. Check the back panel too: after Row 10, it should measure 9 in (22.9 cm) wide. All the joining math relies on the front border and the back panel both having 34 stitches per edge, so gauge matters more than the hook size printed on the label.
Granny Square (Make 4)
Round 1 (cream): MR, ch 2 (doesn’t count as a st), puff in ring, ch 2. Puff in ring, ch 2; repeat from * 6 more times. Join with a sl st to the top of the first puff. Fasten off.
(8 puffs, 8 ch-2 sps)*
Round 2 (rust): Join rust in any ch-2 sp. Ch 3 (counts as dc), then (2 dc, ch 2, 3 dc) in the same sp for the first corner. 3 dc in the next ch-2 sp. (3 dc, ch 2, 3 dc) in the next ch-2 sp, 3 dc in the next ch-2 sp; repeat from * 2 more times. Join to the top of the beginning ch-3.
(36 dc: 9 dc per side between corner sps, 4 corner ch-2 sps)*
Round 3 (rust): Sl st in the next 2 dc and into the corner ch-2 sp. Ch 3, (2 dc, ch 2, 3 dc) in the same sp. 3 dc in each of the next 2 gaps between 3-dc groups, then (3 dc, ch 2, 3 dc) in the next corner sp; repeat from * 2 more times. 3 dc in each of the last 2 gaps. Join and fasten off.
(48 dc: 12 dc per side between corner sps, 4 corner ch-2 sps)*
Round 4 (cream): Join cream in any corner ch-2 sp. (Sc, ch 2, sc) in the corner sp, then sc in each of the next 12 dc; repeat from * 3 more times. Join to the first sc and fasten off, leaving a 4 in (10.2 cm) tail.
(56 sc + 4 corner ch-2 sps)*
Per-side count: 14 sc per side, which already includes both corner sc. The ch-2 corner sps are not counted.
Make All Pieces
- Cream: Round 1 and Round 4 of each square (4 squares), the border, the back panel, the joining round and the loop
- Rust: Rounds 2–3 of each square (4 squares)
Front layout (RS facing):
+-----+-----+
|  A  |  B  |
+-----+-----+
|  C  |  D  |
+-----+-----+
Block all four squares lightly to 4 in (10.2 cm) before you join them.
Joining the Squares
Method: a raised slip-stitch seam on the RS, worked in cream.
Hold squares A and B with WS together, edges lined up. Working through the outer loops of both squares:
- Sl st through both corner ch-2 sps.
- Sl st through each matching pair of sts, 14 in all, one for one.
- Sl st through both of the next corner ch-2 sps.
That’s 16 sl sts per seam. Join C and D the same way. Then join the A-B strip to the C-D strip with one long seam: 2 x 16 = 32 sl sts, crossing the first seams in the center.
Stitch-to-stitch logic: each seam matches 14 sts to 14 sts. The seam sl sts sit inside the ridge and are never worked into by the border, so no stitches are added at the seams.
Tension: keep the sl sts as loose as your sc. If the seam is tight, the panel puckers and pulls in.
Checkpoint: the joined panel measures 8 in (20.3 cm) square.
Border
Border gauge: the same 15 sc = 4 in (10.2 cm). Each square contributes 14 sts per side, so each side of the panel starts with 2 x 14 = 28 sts.
Border Round 1 (cream): Join in the top-right corner ch-2 sp. 3 sc in the corner sp. Sc in each of the 14 sts of the first square. Skip both seam corner sps, which are already used by the seam. Sc in each of the 14 sts of the next square. Repeat from * around and join to the first sc.
(28 + 3 per corner = 124 sc. Each side, counting the center sc of both corners, has 32 sts.)*
Border Round 2 (cream): Ch 1. 3 sc in the corner center st, then sc in each st to the next corner center st; repeat from * around and join.
(132 sc. Each side, counting the center sc of both corners, has 34 sts.)*
Why the math works: Round 1 adds 4 sts per side (2 in each corner), so 28 + 4 = 32. Round 2 adds 1 per corner on each side, so 32 + 2 = 34. The total is 4 x (34 – 1) = 132, because each corner center is shared by two sides. At 15 sc per 4 in, 34 sts = 9 in (22.9 cm), which matches the back panel width exactly.
Checkpoint: the front panel measures 9 in (22.9 cm) square. Fasten off and weave in the ends.
Back Panel (Make 1)
Worked flat in cream, with a ch 1 at the start of each row that does not count as a stitch.
Foundation: Ch 35.
Row 1: Sc in the 2nd ch from the hook and in each ch across, turn. (34 sc)
Rows 2–34: Ch 1, sc in each st across, turn. (34 sc per row)
Checkpoint: the rectangle measures 9 in (22.9 cm) wide x 9 in (22.9 cm) tall, the same as the front panel.
Shaping the top: the decreases start slowly and then speed up, which gives the rounded, teardrop curve.
Row 35: Ch 1, sc2tog, sc to the last 2 sts, sc2tog, turn. (32 sc)
Row 36: Ch 1, sc in each st across, turn. (32 sc)
Rows 37–44: Repeat Rows 35–36 four more times.
(Row 37: 30 · Row 39: 28 · Row 41: 26 · Row 43: 24 · Row 44: 24 sc)
Checkpoint: the panel measures about 6.4 in (16.3 cm) wide at Row 44.
Rows 45–54: Ch 1, sc2tog, sc to the last 2 sts, sc2tog, turn.
(Row 45: 22 · 46: 20 · 47: 18 · 48: 16 · 49: 14 · 50: 12 · 51: 10 · 52: 8 · 53: 6 · 54: 4 sc)
Fasten off. The shaped section is 20 rows, about 5.3 in (13.5 cm). The whole back panel is 54 rows, about 14.4 in (36.6 cm) tall.
Joining Front to Back
Lay the back panel RS down, with the foundation edge at the bottom. Place the front panel on top, RS up, so its bottom and sides line up with Rows 1–34. Pin the corners and the midpoints of each side.
Joining round (cream, through both layers): Join at the top-right corner center st of the front, together with the end of Row 34 on the back.
- Right side: working down, sc through each front st and the matching back row-end. Cover the front sts down to just above the bottom corner and back Rows 34 to 2. (33 sc)
- Corner: 3 sc into the front corner center st together with the back corner (Row 1 / first foundation st). These 3 sc give the gently rounded bottom.
- Bottom: sc through each front st and back foundation sts 2–33. (32 sc)
- Corner: 3 sc as before.
- Left side: working up, sc through each front st and back Rows 2–34, ending at the top-left corner center st. (33 sc)
(Joining section total: 33 + 3 + 32 + 3 + 33 = 104 sc)
Continue around the back panel top (single layer): 1 sc in each row-end of Rows 35–54 (20 sc), 1 sc in each of the 4 sts of Row 54 (4 sc), then 1 sc in each row-end of Rows 54–35 down the other side (20 sc). Join to the first sc of the joining round. (44 sc for the top section)
The top edge of the front panel stays free. That’s the pocket opening, and Border Round 2 already finishes it.
Hanging loop: In the 4 top sts, sl st into the 1st top st. Ch 18, then sl st into the 4th top st to make the loop. Turn, work 24 sc into the loop and sl st into the 1st top st. Fasten off. The loop stands about 2 in (5.1 cm) tall.
Checkpoint: the pocket is 9.5 in (24.1 cm) wide and 9.25 in (23.5 cm) deep. The body is 15 in (38.1 cm) tall, or 17 in (43.2 cm) with the loop.
Final Blocking
- Weave in all ends along seams or edging, never across the puff flowers.
- Mist the whole piece evenly with water until it’s damp but not soaked.
- Lay it flat with the front facing up.
- Pin the width to 9.5 in (24.1 cm) at the pocket and the top of the back to the same width.
- Shape the curved top evenly and pin the loop straight up.
- Gently push each puff flower up with a fingertip so it stands slightly raised.
- Leave it to dry completely, at least 12 hours, before you unpin it.
Final Quality-Control Checklist
- All 4 squares measure 4 in (10.2 cm) and show 14 sts per side.
- Each seam has 16 sl sts and lies flat without puckering.
- The front border ends with 132 sc (34 per side, counting the corner centers).
- The back panel has 34 sts and 34 rows below the shaping and 4 sts at Row 54.
- The joining round has 104 sc and the top section has 44 sc.
- The bottom corners are rounded, not pointed.
- The pocket opening is open and not stitched shut.
- The loop is secure and centered.
- No loose ends show on the front.
Troubleshooting
The square isn’t flat and the corners ruffle: Round 3 has too many groups. Check that there are exactly 2 gaps per side.
The square is cupping: your puff stitches are tight. Pull the loops up a little taller.
The front and back don’t match in width: check your sc gauge on the back panel and redo it with a different hook if needed. Don’t add or skip border stitches to make up the difference.
The sides don’t line up while joining: count the back rows. There must be exactly 34 below the shaping.
The top shaping is lopsided: a decrease was missed at one end. Count each row against the list.
The pocket sags when loaded: use cotton yarn, or go down half a hook size for the back panel.
The loop stretches: add a second sc round into the loop.
Care
Hand wash cold and lay flat to dry, reshaping the curved top while it’s damp. Don’t tumble dry, because it can blur the puff flowers.
Final Notes
Here’s the measurement chain the whole pocket depends on. Each square is 4 in (10.2 cm) with 14 sts per side. Four squares make an 8 in (20.3 cm) panel. Two border rounds bring each side to 34 sts and 9 in (22.9 cm). The back panel is 34 sts by 34 rows, also 9 in (22.9 cm), so the front and back join one stitch to one stitch. The rounded top and the 2 in (5.1 cm) loop complete a 17 in (43.2 cm) organizer that is useful, sturdy and easy to make.
Happy crocheting!