

The Peach Nook is a soft hanging wall pocket for the things you reach for at bedtime, like your phone, reading glasses or lip balm. It hangs from one loop on a hook. The back rises to a neat point, and the front dips into a wide V so you can drop things in with one hand.
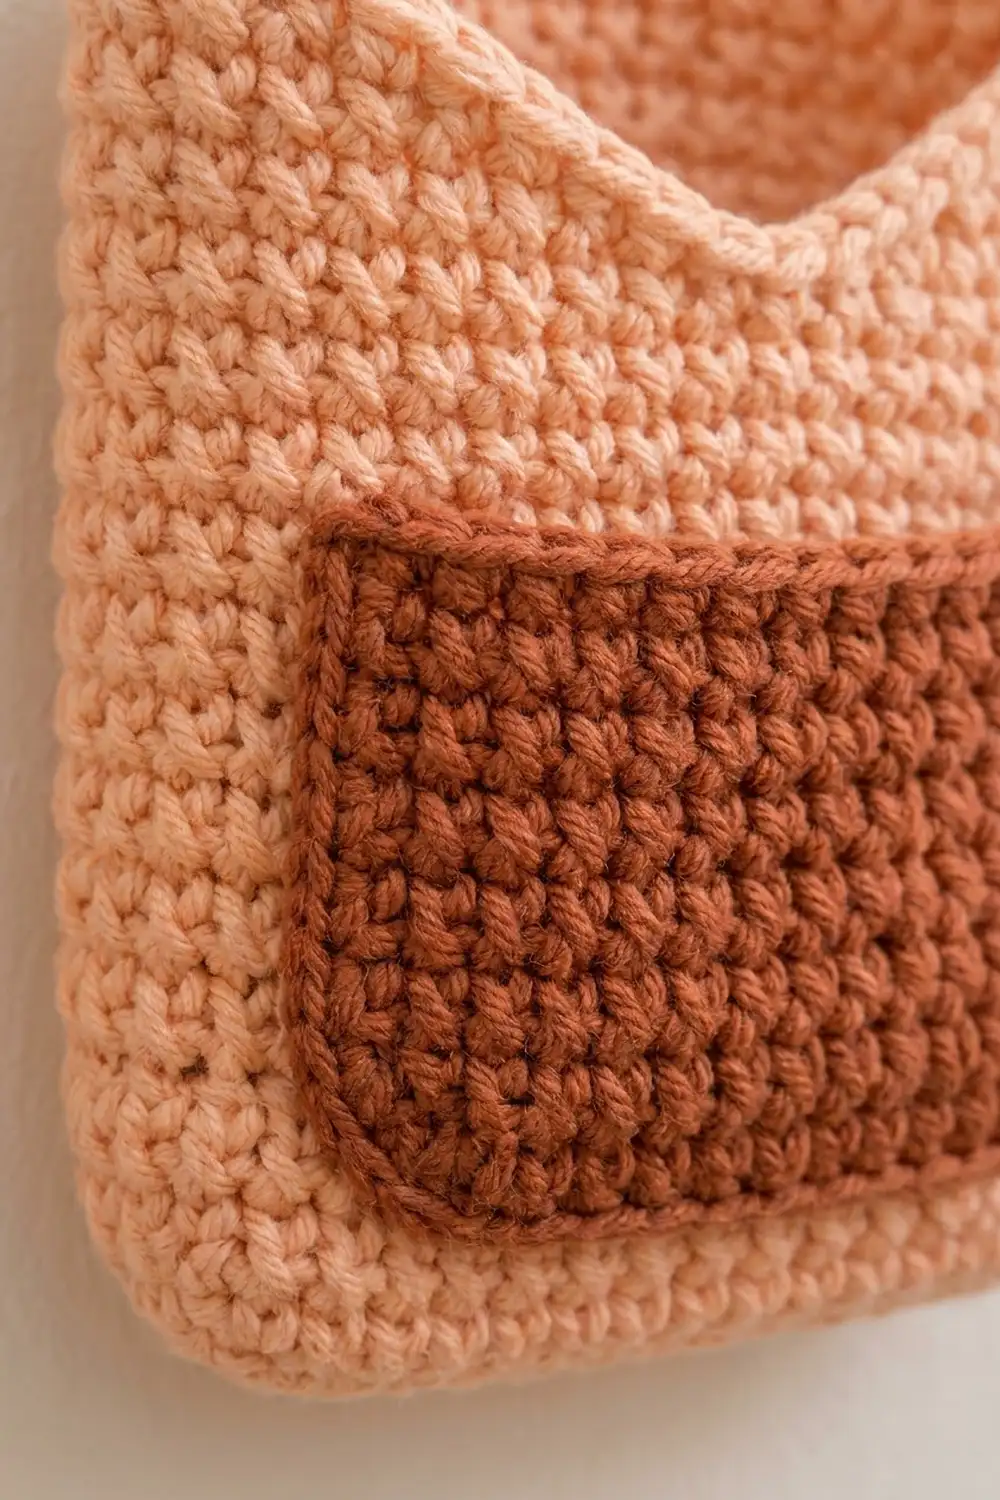
The body is worked in warm peach yarn in dense single crochet, so it holds its shape without stiffener. A rust-brown patch pocket with softly rounded corners sits across the lower front. Glasses fit in the patch pocket, and the main pouch behind it holds a phone.
This pattern uses US crochet terms. The finished pocket measures 7 in (17.8 cm) wide and 12.0 in (30.5 cm) tall to the tip of the point. With the hanging loop it is 14.0 in (35.6 cm) tall.
Construction is simple. First you work a flat-bottomed tube in joined, turned rounds. Then you switch to rows to shape the front V and the back point in one continuous section. One border round finishes the opening, and a loop is added at the point. The rust pocket is crocheted separately and sewn on.
Finished Size and Construction
- Finished size: 7 in (17.8 cm) wide x 12.0 in (30.5 cm) tall; 14.0 in (35.6 cm) with loop
- Skill level: Easy / advanced beginner
- Terminology: US crochet terms
- Yarn weight: Aran / heavy worsted (#4)
- Hook: 6.0 mm (US J-10)
- Number of pieces: 1 body (with built-in border and loop) + 1 sewn-on patch pocket
- Layout: Single item, with the pocket centered on the lower front
- Body size before border: 7 in (17.8 cm) wide x 11.7 in (29.7 cm) tall to the point
- Patch pocket size: 6.0 in (15.2 cm) wide x 4.0 in (10.2 cm) tall
- Border depth: 0.3 in (0.8 cm), one round of single crochet
Materials
Choose a smooth cotton or cotton-acrylic blend in aran weight, about 170 m (186 yd) per 100 g. Cotton keeps the stitches crisp and doesn’t stretch when the pouch is full. Avoid fuzzy or very soft acrylics, because they sag.
- Color A, Peach: 70 g, about 119 m (130 yd), for the body, border and loop
- Color B, Rust / Terracotta: 20 g, about 34 m (37 yd), for the patch pocket
These amounts include a margin of about 25 percent for your gauge swatch and for differences in tension.
Tools:
- 6.0 mm (US J-10) crochet hook
- Tapestry needle
- 4-6 locking stitch markers
- Rustproof pins and a tape measure
- Blocking mat or folded towel, plus a spray bottle
- Wall hook for hanging
Abbreviations (US Terms)
- ch – chain
- sl st – slip stitch
- sc – single crochet
- sc2tog – single crochet 2 together
- sc3tog – single crochet 3 together
- st(s) – stitch(es)
- RS – right side
sc3tog: Insert the hook in the next st, yarn over and pull up a loop. Repeat in each of the next 2 sts (4 loops on hook). Yarn over and pull through all 4 loops.
Row-end: The side edge of one row. To work into a row-end, insert the hook under the outer 1-2 strands of the end stitch.
Gauge and Checkpoints
Gauge: 12 sc and 13 rows = 4 in (10.2 cm) in sc, worked in turned rows with a 6.0 mm hook.
Make a swatch before you start the pocket. Ch 13, then sc in the 2nd ch from the hook and in each ch across (12 sc). Work 12 more rows of sc, turning each row. The swatch should measure 4 in (10.2 cm) square. The body rounds are also turned, so the swatch matches the body fabric.
Checkpoints:
- After Round 1, laid flat: 7 in (17.8 cm) wide
- After Round 18: 5.5 in (14.0 cm) tall
- After V Row 10: 8.6 in (21.8 cm) tall at the side folds
- After Row 20: 11.7 in (29.7 cm) tall at the back point
- After the border: 12.0 in (30.5 cm) tall at the point
- Pocket before edging: 5.3 in (13.5 cm) x 3.4 in (8.6 cm)
- Pocket after edging: 6.0 in (15.2 cm) x 4.0 in (10.2 cm)
If your piece is too big, change to a 5.5 mm hook. If it is too small, change to a 6.5 mm hook. Don’t change the stitch counts, because all the shaping depends on them. Measure again after Round 1, since the base width sets everything that follows.
Body
The body starts as a flat-bottomed tube. Stitches 1–21 of each round form the front, and stitches 22–42 form the back. The round join sits at the right-hand side fold. Put a marker in the first st of each round and move it up as you go.
Foundation: With Color A, ch 22.
Round 1: Sc in the 2nd ch from the hook and in each ch across (21 sc). Rotate the work and sc in the bottom loop of each of the same 21 ch (21 sc). Sl st to the first sc. (42 sc)
The chain becomes a flat, closed base.
Round 2: Ch 1 (does not count as a st), turn. Sc in each st around. Sl st to the first sc. (42 sc)
Rounds 3–18: Repeat Round 2. (42 sc in each round)
Check that the tube lies flat at 7 in (17.8 cm) wide and 5.5 in (14.0 cm) tall. Fasten off.
Lay the tube flat with the join at the right fold. The front center is st 11 of Round 18, which has 10 sts on each side of it. Mark it.
V Shaping (Front Opening)
From here you work in turned rows. The front center st is never worked, and every row decreases at both ends. This opens the front into a V while the back stays full width.
V Row 1 (RS): With the outside of the pouch facing you, join Color A in st 12. Ch 1, sc2tog over sts 12–13, sc in sts 14–21 (8 sc), sc in sts 22–42 (21 sc), sc in sts 1–8 (8 sc), then sc2tog over sts 9–10. Leave st 11 unworked. (39 sts: 9 front + 21 back + 9 front)
V Row 2: Ch 1, turn. Sc2tog, sc in each st across to the last 2 sts, sc2tog. (37 sts)
V Rows 3–9: Repeat V Row 2. Each row has 2 fewer sts than the row before.
- Row 3: 35 sts
- Row 4: 33 sts
- Row 5: 31 sts
- Row 6: 29 sts
- Row 7: 27 sts
- Row 8: 25 sts
- Row 9: 23 sts (1 front + 21 back + 1 front)
V Row 10: Ch 1, turn. Sc2tog (this joins the last front st to the first back st), sc in the next 19 sts, sc2tog. (21 sts)
All the front stitches are now used up. The V edges run diagonally from the center tip to the side folds. Check that the piece is 8.6 in (21.8 cm) tall at the shoulders and that the V is about 3.1 in (7.9 cm) deep.
Back Point
Keep working in rows over the 21 back sts only.
Row 11: Ch 1, turn. Sc2tog, sc in each st to the last 2 sts, sc2tog. (19 sts)
Rows 12–19: Repeat Row 11.
- Row 12: 17 sts
- Row 13: 15 sts
- Row 14: 13 sts
- Row 15: 11 sts
- Row 16: 9 sts
- Row 17: 7 sts
- Row 18: 5 sts
- Row 19: 3 sts
Row 20: Ch 1, turn. Sc3tog. (1 st) Fasten off.
Check that the piece measures 11.7 in (29.7 cm) from the base to the point. The back triangle is about 3.1 in (7.9 cm) tall.
Patch Pocket
The pocket is a flat rectangle with softly rounded corners, worked in Color B.
Foundation: With Color B, ch 17.
Row 1: Sc in the 2nd ch from the hook and in each ch across. (16 sc)
Rows 2–11: Ch 1, turn. Sc in each st across. (16 sc in each row)
Check that it measures 5.3 in (13.5 cm) wide x 3.4 in (8.6 cm) tall.
Edging Round: Ch 1. Don’t turn.
- Top edge: 2 sc in the first st, sc in the next 14 sts, 2 sc in the last st. (18 sc)
- Side: Sc in each of the 11 row-ends. (11 sc)
- Bottom edge (in the foundation ch loops): 2 sc in the first ch, sc in the next 14 ch, 2 sc in the last ch. (18 sc)
- Other side: Sc in each of the 11 row-ends. (11 sc)
Sl st to the first sc. (58 sc)
Putting 2 sc in each corner instead of the usual 3 gives the corners a soft curve. Fasten off and leave a 30 in (76.2 cm) tail for sewing. Check that the pocket measures 6.0 in (15.2 cm) x 4.0 in (10.2 cm).
Border
The border is one round of sc in Color A around the whole top opening. It goes up one side of the V, over the back point and down the other side.
Border gauge: 3 sc per 1 in (2.5 cm) of edge, the same as the body gauge.
Border Round: Join Color A in the unworked st 11 at the V tip. Ch 1, then sc in the same st. (1 sc)
- Up the V edge to the shoulder (row-ends of Rows 1–10): [sc in each of the next 2 row-ends, 2 sc in the next row-end] 3 times, then 2 sc in the next row-end. (14 sc)
- Up the back edge to the point (Rows 11–20): [sc in each of the next 2 row-ends, 2 sc in the next row-end] 3 times, then 2 sc in the next row-end. (14 sc)
- Point: 3 sc in the top of the Row 20 sc3tog. (3 sc)
- Down the back edge (Rows 20–11): 2 sc in the next row-end, then [2 sc in the next row-end, sc in each of the next 2 row-ends] 3 times. (14 sc)
- Down the V edge to the tip (Rows 10–1): 2 sc in the next row-end, then [2 sc in the next row-end, sc in each of the next 2 row-ends] 3 times. (14 sc)
Sl st to the first sc. (60 sc: 1 + 14 + 14 + 3 + 14 + 14) Fasten off.
Why the math works: Each diagonal edge spans 10 rows. It moves about 3.5 in (8.9 cm) sideways and 3.1 in (7.9 cm) up, so the edge is about 4.7 in (11.9 cm) long. At 3 sc per inch, that length needs 14 sc. One sc per row-end would give only 10 sc and pull the opening tight. The 2 sc at each shoulder row-end help the side corners turn cleanly, and the 3 sc at the point keep the tip sharp.
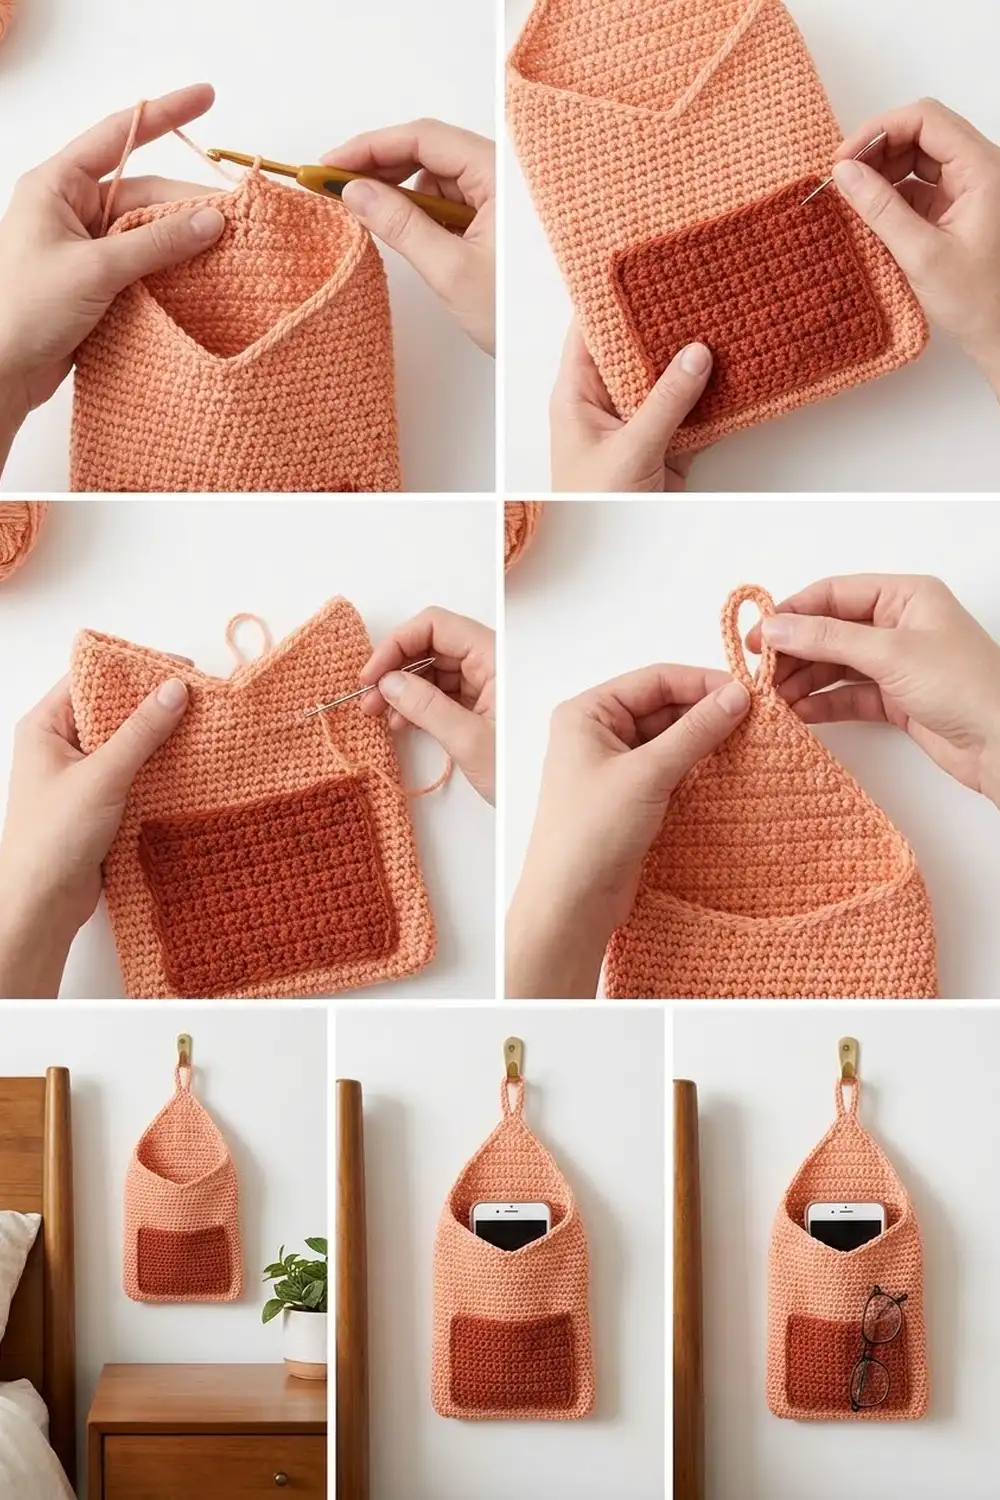
Hanging Loop: Join Color A in the center sc of the 3 sc at the point. Ch 14, then sl st in the same sc to form a ring. Turn and work 20 sc into the ch-14 ring. Sl st in the center sc again and fasten off. Weave the tail through the base of the loop twice for strength. The loop stands about 2 in (5.1 cm) above the point.
Attaching the Pocket
Lay the body flat with the front facing up. Pin the pocket so its bottom edge sits 0.5 in (1.3 cm) above the base of the body. Leave a 0.5 in (1.3 cm) peach margin on each side.
Thread the Color B tail. Whipstitch through the back loops of the pocket edging and the matching body sts, going up one side, across the bottom and up the other side. Leave the top 18 sts open. Slip a piece of cardboard inside the tube so you only sew through the front layer. Add 2 extra stitches at each top corner, because those corners take the most strain.
Final Blocking
- Weave in all remaining ends on the inside of the pouch.
- Mist the whole piece lightly with water until it is just damp.
- Fill the pouch with a folded towel so the front and back sit flat.
- Pin the side folds straight, 7 in (17.8 cm) apart.
- Pin the back point straight up, 12.0 in (30.5 cm) from the base.
- Smooth the V edges so the border lies flat.
- Square the pocket gently and check the 0.5 in (1.3 cm) margins.
- Let it dry completely, about 12-24 hours, before you remove the pins.
Final Quality-Control Checklist
- The body is 7 in (17.8 cm) wide from fold to fold.
- The height to the point is 12.0 in (30.5 cm), including the border.
- The V tip is centered about 1 in (2.5 cm) above the pocket.
- Both V edges have the same slope and length.
- The border has 60 sts and lies flat without ruffling or pulling.
- The loop is centered on the point and firmly anchored.
- The pocket is level, centered and sewn on 3 sides.
- No stitches go through to the back layer.
Troubleshooting
The tube twists: You probably forgot to turn a round. Turn every round and count 42 sts.
The V is lopsided: Make sure you joined in st 12 and left st 11 unworked. Every V row should begin and end with a decrease.
The back point leans: Every row from 11 to 20 needs a decrease at both ends. Check each row’s count against the list.
The border ruffles: Your border stitches are probably looser than your body stitches. Use a 5.5 mm hook for the border only.
The pocket gapes: Add more stitches at the top corners, or block the pocket flat before you sew it on.
The pouch sags: Use cotton yarn, crochet more tightly and keep heavy items out of the pouch.
Care
Hand wash in cool water with mild detergent. Press out the water in a towel and dry flat in shape, and don’t tumble dry.
Final Notes
Every measurement in this pattern builds on the one before it. A gauge of 12 sc x 13 rows = 4 in (10.2 cm) gives a 21-st base that is 7 in (17.8 cm) wide. Eighteen rounds make a 5.5 in (14.0 cm) tube. Ten V rows bring the shoulders to 8.6 in (21.8 cm), and ten point rows bring the back to 11.7 in (29.7 cm). One 60-st border round finishes the piece at 12.0 in (30.5 cm). The 6.0 in (15.2 cm) x 4.0 in (10.2 cm) pocket leaves a 0.5 in (1.3 cm) margin on each side.
If Round 1 measures 7 in (17.8 cm), the rest of the measurements should come out right. Hang it by your bed and fill it with your phone and glasses.
Happy crocheting!