

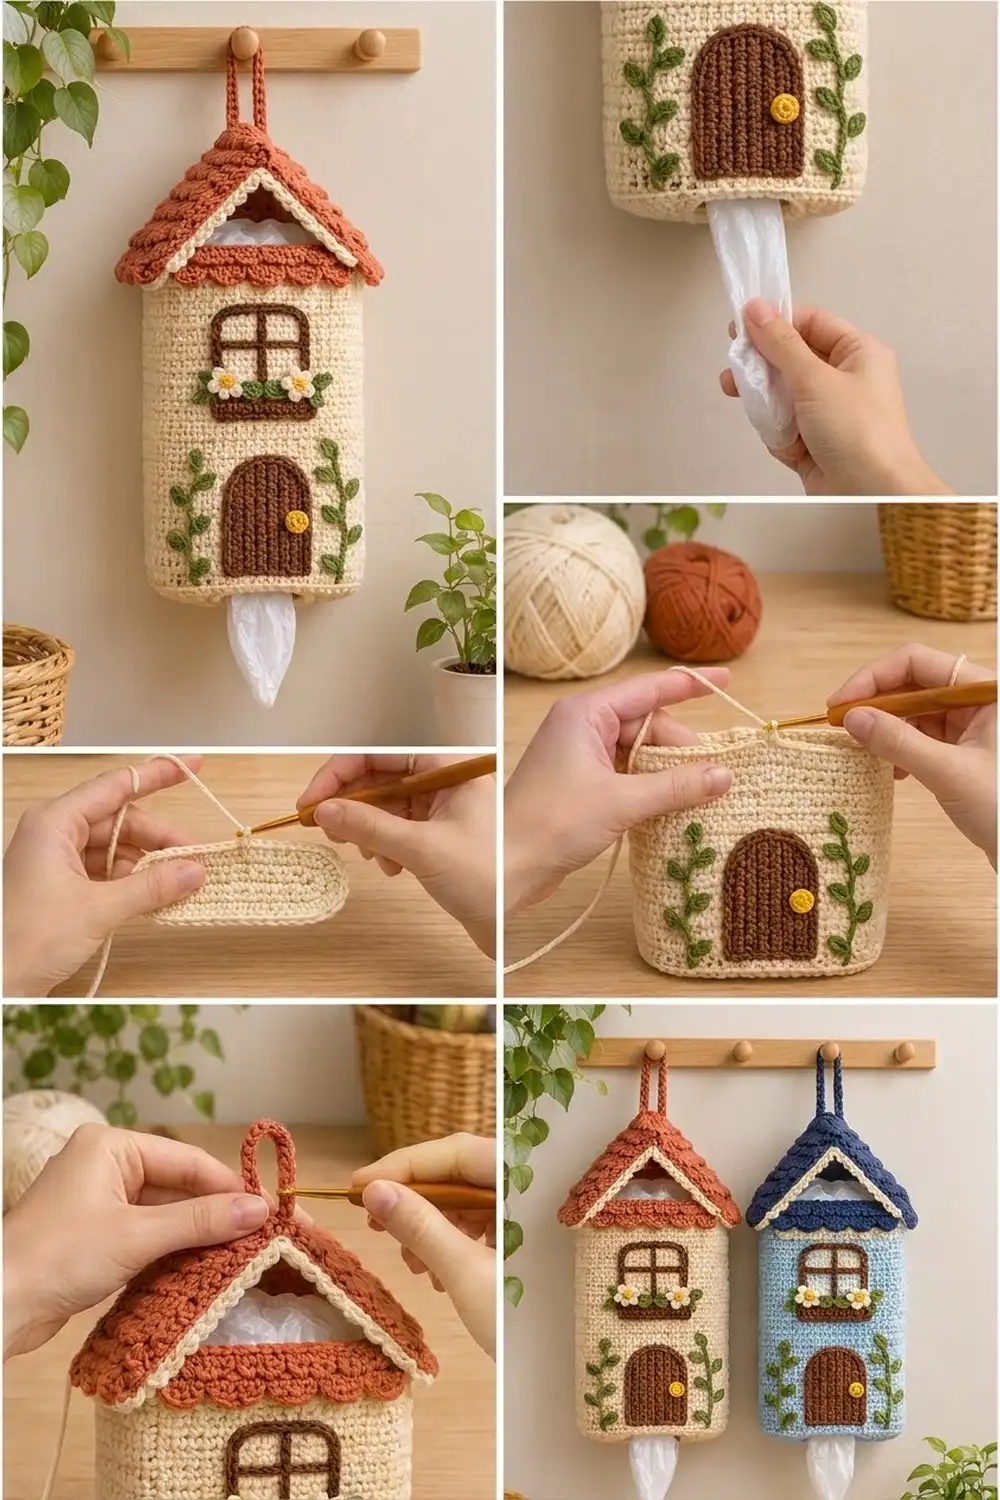
The Rosehip Cottage is a hanging plastic bag holder shaped like a little storybook house. You stuff bags in through the open gable under the roof and pull them out one at a time from the opening in the base.
The palette is warm and simple: a cream body, a rust shingled roof and eave skirt, a chocolate-brown door, window and window box, green vines, white flowers and sunny yellow accents. The style is cozy and slightly rustic, and it suits a kitchen or laundry room.
This pattern uses US crochet terms. The finished holder is about 5.75 in (14.6 cm) wide, 3.25 in (8.3 cm) deep and 14.5 in (36.8 cm) tall including the loop. The body is 8 in (20.3 cm) tall.
Construction is straightforward. You work an oval base with an open center in joined rounds, then turn upward and work a straight tube for the walls. Two shingled roof panels are seamed at the ridge, trimmed, and sewn to the sides. The scalloped eave skirt goes into the front loops of the last body round. Last, you add the appliqués and the loop.
Finished Size and Construction
- Finished size: 5.75 in (14.6 cm) wide x 3.25 in (8.3 cm) deep x 14.5 in (36.8 cm) tall with loop
- Skill level: Intermediate
- Terminology: US
- Yarn weight: Worsted (#4), cotton or cotton blend
- Hook: 4.0 mm (G-6)
- Number of pieces: 1 finished holder (body, 2 roof panels, small appliqués)
- Layout: Single piece, no grid
- Body size: 18 in (45.7 cm) around x 8 in (20.3 cm) tall
- Size before border: body and roof only, ridge 10.75 in (27.3 cm) above the base
- Border depth: eave skirt about 0.5 in (1.3 cm)
Materials
Choose a smooth, firm cotton. It holds its shape, shows stitch texture well and stands up to frequent handling. Acrylic works too, but the walls will be a little softer.
- Cream: 60 g / 114 m (body)
- Rust: 30 g / 57 m (roof, skirt, loop)
- Brown: 15 g / 29 m (door, window, window box)
- Green: 8 g / 15 m (vines, leaves)
- White: 3 g / 6 m (petals)
- Yellow: 2 g / 4 m (flower centers, knob)
Tools:
– 4.0 mm (G-6) hook
– Tapestry needle
– 6 locking stitch markers
– Scissors, tape measure, pins
All quantities include a margin of about 15 percent.
Abbreviations (US Terms)
- ch – chain
- sl st – slip stitch
- sc – single crochet
- hdc – half double crochet
- dc – double crochet
- inc – 2 sc in the same stitch
- sc2tog – single crochet 2 together
- FLO / BLO – front loop only / back loop only
- st(s) – stitch(es)
- RS / WS – right side / wrong side
Shell: 5 dc in the same stitch.
Picot: ch 3, sl st in the 3rd ch from hook.
Surface slip stitch: hold the yarn behind the fabric, insert the hook from front to back, pull up a loop and draw it through the loop on your hook.
Gauge and Checkpoints
Gauge: 16 sc and 18 rounds = 4 in (10.2 cm) in sc.
Test the base before you commit to the whole body. It is the first piece you make, and it sets every later measurement.
Checkpoints:
– After Rnd 1: the opening measures 6 in (15.2 cm) around, about 3 in (7.6 cm) across when flattened.
– After Rnd 9: the outer edge measures 18 in (45.7 cm) around.
– After Rnd 27: the walls measure 4 in (10.2 cm) from the fold line.
– After Rnd 45: the walls measure 8 in (20.3 cm).
– Each roof panel: 3.25 in (8.3 cm) wide x 4 in (10.2 cm) tall.
If the base is too big, go down 0.5 mm in hook size. If it is too small, go up 0.5 mm. If a checkpoint is only slightly off, check your tension before you change hooks.
Body
Work in joined rounds: at the end of each round, sl st to the first sc and ch 1. The ch 1 never counts as a stitch. Keeping the joins in line puts the seam at center back.
Base
With cream:
Rnd 1: Ch 24 and sl st to the first ch to form a ring without twisting. Ch 1, sc in each ch around. (24)
Rnd 2: Sc 9, inc 3 times twice. (30)
Rnd 3: Sc 9, (sc 1, inc) 3 times twice. (36)
Rnd 4: Sc 9, (sc 2, inc) 3 times twice. (42)
Rnd 5: Sc 9, (sc 3, inc) 3 times twice. (48)
Rnd 6: Sc 9, (sc 4, inc) 3 times twice. (54)
Rnd 7: Sc 9, (sc 5, inc) 3 times twice. (60)
Rnd 8: Sc 9, (sc 6, inc) 3 times twice. (66)
Rnd 9: Sc 9, (sc 7, inc) 3 times twice. (72)
The base is now a flat oval ring about 2 in (5.1 cm) wide from the opening to the outer edge. Each half has a straight run of 9 sts and a curved end of 27 sts.
Walls
Rnd 10: Sc in BLO around. (72) This makes a fold line where the walls turn upward.
Rnds 11–45: Sc around. (72)
Fasten off and weave in the ends.
Mapping the Faces
Number the sts of Rnd 45 from 1 to 72, starting at the join.
- Front: sts 30–52 (23 sts), centered on the second straight run of the base. The center front st is st 41.
- Right side: sts 53–65 (13 sts)
- Back: sts 66–72 and 1–16 (23 sts)
- Left side: sts 17–29 (13 sts)
Mark sts 30, 52, 53, 65, 17 and 29. Check the math: each curved end of 27 sts splits into 7 front + 13 side + 7 back.
Roof Panels (Make 2)
With rust:
Row 1 (RS): Ch 14, sc in the 2nd ch from hook and in each ch across. (13)
Rows 2–4: Ch 1, turn, sc across. (13)
Row 5 (RS, shingle row): Turn. Sl st in FLO of the first st, skip 1, shell in FLO of next st, skip 1, sl st in FLO of next st 3 times. (3 shells, 13 sts used)
Row 6 (WS): Turn, ch 1, sc in each unused back loop of Row 4. (13)
Rows 7–8: Ch 1, turn, sc across. (13)
Row 9: Shingle row worked in Row 8.
Row 10: Sc in the unused loops of Row 8. (13)
Rows 11–12: Sc across. (13)
Row 13: Shingle row worked in Row 12.
Row 14: Sc in the unused loops of Row 12. (13)
Rows 15–16: Sc across. (13)
Row 17: Shingle row worked in Row 16.
Row 18: Sc in the unused loops of Row 16. (13)
Rows 19–22: Sc across. (13) Fasten off.
Each panel has 18 sc rows and 4 shingle rows (12 shells). Press the shells down toward the foundation edge, which becomes the eave. Each panel should measure 3.25 in (8.3 cm) x 4 in (10.2 cm).
Ridge Seam
Hold the panels WS together. Whipstitch the Row 22 edges together through both loops, matching 13 sts to 13 sts. Open the panels into an inverted V.
Appliqués
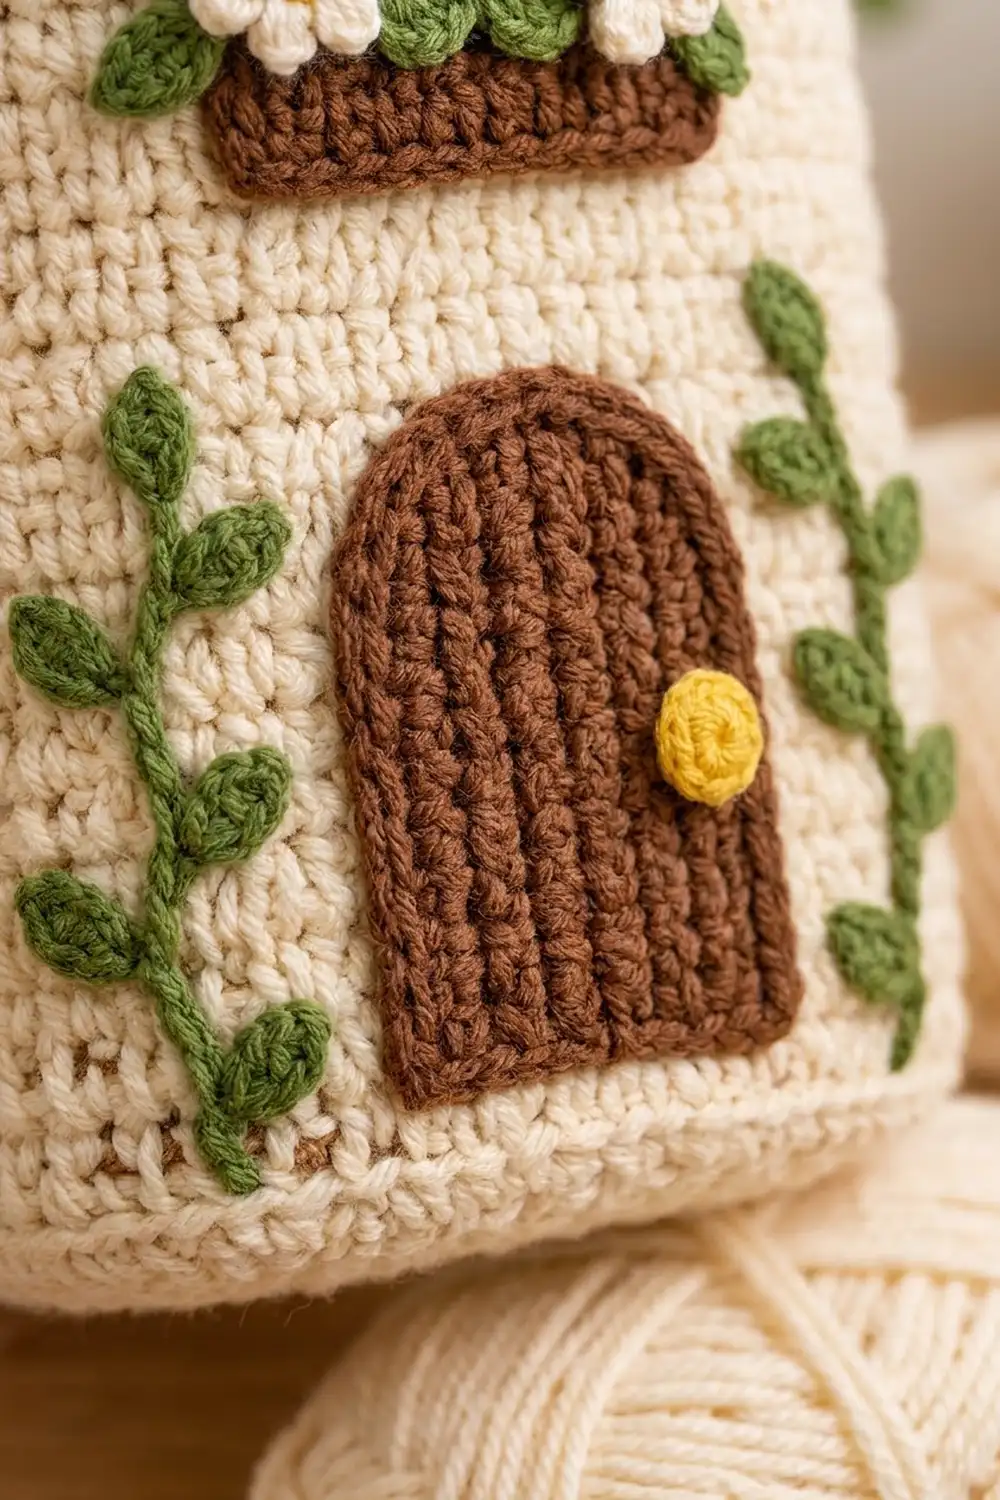
Door (brown): Ch 8.
– Row 1: Sc in the 2nd ch from hook and in each ch across. (7)
– Rows 2–12: Ch 1, turn, sc across. (7)
– Row 13: Sc2tog, sc 3, sc2tog. (5)
– Row 14: Sc across. (5)
– Row 15: Sc2tog, sc 1, sc2tog. (3)
The door measures about 1.75 in (4.4 cm) x 3.3 in (8.4 cm) at this stage. The stacked sc columns give it the vertical plank texture.
- Edging round: Ch 1, sc in each of the 3 top sts, 15 sc down the row ends, 3 sc in the first foundation ch, sc in the next 5 ch, 3 sc in the last ch, 15 sc up the row ends, then sl st to the first sc. (44)
Finished door: about 2.25 in (5.7 cm) x 3.75 in (9.5 cm).
Door knob (yellow): 6 sc in a magic ring and sl st to join. (6)
Window box (brown): Ch 12. Work Rows 1–3 in sc. (11) The box measures 2.75 in (7.0 cm) x 0.75 in (1.9 cm).
Flowers (make 2):
– Rnd 1 (yellow): 5 sc in a magic ring and sl st to join. (5)
– Rnd 2 (white): (Sl st, ch 2, dc, ch 2, sl st) in the next st 5 times. (5 petals)
Each flower is about 1 in (2.5 cm) across.
Small leaves (green, make 16): Ch 4. Working in the chains from the 2nd ch from hook: sc, hdc, sc. Ch 1, then work along the other side of the chain: sc, hdc, sc. Sl st to the tip. Each leaf is about 0.75 in (1.9 cm) long.
Assembly
- Window frame: Use brown held double and surface slip stitch on the front.
- Vertical lines run up the columns at sts 37, 41 and 45, from Rnd 32 to Rnd 40.
- Horizontal lines run along Rnds 32, 36 and 40, from st 37 to st 45.
- The frame is about 2 in (5.1 cm) x 1.8 in (4.6 cm) with four panes.
- Window box: Sew it over Rnds 29–31 at sts 36–46. Sew the flowers along its top edge at sts 38 and 44, then tuck 4 leaves around them.
- Door: Sew it over sts 37–45 from Rnd 12 to about Rnd 28. Sew the knob on the right side at mid-height.
- Vines: Use green to surface slip stitch up the columns at sts 33 and 49, from Rnd 12 to Rnd 28. Each vine is about 3.5 in (8.9 cm). Sew 6 leaves along each vine, alternating sides about every 3 rounds.
- Hanging loop (rust): Ch 35. Sc in the 2nd ch from hook and in each ch across (34), then turn and sl st across.
- The strip measures 8.5 in (21.6 cm).
- Fold it in half and sew the last 0.5 in (1.3 cm) of each end to the center of the ridge, one end on each side.
- The loop rises about 3.75 in (9.5 cm).
Attach the roof after the border steps below.
Border
The border has two parts: the gable trim on the roof and the scalloped eave skirt on the body.
Border gauge: One shell repeat uses 4 sts and measures 1 in (2.5 cm). Along the gable, 4 sc = 1 in (2.5 cm).
Gable Trim (Cream)
Row 1: With the RS of the roof facing, join cream at the front corner of one eave. Work 16 sc evenly up the row ends to the ridge, then 16 sc down the second panel. (32)
– Work 1 sc in the end of each sc row, but skip the ends of Rows 2 and 21.
– Do not work into the ends of the shingle rows.
Row 2: Ch 1, turn. Sc in the next 2 sts, picot 16 times. (32 sc, 16 picots, 8 per slope) Fasten off.
Repeat both rows on the back edge.
Why the math works: Each slope is 4 in (10.2 cm) long. 16 sc at 4 sc per inch fills that length exactly, so the trim lies flat instead of rippling.
Attaching the Roof
Pin the eave edge of one panel to the back loops of the left side (sts 17–29). Pin the other eave to the right side (sts 53–65). Whipstitch each one, 13 sts to 13 sts.
The front 23 sts and back 23 sts stay unattached. Those open gables are where you load the bags. The ridge should sit about 2.75 in (7.0 cm) above the body, for a total of 10.75 in (27.3 cm) from base to ridge.
Eave Skirt (Rust)
Rnd 46: Join rust with a sl st in the FLO of st 1 of Rnd 45. Skip 1, shell in FLO of next st, skip 1, sl st in FLO of next st 18 times. The last sl st lands in the joining st. (18 scallops) Fasten off.
The per-face counts stay at front 23, side 13, back 23 and side 13. The scallops run continuously around the corners.
Why the math works: 72 sts ÷ 4 = 18 repeats exactly, so there is no partial scallop at the join. The skirt is 18 in (45.7 cm) around, the same as the body.
Final Blocking
- Lightly mist the whole holder, or hover a steam iron above it without touching the yarn.
- Fill the body with a rolled towel so it holds a 5.75 in (14.6 cm) x 3.25 in (8.3 cm) shape.
- Press the shingles and eave scallops downward with your fingers.
- Pin the gable picots so they lie flat.
- Let it dry completely, then remove the towel.
Final Quality-Control Checklist
- Base outer edge is 18 in (45.7 cm) around and the opening is 6 in (15.2 cm) around.
- Body is 8 in (20.3 cm) tall, and the seam runs straight up the back.
- Door, window and vines are centered on st 41.
- Each roof panel has 12 shells and 18 sc rows.
- Gable trim has 16 sc per slope and lies flat.
- The skirt has 18 scallops and no gap at the join.
- The loop is sewn securely through both roof panels.
- All ends are woven in on the inside.
Troubleshooting
- Base cups upward: Your tension is tight. Go up 0.5 mm in hook size, or loosen the increase stitches.
- Base ruffles: Your tension is loose. Go down 0.5 mm.
- The seam drifts: Make sure you sl st into the first sc of the round, not into the ch 1.
- Shells don’t lie flat: You worked into both loops. Use FLO only.
- Gable trim ripples: You worked too many sc. Keep it to 16 per slope.
- Roof tilts: The eaves are sewn to different numbers of sts. Re-sew them 13 to 13.
- Bags fall out: Work one extra round of sc2tog around the opening.
Care
Hand wash in cool water and lay flat to dry, reshaping the body around a towel. Do not tumble dry, because cotton can shrink and distort the appliqués.
Final Notes
Every measurement here builds on the one before it:
– A gauge of 16 sc = 4 in (10.2 cm) gives a 72-st base that is 18 in (45.7 cm) around.
– 36 wall rounds make a body 8 in (20.3 cm) tall.
– Two 3.25 in x 4 in (8.3 cm x 10.2 cm) roof panels raise the ridge 2.75 in (7.0 cm).
– A 3.75 in (9.5 cm) loop brings the total to 14.5 in (36.8 cm).
If you keep the checkpoints on track, the roof, trim and skirt will all fit without adjustment.
Happy crocheting!